Headbands with small flowers from foamiran. Master class of "Hope" headband from foamiran with step-by-step photos
Flowers and compositions made of plastic suede fascinate and delight, they are as close as possible to their natural prototypes.
Due to the availability of material and simple technique, not only an experienced, but also a novice needlewoman can make a bezel with flowers from foamiran with her own hands. Such an accessory will decorate your hairdo in the summer and will cheer you up on a cool cloudy day. Bells are fixed on the basis of the finished accessory. Flowers are made without additional tools. They can also be used for bouquets and other crafts.
Preparation of materials for needlework
Before making a bezel with flowers from foamiran with your own hands, prepare:
- thin headband for hair;
- plastic suede in blue, white and green shades;
- dry pastel;
- wet wipes;
- scissors;
- several small beads;
- fishing line;
- lighter;
- glue gun;
- thin satin ribbon;
- stamens (sold at craft stores).
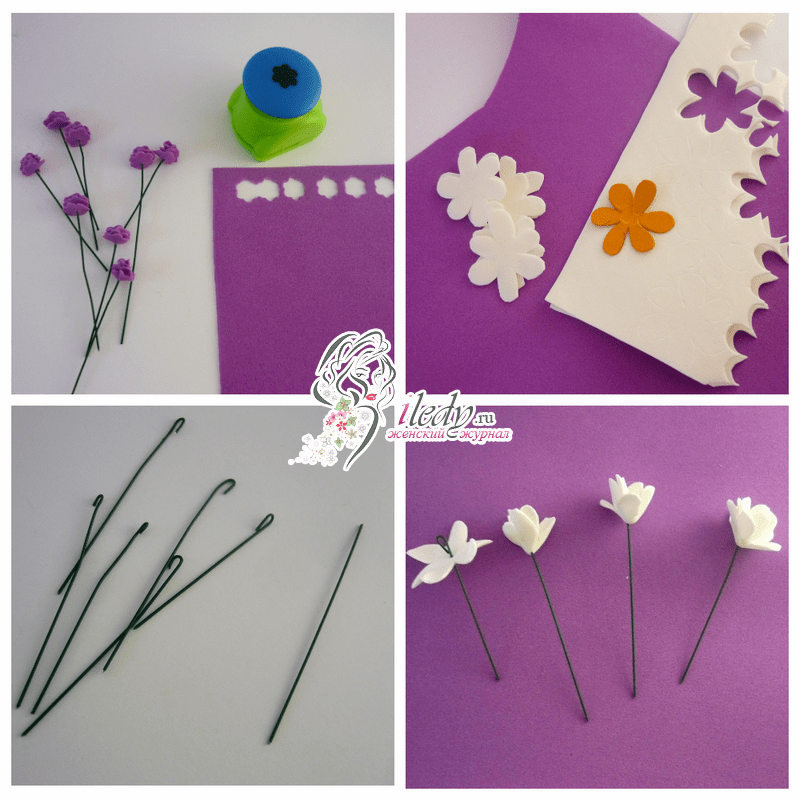
Step-by-step master class for making cornflowers
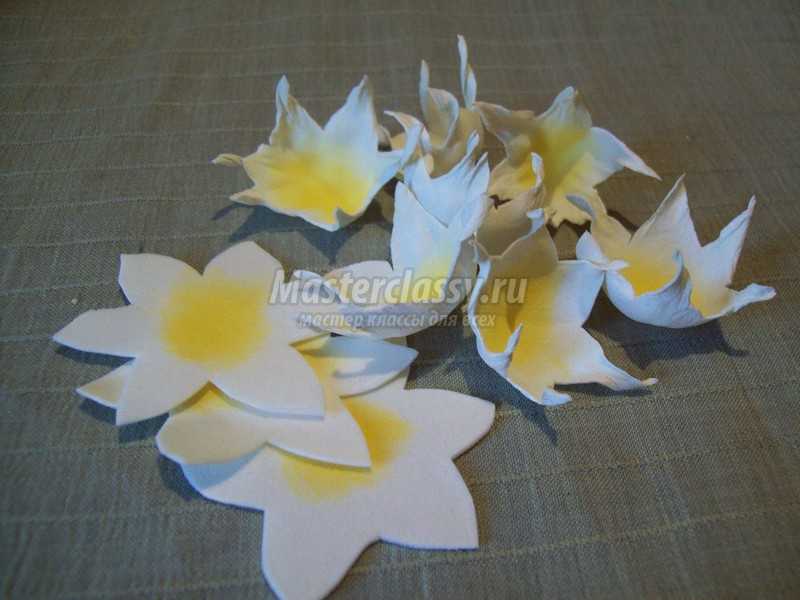
First you need to create bells from foamiran according to the master class. There are 11 bells and several small white buds on the rim. Therefore, cut out 11 circles with a diameter of 8 cm.

Now take one circle and make a flower petal with eight divisions. Fold the circle in half and press down to keep the folds, then unfold. Fold in half once, position the piece horizontally with the fold at the bottom. Further, the lower edge of the fold along right side lift up to the fold in the middle of the workpiece. On this folded section, cut out the edge of the petals with a rounded edge and a sharp tip in the middle. You get 4 details.

Now fold the bottom edge over to the left side.

Cut off all blue circles in this way. Additionally, make small notches on the folds.

Next, you need green plastic suede. Cut 11 squares with a side of 3.5 cm. Cut out the sepals for the bells. Cut out a fan-like piece with 4 sharp pieces in the middle and two equal sides coming together at one corner.

The main blanks are completed and now start painting them. You will need wet wipes and dry pastels of raspberry, yellow and blue shades so that the rim with flowers from foamiran looks as natural as possible.

Start with yellow color... On a damp cloth wrapped around your finger, take some paint and tint the centers of the circles on one side.

Then continue with crimson, painting around the yellow center, and smoothly down to the blue pastels. She will also need to paint the middle part of the other side. Additionally paint over the edges of all the petals on both sides.
While the petals are drying, on green blanks, paint only the bottom corner with blue pastel.


Then open it a little. The shape of the flower is already visible.

Proceed to the edge of the petals. Warm up the three parts a little with a lighter and twist to the middle of the flower. And on the other five, the bend will be from the middle.

Perform similar actions with all with all flowers.

The bells of their foamiran will be double, double, so you need to fold them correctly. Fold the workpiece in half so that the three petals are in five pieces from the top, and all the folds are directed from the middle.

Connect the resulting two folded edges with a glue gun.

You should have 11 plastic suede bells.

Do not forget about the stamens, they need to be glued 5 or 6 pieces to each flower.

Any shade can be used, and the stamens themselves can be made independently in various ways.

Flowers need sepals, but they need to be given new form... You should put the sharp parts together and just scroll with your hands and unfold a little.

Glue these blanks on the flowers. The seam on the bells remains free.


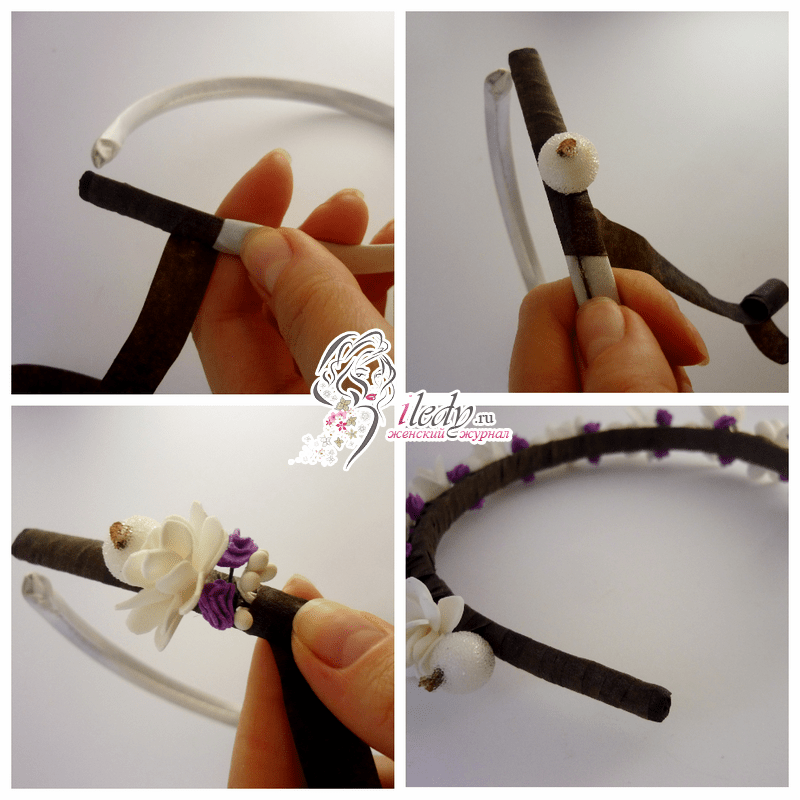
Assembling a rim from elements
Prepare a blank for a headband with flowers from foamiran to work - cover the base with a thin tape. Start the assembly by connecting the three colors together in a circle with the bases at one point. Apply glue to the bottom of the base.

Step 10 cm away from the edge of the rim, place the triple flower in one piece per accessory.

Glue two more bells, placing them next to the first two.

Attach two more blanks side by side, located on the rim.

Glue two more bells, one at a time, moving along the rim. Apply glue to the seam.
Attach the last 2 bells in turn to the foamiran flower headband.

To decorate the composition, make 8 squares with a side of 2 cm out of white suede. Cut the fishing line 7 cm long, 8 pieces long. We fold each square 2 times in half and knead the top edge. Then we attach a small bead to the fishing line and stretch it into the middle of the resulting flower. Additionally, cut out 3 green circles 1 cm in diameter.

It remains only to arrange the white buds as you wish and glue the prepared circles on the seamy side of the product, additionally fastening some bells to the base.

This is the end of the master class, the bezel with flowers from foamiran is ready. An equally beautiful hoop made of this material with a rose is waiting for you at. And you can do it according to another instruction. Do not deny yourself the pleasure!
V last years it has become fashionable to decorate hair with floral products. Of course, they are in special demand original jewelry self made... Knowing how to craft spectacular flower headbands will help you out in any situation. You can make a special birthday present for your friend or show up in an unusual way to a festive party. Moreover, today floristic motives are more relevant than ever.
Foamiran is very often used for the manufacture of such products. To make a beautiful headband with flowers from this material, it is not at all necessary to be an experienced professional needlewoman. It's enough to cook everything necessary tools and materials, be patient and follow the instructions carefully.
You can make beautiful foamiran headbands at home on your own, thanks to our master classes
What is foamiran?
The modern material foamiran was first produced in Iran. Hence its unusual name: foam + Iran. It is made of foamed rubber and somewhat resembles suede.
Foamiran has gained immense popularity due to the following features:
- Quite affordable.
- With a little heat, it becomes very plastic, so it is easy to work with it.
- It shrinks and stretches without any effort, without tearing.
- Easily cut, which allows you to create the finest patterns.
- It can be painted well (however, you can do without painting, since 22 shades are presented in the standard package).
- It is resistant to external influences. Jewelry does not deteriorate from strong wind or rain.
- It belongs to environmentally friendly materials, so children can also be allowed to work.
Due to its unique characteristics, foamiran is the most suitable material for beginner needlewomen. Therefore, buy everything you need and do not be afraid to try your hand. We bring to your attention three exciting master classes.
Master class №1. Classic headband with white flowers from foamiran
To begin with, we propose to make a very simple, but rather cute headband with white flowers from foamiran. It turns out to be very gentle and therefore perfect for a romantic spring look.
For this product you will need:
- Foamiran (white and lilac).
- Awl.
- Scissors.
- Bezel.
- Flower hole punch (diameter 1 cm).
- Cardboard (for a template).
- The stamens are white.
- The tape is brown.
- Wire (for making stems).
- Glue gun.
- Sugar-coated berries (white).
Each flower is collected by hand, and there will be many flowers in the rim. Therefore, concentrate and get ready for long, painstaking work. First, the wire is prepared - it is cut into pieces of equal length (4 cm). After that, take a lilac foamiran and make 60 blanks using a hole punch. Each flower takes 3 blanks, that is, the rim will be decorated with 20 such flowers.
Once all the blanks are done, you can proceed to the assembly of the decoration. We immediately put on the wire 3 blanks. Apply a little glue to the end of the wire and squeeze the first layer around it. The wire should be hidden under the material. We attach the second to the first layer, and we attach the lower to the middle one.
This painstaking work does not end there. Now it was the turn of the white foamiran. On a cardboard with a diameter of 25 by 25 mm, you need to draw a flower and carefully cut it out. You get a template, on the basis of which 30 white blanks are cut.
Cut the wire again, and twist its ends into loops. Then we fold each petal with our hands in different directions - such manipulations will make the petals voluminous. Collect white blanks by analogy with purple ones.
Now you can start assembling the entire bezel. Its end is wrapped with tape (by the way, its shade can be chosen to taste). When the rim is wrapped by 5 cm, flowers begin to be attached - first a berry, then a white flower. Then secure with tape. This is followed by two purple elements side by side. Between them are stamens in a bouquet of 5 pieces. In the same sequence, the composition is stretched over the entire rim. At the end of weaving, the same elements should be found as at the beginning.
As you can see, nothing complicated. The main thing is to be patient and take the time. The result is a hair accessory that will pleasantly refresh your look.

Master class number 2. Original headband with crocuses
To get a beautiful hair accessory, we suggest making crocuses on your own, which just look great on the headband.
Get everything you need in advance:
- Foamiran of three colors (greenish, yellow, purple).
- Wire.
- Tweezers.
- Regular iron.
- Toothpick.
- Paper for preparing a template.
- Scissors.
- Metal bezel.
- Glue gun.
Drawings of leaves and petals for the template you need to do yourself. It's not difficult at all. Draw a droplet 2 cm high and 1.5 cm wide. And you have a flower petal. As for the leaves, they will be cut randomly in the process of drawing up a decorative composition.
Next, we take the foam for making the petals. First, we cut off a strip 2.2 cm wide (2 cm is the height of the petals, and 0.2 cm is the allowance). At the very beginning of the strip, we circle the template with a toothpick and fold the foam with an accordion along the width of the petal. This technique allows you to cut several blanks at the same time, greatly facilitating the work.
The next stage is making the middle. For this purpose, let's take a yellow foamiran. Cut a strip from the material, its width should be 2 cm. We make a fringe on it, not reaching the edge. Try to keep the stripes very thin.
Then you need to iron the petal blanks. If you are not in a hurry, take each petal with tweezers and apply it to the heated surface of the iron. If desired, this painstaking process can be accelerated, and very in a simple way... Take the iron in one hand, pointing the sole upward, and place a few petals on it with the other hand. After a couple of seconds, turn the iron over, and the finished workpieces will fall on the table.

Then we take a wire cut into three-centimeter pieces. At one end we attach a yellow fringe strip. Immediately, we begin to fix the petals one at a time, trying to distribute them evenly. Each flower will have three petals. Try to prepare more flowers, you will need a lot of them for a spectacular decoration. It is likely that you will want to add flowers to the entire bezel.

We cut out the leaves from green foamiran, they should not be longer than 5 cm. They need to be processed in the same way as the petals.
When all the decorative elements are prepared, we proceed to drawing up the composition. To determine where the flowers will be, we apply the rim to the head.
At the very beginning of the composition, we fix several leaves for the base.
After that, no difficulties should arise in the work. We just alternate between flowers and leaves. At the same time, try to concentrate the ends of the wire along the line of the rim, and its back side was neat.
Of course, this kind of work takes time and effort. But the result is worth it as you will receive an unusual and very stylish decoration.

MK number 3. A bezel with red flowers for the New Year.
Celebrating the New Year is a special event for which they begin to prepare in advance. Thinking over the details festive image, pay attention to your hairstyle. For example, you can decorate your hair with an original handmade headband, and then you will definitely be in the spotlight.
To do unusual decoration for new year holidays, you will need the following tools and materials:
- Tape tape.
- The stamens are red.
- Wire (thick and thin).
- Compass.
- Cardboard.
- Glue.
- Satin ribbon in red.
- Foamiran in three colors (green, pink, red).
- Large beads.
- Large beads of black color.
- Pastel brown, red.
- Brush.
- Gold paint.
- Large gold bead.
- Glue gun.
- Scissors.
- Beads.
- Other decorative elements (golden).
The decoration is made as follows. Measure the rim and prepare three pieces of wire. Moreover, the thickness should be such that the rods are suitable for the base of the rim. The two wire rods should be wrapped with brown tape. And when you start wrapping the third wire, weave the stamens into it (they should be directed in different directions).
The ends of the rods are glued together so that they diverge in width and connect at one point. Then they give the wire the required shape and again the three ends are combined at one point. A red ribbon (20 cm) is attached to each end with glue, then take the tape and wrap the bonding point.
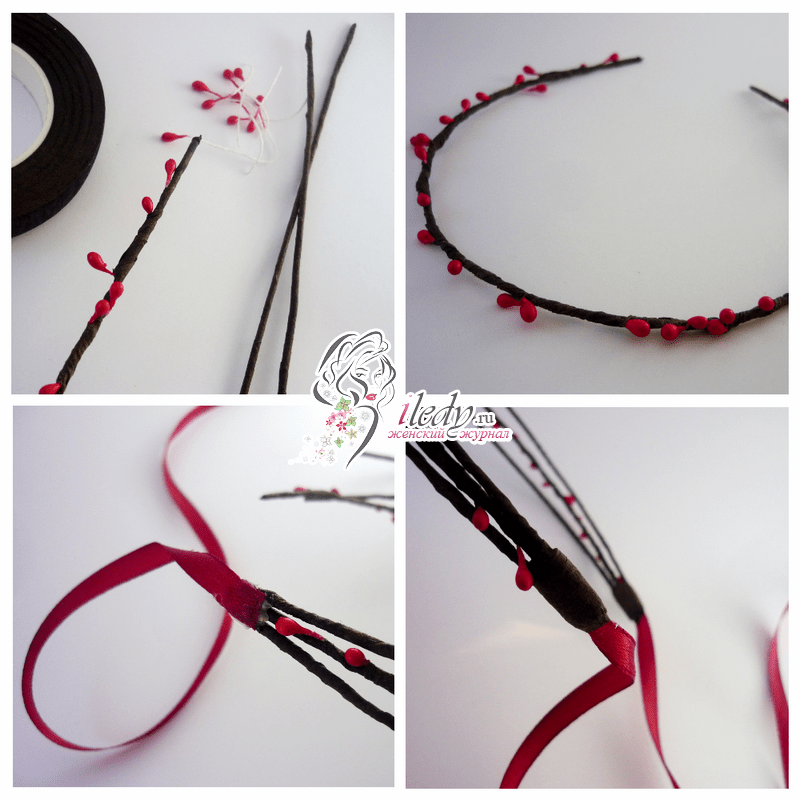
The basis of this composition is a flower and rose hips. These elements are made from foamiran. First, cut the wire, you should get 15 cm segments.In the middle, twist a large bead (black). Then they string a large bead (any shade) and stick it on the bead.
Next, take a small cardboard (diameter 4 cm) and prepare a template. Then the template is circled 5 times on the red foam and circles are cut. After that, the faom is strung in the center on the ends of the wires. It is necessary to cover the bead in a circle and tie it with a wire under the bead. The excess faom from above is neatly cut off. The top is painted using pastels.

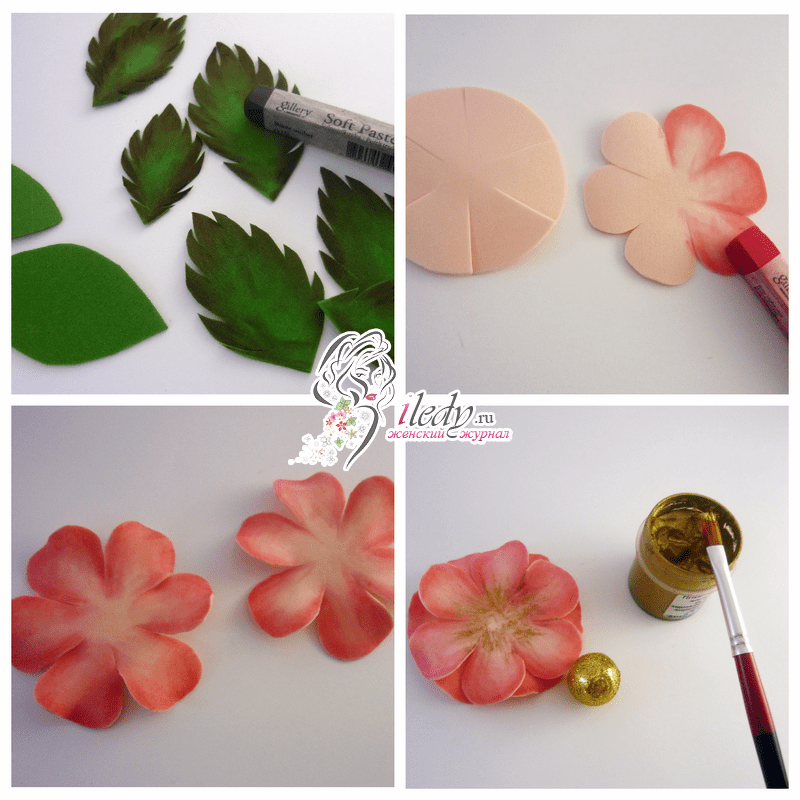
The leaves are quite simple to make - they are cut randomly from green foamiran.
The flower will consist of two identical circles. The diameter of each is 7 cm. The circles are made of pink foam. Then they are divided into 6 sectors and cuts are made. At the same time, the center must remain intact. The corners of each sector are trimmed so that it takes on a rounded shape. You get petals, the edges of which are tinted with red pastel. To create volume, the petals need to be slightly stretched. Gold paint is used as an additional decoration - rays are drawn on the petals.
The next stage is composition. First, prepare a base of leaves. Moreover, elements of different sizes must be distributed evenly. Above are stamens, rose hips, any golden decorative elements. All this is fastened towards the center. In this case, it is very important that the two compositions look in different directions. In addition, you need to connect the two layers of petals. The flower is placed in the center. At the same time, try to mask all the flaws with the lower petals so that no one will notice them.
Before attaching the entire composition, carefully consider a suitable place for it. To do this, you must first take measurements. Remember that the distance between the rods should be approximately 5 mm. Therefore, spread them out and fix the flower in this position. And on the other hand, you need to cover everything with a large green leaf from the foam. But at the same time he should not go beyond the limits of the composition.

And in the end of the work - the final touch. The lower leaves are glued to the twigs, which helps to cover all internal imperfections. That's all, a wonderful New Year's headband is ready! Wear it for holiday celebrations and enjoy your flamboyant image!

Headbands made with flowers from foamiran look stylish, fashionable and original, the most important thing is love in the craft! Good luck!
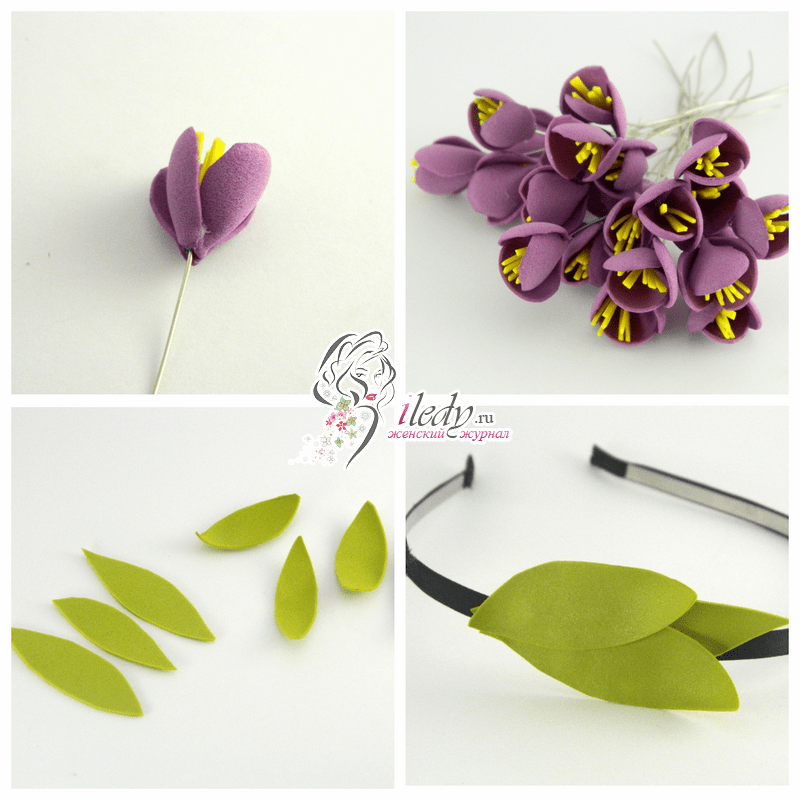
Now we will draw patterns for the flowers. The petals are similar in shape to a droplet, measuring 6 x 5.5 cm, 4 x 5.5 cm and 3.5 x 4.5 cm.And you will need 2 more flower templates with 6 petals with a diameter of 6 cm and 4.5 cm.
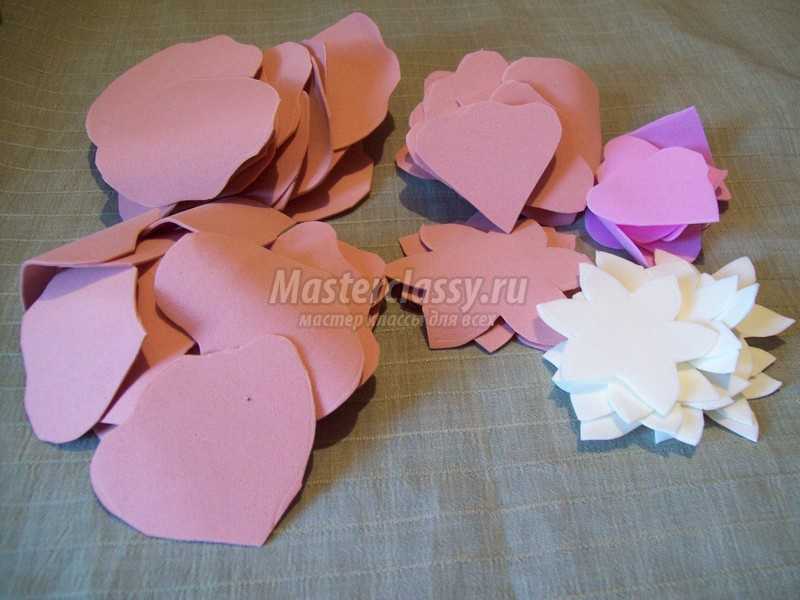
Now let's start cutting out the blanks. We take peach-colored suede and make all three sizes of petals, 24 pieces of each, according to templates. Then, from the same suede, we cut out 3 flowers with a diameter of 6 cm.And we cut out 10 flowers with a diameter of 4.5 cm from white material. From pink suede, we additionally cut 9 pieces of droplets measuring 3.5 x 4.5 cm

It remains to cut 3 strips of 13 x 2 cm from the green material. Divide them in half, and then divide the resulting rectangles diagonally, from corner to corner.

We will process all the peach-colored petals with a dry bed of a lilac shade along the wide edge of the blanks on both sides, using wet wipes.

We paint droplets of three sizes, 24 pieces each.

The other 3 blanks of a peach-tone flower with a diameter of 6 cm are tinted with red pastels completely on the edge. And flowers made of white suede according to a pattern with a diameter of 4.5 cm. There will be 10 of them and in the middle of each blank we paint a yellow circle. We give time to dry.
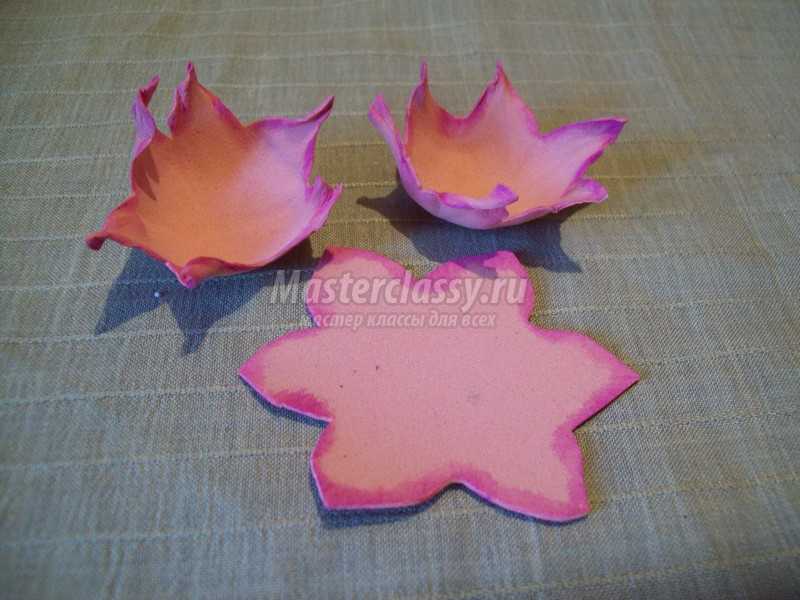
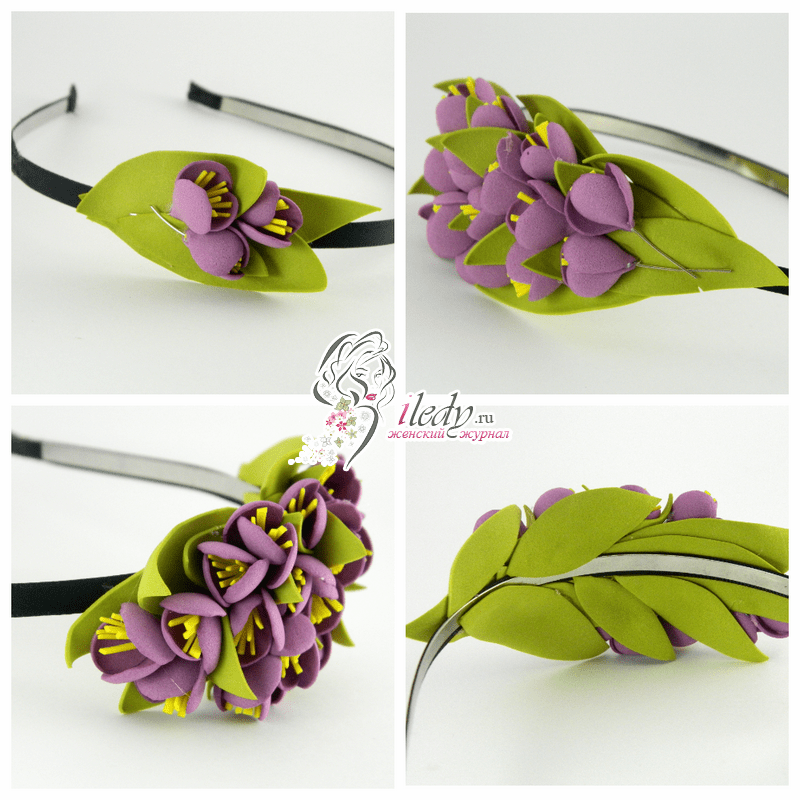
Now let's start processing all the elements. Let's start with three round colors. Fold in half, a few more times, scroll with your fingers without grabbing the middle and straighten it a little.
We do the same with small white flowers.

In peach-colored petals, processing is more difficult, we will use a lighter. You need to make waves along the wide edge. We heat a small gap of suede with fire and bend with our fingers while the material is warm. There should be three waves. Then we warm it up from below at the thin edge of the workpiece and press it with our fingers in depth, making the shape of a boat.

It remains to process the green leaves. Fold several pieces together with a thin edge up and scroll it with your fingers, do not grab the wide part of the workpiece.

Now we collect flowers for decoration. We take white blanks, 10 medium-sized beads and cut the floristic wire 8 cm long.

Then we make a small bend at one edge of the wire so that the bead does not come off.
Content
Recently, flower head jewelry has become very popular. Hand-made works are especially appreciated. A headband with flowers is not a shame to give for a birthday or to appear in one at a city holiday, or in the office at work. Moreover, in this spring-summer season, floral print and floral motifs in clothes are more fashionable than ever. If you want to shine and be in trend, then it's time to learn how to make flowers from a very pleasant material to work with - foamiran.
Material properties
Before starting work, perhaps it is worth understanding what foamiran is, or, as it is also called, foam, and how to work with it:
- in general, the word foam is translated from English as foam. But the name is believed to have come from the Iranian company that produces the material - Foam Iran Company. Foamiran is also called as fom, rubber paper, plastic suede, fom eva;
- foamiran is foamed rubber and, indeed, resembles suede;
- the material is easy to work with and becomes ductile if slightly heated. This is great material for beginners;
- plastic suede stretches and shrinks quite easily, while it is difficult to tear it;
- very easy to cut, you can make different patterns, even the most jewelry;
- it is easy to paint;
- foam is a fairly inexpensive material;
- very unpretentious material - it will withstand snow, rain, and strong wind;
- the material is environmentally friendly, so it can be used when working with children;
- when unpacking, the material emits a specific odor that goes away quickly. Finished goods do not smell;
- ready-made buttercups are stored away from direct sunlight, and they are quite durable;
- there are only 22 colors in the standard packing of Iranian material. But you can always paint it in a suitable shade.

Material in work
Now it's time to test the material and practice making beauty out of it.
Now let's try to learn a master class on how to make a headband from foamiran, or, more precisely, flowers from it. Prepare the following:
- foamiran in two colors, for example, take purple and pink materials, or peach and white;
- glue or glue gun;
- lighter;
- foil;
- teip tape.
For our future rose, you need to prepare petal patterns.

There may be slightly fewer types of petals. Prepare 5 large petals, about 10 medium ones, 7-8 small ones. When assembling a flower, the number of petals may decrease or, conversely, you will need a few more details, you will look along the way.
Now, according to the template, you need to cut out the petals from our material. You can trace the patterns using wooden stick pressing lightly. Remember that some of the petals should be of one color and some of the other. Determine this for yourself in advance.
When the petals are cut, they need to be lightly processed. What does it mean? It is necessary to collect the base of the petal with an accordion and rub it a little, wrinkle it so that the petals turn out to be, as it were, crumpled.

Then, using a lighter, slightly heating, give the petals a wavy edge and the shape of a cup, shells, bend them in different directions to make the rose more magnificent.

Now take a piece of foil, twist an elongated ball out of it and wrap it with foamiran - this will be the core of the rose. We will start to glue the petals to it, we start with the smallest ones and so we attach all the rest in a circle, getting to the large details. Each row of a flower will have approximately two, maximum three petals. Thus, you will get a large lush beauty, which can then be attached to the bezel. The rose can be decorated with a couple of green petals made from the same material.

There may be several petals on the rim, only in this case, do them different sizes... If you make roses the same size, then cook them not too large.

Foamiran bezel turns out to be very delicate and original. You can cover the entire workpiece with flowers, or you can wrap the rim in advance satin ribbon and attach literally one or two flowers from the foam.
Making calla lilies from foamiran
How to make a headband with flowers from foamiran, for example, for a wedding or graduation? Calla lilies are very suitable for such an event - we will try to make them out of our "suede".
To do this, you need to prepare:
- white foam;
- glue;
- stamens;
- scissors.
A square needs to be cut out of white material, its size will depend on what size you want to make a flower. Now we need to prepare a template for the flower, something like this:

When the workpiece already appears in your hands, you can glue the stamens purchased in advance or made by your own hands to it. Now we carefully fold the base of the flower and fix it with glue.

If you plan to attach calla lilies to the rim, then you do not need to leave a stem that is too long. Calla lilies are elegantly combined with other flowers in the composition.

Headband in lilies
And now we offer you a master class on a foamiran headband with a lily. Oh, how natural and gentle this flower from Thomas looks. What do you need:
- flower pattern;
- material;
- scissors;
- glue;
- iron;
- ready-made stamens.
Prepare a petal template from cardboard, we offer you a pattern of all the details at once:

Now, according to the cardboard pattern, you need to cut out the petals from the white material. There should be six petals. You can slightly tint the petals to make them look like a lily, or you can leave them in their original form.
Now you need to slightly warm up the iron, attach the petals to it and make the edge slightly corrugated. The pistils and stamens are made with wire and a few pieces of black foamiran.
Just like the petals, you need to prepare the leaves from the green foam.
Now start assembling around the stamens. Just stick the petals to their base and glue.

Do not forget that if the flower is intended for a rim, then the stem should be as short as possible.
Jasmine is made approximately according to the same principle, only the template for it will be a little different.

And the result is this beauty:

In fact, you can make any flowers from foamiran with your own hands: poppies, tulips, daisies, oak trees, and all of them will look very gentle on your head. Moreover, it can be not only headbands, but also hairpins, invisibility, wide elastic bands and other decorations.
Wide rims completely covered with small foamiran flowers look very beautiful. For such flowers, in general, you do not need any extra body movements - you just need to cut it according to the template and attach a small bead instead of the core. There should be a lot of flowers, so you have to work hard. But there is a little secret - just take the base in the color of the blanks and then it will seem that there are really a lot of flowers.
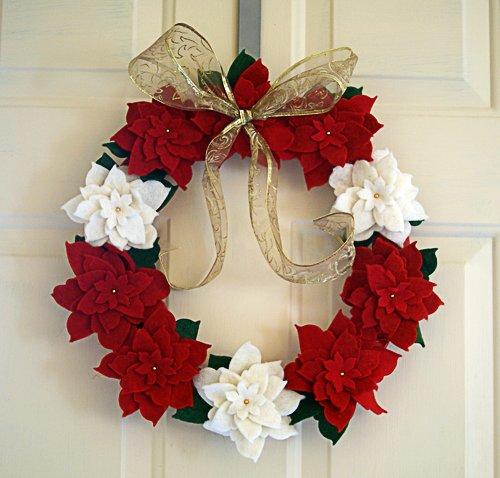
Needlewomen know that foamiran is like a magnet - if you do one thing, you immediately want to make new products. First, there are decorations, then souvenirs, then you are tempted to make a whole set of foamiran products. And in anticipation of the New Year, hands are itching to make some funny foam Christmas decorations, or a Christmas wreath, or balls ... In a word, there is something to do, just choose.
It is clear that a gift may not be necessary. new year theme... So if you have ready-made brooches from foam, hairpins, elastic bands, headbands - prepare beautiful packages. The finished work will only have to be packed like New Year's.
But other options deserve attention:
- Postcard with a foam - it will be voluminous, and all the warmth of your hands (literally) and soul will be felt by the one who gets it;
- Decorative Christmas tree from foam - the composition may be small, but for the New Year it will be traditional, expected, and most importantly, you can get it for many years on holidays;
- A Christmas wreath is a painstaking work, you need not only to prepare the material, but also spend a lot of time on every detail, therefore such a wreath is being made, perhaps since November;
- Foamiran balls - and they can be made even with children.

And, of course, the ideas lying on the surface - foamiran Santa Claus, foam Christmas tree star, boot or sock from foam, Christmas tree souvenir, Carnival masks and the symbol of the coming year. You can just make memorable magnets. From the foam, there can only be a frame, and inside - your New Year's photo or wishes.
What Christmas decorations from foamiran can be made
Well, for example, 2018 is the year of the Rooster. Therefore, making a rooster pendant is probably the most logical move. It is not necessary to purchase foamiran different colors, you can always tint the material with pastel or acrylic.
New Year's rim - it can be the same flowers, just a little more shine in them. Yes, today the flower theme is also relevant for the New Year, if you pay attention to how popular the decoration of Christmas trees with flowers was now. So a light rose on a Christmas tree is a trend.

But you can do christmas bouquet! Add red berries, cones, nuts, artificial snow to real or artificial spruce branches. You will definitely be known as the original. In a word, there are a lot of ideas, and you can always come up with something of your own.
With your own hands: New Year's crafts from foamiran with children
If you love tinkering with kids, then you know that complex crafts only nerves will shake. Don't make too difficult schemes. Remember the principle of felt jewelry - the simplest applique, which becomes more interesting due to the texture of the material.
So, with a child you can do:
- Snowman - minimum details;
- Fawn;
- Umku;
- New Year's horseshoe;
- Christmas ball;
- Snowflake;
- Spruce twig.
And the main such work will be thick cardboard... If you have a shiny forehead, the work will be even more festive. But there is a way out: take a children's hairspray with glitter, and direct it to the already finished work, it will shine, and the haunting smell will soon disappear.
Little snowman from foamiran
If this snowman is on a magnetic base, then you do not have to worry about the aesthetics of the seamy side. This makes things easier, of course. There are many options for how to make a snowman - usually they boil down to the fact that a template is made of cardboard, onto which the heated material is pulled.
It is easier to buy eyes for a snowman in the form of blanks (they are sold in any needlework store). The nose can be the tip of a toothpick wrapped in orange foamiran, or simply painted with orange acrylic. From the foam, a scarf will be made. The snowman may have a vest - also made of foam.

But the craft can also be in a combined technique - for example, a foamiran snowman in a felt vest. Or the eyes are made of beads, the caftan is decorated with beads. Sometimes the solution comes right in the process.
Master class: Christmas flower from foamiran
It is made like standard foamiran colors. The Christmas flower can be on a ribbon, hairpin, brooches, etc. Materials are standard.
You need:
- Blue and white foam;
- Dry blue pastel;
- Mold for leaves;
- Scissors;
- Iron;
- White tape tape;
- Sequins;
- Second glue;
- Stamen;
- Wire;
- Base blanks.

Petal circles are cut out according to the pattern. The white circles will be large and the blue ones smaller. Star petals are tinted on both sides with dry blue pastels and a damp cloth. In the small petal circle, only the very tips are tinted. The petals are heated on the iron, some can be processed in turn on the mold.
A bundle of stamens is glued to a wire wrapped with white tape. The small petal circle is put on the wire, the petals are glued with a slight rise. So, gradually, starting with small ones, all the petals are glued.
Fashionable New Year's headbands from foamiran
And if you want to be the most fashionable for the New Year, meet him in a foamiran rim. And there could be anything - berries, flowers, sweets. Spruce branches themselves ask for such a rim, but then it will be strictly New Year's decoration.
What should be the New Year's headband:
- Luxurious;
- Shiny;
- Accentuated.
That is, it is logical to assume that the outfit in this situation should not be very bright. One thing: either a bright accessory or an outfit. Remember that the bezel will draw attention to your facial features. This does not mean that the makeup must be bright - it means that you need to think over the styling and emphasize what you want to emphasize.
It's great if you make such a foamiran headband yourself. Enjoy compliments both for your appearance and for your talents. In this case, video master classes are the best helpers.
Festive crafts from foamiran for the new year (video)
Use foamiran in the New Year's celebration - why not? Start small, expand your collection new year decorations and it may even become your family tradition.
We also recommend
 Why doesn't the husband want a second child?
 Long bob with bangs on fine hair
 Features of the design of thematic corners in the younger group
 Selection of makeup for your type of appearance How to choose your makeup
 Dyufaston or Utrozhestan - which is better?
 Face contouring (cheekbones): How to make cheekbones with makeup How to highlight cheekbones in makeup