Decoration of photo frames. Unusual DIY photo frame decor ideas
It's the 21st century, technologies are developing more and more rapidly, most of the photos have gone digital, but despite this, I want to have a tangible image of my loved ones, so I want to tell you, how to decorate a photo with your own hands... Most often, its framing serves as a decoration for a photo; a wide range of a wide variety of photo frames from various materials, made in different styles, but you must admit that a frame made by yourself is much more expensive. After all, when you created it, you put a piece of your soul into it, and every time you see a photo that was designed on your own, pleasant emotions will come to life.
You might be surprised how many ways there are how to decorate a photo with your own hands ideas presented in today's master class will help you rip out something to your liking.
How to decorate a photo with your own hands master classes
You can use any technique that you own or would like to try, for example, quilling, frames designed in this technique look very elegant and original. Let's take a closer look, the following materials and tools will be needed for work: your favorite photo, a smooth frame of a suitable size - a base, a sheet of decorative paper with a velvety surface, quilling paper 5-7mm, 3mm wide or colored paper, scissors, stationery glue, quilling tools.
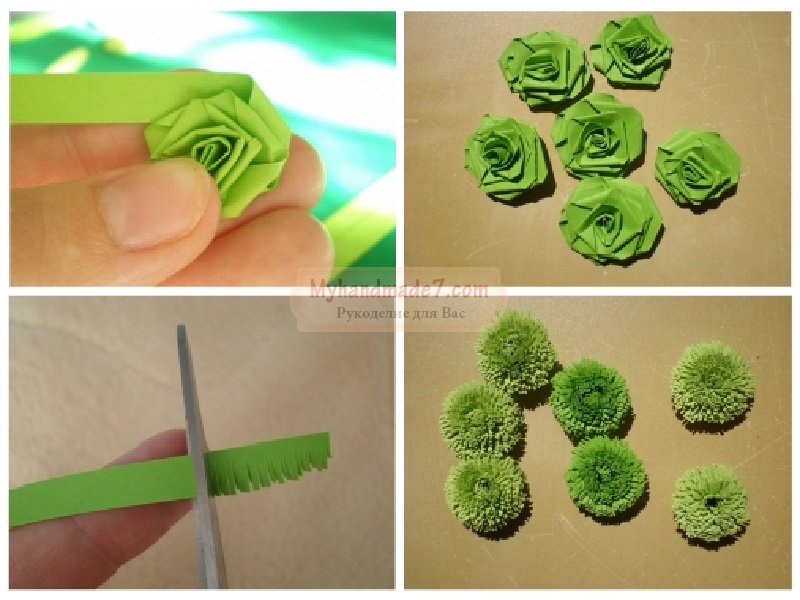
In my case, the composition will be in green tones, you can choose other matching colors at your discretion. To decorate the frame, you need to prepare the following paper elements: roses, leaves, curls and double flowers. We make a rose as follows, we take a strip of light green color, 7 mm wide and form a core by rolling the strip several times, then lay out the petals, turning the strip in a spiral, the folds form the edges of the petal, we make small roses, on average 1.5-2 cm in diameter. Glue the tip of the strip with glue with inside... You will need 5 roses in total. To make a terry flower, use the same paper. Here you will need small scissors, on one side of the strip we make a thin fringe, then just roll up the strip, fix the edge with a drop of glue, leave the blank to dry, then fluff the fringe. Flowers need 7-8 pieces.

For the manufacture of leaves, we use narrower strips of light green and dark green, using a quilling tool, we roll up a roll about 15 cm in diameter, carefully glue the edge, flatten the roll to make a leaf, shift all the turns to one side, fix it in this position with glue ... In total, we make 10 multi-colored leaves. The curls are the easiest to make, cut the quilling strip into three equal segments, twist one edge into a spiral, give the remaining piece of the strip a curved shape with your fingers, curls for the composition need 6 pieces.

When all the necessary elements are prepared, we proceed to the design of the base, take a sheet of decorative paper, put it inside out, put the blank on top, circle the rectangle where the photo will be with a simple pencil, cut out a hole with a margin of 2 cm, cut the corners obliquely, now carefully coat with glue the entire surface of the workpiece, glue the paper on top, bending the remaining edges to the wrong side. Let the glue dry completely. Now we place all the quilling elements, as shown in the illustration, or you can come up with your own version, first place all the elements and figure out whether such a composition suits you or not, and then glue it. Do not overdo it with the amount of glue, otherwise the product will look messy. A photo decorated with such a frame will delight you both on the wall in the living room and on your desktop.
There is another option, how to arrange a photo using the quilling technique, the elements for such a frame are even easier to make than in the previous version, but it looks no less impressive. For work you need: a frame with a smooth surface, multi-colored quilling paper, an old glossy magazine, a hot gun. If you have a plastic blank, then it is advisable to degrease the surface before work with a cotton swab with alcohol, if it is wooden, then you first need to clean the surface with a fine sandpaper.

We will fill the entire surface of the frame with circles rolled from quilling paper and magazine strips. We cut the sheets from the magazine into strips, about 1.5-2 cm wide, fold each strip lengthwise so that it turns out to be like a quilling strip in width, thus, when folding, the stripes from the magazine sheets will be more voluminous. Now we roll up circles with a diameter of 1 to 2.5 cm, arbitrarily from a magazine or quilling strips, or putting them together, we need a lot of circles to completely cover the area of the frame. When you have accumulated a sufficient number of circles, we attach them to the surface of the base with a glue gun, tightly to each other, it is possible for the circles to extend slightly beyond the edges of the frame. The finished photo frame looks elegant and cheerful.
Decorations for photographs, designed using natural materials such as cones, acorns, seashells, cereals, or coffee beans. What other crafts can be made from natural materials, see.
I would like to dwell on some options in more detail. Coffee has long ceased to be just a fragrant drink, roasted coffee beans are used to decorate the most various crafts, coffee trees, scented candles and other things, frames decorated with coffee beans look very beautiful. There are several ways of attaching grains to any surface, to decorate the frame, we will consider an unconventional way.
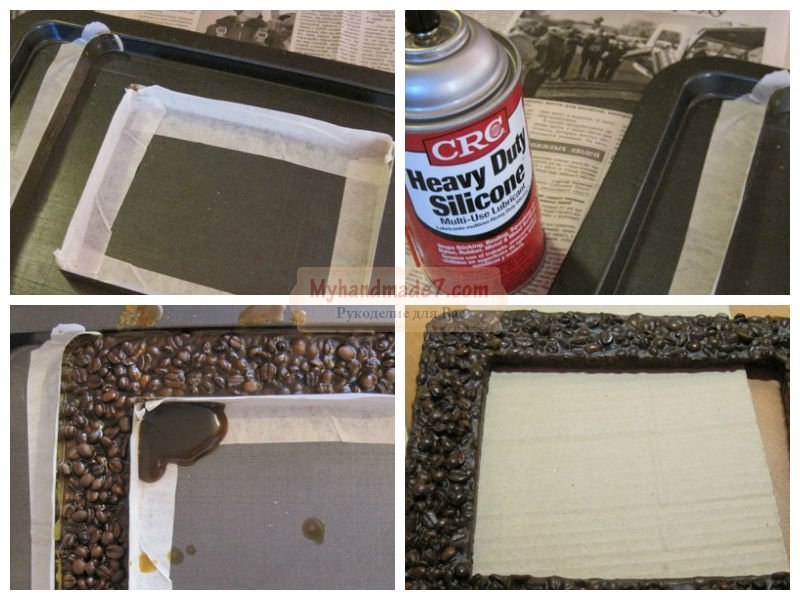
So, for work, you will need a baking sheet, thick cardboard, coffee beans, paraffin candle Brown, liquid silicone or other synthetic lubricant, a piece of plexiglass, masking tape. The basis for our frame is not needed, in this case we will do everything ourselves. Take a baking sheet, treat the surface with liquid silicone so that the product can be easily removed, we form the outlines of the future craft from the cardboard, make like a formwork, glue all the edges and joints with masking tape, to fix the structure, you can make corners from a tin. We make the edging about 4 cm wide, if the size of the baking sheet allows you, you can make it wider. Now we put coffee beans inside the sides, melt the candle in a water bath, pour evenly melted paraffin over the coffee beans. When the paraffin begins to set, you need to attach a hook or other fastener, you can take the wire, roll it up in several layers, fix it with screws, drown them in paraffin, you can even add a little melted paraffin on top, set the workpiece aside until it hardens in a cool place.

When the paraffin is completely hardened, carefully remove the formwork and remove the frame from the baking sheet. Remove excess paraffin and unevenness with a knife to refresh the outer layer of grains, blow the product with hot air from a hair dryer. We cut out the back wall of the frame from any thick cardboard, fix a photograph on it, fix a piece of thin plexiglass or thick film on top, assemble the parts together with liquid nails. Thus, having designed several frames, you will decorate not only photographs, but also the interior.
How to decorate a photo with your own hands a master class step by step
The design of photos using the scrapbooking technique is also very popular now. Let's get a look, how to decorate a photo with your own hands, scrapbooking ideal for this, with its help you can make whole panels, albums or other interesting compositions.
Let's try to design a panel, choose 4-6 photos from a memorable trip or just from a family album. Any medium-sized cardboard box is suitable as a base. You will also need any beautiful paper, even wallpaper, logging, glue, lace, and any other decorative elements will do.

First you need to arrange the basis for the panel, I have a cover from a shoe box, you need to completely wrap it with paper, now cut out the partitions from the cardboard to the size of the photo. We will attach the panel to the wall using a lace loop, for this make two through holes in the upper rim, cut a piece of lace, thread its edges into the holes and tie knots at the ends. We arbitrarily place the photo inside the box, in the remaining space we glue a suitable journal, paper flowers, butterflies, the photo can be signed with beautiful ink, in general, you can use any decorative elements. How to design a scrapbooking postcard, see ours.

The photo can be decorated to give it to your loved one. Such a romantic gift will be pleasant to receive both for a guy and a girl. To make a delicate frame for the photo, we will use a firth, I took a pink one, in addition to this, you will need thick threads, thin braid, cardboard, glue, magnetic tape, decorative flowers, and other decorative elements at your discretion.

First, draw a pattern on paper, I have a flower with round petals, we make the size taking into account the size of the photo. Cut out the middle in the form of a circle, you can choose another shape, rectangle or heart. We transfer the pattern to felt with an ordinary simple pencil. Carefully cut out the blank from felt, cut out the middle, as on paper. We sew the outer edge with an overlock seam using contrasting threads, I have white ones. We decorate the edge of the inner hole with braid, it can be neatly sewn on or glued on.

Flowers can be taken ready-made or assembled at your own discretion, for example, from scrapbooking blanks. In total, you need three flowers, we glue them on felt. We also decorate the craft by sewing two heart-shaped buttons on the side. We cut out larger hearts from colored paper, write the names of lovers on them.

When the front part of the frame is ready, you also need to make the back one; thick cardboard is suitable for this. Cut out a circle a couple of centimeters smaller in diameter than the front. We glue both parts, leaving an un-glued gap for the photo. We glue a piece of magnetic tape to the back of the frame so that the photo can be placed on any metal surface or refrigerator.

Another interesting option decorating photos - decorate the frame with tubes from old magazines. This is also a fairly budget option, but it looks very creative. For creativity, we will need: a few unnecessary magazines, a knitting needle, a glue stick, scissors, a glue gun, a frame - the base. First, we disassemble the magazines into separate pages, we make many blanks - squares, the size depends on the size of the frame and on your desire. On average, squares with a side of 20 cm are suitable.When you have cut out a sufficient number of squares, we begin to twist them into tubes, for this we use a knitting needle, fix the edge with glue.
You can place the tubes on the surface of the frame in any order, you can make smooth edges by placing all the tubes strictly parallel. Either cut the tubes and arrange them from the smallest to the largest on each side of the frame, or even go outside the frame and make a decorative edge in the shape of a wave. The main thing is not to leave gaps between the tubes and final result it is better to cover with a layer of colorless varnish, so the craft will live longer.

A great gift for relatives and friends will be a common photo in a New Year's frame.To make it you will need the following: a wooden frame, cones, a pair of bells, gold or silver paint in a spray can, a hot gun and a ribbon.
First, we cover the frame itself with a layer of paint, then we cover the cones with the same paint, it is better if they are open, for this it is enough to put them for several hours near a warm battery. When the paint is completely dry, begin to glue the bumps around the frame with a hot gun. We attach the bells to the frame as a decoration. We attach a string to the back of the frame so that the photo can be hung on the wall. We insert a suitable photo and you have a great gift for the New Year, a lot interesting ideas what else can you give to New Year, look.
In this article, we will talk about how you can make comfortable and beautiful photo frames with your own hands.
Each photograph is a unique phenomenon that retains a part of some emotion. So why not arrange such images in unique frames?
Crafts - beautiful do-it-yourself photo frames from scrap materials: ideas, photos
To begin with, we suggest that you familiarize yourself with the ideas of what kind of photo frames you can make:
Photo frame made of burlap roses 
 Photo frame made of natural flowers - short-lived, but beautiful
  Frames with knitted spirals


 Extremely original idea- old clock as a photo frame

DIY cardboard photo frame: master class
To make a cardboard photo frame, you will need stock up on the following things:
- Corrugated cardboard
- With a knife
- Pencil
- Glue
- Decor paper - absolutely any paper will do
- Buttons, shells, beads
You can start making:
- From a piece of cardboard necessary cut out the front and back of the frame. It should look like this blanks as in this photo:


- Now is the time to decide how much you need measure out paper for decoration.
IMPORTANT: It must be taken into account that it will have to be folded inward. That is, you cannot do without a stock.

- Now the front of the cardboard blank necessary glue, and then glue decorative paper to it. Until the glue is completely dry, you cannot proceed to further points.


- But after drying, you can glue the front and back of the photo frame. Only the upper parts do not need to be glued, since a photograph will be placed through the top in the future.
- But that's not all, because it is necessary build a support for the frame. For this purpose, you need to cut out such a part from cardboard, which is indicated in the photo below. You can make it out of paper, then stick it on a cardboard base.


- All that remains is decorate photo frame to taste.


How to make a children's frame out of paper: templates, diagrams with a description
Such a bright photo frame will surely appeal to children, especially girls. She will definitely decorate the interior of a children's room:


If you like this idea, you should stock up on the following constituents for its implementation:
- Paper - regular color, gift or even unnecessary magazines will do
- A frame made of wood, which you can easily find at a craft store. Or maybe an old frame is gathering dust somewhere in the house?
- Glue
IMPORTANT: A hot glue gun is also useful, especially handy for beginners with needlework.
- Scissors or a stationery knife
- Toothpick
You can start:
- If you want to update the frame cover, you can do it now, having painted her.
- From paper you need cut strips.


- Then all stripes are needed fold in half.
- Now each strip needs roll into a roll... This is where a toothpick comes in handy, although you can completely do without using it. The ends each roll needs to be carefully glue.


IMPORTANT: Do not be upset if the blanks turn out different sizes... It is even preferable that each roll is different from the previous one.


- As soon as there are enough bright rolls, you can proceed to their fixation on the frame. This is where the glue gun comes in handy. You can fix the parts randomly, but the strength of their pressing to the frame is required!

We attach to your attention another one with Hemu making a photo frame:

How to make an autumn frame in autumn style - golden autumn: templates, schemes with descriptions
The easiest way to create a golden autumn frame is glue the finished frame with leaves. Leaves you need in advance smooth with an iron... Then they are recommended dip in hot water for one minute. However, not boiling! This will allow the leaves to lie better on the cardboard.
After fixing the leaves on the frame, it is worth sending the craft under the press with. Can then cover the surface with matte varnish.


If you want something not as familiar as leaves, you can decorate the frame acorns.


More a few ideas to create an autumn frame:


How to make a beautiful felt frame: templates, schemes with descriptions
The felt photo frame magnet is quite unusual and easy to manufacture.


If you like the idea, need to buy:
- Hard felt
IMPORTANT: It is desirable that it correspond to a thickness of 2 mm and dimensions of 13x26 cm.
- Tapes about 5 mm wide and about 3 m long
- Needles - one regular and the other with a wide eye
- Floss threads - it is preferable that they make up the same scale with felt
- Finished magnet or magnetic tape
- Paper
- Scissors
- Ruler
- Toothpick or awl
- Colored pencils
- A coin


You can get to work:
- On the back of the felt it is required to draw two squares... Each of them must have sides equal 13 cm.

IMPORTANT: Now is the time to take a coin. You should not ignore this stage if you want to get a rounded frame.

- Blanks can cut out.


- Now is the time to get busy a template for making a hole under the photo. In this example, it is represented as a cloud, but in reality it can be any shape you like.

- Hole necessary cut out.


- But of course without sheathing the cut not enough! For this it will come in handy overcast seam in two strands. Fastening takes place on the inside.

- Now the template blank must be circled on paper. On it, it is worth sketching the outlines of the embroidery.

It's time to get busy embroidery ribbons! Cut off from green about 50 cm by inserting it in a needle with a wide eyelet.
IMPORTANT: Try to cut the end of the tape at a 45 degree angle.


- End ribbons should fasten on the seamy side felt blank with a needle and thread.

- Then follows in advance pierce the felt in those places where you plan to thread a needle with a ribbon. The fact is that the stiff felt for the needle is too strong, so it is recommended to use an awl or, in extreme cases, a toothpick.


- Now it is worth stitching the frame in the same way and blue ribbons.


- Next you need fold both felt blanks. They should overcast using floss threads.

- Left glue the magnetic tape on the back of the frame.


How to make a carved wooden photo frame: templates, schemes with descriptions
Choosing the right wood for the frame is half the battle. Very will look attractive products from cherry, walnut, ash, linden. If in the future painting planned, then the optimal options are spruce and pine.
IMPORTANT: It must be remembered that the softer the wood, the easier it will be for the master to make patterns on it. This is especially important for beginners to consider.
You need to make a frame as follows:
- From the plate you need cut out blanks,the thickness of which will reach approximately 26 mm. Minimum allowances are required.

- Now you need attach the edges, then gluing the workpiece.
- By drawing template for the pattern, it is worth attaching it to the tree. The pattern is transferred to the future frame.
- Contours outlining hole for placing a photo, need to be cut.
- It is also necessary to cut and patterns.
- Now we need to designate rebate dimensions targeting glass with photography.
IMPORTANT: It is worth observing the symmetry of the marks.
- It's turn milling.
- Now happening alignment with straight chisels.
- Can be done the back of the frame.


We offer the following patterns. They are mainly used by craftsmen for making platbands, but they are also perfect for photo frames:
 Patterns-1 for a photo frame made of wood


How to make a photo frame from plywood: templates, schemes with descriptions
For a similar photo frame needed:
- Multi-layer plywood with a minimum width of 10 mm
- Saw for wood plywood
- Electric jigsaw
- Drill - can be either manual or electric
IMPORTANT: The most important thing is to have wood drills.
- Scissors, measuring instruments
- Furniture stapler and staples
- Metal bracket or reinforced thread in order to fix the frame
- Grinding devices - fine-grained sandpaper or special grinders
- Varnish for woodwork

You can get to work:
- The first step is to transfer templates for the material.


- With a drill need to do multiple holes, and through.
- Now you need to place a jigsaw in the holes. It produces cutting out the pattern.
- Now is the time grinding.
- Then you can proceed to painting object.
- Now you can insert a photo. If you wish, you can place it under glass. In this case, you will have to fix the back wall, fixing it with a construction stapler or self-tapping screw.


How to make a photo frame from a skirting board: templates, schemes with descriptions
To create such a photo frame needed:
- Pieces of wooden plinth
- Glue type "Moment" or "Glue nails"
- Stationery knife or construction knife
- Protractor or miter box
- Marker
- Ruler
- Acrylic paints and acrylic putty for working with wood
- Cardboard - necessarily dense

Operating procedure:
- First, it is advisable to cut cardboard base, which will be slightly larger than the desired photo.
- Next, you need to cut out another piece of cardboard - the front of the frame.
IMPORTANT: Each side of the second part must be about 5 mm less than the first.
- Now both parts need to be glued to each other.
- Then you need to measure 4 pieces of plinth. The miter box needs them trim at a 45 degree angle. If there is no miter box, you can draw a corner on paper, then mark it on the baseboard with a marker.
- Now you need glue the panels to the cardboard base. If you don't want to make such a basis, you can simply glue the parts to each other.


- If at the joints there are cracks, they can be easily mask with putty.


- After the putty is dry, you can proceed to painting.
IMPORTANT: If there is no water-based or acrylic paint, you should cover the workpiece with PVA glue before applying any other paint. Moreover, it is necessary to apply several layers.


- It's time to apply water-based varnish.


How to make a photo frame from disks: templates, schemes with descriptions
For a similar craft needed:
- DVDs, CDs
- Black stained glass paint
- Dense cardboard
- Pencil, ruler, scissors, tweezers
You can get to work:
- Made of cardboard cut out blank frame


- Now is the time to get busy cutting out pieces from disks.
IMPORTANT: These pieces must be irregular in shape.

- Next you need cover the frame with glue, by gluing colored pieces on it. Tweezers are most convenient. It is advisable to lay out the parts not tightly to each other, because you need to fill the gaps with paint.


- Now paint fills in the distance between the pieces. The edges of the frame can also be blackened.


How to make a frame for a scrapbooking photo: templates, schemes with descriptions
Necessary things to create a frame:
- Special paper for scrapbooking
- Cardboard
- Construction or stationery knife
- Scotch tape, glue, scissors, ruler
- Decor elements, stencils for drawings
Operating procedure:
- On cardboard celebrated product boundaries
- All unnecessary is cut off- only a blank frame should remain.
- Received the blank should be glued to the back of the scrapbooking paper.
IMPORTANT: The excess edges of the paper must be slightly cut and then wrapped outside the frame.
- Everything the edges future framework needs fasten with tape. The upper part cannot be glued, since the photo will be inserted through it.
- Further made of cardboard necessary cut a piece for the back of the frame.
- Now it is desirable to create support leg for the frame.
- The most interesting stage of work remains - decor! It can be very diverse.
We attach several options for ideas:

Decorating, decorating and decorating frames for a photo with your own hands: ideas, decor, photos
Ready-made standard frames can also be beautifully decorated. Moreover, after decorating, you will get unique and cute things:


 Photo frame decorated with multi-colored spools of thread

Collage from photo frames with your own hands: ideas, photos Collage of photo frames in the form of a puzzle for baby photos 
As you can see, even novice needlewomen can create an original photo frame. Such a product will give the interior a unique charm and will surely catch the eyes of guests. And as a gift, such a photo frame will bring a lot of joy.
Master class on creating an unusual photo frame carousel
Despite the fact that progress does not stand still and digital cameras have long replaced film ones, we continue to arrange and hang frames throughout the apartment, which to this day are the best design for photo. Large and small, simple and whimsical shapes - all of them are designed not only to match the interior, but also to reflect our mood.
That is why we propose not to depend on the whims of designers, but to rely on your own taste and try to arrange a photo in accordance with it.
1. Store your old credit cards? And you are doing the right thing! After all, they will still be useful for decorating your favorite photo! True, for this, the credit cards will have to be cut into small pieces. But these are already details ... (ideafrom here )

3. Thrifty needlewomen will like the simple frame design option from what is at hand. It could be buttons, old jewelry, coins ... or spools of thread! Such practical free frames look great not only as a frame for a photo, but also perfectly fit into any interior. (original idea )

4. Artfully laid out around the frame coffee beans of different varieties - a wonderful design, which has another unique property- delicate aroma. ( )

5. Do not rush to burn or throw away old "women's magazines". Thanks to their bright pages, they can be a great decor for a photo frame. (idea withsite )

6. An amazingly delicate vintage photo frame is made from a piece of old wire. (original article )

7. Sweet tooths will be delighted if they receive a beautiful and quite edible photo frame for the holiday. (originalidea )

8. Ice cream lovers will now eat it with double pleasure, because sticks painted in different colors make a bright summer photo frame. (MK )

9. Few can resist the temptation and do not collect shells or pebbles on the seashore. But what to do with them later? To put in jars and keep carefully as a memory? Better to decorate your photo frame with stones and shells! (idea )

10. A glamorous frame is obtained if you decorate it with ... ordinary buttons. This option does not look primitive, especially considering that the proposed design option for a photo frame does not require special investments, and those who have a stock of buttons will get it for free. ( )

11. Do not scold your children for breaking pencils often! Lushe, use their addiction and decorate the frame with "stubs". It looks very unusual and colorful! (details )

12. Cute and very miniature photo frames are made from bottle caps. ( )

13. Old CDs are excellent material for decoration. Its strength and lightness will be appreciated by many needlewomen. (MK )

14. For young ladies who adore everything cozy and homely, volumetric frames made of textiles will become a godsend. (original MK )

15. This unusual frame will be able to contain photographs of all family members, because there are as many as 12 cells in it. Have you guessed? It's made from an egg container! ( )

16. The most precious thing in our life is children. And their photos also deserve a decent design. (idea
We also recommend
 Pregnancy and Funeral: Dispelling Myths Is It Possible for Pregnant Women to Funeral
 Can pregnant women go to funerals and what should they be afraid of?
 How much can pregnant women lift in the early stages
 Dress up games for girls with super heroes
 Prayer conspiracies from adenoids
 How to sew a dress and cape of Elsa from a cold heart with your own hands