How to make a mock-up of a tank out of cardboard. We make a model of a tank from thick cardboard
My son and I decided to make a small model of a combat vehicle he liked or want to make a model more real sizes? Then you need to know how to make a tank out of cardboard or other suitable material.
A child's play or an adult's hobby?
Oh, those boys! It just so happened that from the very early childhood they are surrounded by all kinds of soldiers, cars, tanks, railway, etc. And some of them do not want to part with this fascinating world, albeit not real, but technology. While still quite toddlers, they try to copy their favorite car models from toy boxes, cardboard, paper. And later, when they grow up, this childhood hobby for many of them becomes interesting and often young dads pass it on to their children by inheritance. This is how entire collections of models of various brands of military equipment, racing cars and other exhibits created from improvised means appear. And if your kid is trying to make something on his own, screwing, for example, an empty tin can (supposedly a wheel) to a shoe box, maybe you should still help him, and not scold him because of the eternal mess in the nursery? Let the first topic of your joint activities be a craft - a cardboard tank.

Materials for creativity
Since we are talking about the manufacture, though not real, but still armored vehicles, you need to choose thick cardboard, or even better - large boxes for shoes, food, etc., having a multi-layer texture. In addition to ordinary scissors with long blades, a knife with a sharp point in the form of a serrated file will not interfere, which will significantly speed up the process of preparing and cutting parts. Such items, of course, should only be used by an adult. When making crafts during independent creative pursuits Give your baby only small blunt scissors, paints, and glue. Having mastered simple technique connecting parts, you can offer him a new connection method - using flexible wire. And so, by step-by-step improvement, you can gradually move on to the manufacture of more complex models with the addition of other improvised materials - unnecessary hoses, covers, plastic bottles etc.

Basic build order
Let's take a look at how to make a tank out of cardboard or thick paper. The basic order of assembly, no doubt, each master can have his own. In addition, the technology for the manufacture of certain machines will not be understood at all by a common man in the street. But here it is described how to make a tank out of cardboard, for a beginner who is just starting to take his first steps in the science of "paper making". It will be very good if there is a pattern found on the Internet. The procedure is as follows:
- From two large sheets of cardboard, fold the body part. Make a hole in the middle for the tower.
- Decorate the body with a few long or triangular stripes that simulate armor.
- Cut out the wheels, which you use with felt-tip pens.
- On top of them, fasten a rim from a strip of paper.
- The tower can be just rectangular, or it can have more complex structure... Make it depending on your desire and skill. Secure the tower over the top of the tank.
- Roll the paper into a tube and glue. Attach the resulting muzzle to the front of the tower.

How to make a cardboard tank neatly and quickly
The assembly of the simple model of the vehicle is now complete. Comprehending the basics of this applied art, you need to observe the following rules and recommendations during further work:
- It is better to take transparent glue so that the material does not have any contamination.
- When cutting out a layout, you should not rush to the right size right away. It is better to carry out the work gradually, in several stages, so that there are no defective parts due to lack of material.
- For used cans, bend the jagged edge inward immediately after opening to avoid a cut.
- Plastic bottles can change shape when heated. This interesting property will help find application for this material.
- Use field-proven drawings. This will significantly save time in the manufacture of subsequent crafts. Therefore, treat the construction of circuits most responsibly.
Various models of cardboard tanks
Once you have learned how to make the simplest models, you can try more complex designs. Having made a cardboard tank as the first craft, the boy will proceed to the next one. It can be not only other brands of armored vehicles, cars, jeeps and vans, but also helicopters and airplanes. Who knows, maybe the child will become in the future a design engineer for real sea vessels or spaceships. And it all started with a simple tank, which, according to outward appearance looked more like an ordinary box, rather than a model of armored vehicles. Therefore, from childhood, it is necessary to instill in children the ability to think figuratively and the desire to make their dreams come true!
Making tanks out of paper may be of interest not only to boys, but also to girls. Firstly, these figures will be great toys for them. Secondly, the process of creating a figurine itself arouses unprecedented interest in children, develops motor skills. And thirdly, many parents, during the process of forming such figures, tell their children about the great wars and their features, attracting kids to the history of their state. So, how to make a tank out of paper and where can you find a layout and drawing?
Making tanks out of paper may be of interest not only to boys, but also to girls.
The T 34 tank made of paper corresponding to a real machine can be glued using ready-made reamers. To do this, you first need to print the necessary scan on thick paper. Then you should cut out all the drawn details.

 To make a T 34 from a sweep, you must follow the instructions:
- Find fold lines on the cut elements. A ruler is applied to each of them, and then the free edge of the paper is lifted and ironed. This creates an even fold.
- After all the bends are indicated, you can proceed to gluing the model.
- The first step is to glue the main body of the tank. For this, it is advisable to use transparent acrylic glue or quick-drying PVA.
- Then all the minor parts are glued to the body.
- Then you can move on to the cannon. First of all, its base is glued together, and only after that the gun is supplemented with secondary elements. The finished model is glued to the main body of the combat vehicle.
- After that, the caterpillars are assembled. First, the inner circles are made, and only after that they are framed by a single caterpillar strip. The finished tracks are attached to the sides of the hull.


It is worth considering that there are various sweeps of the T 34 tank, which may differ from each other in color and convention. If you manage to print only a black and white version of the car, it should be painted using acrylic paints before assembly. Such processing of cardboard will allow the future toy to acquire the appearance of a tank with a natural coating.
Gallery: paper tank (25 photos)


Tank IS 7 made of paper
To make this tank, you should also use a ready-made scan.


- All elements of the sweep are cut out using a clerical knife.
- Next, using a ruler, folds are made at all places marked for this purpose.
- A supporting structure for the body is manufactured. It is made of two rectangles, set parallel to each other and fixed by 3 transverse strips, located at an equal distance from each other.
- A body with a circle cut out in it is glued onto the resulting base.
- The body is glued with the sides, niches for the caterpillar are formed. The tank bottom is being formed.
- The basis for the cannon installation is being made. It is done in the same way as for the case. A manufactured tower is installed on the hull. A machine gun and additional elements are glued to the tower.
- Further tracks are made: middle - smooth, rear - with teeth.
- The tracks are glued to the bottom of the main body, fastened with a caterpillar track.
This model is characterized by a rather high complexity of assembly, therefore, when creating it with children, it is necessary to provide them with extensive assistance. When assembling it with children, you can abandon a few small parts, thereby simplifying the gluing process.
How to make a T 90 tank out of paper?
T 90 can be made using origami technique. To do this, you only need paper: A4 sheet and a small piece of paper for notes.

T 90 can be made using origami technique
How to do:
- First, an A4 sheet is folded. First of all, it bends in half lengthwise.
- The perpendicular sides of the sheet are folded to join each other. First, the short side is applied to the bottom of the long one, and then to the top. Similar manipulations should be performed on both sides of the sheet.
- The sheet is turned over. The corners of the short side are bent to the ends of the crosses formed from the fold line.
- The sheet is turned over and bent along the resulting lines, forming basic form double triangle.
- The long sides are folded towards the middle so that the resulting double triangles are on top of them. The result is a double arrow.
- The edges just folded are folded to the outside of the rectangle.
- The side corners of one of the triangles are bent towards the apex.
- The workpiece is turned over and conditionally divided into 3 parts so that, as a result, the top of the folded triangle touches the middle of the base of the open one.
- The free corners of the triangle are bent inward.
- "Ears" from the previously bent triangle are set in the resulting pockets.
- The result is a tower.
- A small sheet of paper is folded into a cylindrical barrel using a knitting needle or culinary skewer.
- The barrel is inserted into the hole in the turret and glued.
The figure collected in this way can be decorated using thick paints, felt-tip pens or pencils.
How to make a tank from origami modules?
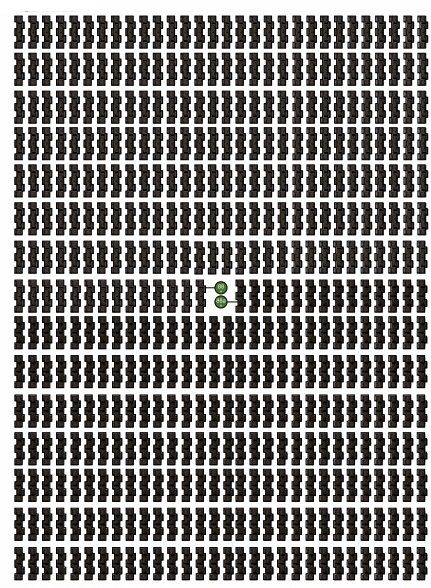
To create tanks, you can use the assembly scheme, which offers modular origami. To get started, the assembler will need to prepare 1688 triangular modules.
How to assemble:
- The first thing to do is to assemble the tower. Its first and second rows are closed in a circle. Each row consists of 30 modules.
- The workpiece is turned inside out, supplemented with a third layer, consisting of a similar number of elements. In this way, the tower is built up to layer 8.
- The ninth row is assembled from 30 modules, but they should be installed backwards.
- Next, you need to start with the tracks. A chain of 4 rows is made, each of which has 50 modules.
- The fifth row uses 46 elements. The reduction should be carried out in the places where the track is bent.
- Row 7 consists of 46 elements set back to front.
- The same design is used to create the second track.
- For each track, 3 wheels are made. For this, a circle is made of 2 rows, in each of which 10 modules are involved. The figure is turned inside out and complemented by 5 rows.
- The wheels are placed inside the track. These elements are connected by a middle bar made of 34 rows: 1 - 5 modules, 2 - 4 elements. Further, the rows alternate.
- The slightly bent part is inserted between the tracks.
- A tower is placed on top.
- The cannon is made of 20 rows, the width of which alternates: 1 row - 2 elements, 2 row - 1. The last three rows increase to 4, 3 and 4 elements.
- The machine gun is inserted into the tower.

With the help of this article, you will learn how to make a tank out of paper with your own hands. This instruction includes 2 options for making such crafts. They vary in complexity and technique. The first master class is quite simple and is quite suitable for novice masters. The second is laborious and complex. If you don't have any experience with origami, try a simpler job first.
A paper tank sounds serious enough. It seems that making such a craft is very difficult. And this is not at all true! With the free time and some patience, you can easily create it. Read on and you will learn how to make a tank out of paper with your own hands. 
Materials and tools:
- plain or color A4 paper;
- pencil gray;
- thin metal ruler;
- PVA glue or stationery;
- scissors.
How to make a simple tank out of paper
This craft is easy to make and perfect for beginners. To do it, you will need one sheet of A4 colored paper, a small piece of paper in a contrasting color, scissors and a pencil. 
Manufacturing time - 20 minutes
Difficulty level is easy.

Step 1: make the folds
Take a standard A4 sheet of paper. 
Fold it in half lengthwise. 
Fold the top-left corner to the bottom edge. Iron the folds well and unfold. 
Fold the bottom-left corner towards the top in the same way. Expand. 
You should have a cruciform fold. 
Step 2: shape the flaps
Place the craft vertically. Fold the right corner down. 
Divide the bottom side into 2 equal parts. 
Leave the first part in place and fold the second to the lower right corner. 
Repeat on the left side. 
Above, in the foreground, you should make a regular triangle. 
Repeat on the other side. 
Step 3: narrow the middle
Fold the underside towards the center line. 
Fold the paper flat in the middle and fold it back to the bottom edge. 

Iron any folds with an iron ruler to keep them neat and even. 
Step 4: shape the tower
Fold the bottom corner of one of the triangles up. 
Raise the right one as well. 
Roll the craft into a cylinder with all the formed elements upward. 
Insert the "arrow" inside the square. 
Fold the other two "arrow" corners into the lower pockets so that you get it like this (see photo below). 

Step 5: add the muzzle
Take a small rectangle in a contrasting shade. 
Roll it up into a thin tube. 
Insert the tube into the tower. Ready! 
You can also craft this tank by watching the following video.
How to make a paper tank with a rotating tower
To create this origami you will need:
- 1 sheet of A4 paper,
- scissors,
- pencil,
- iron ruler,
- glue,
- a thin object for smoothing out small folds.


Manufacturing time - 1 hour
Difficulty: medium
Step 1: formulate the undercarriage
Take a sheet of A4 paper. 
Fold it in half and then in four. Cut the sheet into 2 equal parts in the middle, that is, into 2 long strips (in the photo, these strips are folded in half in width). 
Take one of the strips and divide it into 2 parts in width, that is, in fact, you should have 2 quarters of A4 sheet in your hands. Set aside one quarter, and work on the second.
Fold a quarter of a sheet in half. 
Expand. Fold the underside towards the center line. 
Fold the right side towards the center as well. 
Roll the craft into a cylinder. 
Press this cylinder down. 
Fold all corners of the resulting shape by about 0.5 cm. 
Fold all corners inward. 

Iron the folds with a metal ruler to make them more pronounced. 
Fold the top flap towards the center of the shape. 
Repeat on the other side. 
Lift the right semicircular pocket at the bottom slightly. Make it longer. 

Repeat this on all 4 sides. 
Tuck the outermost flaps on both sides to the top point. 
Turn the craft over. Fold the corners up approximately 0.5 cm. 
Repeat on all 4 sides. 
Pull the folded corners back down. 
Place the side members perpendicular to the axis. 
Bend the craft up along its perimeter along the folds folded earlier. 

The chassis is ready. 

Step 2: protect the undercarriage
Take the second quarter of an A4 sheet. 
Fold the top edge about 1 inch (0.6 cm), then fold it back again. You need to wrap the paper in one direction 2 times. It is convenient to use a metal ruler when folding. 

Repeat on the opposite side. 
Place the guard on the undercarriage. The width of the first should be approximately 0.1-0.2 cm longer than the second. 
Fold the extreme corners along the folds on one side by about 0.5 cm. 
Fold the corners inward along the curved lines. 

Smooth the folds with a ruler. 
Fold the outermost element up so that the "horns" stick out to the side. 
Turn the craft over and insert the chassis into it. The latter should fit comfortably and tightly in the protection. 
Draw a line with a pencil for the second edge of the defense. 
Fold the paper inward at the marked point. 
Fold the corners on the second side of the guard approximately 0.5 cm. Fold the corners inward along the marked folds. 

Fold the rear flaps downward, decreasing their width by approximately 2 times. Make them more elongated. 
Repeat on the other side. 
Take protection and chassis. Put the first on the second and check how they fit together. If necessary, correct minor defects by lengthening or shortening the protection accordingly. 

Step 3: make the fixing piece
At this stage, you need to make the suspension and protection element that you will put on the turret. Also, with its help, the tower will be able to rotate in different directions.
Take the other half from A4 sheet. 
Fold the right edge towards the center line. Unbend. 
Cut a quarter from this piece along the curved line. 
Fold the paper in half lengthwise and mark the folds around the edges. 
Fold both edges towards the center along the intended folds. 
Fold the corner down to the right. 
On the opposite side, also bend the corner so that you have a triangle in the foreground. 
Expand. You should have a cruciform fold. 
Fold the side flaps inward along the intended folds so that you have a triangle in the foreground. 

Turn the left corner with bottom side up. 
Repeat on the other side. You should have the following shape. 
Fold the bottom side to the center line. 
Fold the top side towards the center as well. 
Place the craft on the undercarriage so that the square piece is exactly in the center. 
Next, you begin to bend around the figure around the chassis. Make sure that it follows all the contours of the element placed inside. 
Wrap the craft around the undercarriage completely. Cut off the excess length. 

Insert one edge of the element into the other so that the square is at the top at the center point. 

————————————————-
Disconnect the mount.

Place the guard on top of the chassis.

Wrap the indicated parts again with the element with a square at the top. Some actions will be quite difficult to perform, but do not rush, act carefully and you will succeed.

The bottom of the tank is ready!

Step 4: craft the tower
Cut a square with a side about 6-7 cm. Bend it along both diagonals.

Fold the paper in half.

Fold the corners down to form a regular triangle.

Flip the shape over.

Fold the left corner towards the top.

Repeat on the other side.

Rotate the craft. Fold the side corners towards the centerline so that they are slightly upward.

Insert the bottom flap with right side into a pocket located at the bottom of the side flap.

Insert the right flap into the pocket as well. You should have it like this.

Turn the craft over.

Lift the inner pockets up slightly.

Turn the pocket outward slightly.

Repeat on the other side.

Fold the top corner down. You have made the base for the tower.

Step 5: craft the tower defense and muzzle
Cut out an 8cm x 6cm piece of paper. For this work, you can use the same shade of paper you used previously, or use a contrasting color. We used a different shade and it really looks cute! If you use different shades of paper for each element, it will look original and fresh!

Fold the piece in half widthwise. Next, you need to wrap this paper three times along the points indicated by the arrows in the photo below.

Here the paper has already been folded in three.

Open one spread. Fold the lower left corner from bottom to top. In the same way, wrap the right corner symmetrically towards the top. Pull the middle up and fold the craft in half. Pull the inner flap gently upwards.

Expand the craft.

Decorate the third part on the other side of the craft in the same way.

Make sure the inner flaps are symmetrically positioned.

Take your tower.

Insert one edge of the green guard into the inner pocket at the top of the tower.


From the underside, insert the protection into the inner pocket at the bottom of the tower. Cut off the excess length of the protection.

Fold the cut corner in the middle.

Place the defense on the tower and secure both elements. Use a little glue if needed.

Cut a small rectangle around the circumference of the tower.

Roll it into a thin strip.

Fold one end of the strip perpendicularly and fold in half to form a small triangle at the top.

Insert this end inward between the green guard and the tower.

Wrap the strip around the tower. Insert the other end of it on the other side of the protection. If necessary, secure the work with glue.

Twist a tube from a thin piece of paper and fix it with glue. It will blow.

Slip the turret onto the chassis. To do this, insert the square located at the top of the chassis into the inner pockets at the bottom of the tower.
Place the muzzle inside the tower and fix it with glue.


The work is ready!
We have tried to tell you in as much detail as possible and show you the technique of making this tank. But if you still have questions and do not fully understand how to make this tank out of paper correctly, watch the following video.
From paper.
On the eve of the holidays on February 23 and May 9, I want to give you a selection of paper tanks. And most importantly, how to make them with your own hands.
Also in the article you will find diagrams for origami and templates for cutting and gluing models. There will be, like modern models of combat vehicles, and the times of the first and second world wars.
In general, not all of the proposed ideas are simple. However, there are some that a child attending kindergarten can do.
Bookmark the article so as not to lose it, because at school and kindergarten they will definitely ask you to make a craft, so let the ideas be at your fingertips.
Let's start with simple ideas. Schoolchildren can already create them by repeating the steps in the master classes. however, young children will need adult help.
Master class №1.

For this craft, you need to take 3 matchboxes, 2 sheets of double-sided green paper, a green bottle cap and a lollipop stick, a tape of black and red self-adhesive sheets.
We take a sheet of paper. We put two cardboard boxes on one and measure the length and width. We remove the boxes, and from the marked lines we retreat allowances of 1 cm.Then cut out the wrapper.
Ask your parents to put the lollipop stick in the lid.


We glue the resulting blanks of wrappers over the matchboxes. Two will go to the longest, and one to the short.

We cut out the caterpillars, in width a little more than the lateral narrow sides of the matchboxes.
Cut 6 circles out of black paper and stick them on the tracks.
From the red leaf we get a star to decorate the craft.
Master class number 2.
An option when you need to take one matchbox and a slightly larger box as a basis.
Also, as in the previous version, you need to wrap the boxes in green paper. Stick them on top of each other.
For tracks, take stiffeners from a cardboard box or corrugated paper dark shade.
For the muzzle, take a lollipop stick or lollipop. We wrap it with a green strip and insert it into the cab. It is fashionable to make a hole for the muzzle, or you can fix it with a thermal gun.

Master class №3.
Another idea of three matchboxes, buttons and paper.

We glue one box first. Then two. It turns out two blanks: one smaller than the other.


We put a smaller workpiece on a large one and fix it with glue.

Buttons of the same size are glued along the edges.

We take the lid from the soda and make a hole in it with a hot awl, into which we insert the lollipop stick.

Simulate caterpillars around the edges with black paper.

Master class №4.
Very simple idea tank. The main thing is to carefully repeat all steps of the photo instructions.

Cut out two strips 20 cm long and 2 cm wide from double-sided paper.

We glue them into rings.

We measure a piece of paper with dimensions of 12 * 7 cm.From two edges we mark 0.5 cm each.Then 2.5 cm from this line.


Now those lines, 0.5 cm wide, need to be bent away from you using a ruler. We bend all the lines in turn, alternately changing the side of the fold.

We make a second similar part of a smaller size 8 * 5 cm

We will make a muzzle.

You need to take a segment with dimensions of 4-8 cm. And mark the lines in length every centimeter. 


We bend it and glue it to the cockpit - a smaller part.

We take a large part and glue the cabin on it, tucking the allowances inward.

We take our "rings" and flatten them a little with our hands to get an oval. We glue the tracks in place.

It remains only to decorate the craft.
Master class №5.
The simplest craft for the little ones.

Cut out such parts and invite the child to glue the blanks in the right places.

Master class number 6.
Option for those who like to bother. Everything is more realistic here than in the previous version.

Place 4 empty matchboxes together. This will be the base of the tank.

Take one more box to the cockpit. We glue them with colored paper.

We pierce the cockpit with an awl or knitting needle and insert the muzzle.

We make a hole in the middle with an awl. We need it to make a rotating cockpit.

For the muzzle, you can take any thin stick. For example, from a lollipop or a skewer for kebabs. Scissors can be used to enlarge the hole if the tube does not fit.

We take the lid and make a hole in it with a hot awl.
Now we need a rod. It needs to be heated over fire and cooled against metal. This is necessary so that the plug is baked at the end. She will hold all our parts together. This work must be done by adults! The child can get burned!

We pass the rod through the cab and the lid.

We pass it through the base with caterpillars.

Cut five strips with a width of 1.5 cm out of dark paper. From 4 of them we make an "accordion" and glue them onto the tracks. Cut out the circles from the rest and glue them to the end of the base.
Master class number 7.
Paper and sleeve option. Very simple and fast craft. However, it looks very dignified!

Paint the upper edges of the bushings dark.

We fix them together with masking tape.

We take thick paper and decorate the place of the tape.

From silvery corrugated cardboard we measure two strips, 2 cm wide and a length corresponding to the width of the tracks. We glue the cardboard to the right places on the sides.

We turn the box out of thick paper without side walls.

Decorate with the same color of the sheet.

Putting the parts together in one craft.

Let's make a muzzle out of a cocktail tube. Let's wrap it up.

We make a hole in the cockpit and check that the tube goes into it and does not fall out.

Insert the muzzle and decorate the tank.

Master class number 8.
Another simple and easy idea for kids.

Here is a diagram with dimensions. Transfer it to A4 sheet and cut out all the details. Bend all the blanks along the fold line.

Such caterpillar parts need two things.

Glue black circles on the front. Bent allowances are used for gluing with other parts of the craft.

We glue the ends of the tracks with black stripes. Here's what happens.

We take a base rectangle and glue it, connecting the finished parts of the tank.

This is how the blank looks like from the front side.

Cut out the cabin and folded it along the indicated lines, alternating the side of the fold. 
We make a hole in it and decorate the back of the cabin with a star.
We glue it to the base.

Roll up the muzzle and insert it into the hole.

The craft is ready. You can make an imitation of the Eternal Flame or add orders to it. You will find a layout of the order at the end of this article.
Origami Paper Tank - Step-by-Step Instructions for Beginners
Now a section for those who love origami technique. Before you will be 5 detailed step-by-step diagrams.
And we will start with this version called "Abrams".

We take the spread of the notebook. Collectively, this is A4 size. We fold it along the fold, then in half and cut it. We bend one of the parts diagonally to the middle. Bend the part along the marked lines so that a triangle is formed from the edge, as in the photo.


It turns out such a model.

Another version of a hand-folded tank.


Another diagram with detailed steps and indicated lines.

Option itself simple product origami.

A diagram for those who are just starting to master the basics of this technique. The craft is made from one sheet.

Having mastered this technique, such beauty is obtained.


These tank variants can also be used for gifts and crafts for themed holidays.
Master class made of cardboard
Paperboard allows for durable crafts. They will not bend as quickly as the previous ones. And you can even play with them.
Here are two master classes.
First option.

Have to take corrugated cardboard, it is sold in any stationery store. Or remove the top layer from the cardboard box, exposing the stiffeners.
We make round rolls from thin strips.

We connect them with a rectangular base.

We twist the cabin on top.

We make a muzzle and decorate the craft with flags.

A similar beauty is made from cardboard.


Option 2.


Blue ribbons will be used for roller wheels, cab and decoration. The green ones are for the caterpillars themselves.

We roll the tracks from 4 spherical rolls. We take two strips of the same size. The next two need to be taken three centimeters less.

We tie them with tape to hold the rolls together.

We make the basis for the cab and tracks.

So that they do not turn around, we glue them with PVA glue.

We make the remaining details.

Whole compositions are created and sent to exhibitions.

I also suggest watching a video in which the creation of a tank is shown step by step.
All models can be changed to your liking.
Ideas for tanks that shoot
And now you have three machine ideas that are captured at the stage of the shots. Of course, these are comic models. children's creativity... A pompom made of red threads, tinsel or toothpicks can "fly" from the muzzle.

As we can see, circles and hearts of red paper were glued to the toothpicks, which imitate the speed and speed of the shot.

Such funny idea with hearts.

Pay attention to the crafts themselves. They can inspire you to create wonderful compositions.
Tanks that can be printed, cut, glued
You will now have a lot of cutout templates in front of you. They need to be printed on thick paper or photo paper. Then cut out all the details along the contours and glue them.

The whole composition: a tank on a pedestal.

The following diagram with assembly instructions.

The next sketch is simple and quick to assemble.

Tank made of paper T-34
When assembled, it looks like this.

You need to print these diagrams.


Now detailed diagram assembly.


Tank T-90
For the T-90, this scheme is suitable.


Assembly instructions.


Other notable tanks
Comic idea of a tank with a diagram.


Model of the Second World War.

The next model is the M-36.

T-40 car.

Schematic machine MK1.

Another option.

There are also modern models.

Izvesny KV-1.

Making ISU-152.

Model SU-100.


With the proper level of care and attention, you can build pretty realistic cars.
Tank coloring pages
Coloring books and templates can be useful for children for applications and postcards. I give a small selection.


Remember, you promised to give a medal with a tank? So there she is.

Create with pleasure with your children, explaining what a great deed our ancestors did, bringing victory to the USSR!
Paper tank ideas
And in conclusion, a small selection of ready-made handicrafts made by hand. Someone creates completely independently, while others are helped by their parents.
Take the sleeve idea for inspiration.

Or the idea of a square cockpit.

Gift option made of corrugated paper.


Tank made of round parts.


A similar model was made above from green cardboard.

A quick DIY idea.


Passionate people create life-size crafts from cardboard and even plywood.


How do you like the selection? I am sure that older students and younger preschoolers... Also show your ideas to dads, maybe they will also be inspired and help children in creating crafts.
Tweet
Tell VK
We will devote this lesson of homemade toys to a military theme. Many boys, as future defenders of the fatherland, are interested in military equipment. So you and I will now make a model of the tank. The originality of this model is that it is made of thick cardboard according to templates. In order to assemble this model of the tank, prepare the following: scissors and a cutting knife, an ordinary drawing ruler, medical or cosmetic tweezers, a set of brushes for glue and watercolors, colored pencils and simple toothpicks.
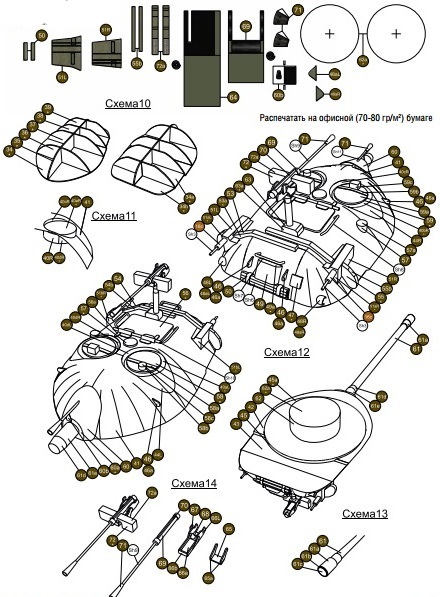
Print the template of the tank model on a printer using thick matte A4 photo paper.

To assemble the tank, it is better to use not ordinary paper glue, but transparent glue "moment"
Before getting started, check out the following tips.
- Look carefully at all the drawings, and figure out where which part will be connected.
- Before cutting out any part, make the required hole in it.
- Cut out those parts that are needed at the moment, and put away those not glued into a separate one.
- To make the part bend better, use a ruler and a knife, or a toothpick, tracing them along the fold line.
- First wind all cylindrical parts on cylindrical objects of suitable diameter so that they retain the desired shape.
- Before gluing the parts, paint over their ends.
Tank assembly diagram.

We will assemble the tank model as follows.
Cut out part 1 of the hull and glue it, after making a hole for inserting the tower. In the body part, cut lines in the indicated places. We glue the bottom to the body of the tank at the very last moment, with an overlap to the rear wall. Next, we cut out part 2 and also make all the necessary cuts in it at the indicated marks. We give a triangular shape in the section of this part and glue it.
We glue the side strips directly to the base of the part - this will be an imitation of armor. Now part 2 can be glued to part 1. parts 3, 6 a and 6 b will first be glued on to give them volume and also glue to the body. Then we cut out part 4, glue it and glue it butt to part 1. We also cut out part 5, giving it the necessary shape and bending the upper part, glue it to the body. Wing parts 7 L and 7 R need to be folded in half and glued together. Part of the rear wings must be rounded and, bending slightly upward, the petals, on which the structure of the armor is drawn, should be glued to the tank hull.
Next, we will deal with the chassis of the tank.
Parts 9L and 9R will cut out and, making cuts in the right places, glue them. In the track section, which is at the top of the tape, we will make three slots. The track strap is butt-attached to the sidewall. Now we will cut out the parts designated by the numbers 10L and 10R, make three rectangular slots in each of them and bend the petals inward. To do everything correctly, constantly review the tank assembly diagram. We glue both parts ten to parts nine: the right one to the right, the left one to the left, and glue the resulting nodes to the body.
Making the first turret of the tank.
Hatches 11a and, having cut them out, glue them onto part 11. To make the hatches look curved, roll up parts 11 into a cylinder and glue them. Let's make holes for observation devices in part 13. Glue to part 11, parts 12 and 13. glue part 14 by making a hole in it. Glue the assembled gun mask end-to-end to the tank turret. Next, roll up part 15 into a roll and glue it back to back to the gun mask. Now it remains to insert into hole 16, having previously twisted and glued it.

Now we will make the second turret of the tank.
You need 17, 18, and 19. To make a hole in it for the axle - this is the base of the tower. Glue the hatches 21a again first on the cardboard, and then to the part 21. Then, after giving the part 21 the required shape and making a hole for the axle, we glue it to the part 20. Install the resulting tower on the base and glue the observation device 15 and 23, hatch 24, and let's collect the mask of the gun 22. With a thin needle in the mask 3 we make holes for the machine gun and the cannon. Glue this mask to the tank's turret and assemble the cannon using parts 25, 26, 27. Glue the cannon and machine gun into the holes of the mask. Fold the headlight 8 in half and, gluing it together, attach it to the body of the tank end-to-end. We put one of the made towers on the axle made of a toothpick and install it on the resulting tank. In general, now all the work on the tank is finished.
Once again, I remind you that when collecting the parts of the tank, constantly focus on, so as not to make mistakes even in the smallest details.
We also recommend
 Why doesn't the husband want a second child?
 Long bob with bangs on fine hair
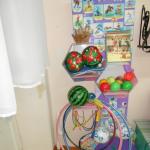 Features of the design of thematic corners in the younger group
 Selection of makeup for your type of appearance How to choose your makeup
 Dyufaston or Utrozhestan - which is better?
 Face contouring (cheekbones): How to make cheekbones with makeup How to highlight cheekbones in makeup