Flowers from watermelon seeds. Master class on making crafts from natural material "Stork
Sometimes, in order to decorate the house or entertain a child with creativity, it is enough to look into the kitchen cabinet where the groceries are stored. Indeed, from cereals, beans, spices, grains and seeds, you can make decor in the style of eco or rustic, as well as educational children's crafts. The main thing is to show your imagination and allocate some free time. In this material you will find 10 ideas and step-by-step instructions for making crafts from cereals with your own hands for children and adults, as well as a master class on coloring them with food dyes.
Idea 1. Topiary for table setting or interior decoration
Beans bright colors- This is an excellent material for decorating a crown or topiary pot. For example, you can create such a decorative tree from green peas for spring home decoration or table setting for Easter.
Materials:
- 1 package of green peas (chopped and polished);
- Styrofoam ball (sold in craft stores);
- 1 package of dry moss (any other material for decorating the "soil" of topiary is also suitable);
- 1 clay pot, medium;
- PVA glue and thermal glue in the gun;
- Brush;
- 1 wooden stick, skewer or pencil (this will be the trunk of the topiary);
- Green acrylic paint (for painting the ball to match the peas);
- Paints of the desired colors for the decoration of the pot (optional);
- Styrofoam, floral foam, or any solidifying mixture like cement or alabaster.
Master Class:
Step 1. If you are not satisfied with the look of your pot and / or trunk, paint it and let it dry.
Step 2. While the pot dries, paint one half foam ball match the beans and let dry. When this happens, paint the other half of the ball and leave it to dry as well.

Step 3. When the ball is completely dry, cut a hole in it for a barrel 2-3 cm deep using an awl or knife.
Step 4. Start decorating it with peas. To do this, put it on a plate, use a brush to apply PVA glue to a small area and sprinkle peas on it generously.

Let this area dry a little and start sprinkling the next part of the ball. Continue the procedure until the entire ball is overgrown green peas and then leave it to dry overnight.
Step 5. When the resulting crown is dry, work on the gaps. To do this, you need to glue the voids and sprinkle them with cereals again.

Step 6. Now insert the barrel into the ball, previously pouring a drop of thermal glue into the hole made earlier. To keep the barrel stronger, you can lay pieces of paper around it and fill the hole with glue to the very top. Keep in mind that without the paper, the glue will melt the foam and deepen the hole too much. Finally, when the trunk is secured, paint the area around it with peas (if necessary).

Step 7. Go about creating a fixing "soil" in the pot. In this workshop, floral foam was used to fix the tree. If you are also using foam or polystyrene, then you only need to adjust its dimensions to the pot so that the tree stands level and firm. Otherwise, you can dilute any fixing compound according to the manufacturer's instructions.

Step 8. When the base of the topiary is ready, you just have to decorate it with moss, sisal, the same peas or any other cereal.

Idea 2. Panel or picture from cereals
Groats, beans, grains and seeds are the most different colors, which means that they can "paint" a picture or add mosaic panel... Depending on your idea and artistic skills, the drawing can be more detailed or very sketchy.
The following selection of photos presents examples of children's crafts from cereals and pasta in the form of applications.


In the next video, you can see the process of making cereal appliques together with your baby.
And here is a selection of examples of panels and pictures from cereals that you can make with your own hands to decorate the interior (scroll the photo to the right).


Materials:
- Various colored beans, cereals, seeds, pasta;
- PVA glue and glue brush;
- Thick and strong cardboard (for children's applications), a piece of plywood or canvas on a stretcher (for "adult" paintings);
- Drawing sketch;
- Paints and brushes.
Master Class:
- Paint the background of the painting in the desired color.
- Choose cereals that match the color of the selected pattern and sort them into plates.
- Draw by hand or transfer to cardboard, for example, through carbon paper or using a ready-made / homemade stencil.

- Apply a thin layer of glue to a small area of the design, and immediately sprinkle on it the grain of the color that matches the image in this area. When the area dries up a little, remove the excess cereal and continue to "paint" the picture in parts so that the glue does not have time to dry.
- Remember that PVA glue dries completely in about 2 hours.
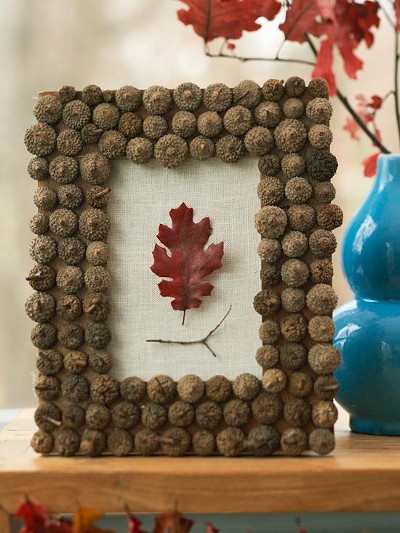
Idea 3. Frame decor
With the help of cereals, you can transform a simple frame for a photo, painting or mirror. You can fold the colored bean ornament or simply emboss the surface by sprinkling it with cereals.


If desired, the frame itself and the rump can be spray painted.

By the same principle, you can decorate not only the frame with cereals, but also the interior letter as in the photo below. To make such a letter were used: beans, purple paint in a spray can and a blank in the shape of the letter B, cut out of plywood with a jigsaw.

And here is the idea of a cereal craft for children - a magnet frame for a refrigerator with an ornament of colored beans.

To make such a cute photo frame, you just need to cut out a blank frame from cardboard, decorate it with colored beans according to the mosaic principle, and then glue a couple of magnets on the wrong side.

Idea 4. Decor for vases and bottles
Cereals can be used as decorative filler in glass vases and bottles for candles, artificial flowers, twigs, dried flowers, makeup brushes and even knives. The following selection of photos shows examples of candlesticks in autumn colors.


This slider presents photo examples of decorative filling of vases for flowers and plants with cereals.

Cereals and beans can be filled not only in vases, but also in bottles.


And here are examples of the practical use of vases filled with cereals.


Glass for cosmetic brushes with colored rice filling
Here are some tips to help you create a beautiful composition:
- In order not to spend a kilogram of cereal on one candlestick, you need to put a glass in the center of the container, which will support the candle.
- You can use one type of cereal or several types of cereals and beans in contrasting colors to create a striped vase filling.
- To pour colored cereals into the bottle in layers, use a funnel or just paper rolled into a cone.

- Colored beans can be replaced with rice colored with food colors as in the photo below (see the master class at the end of the article).

Idea 5. Decorating Easter eggs
Fine grains, grains, spices, star pasta, seeds, and dried herbs can be used to decorate Easter eggs. You can simply apply PVA glue to the egg and roll it in grains or create some patterns according to the mosaic principle, having previously drawn a markup or sketch on the shell. Use stencils for more precise shapes and shapes.


Idea 6. Bird food in the form of figurines
Feeders in the form of cute figurines are a more original alternative to birdhouses.

It is so easy to make such crafts from cereals and seeds that kids will be able to cope with almost without the help of adults.

Materials:
- 3/4 cup bird food
- 1 sachet of gelatin;
- 1/4 cup water
- Cookie cutters (large and medium);
- Twine or tape;
- Straw;
- Baking paper;
- Large bowl;
- Pan;
- A spoon.
Master Class:
Step 1. In a saucepan, bring water to a boil and add gelatin. Keep the resulting mixture over medium heat for about 5 minutes (until the gelatin is completely dissolved), stirring constantly with a spoon.
Step 2. Remove mixture from heat and let cool for about 1 minute. In a large bowl, combine the gelatin and poultry food (3/4 cup or more) with a spoon or hands. This work can be just entrusted to children.
Step 3. Place a piece of baking paper on the table and place the cookie cutters on top of it. Fill the molds halfway with the poultry food and gelatin mixture and tamp it down.

Step 4. Make loops from the twine suitable length and slightly deepen their knots inside each mold with the mixture.

Step 5. Fill the molds to the very top.
Step 6. Place all figurines in the freezer for 20 minutes and then let them dry overnight or a full day.
Step 7. Remove the figures from the molds, hang them in the trees and wait for the first guests!
Idea 7. Napkin rings
Decorate with the cereal and seed mosaic tubules from toilet paper to create adorable napkin rings perfect for fall or country table setting.

Materials:
- Variety of cereals, seeds, beans and spices;
- Toilet paper tube;
- PVA glue;
- Stationery knife;
- Acrylic paints;
- Brush.
Instructions:
Step 1. Cut the toilet paper tube into three equal-width sections (about 4 cm).
Step 2. Paint each section (inside and outside) in some neutral or contrasting color. You will get ring blanks.
Step 3. Prepare and sort the various seeds, grains, beans and spices.
Step 4. Apply a thick layer of glue to a small area of the ring and sprinkle or point grains and seeds on it. Wait until the glue in this area dries and only then proceed to the processing of the next area. Continue these steps until the entire surface of the ring is formed, and then leave it to dry.
Step 5. If you are afraid that the seeds will peel and crumble, additionally treat them with a thick layer of glue, covering even the gaps between the seeds.
Idea 8. Decorative balls
From cereals and foam blanks you can make decorative balls that will look spectacular on a platter or in a glass vase. Such a composition will decorate any dining table, console or coffee table.


Materials:
- Black spray paint;
- Small diameter foam balls (or floral foam balls);
- PVA glue;
- Cereals such as split peas, red beans, white beans, black beans, and lentils.
Instructions:
- Paint foam ball black or cereal and let dry.
- Apply glue to a small part of the ball with a brush and then sprinkle the beans or glue them pointwise. Let the treated area dry before proceeding with the next area. Continue these steps until the whole ball is covered with beans.
- Make some of these balls and place them on a nice dish. If desired, complement the composition with candles, dried branches, pine cones or any other decor.


By the way, if instead of balls you take foam eggs, and paint the cereals in pastel colors, then you will get original Easter decorations as in the photo below.


Idea 9. Decorative wreath
From cereals and a base ring, you can make a beautiful wreath for a seasonal or holiday decoration at home.

Materials:
- Split green peas;
- Two straw wreaths with a diameter of 20 cm (can be replaced with a foam blank);
- PVA glue or glue gun with a large supply of glue sticks;
- Brush;
- Baking sheet;
- Foil;
- Leg-split.
Master Class:
- If you are using a foam base, then first paint it with acrylic paint to match the cereal and let it dry completely.
- Cover a baking sheet with foil and fill with peas.
- Apply thermal glue or PVA glue to a small area inside wreath, then sprinkle cereals on it, brush off the excess and wait until the glue dries.
- Decorate the next area in the same way. Continue until the entire inside of the wreath is covered with peas as shown in the photo below.

- Glue a small area of the outer side of the wreath, immediately roll it in a baking sheet with peas, rotating slightly. Wait until the glue dries a little and start working on the next section until the entire outer side of the wreath is covered with peas. Then work on the voids, filling them with dotted glue and grits.

- Decorate the back of the wreath in the same way, and then its sides.
- When the entire wreath is covered with peas, and the glue is dry, additionally brush with PVA glue over the rump, filling in the glue, including the gaps between the peas.
- Wait for the wreath to dry completely, then tie it with ribbon or twine and finally hang it over your front door, window, or dining table.

If you wish, you can decorate the wreath with dried flowers, twigs, artificial flowers and berries, or an applique made from cereals of a contrasting color, for example, as shown in the photo below.

Idea 10. Coffee or serving table

Materials:
- Large photo frame;
- Bar stool, the seat of which is slightly smaller in width than the frame;
- Drill and drill;
- 4 small screws;
- Primer;
- Dye;
- Paint brush and glue brush;
- PVA glue;
- Epoxy resin (in this case it took less than 1 liter);
- Cereals;
- Floor protection film.
Master Class:
Step 1. Separate the bezel from the native back panel.
Step 2. Cut a frame-sized panel from a thin piece of chipboard or plywood and glue it to the frame itself using liquid nails or wood glue. At this stage, it is advisable to seal the joints, for example, with wood putty. This is necessary so that in the future the epoxy resin does not seep through the holes between the frame and the panel.
Step 3. Place the frame on the stool and secure it with 4 screws with a drill (in the middle of the frame). You will end up with a table-like structure.

Step 4. Place a floor protection film on the floor. Cover the table with a primer, wait for it to dry completely and paint with 2-3 coats of paint. Keep in mind that each coat of paint must be allowed to dry before applying the next coat.

Step 5. Draw several sections in the frame niche if you want to decorate the table in the same way as in this master class, or draw a sketch of the picture / markup according to your idea.

Step 6. Using a brush, apply a thick layer of PVA glue to the panel in the niche in a certain section and spread the cereal evenly there. Make sure that the cereal layer does not protrude above the frame. Continue to decorate the panel with groats in accordance with the markup.


Step 7. If you want to exclude the movement of grains when pouring resin, additionally cover the entire composition in the frame with a thick layer of PVA glue and leave it to dry for about 24 hours.

Step 8. Now is the time to pour the resin into the framed rump. Make sure the table is on a level surface. Carefully following the manufacturer's instructions, mix the components of the resin, and then slowly pour it over the entire composition in one layer. Remove any bubbles that have formed by blowing on them through a straw. Leave the table to dry overnight.
Step 9. When the first layer of resin is dry, carefully pour the rump with the second layer, making sure that it does not go beyond the borders of the frame protrusions. Let the resin dry for another 24 hours and enjoy your new table.

Master class: how to paint cereals and seeds with food colors
Any light-colored grains like rice, white beans, or pumpkin seeds can be colored with food coloring.
Materials:
- Zip-lock or simple packages plastic bags that will withstand a little shake;
- Rubbing alcohol or vinegar;
- Liquid food coloring;
- Groats;
- Measuring cup;
- A baking sheet or paper plates for drying colored cereals.
Instructions:
To paint one serving of cereal in one color, you need to do the following:
- Fill the bag with a couple of handfuls of cereal.
- Pour 1-2 tbsp into it. l alcohol or 3-4 tbsp. l vinegar.
- Add a couple of trickles of food coloring.
- Close the bag, remember several times and shake the bag so that the paint covers all the grains.
- Place the dyed cereals on plates covered with napkins and let dry.

Working with small objects is very rewarding for children. Making crafts from seeds, the child develops not only attentiveness and dexterity, but also fine motor skills and perseverance.
Paintings and applications
Sunflower, watermelon or pumpkin seeds are suitable for crafts that children are working on of different ages, but it is necessary to correctly distribute the load.
For the smallest, the best option would be applications, which are made quite easily and quickly. The main thing is that the baby should work under the supervision of adults. Do not forget that any seeds are small, so it is possible that the child will accidentally choke on them.
From watermelon seeds that can be collected for summer period, you can get a wonderful application in the form of a sunflower. To do this, you need to take a sheet of colored cardboard, yellow paper, scissors, glue and a large number of seeds. Next, petals are cut out of the paper. They should be glued in a circle in the center of the cardboard sheet. The middle is abundantly greased with glue, and then seeds are laid out in this area. To make the applique look more voluminous, you can stick the seeds in two layers. But first you need to wait until the first dries.
Another option for creating an applique with a sunflower with your own hands involves the use of pumpkin seeds. Here, too, you will need cardboard and plasticine with glue. To begin with, the child must roll a ball out of black plasticine, and then make a flat circle out of it. It should be glued to the cardboard. This will be the middle of the sunflower. Next, you should take the pumpkin seeds and glue them around one by one. These will be a kind of petals. Additionally, you can attach stems from twigs or colored paper. So, in just a few minutes, the baby can independently make an interesting application and develop abilities.
Not only flowers, but also animals can act as the main objects of the picture, and you can also make whole landscapes.
For example, you can make an applique with a hedgehog from ordinary sunflower seeds. Here, seeds are pasted over that part of the picture where the animal should have thorns.
Seed hedgehog
Volumetric autumn crafts from seeds can also be made by children of different ages. When sunflower seeds are used, a wonderful hedgehog can be made. An apple, pear or plasticine is usually chosen as a base. This will be the body of the hedgehog. It should be flat and stable.
The whole process is to insert seeds into the back of the future hedgehog. This must be done so that the improvised thorns do not fall out. They should be placed close enough to each other to make the craft look more realistic.
After all the thorn seeds are placed in their places, it is necessary to attach the eyes of the hedgehog from plasticine or black peppercorns. Also, the craft should be placed on green cardboard and supplemented with various accessories in the form of mushrooms, apples, plasticine leaves and colored paper.
Box of watermelon seeds
To make such a craft, you need to use a coffee jar, cardboard, glue, paint and a large amount of watermelon seeds. To begin with, a jar is taken and thoroughly washed from product residues. Its outer surface must be degreased in order for the decor to hold better. After that, you need to make a blank for the lid. To do this, take a cardboard and draw a circle on it using a jar.
After all the blanks are completed, it is necessary to take carefully washed and dried seeds. Then they are carefully glued to the surface of the jar and cardboard lid. Seeds must be placed so that they are as close to each other as possible.
After the glue has completely dried, the prepared box must be carefully painted. For this, you can use any paints, but it is best to take acrylic paints, as they will not leave marks while using the box. The craft can be painted in gold, silver, blue, green or any other color. If you wish, you can paint each seed differently to create a very colorful box. Such a product can be an excellent example for an exhibition in a school or kindergarten. But also a box made of watermelon seeds will be a wonderful gift for a mother or beloved teacher.
Pumpkin seed chamomile
This pumpkin seed craft for kids takes more time than previous options. Here you need high-quality glue that can securely hold all the elements together. To create voluminous chamomiles from seeds, you must use a large amount natural material... Seeds must be thoroughly washed and dried. After that, you can get to work.
First you need to make circles from yellow plasticine. They should be fairly thick, about one centimeter high. This will be the middle of the chamomile. Such blanks need to be made exactly as many flowers are planned to be made.
Next, you can start working on the pumpkin seed petals. The first layer is firmly stuck into the plasticine base. A flower will hold on to it. The remaining layers must be carefully glued to the first row of petals. For open daisies, three layers will be enough. If you plan to make the flower a bud, you need to glue the petals until they converge at the top.
After the main part of the workpiece is ready, you can attach the stems. They can be an ordinary green cocktail tube. The result will be a beautiful bouquet that you can simply tie with a ribbon or put in a vase.
It is worth noting that a vase, if desired, can also be made using seeds.
To do this, take a plastic cup and paste over it with watermelon seeds. After that, the vase is painted with acrylic paint. Inside you need to place a piece of plasticine, which will hold the flowers and prevent the vase from overturning.
Flower panel as a gift to mom from pumpkin seeds with your own hands. Step-by-step instruction with photo
Handicraft workshop for students primary school"Flowers for Mom" (picture of pumpkin seeds)
author Kachkin Bogdan 8 years old
Supervisor: Kachkina Ekaterina Vladimirovna, educator of MDOU № 4 "Nezabudochka", p. Blast furnace, Trans-Baikal Territory.
The master class is designed for older children preschool age, schoolchildren, teachers and parents.
Appointment: this painting can be used as a gift for loved one mom or grandmother, sister or girlfriend, for your favorite teacher. As a rule, handmade gifts are priceless. In addition to being a gift, the picture will complement the interior, at home or in a group in a kindergarten.
Target: To educate in children the desire to engage in artistic creation.
Tasks:
-to cultivate patience and perseverance,
-develop creative thinking,
-develop fine motor skills of the hands.
To work you will need:
-sheet of cardboard,
- PVA glue or glue - pencil,
-water,
- gouache or watercolor paints,
-simple pencil,
-brush,
- pumpkin seeds,
- varnish.

Step by step process making crafts:
The process of making crafts itself takes place in two stages.
Stage I.
1. Draw flowers on a sheet of cardboard with a simple pencil. Photo 1.
1

2. Now paint the picture with paints. We take any paints.
We paint so that after the seeds are glued there are no white gaps. Photo 2
2

The drawing must be dried well, since in the future you will have to work with glue.
The second stage can be crossed only when it dries up.
Stage II.
3. Begin to glue the pumpkin seeds.
Better to start with flowers. Photo 3
3

4. After the flowers have been pasted over, they need to be painted and dried. Photo 4
4

5. Then we glue the leaves. Photo 5
5

6. Coloring. Please note that we used two shades of green, so that we could see each leaf, and not a solid green spot.
Dry.photo 6
6

7. Paste over the pot. Photo 7

8. We paint, dry. Photo 8
8

9.Glue the background. Photo 9
9

10. Coloring, drying. Photo 10
10

11. If you wish, you can varnish the painting to give it a shine. We used a simple hairspray. Photo 11
11

12. Let the painting dry well and can be placed in a frame.
12

The gift is ready !!!

Since this work was done by a child, it took 5 days in time.
***
Today we picked simple flowers for mom,
Relatives, earthly beauty.
And with this bouquet we go to mom:
Let the house be filled with joyful light.
Dear, accept hello from summer,
There is no mother in the world more dear to us.
In a smile flashed, shining lips,
And holy eyes gleamed tenderly.
The bunny's smiles suddenly jumped over me:
"My sweet boy, thank you !!!"
(by Vladimir Privedentsev)
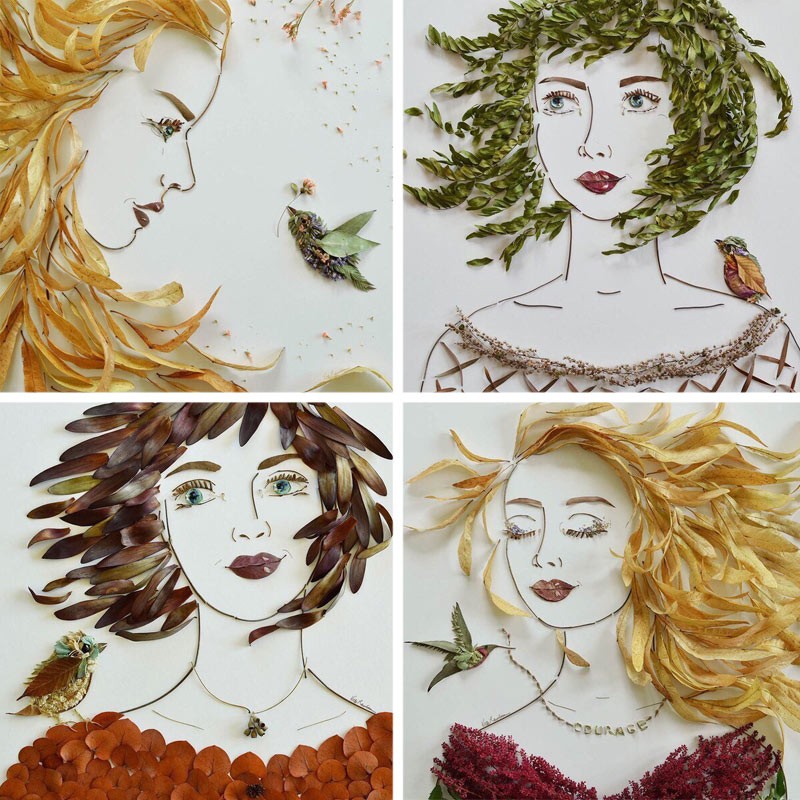
Natalia Vladimirovna Zhulina
At the end of summer, it has become a tradition in our kindergarten to hold an exhibition at the end of summer crafts from natural material... In this I decided to make a picture of different seeds, groats and branches.
Equipment and material:
1. White sheet of paper.
2. Background paper.
4. Acrylic varnish, brush.
5. A simple pencil.
6. Scissors.
7. Seeds of pumpkin, sunflower.
8. Buckwheat, rice groats.
9. Branches, straw, moss.
10. Red, black gouache.
11. Pistachio shell.

Draw a bird pattern on a white sheet.

Cut out.

We take the background sheet and draw the contour of the bird using the template.


We apply glue to the image, and we begin to lay out the head and body of the bird from the pumpkin seeds.

We make the wing of a bird from sunflower seeds.

Buckwheat legs.

We make a beak from rice cereal and paint it with red gouache, we make an eye from a pistachio shell, paint it with black gouache, and for an expressive look we apply a drop of white gouache.
From twigs, straw and moss making a nest, we wait when everything dries up, sticks,
then we cover everything with varnish, wait for it to dry and insert it into the frame.
The picture is ready.
The stork lived with us in the summer,
And now he is visiting somewhere.
For this work, I received first place and was awarded a diploma.
I would be glad if this one master class - useful when working with children.
Thank you for your attention.
Related publications:
Master - class "Coat of arms of Irkutsk province" from natural material. I bring to your attention step by step master class for the manufacture of the coat of arms.
Autumn provides many natural materials for adults and children's creativity- these are chestnuts, acorns. Pine trees are especially popular.
Dear Colleagues! We invite your attention to a master class on making play material for children of primary preschool age.
Today, children rarely walk on the ground. To prevent the development of flat feet, the surface on which we walk barefoot must be uneven.
In addition to building material, paper, in kindergarten for construction is also used waste material... When teaching children to design.
You often come across the question "what can be done with a child in a nursery group so that you can show it to the competition?" Colleagues, a lot.
Crafts made from acorns are a simple and fascinating type of creativity and represent a rich field for imagination. Acorns are easy to color.
Every year, nature gives us a lot of natural materials, suitable for creativity, completely free of charge. The process of creating with your own hands develops the artistic taste, thinking, memory of the child, fosters perseverance. But the most important thing is that you can have fun and usefully spend time with friends, delighting yourself and others with crafts.
Preparation of natural materials for their further use
Nature is the best artist, she creates such natural materials that in skillful hands turn into works of art!

Plant materials
Chestnuts
Chestnut fruits have a bright brown color and a shiny surface, so they make excellent DIY crafts from natural material. The shell of fresh chestnut is thin, easily pierced with an awl. Chestnuts are a fertile material for working with young children themselves. Many different pupae can be made,.


It is best to store in a cool place in boxes.
Acorns
Oak fruits ripen in autumn, in September-October. collected in various shapes and sizes.


At the same time, their cups (plyus) are also collected, on which they are held. Cocks are very often used separately from the acorn, as an independent natural material for various crafts.

Puffs from acorns and balls made of wool
How to dump even balls of wool, see the video Olga Skibina:

Acorn puffs and Christmas bells


You can store them for a very long time, after thoroughly washing and drying them. But why just store stones like that when the whole family can play with them fun?)


Another way to apply an image to river or sea stones watch the video from You can do it craft... You will be surprised how easy it is!
Seashells
You can collect shells on the banks of rivers, seas, lakes while relaxing with children. Many of them are original in appearance, in shape - oval, in the form of a scallop, elongated, etc.
Boil them for a few minutes to free them from living organisms. The shells are washed with a small brush (you can use a toothbrush), after which they are dried, sorted by type and size. Stored at any temperature.
You can also clean the shells in a solution of whiteness and water at the rate of 1: 1. The top layer will disappear after a while and the shell remains with a beautiful shiny top.
Animal figurines are made from large shells.
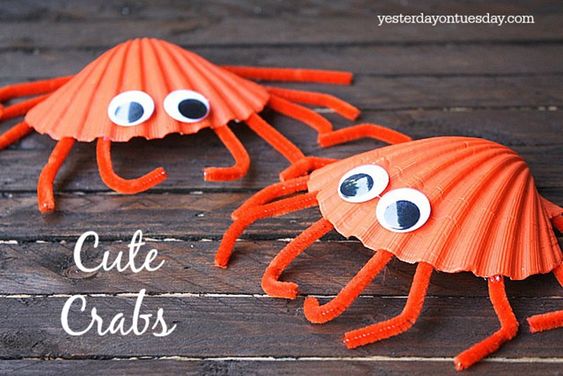


Small shells make beautiful applications, garlands:

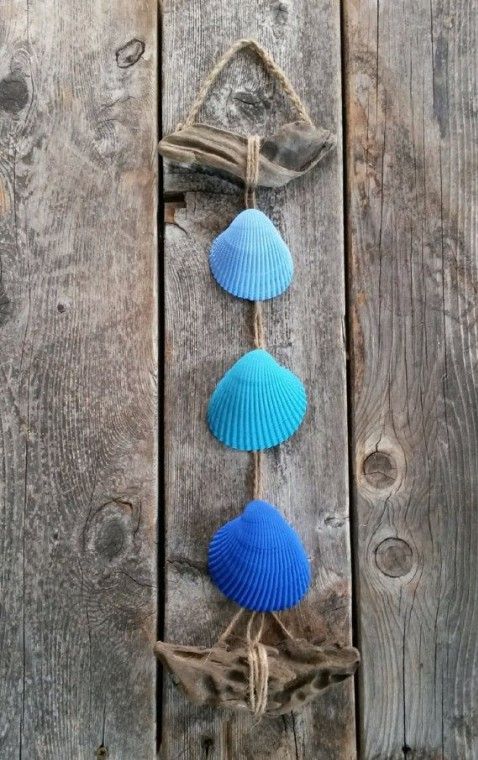
Shells can be used not only as the main material, but also as additional decor (bird wings, dog ears, flower petals, etc.)


Sand
A very accessible material that can be collected in any sandbox. It differs in structure. Before work, it must be well rinsed and dried. And then you can use it as a decoration in your works:


Storage rules for natural materials
DIY crafts from natural material will be perfect if, after collecting, drying, pre-processing, you properly store these natural gifts. To do this, you must adhere to certain rules.
- A dark, cool and well-ventilated area is the best place for storing natural materials.
- You can buy plastic containers for storing every type of material; use cardboard boxes for shoes, tea, sweets; take regular glass jars with a screw top. For seeds, as well as for beads, it is better to have a container with many compartments.
- Dried flowers are fragile, break easily, so they are placed in a tight box or container. The petals are kept separate from the flowers. Flowers with a stem can be stored in a vase.
- Prepared leaves are brittle too. You can store them in large books. Also, for safety, put them in signed candy boxes, grab a little with tape so that they do not accidentally open.
- The shells are placed in glass jars or plastic containers with a wide neck to prevent crumbling.
Additional tools for crafts made from natural materials
To create beautiful craft from natural materials, you will need additional tools and materials.

It can be:
- colored paper;
- cardboard;
- trimming the skin;
- scraps of fabric;
- bird feathers;
- Styrofoam;
- plasticine;
- wire;
- PVA glue, "Moment";
- gouache;
- stain;
- varnish, etc.
Paper very often used as an addition to natural materials. Children, bending, gluing it, make the work much more interesting.
Plasticine fasten separate parts of simple toys at the initial stage of work. It is not very durable, but it is often used as a supplement in kindergarten and elementary school.

From wire most often they make the frame of the toy, the connection of its parts. Copper wire diameter 0.29-0.35mm - soft, flexible and durable - most comfortable. And for the frame, a wire of a larger diameter is used - 1-1.5 mm.
Threads it is better to take thick, multi-colored (No. 10).
Glue it is better to take white PVA, BF, etc. However, in kindergarten it is better to use PVA glue.
They also use foil, pebbles, cherry bones, bristles.
It is best to store additional material in a small drawer with compartments for each type of material.
The use of additional material depends on the intention, the skill of the children, the degree of development of the imagination! Offer your options, but rely more on children's intuition and desire.

It is also additionally necessary to have certain tools for making crafts from natural material:
- art scissors;
- awl;
- jigsaw;
- tweezers;
- pliers and wire cutters;
- sewing needles;
- brushes for glue and paints;
- cotton cloth for wiping up glue residues.
Scissors for children should be with blunt ends, small, with rings comfortable for a child's hand.
Awl you need to take from a durable material with a handle length of about 6 cm, a diameter of about 2 cm, the piercing part - 3.5 cm
Needle I need a large sewing machine. It is imperative to keep it in the needle case with the thread threaded into it.
Attention! Pliers, pliers, drill are used only by an adult!
To draw the contour of the cut out part, you need a simple pencil... For example, dresses, hats for a doll, etc. It is better to take a soft pencil (2M).
Brushes(softer for drawing, harder for glue). Better to buy squirrel brushes (no. 4 and 6). For glue, take a brush with a hard bristle.
Stack- a tool required for surface treatment made of clay or plasticine. The length of the stack for children is about 12 cm. You can make the stack yourself from a worn-out brush: round it on one side, and sharpen it on the other.
Crafts from natural material for kindergarten
Kids love it when in their hands chestnuts and plasticine turn into toys with which to play. Crafts from natural material for kindergarten not very difficult, so any child can cope with the help of an adult. Sometimes they are made from fruits and vegetables, but most often they are applications from leaves and animals from cones and acorns.
Crafts from leaves and maple "helicopters"
The easiest and most affordable job, even for babies, is an applique made of leaves. If this is the first time you are doing a composition with your child, offer him a picture that will serve as a template. Do not rush to do everything yourself. Invite the kid to choose the leaves at will, so that the work turns out to be similar to the sample. This will develop your child's creativity.
Applique material:
- colorful leaves;
- dense sheet A-4;
- glue brushes;
- PVA glue;
- scissors;
- sample.
To make a simple composition, you need even dry leaves. Put them under the press or in a book. The material is ready in two days. Use scissors to cut out the appropriate pieces and lay them out on a piece of paper.
Now you can glue. The background and lower layers first, and then the finer details. For example, if you want to make an elephant, then first make the body and head from the leaves, and then glue the trunk, tail, legs. If there are not enough eyes, then they can be completed with a marker or made from tree seeds.

It is not necessary to do everything according to the template. You can come up with a picture yourself and create an original composition of leaves.


Use as a supplement colored paper, felt-tip pens, paints, so your applications will be even more interesting.
Along with leaves as a basis for crafts made of natural material for kindergarten, helicopters from maple are ideal. Just look at this miracle!

Maple Seed Fairy Wings

Maple helicopter dragonflies
Now you are convinced how beautiful and original appliqués from leaves can be. Use these ideas for leisure activities with your kids.
Simple master classes for creating children's crafts from acorns and cones
At the end of summer, acorns begin to ripen, and they make wonderful crafts from natural materials for kindergarten or school. They are well preserved, and on long autumn evenings, together with the children, you can do a pleasant and useful activity that develops the fine motor skills of the baby's hands, imagination and perseverance.
The most common acorn crafts are animals and various people. From toothpicks, matches, thin twigs, you can easily make legs, arms, horns and other small elements. An adult needs to help children poke holes in acorns.
For fastening small parts, you can use a glue gun, Super Moment glue, but only adults should do this. And for the guys, the safest way is to fasten the parts with plasticine.

Fly agarics from acorns are even easier to make! To paint acorns, you need to remove the caps from them, and after the paint has dried, glue them in place.


Acorns are very beautiful in themselves, and if they are also painted with acrylics or nail polish, then such crafts will decorate any home.

And from the hats painted with silver paint you can make original decoration on the Christmas tree. The process of creating such an eco-toy is quite simple: we stick it tightly on a foam ball (you can take an old christmas ball) acorn caps. And it sparkled with a new one.

We found another video for you, where Niki Junior
In addition to the "edible" handicrafts, kids can choose any one presented in this huge article "Cross"! We tried to choose the best and easy-to-implement ideas 🙂 Good luck and creative inspiration to everyone!
We also recommend
 Pregnancy and Funeral: Dispelling Myths Is It Possible for Pregnant Women to Funeral
 Can pregnant women go to funerals and what should they be afraid of?
 How much can pregnant women lift in the early stages
 Dress up games for girls with super heroes
 Prayer conspiracies from adenoids
 How to sew a dress and cape of Elsa from a cold heart with your own hands