We will need do-it-yourself hair clips. New Year's hair ornaments: a bright accent in a festive look
New Year Holidays“Just around the corner”, which means it's time to think about the New Year's outfit, as well as pick up accessories and decorations for it. Headbands and headbands are not suitable for all girls, they often just fly off their hair in the midst of festive matinee... The situation is the same with my daughter, so I made New Year's hairpins in the kanzashi style for her. I made hair clips from satin ribbon with a combination of blue brocade ribbon. These Kanzashi-style Christmas decorations can be attached to a hairdo, ponytails or braid. I also suggest that you familiarize yourself with my photo of MK for these hairpins.
Hairpins for the New Year from ribbons 4 (5) cm
To create one hair clip from ribbons with our own hands, we need the following consumables:
- Satin ribbon 5 cm wide and brocade ribbon 4 or 5 cm wide,
- Cabochon,
- Barrette,
- Felt patch with a diameter of about 4 cm,
- Instruments.
Let's make a three-layer sharp kanzashi petal. On the pink ribbon, apply brocade, then pink again. We do not cut the petal much, it should turn out to be as large as possible, so that later we can glue a small double petal into it. Having folded the petal, cut off the edge and melt it. Cut off the base and process over the fire.
We glue six triple petals together, as shown in the photo. Fold 6 small ones and glue them into large ones. I use Titan glue, you can also use Moment.
Let's prepare twigs with curls of brocade. Take a 4x4 cm segment, fold it into a sharp petal and cut it so that a straight, thin "stick" remains. Clamp the part with tweezers and melt it with fire, while the cut point is hot, twist the tape into a spiral with tweezers.
For one branch, 3 parts are required: 2 spirals: one wrapped to the left, the other wrapped to the right, as well as a straight part. We glue the blanks into a twig, the central part should be slightly higher than those that are placed on the sides, as shown in the photo. Let's make 2 small double sharp petals, glue them at the base and glue a twig with curls of brocade between them.
You will need 6 such blanks, we will glue them between the main large petals. We glue the middle.
Add round petals to the fold of a wide satin ribbon. We begin to fold it as for a sharp petal. Then we do 3 folds on one side and 3 folds on the other side. Cut off the rest of the tape.
On the reverse side, we also cut off the tape and melt it over the fire. You will need 6 such petals. We glue them between the twigs with curls. It remains to make the base. Take a circle of felt with a diameter of 4 cm, make two cuts in it so that you can insert a hairpin into them. Apply glue to the edge of the felt and glue it to the back of the decoration. Now you can insert the hairpin.
I hope my photo was clear and useful to you. If you have any questions, ask them in the comments, I will be happy to answer them.
A selection of video master classes on New Year's hairpins
I suggest watching a video of master classes on other hair clips from ribbons for the New Year, which you can do with your own hands at no special cost.
In the first master class, the author of Kseniya Ost proposes to make hairpins from sharp kanzashi petals, stylized as a herringbone. A simple and understandable master class for novice craftswomen, which will not be difficult to master. Satin and brocade ribbons were used in the master class.
In a video tutorial from the author White Lily Handmade (CREATIVE MASTER CLASSES), it is shown how to make small click-clack snowflake hairpins, such decorations are suitable for the smallest girls. MK is quite simple, so making New Year's hair accessories using it will not be difficult even for those who consider themselves a beginner in kanzashi.
Hand made by Ludmila K. in his video shows how you can make festive hairpins with spirals from satin ribbons, such decorations look very elegant and are perfect for the New Year's outfit with snowflakes.
Festive hairpin kanzashi, mk from Alina Boloban. Original decoration with a universal mount, based on unusual kanzashi petals. The hair clip is quite simple to manufacture and versatile in use.
Bead jewelry looks very delicate and feminine on your hair. You can wear them to your holiday outfit or wear them every day to add romance and sophistication to your outfit. Bead jewelry can be quite modest and delicate or truly luxurious - a lot depends on what kind of beads and model you choose. By the way, you can buy beads for decoration on purpose or use one or more of your beads that you are no longer going to wear.
DIY hair bead jewelry can be made in several ways. For your attention - a selection of master classes of varying complexity.
Method 1: beads + glue
By "planting" beads, rhinestones, crystals on glue, you can decorate a headband, a large or small hair clip, a "crab", a comb and so on. With a strong glue, you can glue the decor directly onto the hairpin / headband, or first decorate it with fabric, suede, leather.
Advantages of the method: speed of production, the ability to use beads without holes, unlimited possibilities for drawing up patterns and designs.
Note: with glue, you need to be careful not to stain the base of the jewelry with it and keep the neat look of the work.
Hairpin decorated with crystals: master class

You will need:
Metal hairpin without decor;
A piece of artificial or natural suede or leather;
Strong glue and stick for applying it;
Possibly tweezers.
Sequence of work:
1. Glue the suede strip to the hairpin with the edges tucked inward.
2. Glue the beads one at a time to the suede on the clip (small beads may require tweezers). Let the glue dry and you're done.
Photo and source: psimadethis.com
Hair comb decorated with beads and rhinestones: master class

You will need:
Plastic or metal comb without decoration;
Beads and rhinestones for decoration;
A piece of felt;
Strong glue or glue gun;
Scissors;
Threads and a needle.
Sequence of work:
1. Cut an oval, rectangle, or other shape out of felt that matches the base of your scallop (or slightly larger).

2. Glue the beads and rhinestones to the felt one at a time for an abstract composition or orderly pattern.

3. When the pattern is ready, trim off the excess material around the edges.

4. Sew the decor to the comb and fix it with glue to be sure. Let the glue dry and you're done.


Method 2: Beads + fishing line or thread
Stringing different sizes beads and beads on a thin fishing line, you can make beautiful compositions for decorating hairpins, combs, headbands and so on.
Advantages of the method: great opportunities for drawing up patterns and drawings, the ability to use a variety of braids, metal elements for jewelry, embroidery elements, the ability to apply your skills in beading.
Note: only beads with holes are suitable for such jewelry.
Scallop decorated with braid and beads: master class

You will need:
Plastic or metal comb without decoration with a narrow base;
Decorative curly braid in the form of a stem with leaves;
Metal leaves for jewelry;
Suitable beads of one or more types;
Thin line and needle.
Sequence of work:
1. Sew a piece of decorative tape to the base of the scallop with a fishing line.

2. Add metal leaves and beads on top. Try to secure each piece of decor fairly firmly.

3. At the end, secure the line well from the wrong side. Ready!


Photo and source: lovemaegan.com
Hair band with beads: master class

You will need:
Three types of pearl beads;
Thin fishing line;
Scissors;
Satin ribbon.
Sequence of work:
1. Cut the line about 1 m long. String 6 beads into the middle of the line, as shown in photo 1. Pass the line twice into one of the small beads.
2. String 2 beads on both ends of the fishing line and secure them by passing the fishing line through a small bead (see photo 2).
3. Continue to weave, as shown in photos 3, 4, 5. After making the decoration of the desired length, firmly fasten the fishing line and cut the ends.
4. Tie to the ends along a satin ribbon (it is better to process its edges with fire or hot scissors so that they do not crumble).

P. S. By the way, this piece can be worn as a choker or bracelet.

Photo and source: lc.pandahall.com
Jewelry for hair made of strands of beads imitating pearls: a master class

You will need:
Small metal comb;
Invisible;
Four types of pearl beads;
Thread or fishing line and a fine needle;
Strong glue or glue gun.
Sequence of work:

1. Tie a thread to the comb, string several beads of the same type on the thread.
2. Tie another string to the comb and string other beads onto it. Do the same with the third strand and the third type of beads, and with the fourth, respectively.
3. Gather the ends of the three threads and tie them to the "crown" of the invisible.
4. At the base of the comb, glue a few beads to mask the threads. Ready!
Photo and source: clonesnclowns.wordpress.com
Method 3: beads + chains
Hair jewelry with beads can be crafted from a variety of jewelry blanks in the same way as bracelets, necklaces, beads, and other jewelry are made. You can buy chains and other decorative elements on purpose, or you can use unnecessary beads and jewelry.
Advantages of the method: fast result, excellent appearance decorations.
Note: special materials and tools are needed (at least - thin-nose pliers, also, possibly, nippers and pliers).
Hair decoration from pendants and chains: master class

4. Add hanger to the side chains, placing them in the middle. The decoration is ready.


You need to choose New Year's decorations for your hairstyle right now, so as not to miss such an interesting part of your image in the pre-New Year's chores. Women are interesting people, they always want to decorate, decorate, change something. Hairstyle is a considerable field for fashion experiments, especially on the eve of such a magical holiday as New Year. Fire Rooster - a symbol of the coming year of eastern calendar, loves everything bright and shiny. We offer decor options for hairstyles in the style of a fiery bird.

New Year's headbands
Perhaps the bezel is the most unpretentious of the whole variety of items for decorating styling. In this case, it does not matter at all what color and length your curls are. A variety of feathers, beads, stones and flowers transform the prosaic rim into a real work of art. Modern women of fashion can not only buy a rim in a store, but also design it with their own hands. Ideas for every taste:

- Headband with felt. On the basis of the old hoop, you can make all kinds of hair accessories for the New Year. To do this, buy white and blue felt, cut out snowflakes, circles for a snowman, hearts from it according to a previously prepared template. Place the blanks of a neutral color on the rim, and then put everything on the glue.

- Feathers. When choosing feathers as a decoration for a hoop, remember that this material does not tolerate too much. You can easily transform into a New Year's peacock. Therefore, put 2-3 feathers on the base using glue. You can complement them with beads and rhinestones.

- Harness. The master class for making this New Year's decoration is quite simple. Tie several flagella into a knot, measure the length of the hoop on the tourniquet and cut off the excess. Glue the tied rope to the rim and hide the edges with pieces of tape.

- Decor with stones. Suitable for hair of any length. Place the stones on the felt base the way you want. Sew on them alternating with beads and beads. Attach to the hoop and glue the blank. Trim the reverse side with a piece of leather or any thick cloth.

Tiaras for New Years
The diadem is a symbol of grandeur in the past, now it characterizes the hostess as a special lady. Choosing a tiara-shaped hair ornament for the New Year requires taking into account a number of features of its wearing and attachment in styling.
- Tiara scallop. Mounted on special teeth to high hairstyle... Often there are not enough cloves to firmly fix it in the drip. The invisible ones come to the rescue. You need to choose them in the color of the strands.

- Tiara hoop. No additional mounting hardware is required. The main thing is that the volume of the rim should correspond to the size of the head. On short hair you need to place the tiara in the center of the styling, so all attention will be drawn to the beautiful accessory.

- Diadem in greek style. Christmas accessories for hair in the Greek style act as an adornment and fixer for curls. Openwork curls, beads, flowers are located along the edges, and when put on, they appear on both sides of the head at the temples. By attaching a few strands around the tiara, you will give the image of antique chic and romance.

- Diadem on the forehead. Such a hair ornament for the New Year's for a girl is suitable for creating a delicate image of a princess. The tiara is attached to a ready-made hairstyle without violating its integrity. Beautiful decor, descending from the hairline to the forehead, favorably emphasizes the solemnity of the image. The main thing is the size tiaras should clearly correspond to the volume of the head so as not to slip with each movement.

- Stylized kokoshnik. An interesting option The decor of the hairstyle was created based on the Russian folk costume. A brass kokoshnik is created, but, despite the metal base, it does not press behind the ears. The use of this accessory is found in a variety of ways. From creating a modern Russian look to everyday wear with elegant dresses and trouser suits.

New Year's hairpins: choosing the right one
There are so many options for New Year's hairpins that it is very easy to get confused in their variety and choose the wrong option. Remember the basic rules for choosing a fashionable hair decoration.
- The color of the clip should match colors outfit. You can choose a hairpin to match the dress, or you can choose a contrasting color in order to correctly place color accents. If you have an interesting coloring of your hair, for example, then choose a bright red color for the decor item.

- At different form face, the same accessory looks completely different, and not always attractive. For an oval face, any variation is suitable, and for chubby beauties it is better to choose small hairpins in the amount of several pieces. You can complement the image using.

- There are plenty of materials for making hairpins: wood, plastic, metal, kanzashi-style fabric. The choice is solely based on personal preference. Any hair clip will look beautiful on a lush head of hair. If you use it before decorating the hairstyle, the result will exceed expectations.

- The cost of a hair clip is determined by the type of material from which it is made and its exclusivity. Products self made are much more expensive, but you will be sure that there is no second such decoration in the world. Some accessories are decorated precious stones, and instead of a hairpin, you can easily buy a small apartment. But any lady will be able, even with an initial level of training, to design a high-quality decor with her own hands. Fortunately, on the Internet you can find many master classes (mk). In this case, the price of an exclusive item will decrease significantly.

New Year decoration for hair will help every woman to bring zest to the image. with the use of fashionable accessories, it will acquire a magical uniqueness. With the right decor, the magnetism that beautiful women's hair possesses will only increase.
Video: Master class on making simple and beautiful hair accessories for the New Year


Materials and tools
- light synthetic fabric: acetate silk, organza, tulle, veil, crepe satin in two colors - for flower petals and for leaves;
- metal base for a flower - automatic hair clip;
- a small piece of felt to match the color of the leaves;
- a glue gun or other universal glue (preferably one that glues metal together);
- a needle, threads of two colors to match the color of petals and leaves;
- a strip of corrugated paper in the color of the leaves;
- soft wire, about 30 cm long (you can use a wire for beading);
- A small flap of double-sided glue pad (available at fabric or craft stores)
- satin ribbon in the color of the leaves, 5 mm wide and about 1 m long.
- scissors, candle.
From the fabric for the petals, we cut squares with sides of 3x3 cm, 4x4 cm, 5x5 cm, 6x6 cm - 5-7 pieces for each given size. As a result, you will get about 20-30 squares. The more blanks, the more magnificent the flower will be.

From each square for petals, cut out figures in the form of truncated droplets or a heart - without a sharp tip. We look at the photo:

In the flame of a candle, carefully melt each petal.

Melting, the fabric is deformed, and we get petals like real ones!

We begin to sew the flower from the middle, from the smallest petal. To do this, we twist the petal into a tube and stitch it at the base with threads that match the color.

Gradually add and sew new petals in a circle - from the smallest blanks - to the larger ones, forming a flower.

Making leaves. We cut out rectangles of 9x4 cm from the green fabric. We are planning to make 3 leaves, so we will prepare 6 rectangles from the green, main fabric and 6 rectangles from the adhesive double-sided pad. We also need a wire - three pieces of about 10 cm, corrugated paper in the form long tape 1 cm wide.

We wrap each of the three pieces of wire corrugated paper- we form the basis for the leaf. Glue the ends of the paper.

We form a sheet by folding the blanks together (like a sandwich): green flap + spacer + curved wrapped wire + spacer + green flap.

We glue this "sandwich" by ironing it with a heated iron through dry gauze or a thin white sheet of paper. Double-sided glue pad melts under the iron and holds the fabric together and wire frame... Cut out the leaves from the rectangle, melt their edges over the candle in the same way as the petals were done earlier.

We fold the "bows" from the satin ribbon, sew the middle with threads to match the color.

We fold the leaves together and sew them together, attach the bows. We glue the flower to the leaves. After the glue dries, you can additionally stitch the leaves and the flower together - for a strong connection.

Glue a piece of felt onto the base of the hairpin. It is better to do this in advance so that the glue has time to dry. We glue the flower to the hairpin. We follow all the gluing instructions written on the tube! - so that our flower is held firmly on the hair clip, and does not deteriorate when worn. We leave the glue for a day to dry.

Hairpin with voluminous flower ready. Our rose turned out to be beautiful, spectacular - like a real one!


- for: nylon or satin ribbon of two colors - 10 pieces of one color and 5 of another. The length of the cut depends on the width of the tape. With a width of 2.5 cm - length 7 cm, with 3.5 (3.8) cm - 8 or 9 cm, with 5 cm - 10 cm. The wider the ribbon, the larger the flower will turn out;
- for the bandage: a satin ribbon 2.5 cm, approximately 50 cm long;
- elastic band 2 cm - cm 10;
- scissors;
- needle with thread;
- a bead or rhinestone for decoration;
- burner / lighter / candle.
So let's get started. If you have a burner, then with its help we cut the tape into pieces of the required length (depending on the width of the tape), at the same time we singe the edges so that they do not fall off (photo 1). If there is no burner, then cut it with scissors and set the edges on fire with a lighter or over a candle flame. These are the blanks for the petals we got (photo 2).

We fold the tapes at an angle of 90 degrees so that there is the same distance from the edge of the tape to the corner (photo 3). We fold again, connecting the points A and B marked in the photo. It should look like in photo 4 (view of the seamy side). Photo 5 is a side view. We string the petal on a thread with a needle. We start from the front side, make 2 stitches (photo 6).

In this way, we collect five petals in a circle and tighten (photo 7). View from the front side - photo 8, view from the wrong side - 9. We make two more such flowers, collect all the tiers of our flower using a thread and a needle or glue (photos 10, 11). We decorate the middle of the flower with a bead, a strass or a beautiful button (photo 12).

Take the satin bandage ribbon. Having stepped back from the edge 2-3 cm, we make an incision and singe the edges (photo 13). We insert an elastic band into the incision, sew across the length of the tape and along the edges, without grabbing the elastic along the dotted lines marked in photo 14. Do the same on the second side, turn it to the front side (photo 15, 16).

We fold the edge of the satin ribbon under the elastic and stitch it without capturing the outer layer of the ribbon (photo 17). This is what should happen on the front side - photo 18. We do the same on the second side of the elastic, this is the kind of bandage it turns out - photo 19. Determine the place where the flower is attached and sew it on.


The American bow is an oversized bow with many intricate curls. Such a bow is usually made from rep ribbons. different color and different widths. When looking at the American bow it seems like to do it do it yourself very difficult. In fact, this is not the case, because this structure consists of several different bows gathered together. So, let's try to figure out how to make an American bow with our own hands.
, bow made of ribbons. American bow
This sophisticated hair clip is made from a large number tapes of different widths. To create the bow itself, take a ribbon that contains some kind of pattern or just polka dots. Background ribbons can be monochromatic or also contain a motif that emphasizes the design of the main ribbon of the bow. The tapes themselves must be from reps.
To create an American bow, we need:
Rep ribbons.
For the main bow, you will need three ribbons of different widths (it is better that the widest width is no more than 3-3.5 cm). For the background, 3-4 types of tape on which the bow itself will be located can be from 1 cm to 2.5 wide. This is not fundamentally important. It is only important that you arrange them harmoniously, but more on that later;
Scissors;
Cardboard;
Needle and thread;
Glue;
Safety pin, clips;
Lighter.
To create an American bow, we need to learn how to make its famous curls. We will use a special template that we will create ourselves. Take a regular 15 x 7.5 cm piece of cardboard.

Cut a line exactly in the middle, 0.6 cm wide and about 3.8 cm long (slightly more than half).

We need three such templates different lengths... Each is 2.5 cm smaller than the other, but the width remains unchanged. I got templates with a length of 17.5 cm, 15 cm and 13.5, respectively.

Prepare a 2.5 cm wide ribbon, pin, clip, needle and thread, and template. We begin to form a bow.

Using a clip, fix the tape at the edge of the template, on the side where the slot is.

Wrap it twice around the template. Insert a safety pin through the template, into the center of the tape (as shown in the picture above).


Carefully remove the tape from the template without removing the pins.

The next step is a very important part of creating an American bow. Hold the tape with the tail up and fixing the center of the tape, where the pin is, with your fingers we begin to separate the turns to the sides, so that we get something X-shaped.

Pull the loops until an even "X" is formed. When looking at the back of the bow, the ribbons should be horizontally aligned.

Using a thread and a needle, make several stitches exactly in the middle of the bow. Make sure it hasn't lost its X-shape.

Pull the thread tight, wrap it several times and secure with a strong knot. 

Using the same technique, make 2 more bows, but with templates of different sizes.
The next part of creating an American bow is creating a background, such as "thorns". To form it, you can take ribbons of any width, for example, 3.8 cm, 2.5 cm and 1.5 cm wide. Cut each 12.5 cm and make a V-cut at the ends, which is immediately sealed with a lighter.

Take 2 ribbons of the same color, cross them on the cross and pierce the middle with a needle.

Do the same for the rest of the ribbons, stacking all the layers on top of each other. Thus, organize a nice background for the bow and give it an X-shape, as shown in the photo. When all the ribbons are in place, sew tightly in the middle and pull them with thread.

These are the parts we should end up with. Now they are all ready to come together and create an American bow.

The American bow hairpin is ready! It remains only to attach the middle in the center. But I leave this decision to you.

Attach the base from the back. It can be either an iron "crocodile", or a small automatic hair clip, or a rubber band, or ... your option.

Beautiful hair clips are able to transform any hairstyle - the more original the hairpin, the more interesting the hairstyle looks. The most original, unusual and unique hairpins are those that handmade... Let's try to make an interesting hair clip from ribbons in a retro style.
Materials:
metal hairpins,
4 mm wide tape of any color
hot glue gun.
Instructions:
You need to take a hair clip and 60 cm of ribbon. The mid-cut of the tape is placed against the base of the open barrette. Then you should thread one edge of the tape through the middle, but already through the outside. Repeat with the second ponytail too.

This weaving is continued along the entire length of the decoration. After that, a tight knot is tied at the end.

This is how the hairpins looked before.

But we will not stop there and will make them more modern and sophisticated. The remaining tails of the ribbon are twisted and the flagellum is folded in half, forming a spiral cord.


And now we have in our hands excellent hairpins made by our own hands in the retro style!

For you you need the following materials:
- two sticks for sushi (sold in any large supermarket);
- acrylic paint Brown color;
- a small piece of cloth with beautiful ornament;
- decorative thin cord about 10-15 cm;
- PVA glue and a brush.
How to make a hair clip. Master Class.
1. Cut wooden sticks so that they are about 18 cm long. Cover them with brown (black) acrylic paint, leave to dry.

2. Grease the top of the stick with PVA glue. Now wrap each stick with a cloth (see photo). Fold the raw edges of the fabric, glue along the fold and attach to the stick.

3. Apply glue to a small area of the stick below the fabric (about 1 cm), and wrap it with decorative cord several times. Secure the ends of the cord well with glue.

That's all, our oriental-style hairpin is ready.

How cute little girls look in beautiful dresses and with delicate flowers on their heads! It turns out that such a cute decoration as an openwork flower can be easily made with your own hands.
To create such a cute headband for a girl, you will need a minimum of effort and free time, but despite this it will look great and will be a great addition to any outfit of a little fashionista.

A headband with a flower for children, a master class on needlework:
For work you will need: lace, a piece of felt, a beautiful button or bead, elastic lace or a wide elastic band, and for older girls you can take a regular plastic headband, scissors and a glue gun.

Using hot glue, glue the gathered lace onto the felt circle: start at the edge and move inward in a spiral.


Glue a bead or button in the middle and glue the finished flower to the base.


That's all: a wonderful headband for a little princess is ready! Easy and simple, isn't it?

More ideas


From today's master class, you will learn how to make a beautiful hair clip very quickly and easily, which will become a worthy decoration in new year's eve or for Christmas.
To make it you will need:
- metal hair clip;
- decorative silvery leaf;
- brown tape tape;
- red stamens;
- silver beads on a string;
- red, white artificial berries;
- fishing line;
- glue gun.
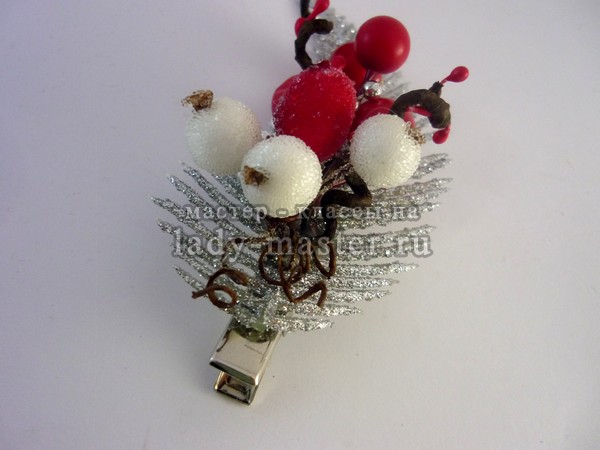
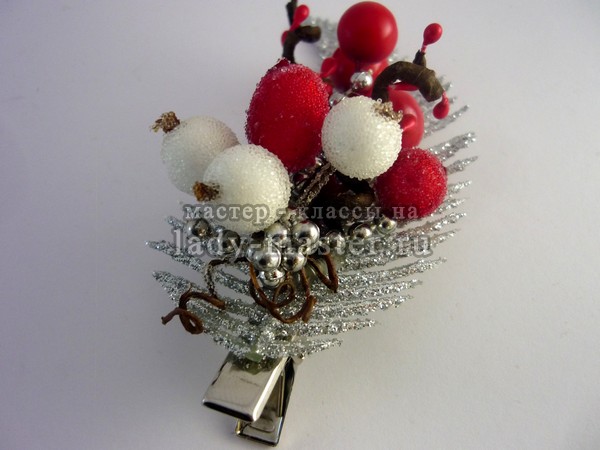
Pick a piece of paper that is large enough to extend beyond the clip. The color of the leaf may vary. But in accordance with it, it will be necessary to select the rest of the decor. The main thing is that you can attach the leaf to the hairpin by its ridge.
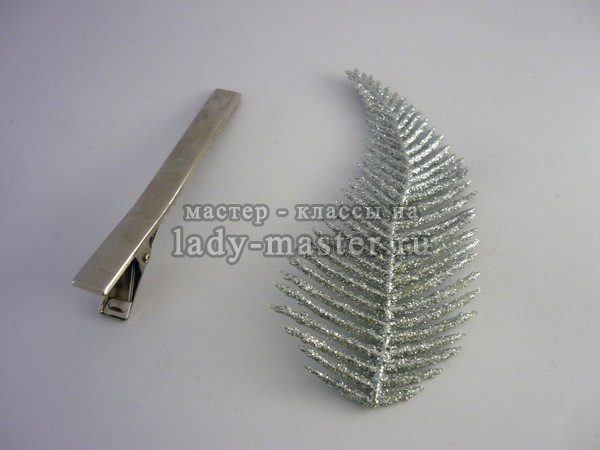
Apply the glue to the top of the hairpin, not reaching the rise, which we take with our fingers to open the clip. We instantly attach the leaf along the ridge to the metal surface. Additionally, we tie the leaf to the hairpin with a fishing line exactly in the middle. The line should run between the hairpin's teeth and the leaf feathers. We tie a knot on the outer surface, as it will be possible to hide it with decor.

Take the red stamens and cut them in half. We cut the wire into two pieces 10 cm and 7 cm long. We begin to wrap it with brown tape, interweaving the stamens. The threads on which the stamens are located should not be visible. There should be one piece at the end of the wire.

We will give these twigs a spiral shape. Each needs to be screwed onto some thin object. This can be a long toothpick or a brush handle. Adjust curls yourself. One branch can be completely twisted, and the other just wavy.
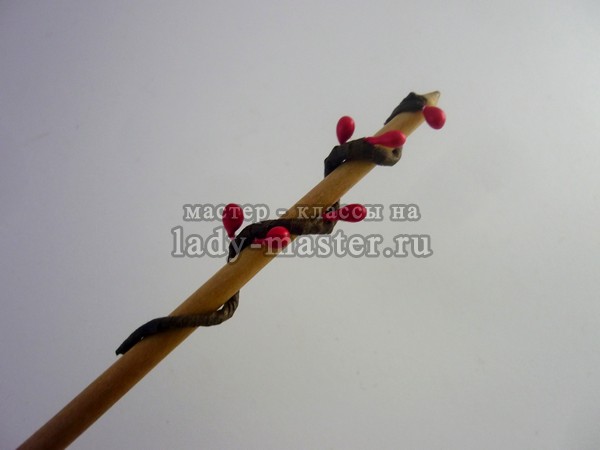
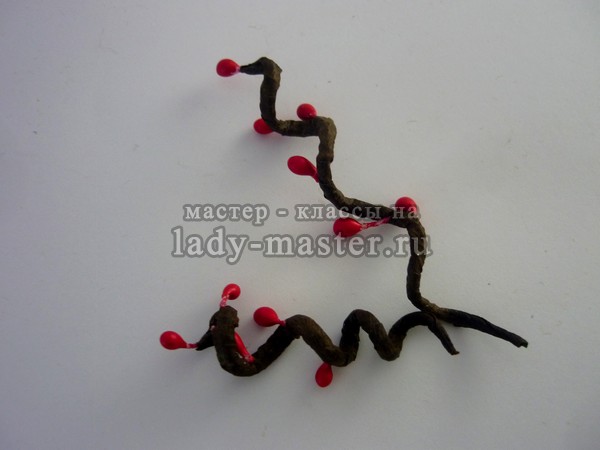
Now we compose the composition on our silvery sheet. We fasten a sprig of red berries, then cover it on top with prepared brown sprigs. To make the composition three-dimensional, we spread them in different directions at an angle of 45 degrees.
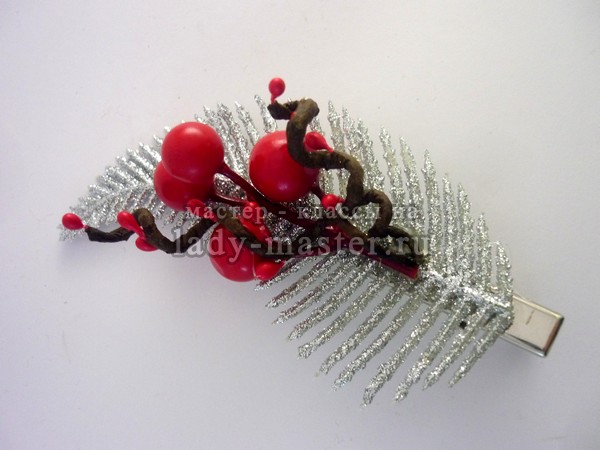
We form a knot from silver beads on a thread several times. Cut off, leaving short ends, and attach to the composition. Thus, we overlap the inner part, where the fishing line and the ends of the branches are located.
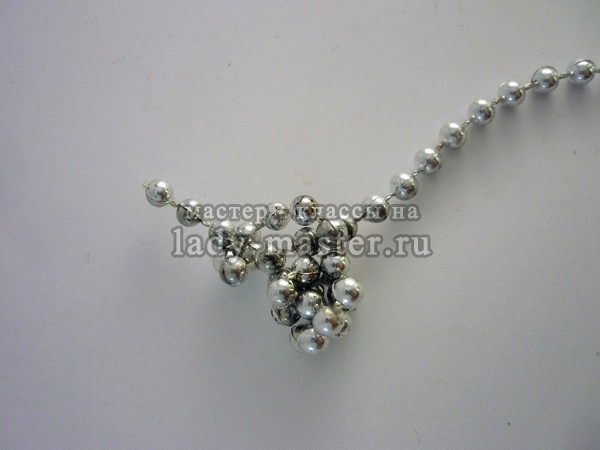
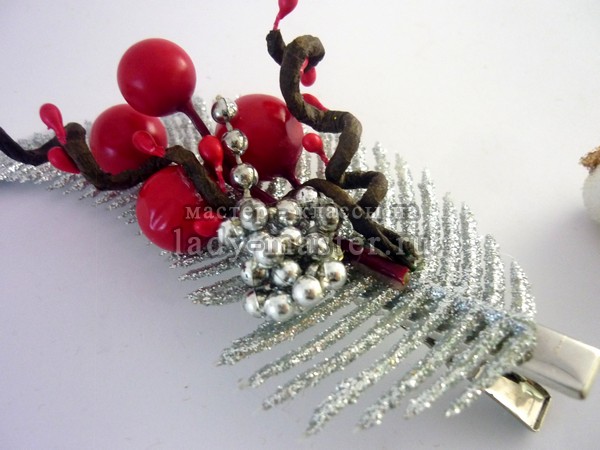
We form a small bunch of berries on a wire. We tie all the rest with one wire. The other tails must be twisted in the same way as the branches with stamens were formed.

We straighten the spirals and fasten the bouquet in the same direction as the entire decor. In the end, we overlap with the same silvery knot, which will complete the entire composition.
We also recommend
 Happy birthday pictures for women
 Happy birthday daughter pictures - congratulations Download a beautiful card happy birthday daughter
 Happy birthday to the fisherman Happy birthday to the fisherman
 Beautiful animated cards Happy Birthday (GIF)
 Good morning - funny pictures download
 How to decorate a New Year's table Decorate a table for the New Year