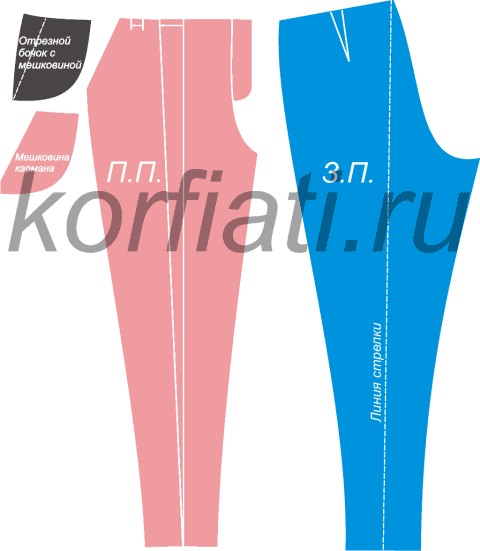
Pattern of straight women's narrowed trousers. Women's trousers: a pattern for beginners (step by step instructions)
Hello!
In this article, we will analyze the construction of the design of classic women's trousers according to the calculation-graphic method of the TSOTSHL cut.
To draw a pattern of trousers using the TSOTSHL method, we need the following measurements:
Name of measurements and legend | cm |
|---|---|
Waist half girth (St) | 28,5 |
Half hip (Sat) | 43,5 |
Seat height (Sun) | |
Front length (DSP) | 103,5 |
Back length (Dsz) | 105,5 |
Side length (Dsb) | |
Knee Waist Length (Dtc) | 58,5 |
Product length (Di) | |
Pants width at the bottom (Wn) (by model) | 16 (half measurement) |
This technique offers the following free-fit supplements:
In this example, we will be using allowances for the snug fit trousers.
We proceed to building the front half of the trousers
We will prepare a blank sheet of paper, which is 10-15 cm more than the measurement of the length of the product.
Drawing grid
Departing from the top edge of the paper 5-10 cm and from the left edge 10-15 cm, we draw a vertical segment of TH, equal to the measure of the length of the product:
TH = Di,
(segment TH = Di = 100cm).
Seat line level: from point T downwards we put off the measurement of the height of the seat + CO and mark the point I:
TY = Sun + CO,
(TY = 29 + 0 = 29cm).
Hip line level we find by the formula:
YB = 1/3 x TY,
we postpone the resulting value up from the point I and put the point B (YB = 29: 3 = 9.7 cm).
Knee line level: downward from the point T, we postpone the measure Dtk and mark the point K:
TC = DTC
(TC = 58.5cm).
Now let's draw horizontal lines from each point: T, B, Z, K and N.
Hip width
We will find this value by the formula:
BB 1 = 0.5 x (Sb + CO) - k,
k = 1cm - for low-volume;
We postpone the resulting value from point B to the right horizontally and put point B 1
(BB 1 = 0.5 x (43.5 + 0.5) - 1 = 21cm).

Through point B 1 we draw a vertical line up and down to the intersection with the horizontal lines from points T and Z, the intersection points will be denoted by T 1 and Z 1.

Centerline position
To the left of point B 1, we postpone the segment B 1 B0, the value of which is found by the formula:
B 1 B 0 = 0.15 x Sb + 1.5 + 0.25 x CO,
where CO is an increase in free fitting to the Sb measure (see table),
(B 1 B 0 = 0.15 x 43.5 + 1.5 + 0.25 x 0.5 = 8.2 cm).
Through point B 0, we move up and down a vertical straight line until it intersects with all horizontal lines, the intersection points will be denoted by T 0, R 0, K 0 and H 0, respectively.

Stepping line position
To the right of point B 0, set aside a segment equal to the length of the segment BB 0 (measure the length according to the drawing) and put point B 2 (B 0 B 2 = BB 0 = 12.8 cm).

Width at the bottom
We find the width of the front half of the trousers below by the formula:
0.5 x Shn - k, where
k = 1cm - for low-volume;
k = 0.5 cm - for trousers of moderate volume;
k = 0 - for bulky loose trousers.
We will postpone the resulting value to the right and left of the point H 0 and mark the points H 1 and H 2
(H 1 H 0 = H 0 H 2 = 0.5 x 16 - 1 = 7cm).

Knee width
If the width at the knee level is known, then its value is laid on both sides of the K 0 point. If the width of the trousers at the knee level is unknown, then the width of the front half at this level will be determined using graphic constructions:
First, we connect points B and H 1 with a straight line. This line will cross the knee line at the point we will call K 11.

From this point, we postpone to the right or left the segment K 11 K 1, the value of which depends on the desired model of trousers:
K 11 K 1 = 1-1.5 cm to the right - for trousers of small and moderate volume along the entire length;
K 11 K 1 = 0-1 cm to the right - for trousers that are loose in the middle, without filling from the side in the knee area;
K 11 K 1 = 0.5-2cm to the left - for trousers that are loose in the middle, when filled from the outside below the level of the thighs.
In our example, we have chosen a tight fit trousers style, so we will set aside 1.5 cm to the right of the K 11 point and put the K 1 point (be careful and choose the length of the segment required for your trousers style).

Let's connect point K 1 with points B and H 1 with straight lines.

We measure the length of the segment K 1 K 0 and postpone this value to the right of the point K 0, we get the point K 2 (K 0 K 2 = K 1 K 0).

Stepping line
Let's connect point K 2 with straight lines with points B 2 and H 2. In this case, the line K 2 B 2 will intercept the line of sitting at the point that we will designate I 2.

From the point I 2 we postpone the distance equal to 1/3 of the segment I 2 K 2. From the obtained point to the left, we postpone a deflection equal to 0.5-1.5 cm - the greater the difference between the width at the level of the hips and knee, the greater the amount of deflection. Connect points I 2 and K 2 with a smooth concave line.

Front waist level
Determine the level of the waist in front by the formula:
T 1 T 10 = Dsb - Dsp,
at positive result we postpone this value down from point T 1;
with negative - up from point T 1 and mark point T 10
(T 1 T 10 = 106 - 103.5 = 2.5 cm).

For figures with a protruding belly, as well as for trousers with a front dart, it is necessary to construct a diversion of the middle front line from point T 10 horizontally to the left by 0.5-1 cm, mark the resulting point T 11 (T 10 T 11 = 1 cm).

middle line
Construct the bisector of the angle with the vertex at the point R 1. On this bisector, we construct an auxiliary point M, which is determined by the style of the trousers:
I 1 M = 2.5cm - for tight trousers;
I 1 M = 3cm - for loose-fitting trousers.
(In our example, we use the value I 1 M = 2.5 cm).

We connect points T 10 (or T 11), B 1, M and Z 2 with a smooth line.

Side line
The position of the side line at the waist level depends on the style of the trousers, depending on this, we select the required value, which we postpone to the right of the point T, the resulting point will be denoted by T 2:
TT 2 = 0-1 cm - with a uniform distribution of folds over the entire part from the side to the middle seam;
TT 2 = 1-2cm - when the folds are distributed closer to the middle of the part.

Connect point T 2 with a straight line with point T 10 (or T 11), and a smooth curved line with point B.

Bottom line
Upward from the point H 0, we postpone the amount of deflection and put the point H 10:
H 0 H 10 = 0.5cm - for wide trousers;
H 0 H 10 = 0.7cm - for tight trousers.
Let's connect point H 10 with straight lines with points H 1 and H 2.

For checkered, striped and naughty fabrics, the bottom line is left horizontal when ironing.
The total size of the darts on the front half
We find the sum of the darts of the front half by the formula:
S = T 2 T 10 (or T 2 T 11) - 0.5 x (St + CO) - k,
where CO is an increase in free fitting to the St measurement (see table), and where k = 0.5-1.5 cm is the fit at the waist.
1) If the total amount of darts of the front half is no more than 3 cm, then we design one dart on the axis line, putting it along the waist line from the point of intersection with the axis line, half of the result obtained in each direction.
The length of the dart is 8-13cm, where larger lengths are taken with a flat stomach, and smaller ones with a protruding one.

2) If the total amount of darts of the front half is more than 3 cm, then we design the second dart, distributing the result equally on both darts. We design the second dart symmetrically to the axis line at a distance of 3-4 cm from the left side of the first dart. The length of the second dart is also 8-13cm.

For bulky trousers in the upper part, the total amount of darts on the front half is determined by the formula:
S = T 2 T 10 (or T 2 T 11) - 0.5 x (St + CO),
that is, without taking into account the fit at the waist.
This completes the construction of the front half of the trousers.


We proceed to building the back half of the trousers
The drawing of the back half of the trousers usually continues to be built on the grid of the drawing of the front half. If you find it difficult to draw a pattern on top of another, then on a blank sheet of paper you need to rebuild the drawing grid, that is, draw a vertical segment equal to the measurement of the length of the product, build the lines of the waist, hips, seat, knee and bottom and draw the center line along the same calculations that we did for the front half of the trousers.

Now let's make calculations
Find the width of the back half trousers without step width:
Shzp = (Sat + CO) - BB 1,
where CO is an increase in free fitting to the Sb measure (see table)
Shzp = (43.5 + 0.5) - 21 = 23cm.
Overall step width for the front and back halves of the trousers, we find by the formula:
Step = 0.4 x (Sb + CO) - k,
where CO is an increase in free fitting to the Sb measure (see table), and where
k = 1cm - for trousers of moderate and large volumes along the hip line;
k = 2cm - for small-volume trousers along the hip line.
Pitch = 0.4 x (43.5 + 0.5) - 2 = 15.6 cm.
Calculate the step width of the back half at hip level:
Step zp = Step - B 1 B 2,
where B 1 B 2 is the width of the step of the front half, the value of which is measurable according to the drawing.
Step zp = 15.6 - 4.6 = 11cm.
Stepping line position
From point B 0 to the right, we postpone the segment B 0 B 4, the length of which is found by the formula:
B 0 B 4 = (Shzp + Shshaga zp) / 2 + 0.5
(B 0 B 4 = (23 + 11) / 2 + 0.5 = 17.5cm).

To the left of point B 4, set aside a segment equal to the step width of the back half and set point B 3:
B 4 B 3 = Step zp,
(B 4 B 3 = 11cm).
Draw a vertical through point B 3 until it intersects with the waist line, the point of intersection is designated T 3.

Centerline bend
To the left of the point T 3, we postpone the segment T 3 T 31, which we find by the formula:
T 3 T 31 = 0.1 x Sb - k, where
k = 1-1.5 cm - for trousers of small and moderate volume;
k = 2-3cm - for bulky trousers.
(T 3 T 31 = 0.1 x 43.5 - 1 = 3.4 cm).

Let's connect points B 3 and T 31 with a straight line, continuing it up and down.

On this line upward from point B 3, we postpone the segment B 3 B 31, which determines the balance of the trousers, we will calculate its value using the formula:
B 3 B 31 = 0.05 x Sb - k, where
k = 0 - for trousers of small and moderate volume;
k = 0.5-2cm - for bulky trousers.
(B 3 B 31 = 0.05 x 43.5 - 0 = 2.2 cm).

On the same line upward from point B 31, we postpone the segment B 31 T 32:
B 31 T 32 = B 1 T 10 (or B 1 T 11) + (Dsz - Dsp),
where the size of the segment B 1 T 10 (or B 1 T 11) is taken from the drawing of the front half of the trousers
(B 31 T 32 = 16.8 + (105.5 - 103.5) = 18.8 cm).

Hip width
From point B 31 we mark an arc, the radius of which is equal to the width of the back half along the line of the thighs, until it intersects with the continuation of the line of the thighs; the intersection point will be denoted by B 5 (B 31 B 5 = Shzp = 23cm).

Lateral line position
From point T 32 we mark an arc with a radius equal to the segment B 31 B 5, before crossing with the continuation of the waist line, the intersection point will be called T 4 (T 32 T 4 = B 31 B 5).

To the right of the point T 4 horizontally, we postpone the segment T 4 T 41 - the solution of the side dart, the value of which depends on the style of the trousers:
T 4 T 41 = TT 2 (from the drawing of the front half) - for low-volume trousers;
T 4 T 41 = 3-4 cm - for trousers of moderate and large volumes, where a large value is for figures with a convex side.
In our example, T 4 T 41 = TT 2 = 1cm.

Let's connect point T 41 with points B 5 and T 32 with straight lines.

Rear dart solution
We find the solution of the tuck by the formula:
S = T 41 T 32 - 0.5 X (St + CO) - k,
where CO is an increase in free fitting to the St measurement (see table), and where k = 0.5-1 cm is the fit at the waist.
1) If the size of the rear dart solution is less than 5 cm, then we design one dart. The position of the rear dart axis is found by the formula:
T 32 T 5 = 0.4 x B 31 B 5.
Let's postpone the result along the waist line to the left of point T 32 and put point T 5
(T 32 T 5 = 0.4 x 23 = 9.2).

The axis of the back dart is located perpendicular to the waist line, therefore, to the segment T 32 T 41, we will build a perpendicular at point T 5. From point T 5 to the right and to the left along the waist line, set aside half the solution of the back dart. The dart length is 9-13cm.

2) If the size of the rear dart solution is more than 5 cm, then first, in exactly the same way, we design a dart with a 5 cm solution, and by the remaining amount we increase the withdrawal of the middle back line along the waist. That is, we lay off the remaining value along the waist line to the left of the point T 32.

We connect the resulting point with a straight line with point B 31.

3) If the size of the tuck solution turned out to be much more than 5 cm, then we increase the withdrawal of the middle back line to 2 cm, and distribute the rest equally into two darts. We find the position of the first tuck using the same formula:
T 32 T 5 = 0.4 x B 31 B 5;
the second groove is placed 3-4 cm from the left side of the first dart. We draw the axes of both darts perpendicular to the segment T 32 T 41; darts length - 9-13cm.

Width at the bottom
Find the width of the back half at the bottom using the formula:
0.5 x Shn + 0.2cm,
we put the resulting value in both directions from the point H 0 and put the points H 3 and H 4
(H 0 H 3 = H 0 H 4 = 0.5 x 16 + 0.2 = 8.2 cm).
Knee width
Calculate the width of the back half at the knee level using the formula:
K 3 K 0 = K 0 K 4 = K 1 K 0 + k,
where K 1 K 0 - we take from the drawing of the front half, and where
k = 2cm - for straight, slightly tapered trousers;
k = 2.5cm - for trousers that are strongly tapered from top to bottom.
We postpone the resulting result in both directions from the point K 0 and mark the points K 3 and K 4.

Side line
We will carry out lateral line connecting points T 41, B 5, K 3 and H 3. From the waist line to the hip line, draw the side line with a smooth convex line. The lateral line of the rear half must be aligned with the lateral line of the front half:
T 41 B 5 K 3 N 3 = T 2 BK 1 N 1.

Stepping line
Let's connect point K 4 with straight lines with points B 4 and H 4. In this case, the segment B 4 K 4 will intersect the line of sitting at the point that we will designate Z 4.
middle line
To the left of the point I 41, we draw a horizontal line to the intersection with the straight line B 3 T 32, the point of intersection is denoted by I 3.

We construct the bisector of the angle with the vertex at the point R 3 and on this bisector we postpone the segment R 3 M 1, the length of which depends on the style of the trousers:
I 3 M 1 = 1.5 cm - for trousers with a slight increase in the depth of the seat;
I 3 M 1 = 2.5 cm - for trousers with a deeper seat line.
(In our example, I 3 M 1 = 1.5 cm).

We draw up the middle line with a smooth straight line, connecting the points T 32, B 31, M 1 and I 41.

Today, trousers are a universal type of clothing that is in the wardrobe not only for men, but also for women. Depending on the model and cut, they can be worn to work, to the gym, to night club, stay at home or use as beautiful outfit for some holiday. If you decide to sew trousers yourself, then remember one rule - the pattern of women's trousers must be correct, then how to make a pattern of women's trousers is always of interest to needlewomen. Only in this case your product will be successful and beautiful. Do not be afraid to fantasize and experiment, only in this case you will be able to choose and sew for yourself exactly such trousers that will hide all your flaws, and vice versa will emphasize the dignity of your figure.
Of course, you can buy any pants now. But will the models be original? Most likely no. But by sewing it yourself, you make an individual cut that is suitable only for you. You can also decorate the pants as you like. So, let's figure out how to make a pattern for women's trousers. Let's get started.
But before proceeding with the analysis of the question of how to build a pattern, it is necessary to decide on the size.
Determine the size
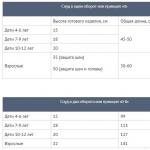
Before you start sewing, you need to find out your size, namely, take off such measurements as: waist circumference (1) and hip circumference (2). So, let's look at the main indicators:
- 42 size: 1 - 66 cm, 2 - 92 cm;
- 44 size: 1 - 70 cm, 2 - 96 cm;
- 46 size: 1 - 74 cm, 2 - 100 cm;
- 48 size: 1 - 78 cm, 2 - 104 cm;
- Size 50: 1 - 82 cm, 2 - 108 cm;
- 52 size: 1 - 86 cm, 2 - 112 cm;
- 54 size: 1 - 90 cm, 2 - 116 cm;
- 56 size: 1 - 94 cm; 2 - 120 cm.


After determining the size, you need to take the following measurements:
- Front length;
- Side length;
- First stride length;
- Second stride length;
- Knee length;
- Thigh circumference;
- Seat height;
- Bottom leg width.
Main types
The correct construction of the pattern indicates how successful the sewing process will be. We bring to your attention several options for ready-made patterns that you can easily download for free, and, based on your measurements, modify them, sew a model of trousers that you like.
The basic pattern of all trousers is the classic cut. It was by making their changes that famous fashion designers in their time came up with other styles of trousers. So, as you already understood, we are talking about the patterns of classic trousers.


Next, consider tapered trousers and their patterns. This type of trousers is perfect for girls who have a model figure. But, as designers say, it doesn't matter what parameters you have, the most important thing is how and with what you wear them.
When choosing narrow trousers, it is necessary to select more voluminous sweaters for them. It can be a tunic, sweater or oversized T-shirt.


Trousers breeches - very fashionable style today. We are sure that patterns of this style will definitely come in handy for every needlewoman. It is recommended to wear such trousers with a romantic and feminine top. Under no circumstances should they be worn with sweatshirts or T-shirts. They are perfect for you if you have a model figure. In other versions of the figure, such trousers will look ridiculous.


Wide trousers with elastic. This type will suit almost any shape. They are not only beautiful because of their cut, but also stylish. An important aspect when choosing this type of trousers is their length. Now in fashion, floor length, as well as their style and fit, should be free and not hinder movement.


Clothing designer
Good day, dear readers! Just as it is difficult to imagine a person living in the conditions of modern civilization who does not have at least one pair of shoes, it is impossible to imagine a man who does not have trousers. Therefore, we will not talk about the importance of this type of clothing. Let's just say that if you have a pattern for the base of men's trousers, you have in your hands a kind of "key to all doors": after all, with its help you can create absolutely any types of men's waist clothing (that is, what is worn on the lower part of the body ) - from classic and sports trousers to jeans and shorts. Modern men's fashion is diverse, and every representative of the strong half of humanity - regardless of age, body size and individual preferences - can find a style suitable for himself. Today we will share with you the secrets of designing men's trousers. Well, let's start, according to the established tradition, with a small excursion into history. So,
The history of classic trousers
The classic style (or so-called "English cut") men's suit, similar in its principles to the modern one, appeared in the second half of the 19th century. At the same time, a rational wardrobe similar to the modern rational wardrobe was formatted and approved. men's clothing... Since the beginning of the 20th century, the most widespread among all types of other clothing was a suit consisting of a jacket, vest and trousers, which acquired stable shapes and lines and became a classic type of men's clothing of the 20th century. Over the next decades, the classic types of men's clothing, and trousers among them, depending on the mainstream fashion, underwent certain changes (sometimes very insignificant in some seasons).
At the very beginning of the 20th century to change fashionable image Men were greatly influenced by the changing conditions of life - the development of various sports, the spread of cars, airplanes, motorcycles. For sports and new activities, new, more expedient costumes were created, the forms of which provided much greater freedom of movement, and the image disposed to greater ease of behavior.
So, we offer you a retrospective look at the fashion that touched men's trousers within the last century *.
20s
By the end of the 20s, the shape of the trousers, in comparison with the beginning of the century, becomes more straight, even along the entire length, the narrowing of the shape from top to bottom disappears, the vertical of the rigidly ironed fold is accentuated. Individual sharp shapes and curves of the figure are leveled, smoothed out: the waist is less emphasized, a hint of roundness in the abdomen disappears - the entire silhouette of the suit approaches a rectangle, and the shape of the trousers also contributes to this.

30s
In the early 30s, trousers become wider from top to bottom, more spacious and are laid in soft folds along the waistline, in addition, they are lengthened to the heel. The width of the trousers is concealed by more and more rigidly ironed vertical lines of the folds, which make their shape narrower, flattened in front, but wide and straight in profile. By the end of the 30s, trousers took on a rigid rectangular shape.

40s
The most characteristic fashion trend of the 40s was the increase in the width of the trousers from top to bottom, their increasing spaciousness. At the end of this trend, their width at the bottom reached 30 cm and more. They created the impression of a general large and static mass and resembled "two skirts". The entire male costume of this period as a whole was characterized by the predominance of masculinity and strength in images, was distinguished by clarity, militarism of forms.

50s
Since the late 1940s, the masses and forms of clothing have decreased, fabrics have become lighter, lengths have been shortened, and widths have decreased. In the 50s, the trousers, still loose at the top, smoothly taper downward, hugging the legs. Their average width at the bottom was recommended 22.5 cm, and at the knee - 2.5 cm wider. They are slightly shortened so that the colored socks are visible, and this further facilitates their shape. The folds of the trousers are ironed rigidly and rigorously.
It should be noted that in real life this transition from wide, loose to tapered trousers was carried out slowly and gradually: men were even then more conservative in fashion, and at that time it was also a consequence of economic difficulties. Therefore, men in old-fashioned, baggy suits with wide trousers in the form of "two skirts" continued to appear for a long time, until the mid-50s, along with others, dressed in completely different fashionable forms.
However, the youth of the 50s, having picked up the trend of narrowing of trousers, is carried away by it to the extreme, and by the end of the 50s. trousers reach at the bottom up to 20 cm or less, turning into tight-fitting pipes. So, for example, young sailors who wanted to look fashionable in the 1940s sewed in, and in the 1960s they ripped wedges out of their uniform trousers, violating the established standard for their width. It was during this period of time that the term "dudes" appeared, which was assigned to those who were unusually boldly following fashion for that time.

60s
In the 60s, there was a significant change in the criteria for the aesthetics and culture of men's clothing - expediency, convenience, comfort became the leading principles. And in search of these principles, bold and irreversible innovations take place - fashion designers borrow elements for a men's suit from work, sports, and even women's clothing abandoning old prejudices.
So "texas", later called jeans, have long been work clothes - practical, reliable and comfortable. Their second birth took place just in the 60s of the XX century, and jeans became one of the most significant discoveries of fashion. The functionality and sporty dynamic style of the jeans was emphasized by the tight-fitting cut on the legs and hips, decorative stitching of all details, metal rivets, and original pockets. Skillfully placed and decorated pockets accentuated those parts of the body below the waist that had not been revealed so frankly by the costume before.

In the second half of the 60s, the trousers lengthen, reach the middle of the heel of the boot, their bottom line is beveled - in the front they are 1-15 cm shorter. In addition, they become less narrow and straight from the knee to the bottom (average width - 23 cm). Top linetrousers fall from the waist to the hips, tightly fitting them and releasing a slender waist.
Due to the fact that fashion now offered a varied assortment of shoulder clothing - jackets, blouses, pullovers, turtlenecks - the jacket loses its obligation even in a business suit. And, as a result, trousers like independent element clothes (their shape, decoration, details), more attention has been paid. By the end of the 60s, the silhouette of trousers began to acquire a tendency to expand from the knee downward.
70s
In the early 70s men's fashion there were still two styles - classic and sporty, and two silhouettes - semi-adjacent and straight. The trousers still fit the thighs tightly, widen at the bottom (from 21-23 cm to 27-30 cm) and lengthen, covering the heels of the shoe. In addition, cuffs 4-5 cm wide that make the bottom of the trousers appear heavier. The legs in flared trousers help to emphasize narrow hips and, in general, we can say that the classic suit of the early 70s has a youthful character. In addition, the silhouette of the legs is additionally lengthened by shoes with thick soles and high, like women, heels.
By the mid-70s, the total volume of clothing increased slightly, and the shapes softened. The trousers are already widening slightly less downward, they are already more loose cut than flared, more calm, even shape along the entire length, with a tight fit along the hips and waistline in a natural place. And the shoes are returning to the classic parameters.
By the end of the 70s, trousers are getting a little shorter and tapering from the hips downward, and one or two folds are laid from the waist. The width at the bottom is from 24 to 28 cm, depending on the height.

80s
In the 80s in classic version the suit is dominated by straight, wide enough trousers, most often with soft folds at the waist. V sports style there appears a variant of trousers, baggy at the top (the volume was also created using folds at the waist) with a pronounced narrowing downwards - the so-called "bananas".

90s
In the 90s, with the flourishing of the grunge style and the increasing popularization of the rap and hip-hop movement, baggy trousers flourished, as well as trousers of incredible width with a very low rise that reveals the underwear belt. Also, one of the most popular models is cargo pants - military-style trousers with numerous patch pockets. In the early 90s, in the classic version, trousers are still quite voluminous and retain folds at the waist; by the end of the decade, their width gradually decreases, keeping the silhouette straight from the hip.

2000s
It is difficult to characterize the first decade of the new century as a single stable trend, there is a frequent change in styles. Not without, of course, some bright touches. For example, the model women's pants with a strongly underestimated crotch seam (forming a kind of "twist" between the legs) by the middle of the 2000s migrated to the men's wardrobe. However, few people rushed to take advantage of such a novelty - mostly advanced youth. O classic trousers we can only mention that their width is no longer strictly regulated, but throughout the decade it remained very moderate. Folds can be found only in rare specimens, and it is recommended to iron the trousers' arrows.

Modern Pants
So, what options does fashion provide for men now, in the second half of the 10s of the XXI century? These are the most diverse models of trousers, their width at the bottom in the “calm” version of straight models from the hip or knee can vary from 22 to 26 cm. given the elasticity of the fabrics used, it can be 20 centimeters or less.
So, we will give examples of some types of trousers, the names of which can be found in the catalogs of men's clothing today.
The trousers that are part of the classic suit now rarely have folds at the waist. Basically, given the different ages of the category of men wearing such suits, these are models straight from the hip, sitting quite tightly on the hips with an average waistline. In more youthful suits of casual style, trousers become more and more narrowed and shortened, taking on the appearance of pipes already well known to us from the 50s of the last century.

You can also often find such a name for trousers as “ slacks "- literally it can be translated as" lazy ", but in modern English there is such a translation of this word as" wide trousers ". However, this term does not always mean wide trousers, but refers mainly to trousers that are not part of a suit, and are a relaxed version of regular dress pants. Slacks look more casual than classic trousers, very often they do without ironed arrows at all, and not only business things can be combined with them.


Chino trousers like slacks, they are not a particular model, but they also have a number of features that make it possible to identify them among other types of trousers. These are colored trousers, most often made from 100% cotton (but taking into account the current tendencies to reduce the cost of production, they are also found from blended fabrics). The cut may vary, but according to current trends, it is also usually tapered. Others distinctive features are beveled pockets in the front and welt pockets in the back.

Whatever the name of the model of trousers is, at the peak of popularity are tapered models, and if a fit figure allows, you can choose both a classic and everyday version in such a silhouette. For those who have a more solid physique, or those who, due to their age, are not in line with the pursuit of every fashionable trend, there is an option to choose trousers of a more straightened and calm silhouette, and at the same time also look stylish and timely!
So, let's get down to what we have gathered today for - to build a basic pattern for men's trousers.
Building a pattern for the basis of men's trousers
Required measurements and other quantities
In order to build a pattern, we need the following figure measurements:
- The distance from the waist line to the plane of the seat Ds - measured from the side in a sitting position from the waist line to the horizontal plane of the seat.
- Hip girth About- measured at the level of the most protruding points of the buttocks horizontally around the body, taking into account the bulge of the abdomen (for this, a flexible plate is laid behind the tape that wraps around the waist line, placing it vertically to the abdomen and when measuring, a centimeter tape is drawn over it).
- Waist circumference From - measured horizontally around the torso at the waistline.
- Leg length by inner surface Day ** - measure along the inner surface of the leg the distance from the crotch to the floor with the legs slightly apart.
** Actually, instead of leg length Dn
,you can use:
1
) measure the distance from the waistline to the floor Dsb(measured from the side!);
2
) or immediately ask the required pants length Db from the waistline (which is less convenient and, for the most part, subjective, so how it can still be determined - a little later ...)
The entire basic grid of the drawing of the trousers is based on these measurements, therefore, if you imagine how the lines of this grid correspond to the lines of the human figure, it will be easy for you to remember and logically reproduce the construction sequence, and also imagine how the shape of the trousers will change when the increments and relative position change. the main contour lines of the grid.

In addition, you will also need to set this parameter:
- Pants width at the bottom Shn
As we saw in our retrospective review, pants width at the bottom- the value is not constant, and largely depends on the fashion. You and I want to have basic pattern , which can be taken as a basis for modeling a wide variety of styles of trousers. Therefore, in our example of construction, we take the average value of the width of the trousers at the bottom - 25 cm. Having given this parameter, we can get a pattern of moderate straight trousers, and from it, by means of certain transformations, you, if you wish, will get a pattern for any other - narrow or wide - trousers.
Their length also depends on the width of the trousers at the bottom - since, depending on the degree of fit of the leg, distance from the line of the bottom of the pants to the floor Rnp will be different.
And now the same has come " a little bit later", Which we talked about when we said that when constructing the baseline grid, we can use the length of the trousers Db : The length of the pants from the waist line can be obtained as the distance from the waist line to the floor Dsb minus Rnp
DB = Dsp - Rnp
And the value of the quantity the distance from the line of the bottom of the pants to the floor Rnp can be selected based on the width of the pants:
- For wide trousers (Shn = 28-32 cm) Rnp = 3-4 cm
- Dl moderate trousers (Shn = 24-27 cm) Rnp = 5-6 cm
- For narrow trousers (Shn = 20-23 cm) Rnp = 7-8 cm
Let's do it one more time: no need to measure and Chipboard , and Day …. just measure one thing!
Creation of a pattern of trousers
So, now for the fun part: consider EXAMPLE building a drawing on a figure with the following parameters:
- Ds = 26.6 cm
- About= 102 cm
- From = 84 cm
- Day = 85.8 cm (or Dsb = 116.4 cm)
Additionally, we use:
- Shn = 25 cm.
Accordingly, with such values of the width of the trousers and the distance from the waistline to the floor, we can immediately determine the estimated length of the trousers using the formula:
- Db = dsb – Rnp = 116,4 – 5 = 111.4 cm
We also need Increments :
- to the half-girth of the thighs: Psb = 1 cm
- to the waist half: Pst = 0.5 cm
That is, to the real girths in our example, the increments will be: along the hips - 2 cm, and along the waistline - 1 cm.
In fact, the increase in hips when building for older figures, as well as figures of greater fullness *** can be increased to Psb = 2 cm.
*** Under " completeness " v male figures the difference between chest girth is understood Og and waist circumference From ... The smaller this difference (it can also be negative), the greater the completeness.
Slightly increase the hip gainPsb makes sense when the value of the width difference is less than 10 cm. So although the measureOg and is not used directly when building a drawing of trousers, it will not be superfluous to measure it! Recall that the chest circumference is measured (the one that interests us - the so-called "third") at the level of the nipple points horizontally around the body.
Generating a drawing grid
So, what the baseline grid looks like - you could already imagine thanks to the drawing presented above. Let us explain its construction in a little more detail, and, so that we have it before our eyes, we will cite it again:

Draw a vertical line - trouser fold line... This will be the line along which the arrows on the trousers are ironed, if they are provided for in your model.
Mark a point on this line T and draw a horizontal line through it. This will waistline the front half of the trousers.
From point T set aside the measurement along the fold line Ds(distance from the waist line to the plane of the seat) and mark the point NS... Draw a horizontal line through a point NS- This will step line .
For example: TSh= 26.6 cm
The next drawing grid point is a point H indicating the horizontal position bottom lines ... You can get it in two ways (depending on what measure you "stocked up" - Day or Chipboard):
- from point NS lay down the length of the leg along the inner surface Day and mark the point H(in this case, you will need to specify the length of the finished trousers when trying on), or….
- from point T put the length of the pants down Dl and mark the point H.
For example: SHN= 85.8 cm, or TN= 111.4 cm
Divide the segment SHN in half and mark a point 5 cm above the obtained point TO... Through point TO draw a horizontal line - this will be the approximate level of the knees.
For example: Nc= 84.8 / 2 + 5 = 47.2 cm
From point NS set aside ¼ measurements Ds and mark the point B... Drawn through the point B horizontal will thigh line .
For example: SB= 26.6 / 4 = 6.7 cm
Building the front of the pants
To the left of the point NS on step lines mark point Ш1at a distance equal to Rev / 12 + 0.5 cm.
For example: ШШ1= 102/12 + 0.5 = 9 cm
To the left of the point Ш1 on step lines mark point W2 at a distance equal to about / 16-0.5 cm.
For example: Ш1Ш2= 102 / 16-0.5 = 5.9 cm
From point Ш1 up, draw a vertical line up. Mark its intersection with the hip line with a dot B1, and with the waistline - a point T1.
From point T1 to the right along the waistline, set aside 1 cm and put a dot T2.
Mark an auxiliary point Ш1 " necessary to draw a smooth midline of the front part. She is on the bisector of the corner Ш2Ш1Т1 at a distance of about 3 cm from the point Ш1... For large sizes(with a hip circumference of 110 or more) this value should be increased to approximately 3.5 cm.
W2, Ш1 ", B1 and T2... This will middle line the front of the pants.
From point T2 along the waist line to the right, set aside a distance equal to From/4+Pst(where Pst= 0.5 cm - an increase along the waist line) and mark the point T3.
For example: T2T3= 84/4 + 0.5 = 21.5 cm
From point B1 along the line of the hips to the right, set aside a quarter of the circumference of the hips and mark the point B2.
For example: B1B2= Rev / 4 = 102/4 = 25.5 cm
From point H set aside half the measurement along the bottom of the pants to the left and right Shn(the width of the pants at the bottom) minus 1 cm and dot H1 and H2.
For example: HH1 = HH2= Wn / 2-1 = 25 / 2-1 = 11.5 cm
From points H1 and H2 draw vertical lines up to the intersection with the knee line and mark the intersection points K1 and K2.
Spend lateral line H2, K2, B2 and T3... At the same time: points H2 and K2 are connected by a straight line segment, in section K2B2 the line has a deflection to the left by 0.5 cm, and then point B2 smoothly connects to point T3 (with a deflection to the right, also about 0.5 cm).
Spend step line the front of the trousers through the points H1, K1,W2... In this case: points H1 and K1 are connected by a straight line segment, and on the K1SH2 section, the line has a deflection to the right by 1 cm.
So, we have received a detail of the front half of the trousers! Further construction of the contours of the back of the trousers is based on the same drawing.
Building the back of the pants
From point Ш1 set aside a quarter of the distance to the right ШШ1 and mark the point Ш3.
For example: Ш1Ш3 = ШШ1 / 4= 9/4 = 2.25 cm
From point Ш3 draw a vertical up and mark its intersection with the hip line with a dot B3, and with the waistline - T4.
Along this vertical from the point B3 set aside a quarter of the distance B3T4 and mark with a dot B4.
For example: B3B4 = B3T4 / 4= 19.9 / 4 = 5 cm
From point W2 to the left set aside half the distance Ш1Ш2 and put a point Ш4... From point Ш4 put down 0.5 cm - and get a point Ш5, the extreme point of the "bow" of the back half of the trousers.
For example: Ш1Ш4 = Ш1Ш2 / 2= 5.9 / 2 = 3 cm
W4SH5 = 0.5 cm
Set aside 2 cm along the waist line to the right - get a point T5, and another 2 cm up from the point T5- get the point T6.
Also mark an auxiliary point Ш3 " necessary to draw a smooth midline of the back. She is on the bisector of the corner Ш4Ш3Т4 at a distance of about 4.5 cm from the point Ш3.
Draw a smooth line through the dots Ш5, Ш3 ", B4 and T6... This will middle line the back of the trousers.
Calculate the waist tuck solution on the back half of the pants Ripped: it will be 15% of the difference between hips and waist.
For example: Pit =0.15 (About-From) = 0.15 * (102-84) = 2.7 cm
From point T6 draw a segment - the waist line of the back half - before crossing the waistline of the front half, mark the point T7... Segment length T6T7 will be equal to a quarter of the waist From plus rear dart mortar.
For example: T6T7 =From / 4 + Pwyt = 84/4 + 2.7 = 23.7 cm
In the middle of the segment T6T7 put a point T8... From point T8 to the left and to the right, set aside half the solution of the rear dart Ripped/ 2 - these will be the edges of the dart. And down the perpendicular to the segment T6T7 from point T8 set aside the length of the dart (about 12 cm) - the point is obtained T8 ", the top of the dart. Connect the top of the dart to its edges.
Along the line of the hips to the right of the point B3 cut off a quarter of the hip girth plus an increase in the half hip girth Psb in 1 cm, mark the point B5.
For example: B3B5 =OB / 4 +Psb= 102/4 + 1 = 26.5 cm
At the level of the knee line, set aside 1 cm to the left and right, respectively, from the points K1 and K2- points obtained K3 and K4.
And at the level of the bottom line, set aside 1 cm to the left and right, respectively, from the points H1 and H2- points obtained H3 and H4... Bend the bottom line of the back half of the trousers slightly between the points H3 and H4- about 1 cm down.
Spend lateral line H4, K4, B5 and T7... In this case: points H4 and K4 are connected by a straight line segment, on the site K4B5 the line has a deflection to the left of approximately 1 cm, and then a point B5 smoothly connects to the point T7(with a slight deflection, no more than 0.5 cm).
Spend step line the back of the trousers through the points H3, K3, Ш5... In this case: points H3 and K3 are connected by a straight line segment, and on the site K3SH5 the line has a deflection to the right by 1-1.5 cm.
The drawing of the back half of the pants is ready!
Pants details
In theory, since we have drawings of the front and back halves of the trousers, then, in principle, it is already possible to sew straight trousers using them. But, in addition to the fact that you need auxiliary parts - such as a belt, pockets, codpiece - you will need to slightly adjust the contours of the main parts themselves. What will this adjustment be like?
First of all, I would like to say that that pattern-base of the trousers, which we have just received, provides for the location of the line of attaching the belt of the trousers at the level of the waist line. What in real life NOT meets !!! Even if the trousers have a sooooo "high" fit, the line of attaching the belt will in any case be 1-1.5 cm below the natural waistline.
And in the conditions modern fashion, the line of attaching the belt of trousers can be located not only at the level of the ilium, but even below. So it is clear that the waist line will need to be lowered.
Immediately, you will probably have a question: if you still have to lower the waistline, then why did we not immediately do this when constructing the drawing? Naturally, we could take this into account, but in this case we would have to have at our disposal several other dimensions of the figure:
- instead of waist circumference From use the waist at the level of the trouser belt Otb
- determine how much girth Otb is below the girth From - natural waistline (let's call this distance "belt position" PP )
- when determining the length of the trousers Db through the measurement of the distance from the waistline to the floor Chipboard the value of the "belt position" should be taken into account: DB = Dsp - Rnp - Pp
- when constructing the baseline grid, the segment TSh determine also taking into account the "position of the belt": TSh = Ds - PP
- also shorten the length of the dart on the back half of the trousers by the amount PP
If you already have the same initial drawing, just built according to the "original" measurements, then you will need to correct the contours of the front and back halves of the trousers by lowering the waist line to the required amount PP ... As a rule, in classic trousers, the belt stitching line is located 4 cm below the natural level of the waist, since the width of the belt itself is 3.6 - 4 cm. The belt stitching line is marked on the front and back halves of the trousers with lines parallel to the corresponding parts of the waist line. How it will look is shown in the figure below.
The transformed outlines of the details of the front and back halves of the trousers are shown in this figure with a bold line.

Depending on the model of the pants, other details may vary, but for example, this figure shows the construction of some of them.
What else might you need details :

These adorable skinny trousers are the perfect trendy combo partner for any top or jacket. Not a single woman of fashion can do without such trousers. Cropped and tapered at the bottom, the trousers perfectly fit the figure due to soft folds and at the same time allow you to show off beautiful shoes. Combine these pants with short jacket matching color - and spectacular image ready!
Tapered trousers pattern - details
Rice. 1-2. Sketch of tapered trousers front and back
Skinny pants pattern - modeling
The pattern of tapered trousers is modeled on. The length from the waist is about 97 cm, the width of the legs at the bottom is 29 cm. Draw modeling lines on the base pattern of women's trousers as shown in Fig. 3. Pattern of narrowed trousers - modeling of the front and back halves.
IMPORTANT! The waistline of the trousers is lowered, so before you start modeling the trousers, set aside 3 cm from the waistline (on the front and back halves of the pattern-base of the trousers), draw a new lowered waistline, cut along the line.
Rice. 3. Pattern of tapered trousers - modeling the front and back halves
Modeling the front half of the trousers
Draw the entry line into the pocket, setting aside 4 cm at the waist line to the right and 14 cm down, and burlap pocket. Move the dart to the fold. Increase the one-piece gaiter 3-4 cm wide and about 14 cm long (for attaching a zipper).
Tighten the trousers at the bottom to 14 cm, and shorten them according to your measurements (the length of the trousers depends on your height).
Additional volume is needed for the second fold. To do this, cut the pattern along the line of the arrow and push it 4 cm apart - you got a second fold and additional volume on the thighs.
Modeling the back half of the trousers
Tighten the back half of the trousers to 15 cm and shorten. The width of the back leg at the bottom should be 1-2 cm wider than the width of the front leg at the bottom. Apply entry lines to the pocket 15 cm wide and 1.5 cm high.
Skinny pants pattern - cut
In fig. 4. details of the cut of the tapered trousers are presented. Please note that the cut-off barrel, one-piece with a burlap pocket, is cut out of solid black fabric. The fabric consumption for trousers is 1.4-1.5 m with a width of 145 cm.
Rice. 4. Pattern of tapered trousers - cut details
Cut out from the main fabric:
- Front half of trousers - 2 pieces
- Back half of trousers - 2 pieces
- The belt of the front half of the trousers - 4 parts 8 cm wide (5 cm in finished form) and the length along the waist of the front half, taking into account the approach to the fastener.
- The belt of the back half of the trousers - 4 parts 8 cm wide (5 cm in finished form) and the length along the waist of the back half, excluding the dart.
- Side pocket burlap - 2 pieces
- Back pocket burlap - 4 pieces 18 cm wide and 20 cm long
- Back pocket facing - 2 pieces, 5 cm wide and 18 cm long
Cut out from a plain black fabric:
Cut-off barrel, one piece with burlap - 2 pieces
Allowances for seams - 1.5 cm, along the bottom of the trousers - 2 cm.
How to sew tapered trousers
Perform on the front halves of the trousers. Perform on the back halves of the trousers.
Lay folds on the front halves in the direction indicated by the arrows.
Sweep and grind side and step cuts, middle seam, leaving open the area for attaching the zipper. In front.
External parts of the belt. Stitch the reinforced and unreinforced parts of the belt together along the side seams and the middle seam of the back at an angle (so that the belt fits snugly around the waist, the connecting seams should be laid in such a way that the belt along the upper cut is narrower than along the lower one, therefore, each seam should be laid at 0 , 5 cm to the left to the top of the marked line). Cut and press the allowances.
Sew the outer reinforced belt part into the trousers, aligning along the side seams, lay the unreinforced belt part face to face on the sewn-in part, stitch along the upper allowance and short allowances, turn it off, sweep cleanly, tuck open allowances and sweep. Stitch the belt along the edge, stitch the belt loops along the markings.
Neaten bottom allowance of trousers, fold in and sew by hand with blind stitches.
Your skinny pants are ready, wear with pleasure! Even more new interesting ideas you will find on the website of the Sewing School of Anastasia Korfiati. Subscribe to free lessons and sew fashionable clothes together with us!
Every woman should have at home sewing machine... It is used most often for household needs: to sew a hole, shorten a skirt or sew a handkerchief. But what if you sew yourself women's trousers yourself? A pattern for beginners can be found ready-made or built on your own. This is not as difficult as it might seem at first glance.
Self-production of trousers may be needed in different cases:
- When shop pants don't fit properly. This can be caused by different reasons: non-standard ratios of the waist and hips, pregnancy, fullness in some places, and others.
- When you want something exclusive. Stores and markets are full of typical products from the simplest fabrics. Exclusive models cost fabulous money.
- When a high-quality fabric was found at home, which is just suitable for trousers in size and composition.
- When for a new thing. If we compare the cost of the amount of fabric required and the cost finished product made of fabric of the same composition, you can see that making trousers yourself will help you save money.
If there are very few sewing skills, then you can try to make the most simple model trousers. For example, a pattern of women's trousers for beginners can be used (harem pants or trousers with an elastic band as a result will be obtained).
What is needed
In order to sew trousers, you will need:
- Millimeter paper for building patterns.
- Pencil, needles, spools of thread, matching the tone.
- Measuring tape
- Main and
- Sewing machine.
- Overlock for processing the edges of the product. If it is not there, it is not necessary to buy a special device. It is quite possible to follow the example of Italian fashion designers and process the edges of the product with a bias tape, which is sold in the hardware store. You can cut the inlay yourself from the same lining fabric.
- For finishing as needed: elastic band, zipper, buttons, hooks, bodice and others. Additional materials are selected according to the needs of the model.

Where to begin
In order to independently make a pattern of trousers, you need to take your own measurements. It is better to do this in one underwear. With the help of a measuring tape, you need to measure yourself in the places necessary to build the pattern:
- OT (waist circumference). Measured around the waist at the narrowest point.
- OB (hip girth). Measured at the widest point of the body. If this is the area of the buttocks, then the measurement is made at the most protruding place without tightening the tape. If the widest point is in the area of the breeches zone, then the tape should be slightly shifted down to this zone.
- Bottom width (SHN).
- DB (side length). This size is determined by the distance along the side of the leg from the waist to the floor.
- BC (seat height). This distance is determined as follows: you need to sit on a chair and lower the perpendicular to the seat. The length of this segment is the required size.
- VK (knee height).
- LH (stride length). This indicator is calculated from the difference in the length of the product in the lateral step and the height of the seat.
- The width of the front and back halves of the trousers.
These designations are used when constructing patterns, and are also used in ready-made patterns in magazines or on the Internet.

Where possible without building
If you don't really want to deal with the complex construction of a pattern that uses formulas, you can use the ready-made option:
- Magazine. You can buy a fashion magazine and copy the pattern from there. The convenience of this method lies in the fact that the magazine often describes in detail how to carry out individual elements of the model when sewing, and also gives advice on choosing a fabric and cutting a product. The downside is that all models are for the most common sizes and typical shapes. Therefore, the owners of non-standard forms will have to adapt ready-made pattern to myself.
- Ready-made trousers. It happens that there are old trousers in the closet, which have become unusable due to the service life or have become trite to be small. You can take them and rip them apart at the seams, then wash, iron them out and cut out a new product along them, adding, if necessary, a few centimeters in the right places.

If there is no ready-made pattern, then it is worth building a pattern that will ideally take into account all the features of the figure and can be used in the future to make various models of women's trousers. Through simple manipulations, the pattern-base of women's trousers for beginners will turn into a designer product.
Building a pattern
For cutting, you will need a pattern for women's trousers for beginners. Step-by-step instructions will help you build it correctly. And with a little effort, you will become the owner of brand new original trousers.
Usually it is quite difficult to construct a pattern for women's trousers. For beginners, however, the drawings do not use complex formulas. You will need to use only two body sizes: hip girth and product length. But it is worth considering that any pattern that is used for the first time must be adjusted to a specific figure.
Cutting will need to be done taking into account the fact that you will have to leave more seam allowances. The first time it is better to do it with a margin to protect yourself from mistakes. For the second time, you can already use a ready-made pattern and easily sew women's trousers. The pattern for beginners is done in the very simple version and is used for sewing straight trousers, which are used in basic wardrobe any woman.

This scheme can be built in just half an hour.
Pattern of women's trousers for beginners: step by step instructions
First you need to determine the so-called hip rate. The formula for the calculation looks like this: Нб = 1/20. That is, if the girth of the hips is 100 cm, then the norm of the hips, calculated according to this formula, will be 5. The second formula, which is used for construction, concerns the determination of the value of the coefficient of the hips. The formula looks like this: KB = NB / 2. That is, the hip ratio is half the value of the hip norm. With a hip girth of 100 cm, the coefficient will be 2.5. In the construction of this pattern, the increase in seams (1 cm) has already been taken into account. The increase along the bottom edge is 3 cm. The pattern of women's trousers of size 54 for beginners will have a hip rate of 6, and size 44 - 4.5. This is how women's trousers begin to be built.
Pattern for beginners: calculating the front half
It is more convenient to first build a pattern on a scale sheet, then transfer it to a sheet of paper already in life size.
In the center of the sheet, a square is built containing 5 values of the hip norm on each side. For example, if the hip norm is 5, then the square will have sides of 25 cm each.
Now, from the lower right corner of the resulting square upwards along its side, we set aside the value of 1.5 norms of hips. In the example, it is 7.5. From the same angle, set aside 1 value of the hip norm to the right. The resulting line is the line of the buttocks. From the obtained angle, it is necessary to postpone a segment equal to half the norm of the hips, and through its end draw a line connecting the first two set points.

Now it is necessary to mark in the drawing the line of arrows for future trousers. To do this, from the lower left corner along the line of the buttocks, it is necessary to set aside 3 norms of the hips to the right and draw a vertical line along this point. Now, from the point of intersection of the line of arrows and the upper surface of the square, you need to measure the length of the trousers, postpone this segment along the line of arrows down. It turned out the bottom line of the trousers. To determine the knee line, the segment from the bottom line to the buttocks line is divided in half.
Now you need to taper the legs. For classical model trousers, it is calculated as follows: on the knee line from the arrow line to the right and left sides, set aside along a segment equal to 2.5 hips. On the bottom of the trousers from the line of arrows, 2 hip norms are laid. This is how a pattern is built for such a thing as women's trousers. For beginners, even, as you can see, there is nothing difficult.
Building the back half
It is more convenient to build this part of the model on the front half, but for convenience it is highlighted in a different color.
You need to find the originally constructed square and above its upper right corner in left side draw a square equal to 1 hip ratio on each side. Further from the already existing step line of the front half, you need to postpone one hip norm to the right, and from it a fourth of the norm. Now you need to draw a smooth line from the resulting point to the upper left corner of the small square. From the same upper left corner of the small square, it is necessary to postpone 5 values of the hip norm so that this line connects with the waist line of the trousers of the front half of the pattern. The line will turn out a little at an angle.
Now you need to add one norm of the hips along the knee line and the bottom line and connect the line side seam... The pattern is ready! Now it remains in the required scale to transfer it to a large sheet of paper and start cutting. Note that there are no darts on this pattern. The authors of this method recommend, after cutting, to try on bent trousers and mark the dart where it is needed. This can be determined in a practical way. Some models use pintucks instead of darts, so you can only place them at an equal distance from each other. There is very little left to sew women's trousers. A pattern for beginners allows you to master the basics of the cut, and then it's a matter of technology.
Further actions
After transferring the pattern to full-size paper, you need to take the prepared fabric, iron it out if necessary, fold it in half and pin the pattern with needles. Each half of the trousers is cut out in duplicate. Before you attach the pattern to the fabric, you need to determine the direction of the shared thread. The pattern of the trousers should be located strictly in the vertical direction. For beginners, you can advise the easiest way to determine the shared thread: you just need to pay attention to the edge of the fabric. It sets the direction. This means that the drawing must be applied parallel to the edge of the fabric. Draw future women's pants on the fabric. The pattern for beginners helps to master the basics of cutting and sewing without any problems.
Getting started sewing
After the pattern is chalked on the fabric, you need to cut it out with sharp scissors. Next, the details of the trousers are swept away and tried on. If the fit of the trousers on the figure is satisfactory, then you can start sewing on the machine. If the planting requires adjustment, then sweeping is carried out again and the product is tried on again. This is done until the landing is satisfactory to the hostess.

Modeling
We examined how the pattern of women's trousers (size 54) is built. Everything was explained in detail for beginners. If an elastic band is used when sewing, and the goal is to obtain summer trousers, then silk fabric can be used. If you make additional narrowing, then you can get pipes-pipes that are fashionable now. The basic principle of modeling: where you want the trousers to be wider, the pattern expands, and where you need a tight fit, it narrows.
Conclusion
Thus, having built a drawing, you can sew fashionable women's trousers for yourself in just an evening or two. The pattern for beginners is easy and quick to build. Having made a blank once, you can sew several models of trousers on its basis.
We also recommend
 Ideas for decorating a table with origami products Origami from napkins flowers light with diagrams
 Knitting for beginners is the easiest
 Knitting for beginners: schemes with a description
 DIY patterns of summer dresses and sundresses: a master class for beginners
 Alginate mask: affordable recipes at home
 How to close loops for snood