Crossed columns. Crochet embossed crossed posts in patterns for blankets and other things
Crossed double crochet:
Knit 2 double crochet crosswise: first on the 2nd loop of the base, then on the 1st.

Crossed double crochet:
(5 lifting loops correspond to it). Having made 2 yarns, insert the hook into the 6th loop of the chain, pick up the working thread and pull it through this loop (there are 4 loops on the hook). Pick up the working thread

and knit 2 loops (3 loops on the hook). Without tying loops on the hook, make a yarn over, insert the hook into the loop of the base through one loop to the left of the 1st column, pick up the working thread and pull it through this loop (there are 5 loops on the hook). Further, picking up the working thread,

alternately knit 2 loops 4 times (1 loop remains on the hook). Do 1 air loop, yarn over and insert the hook into the center of the column, grabbing 2 threads,

pick up the working thread and pull it through 2 threads of the center of the column (3 loops on the hook). Picking up the working thread, knit 2 loops 2 times.
These columns can form an independent pattern and be combined with other columns.
Once I met a photo of a blanket of incredible beauty on the networks, at first I could not understand how it was connected. But then I figured out that the pattern used crossed columns.
We will learn to knit crossed columns with two crochets, and not simple columns, but embossed ones.
We collect a chain of air loops of the required length.
We knit the 1st row simply with two crochets.
2nd row: 4VP, skip two base loops, then knit two embossed columns with two crochets. To do this, we make two yarns, insert a hook under the body of the column of the previous row, pull out the working loop longer and knit the loops alternately together. Similarly, we knit the second embossed column.


Thus, we continue to knit the entire row.
I repeat once again: first we knit embossed columns under the 3rd and 4th column of the previous row, then under the 1st and 2nd.
At the end of the row we knit one C2H in last loop grounds.
This is how the crossed columns are obtained.
We turn knitting.
We also knit all odd (purl) rows.
4th row: we knit in the same way as the 2nd, but the columns should turn out to be crossed from below.
At the beginning of the row 4VP, 2 regular single crochet, skip 2 base loops, 2 embossed C2H.


We knit the second crossed embossed column.
We get columns crossed from above in one row, and columns crossed from below in the other.
I took the photo, but perhaps it will be clearer and clearer if you watch the video from which I learned to crochet crossed crochet crochet stitches.
I must say that out of habit I didn’t succeed right away, but then I got my hand full.
We will learn to knit crossed columns with two crochets, and not simple columns, but embossed ones.
We collect a chain of air loops of the required length.
We knit the 1st row simply with two crochets.
2nd row: 4VP, skip two base loops, then knit two embossed columns with two crochets. To do this, we make two yarns, insert a hook under the body of the column of the previous row, pull out the working loop longer and knit the loops alternately together. Similarly, we knit the second embossed column.


Thus, we continue to knit the entire row.
I repeat once again: first we knit embossed columns under the 3rd and 4th column of the previous row, then under the 1st and 2nd.
At the end of the row we knit one C2H in the last loop of the base.
This is how the crossed columns are obtained.
We turn knitting.
We also knit all odd (purl) rows.
4th row: we knit in the same way as the 2nd, but the columns should turn out to be crossed from below.
At the beginning of the row 4VP, 2 regular single crochet, skip 2 base loops, 2 embossed C2H.


We knit the second crossed embossed column.
We get columns crossed from above in one row, and columns crossed from below in the other.
I took the photo, but perhaps it will be clearer and clearer if you watch the video from which I learned to crochet crossed crochet crochet stitches.
The hero of this tutorial for beginners from "Crochet" is a double crochet. The element is one of the most common, and today we will analyze step by step and in pictures how to perform it correctly. And, of course, you can't do without traditional tips for dessert either.
In crochet patterns, a crochet column is indicated by a large vertical line with small dashes, the number of which corresponds to the number of crochets we need. Dashes can be horizontal, oblique and even look like a zigzag line - don't be confused by this, they all mean the same thing. In the descriptions of work, this element has the designation of Art. from 1 n., art. from 2 n., art. from 3 n. and so on, or C1H, C2H, C3H.

- Column with 1 crochet - 3 vp
- Column with 2 yarns - VP 4
- Column with 3 yarns - VP 5
- Column with 4 yarns - 6 vp
Art. 1 n. Art. 2 n. Art. 3 n.
The rules for knitting the front wall, back or both are exactly the same as when knitting. And our hero of the day fits very similarly.
How to knit a column with one crochet
To move on to a new row, we need three lifting loops. Therefore, if we have the first row, we skip three loops plus one loop of the base and begin to knit from the fifth from the hook of the air loop.
Before inserting the hook into the loop, we make a yarn - we pry on the working thread in the same way as we do it by knitting the loops. On the hook, you get an air loop and a yarn-yarn. Only after that we insert the hook into the fifth air loop from it (and with further knitting it will be the first loop of the previous row from the hook), pick up the thread and knit. The hook now has a loop, yarn over and one more loop. We pick up the working thread and knit together the just knitted loop and yarn. We have two loops on the hook, and we knit them together. Done, you can proceed to the next similar element.
Step 1 Step 2 Step 3 Step 4
How to knit stitches with two or more crochets
Columns with two, three yarns and so on are knitted in the same way, with the only difference that before inserting the hook into the loop of the previous row, we make the appropriate number of turns of the thread - they will be our yarns. They should be knitted alternately: a loop and one yarn, the next step is the resulting loop and a second yarn, and so on, until there are two loops on the hook, which we will knit together.
Step 1 Step 2 Step 3 Step 4
Important: one lifting loop corresponds to each yarn. That is, in the first row, we will insert the hook into the sixth, seventh, and so on loop from it. Remember to knit these stitches in advance. Moving from one row to another, also remember to increase the number of lifting loops.
Convex and concave columns
Starting from the second row, we can knit embossed columns - convex and concave. They are also called facial and purl. In the diagrams, they are indicated by vertical lines with an unfinished circle at the bottom with a corresponding number of horizontal strokes - the convex one corresponds to the image where the unfinished part of the circle is on the left, and the concave one is where it is on the right.
Convex Concave
Let's take a closer look at our first row. There are gaps between the vertical elements - this is what we will use in our further work.
How to knit a raised double crochet
For a convex, or front, double crochet, from the front of the work, we will introduce a hook between the vertical elements of the previous row and go around the element, as shown in the photo. Of course, we did not forget to throw in the working thread. We pick up the thread and stretch it so that it is behind the post, and we have a loop on the hook. We knit it together with the yarn over, the next technique is both the loops we have got. Here is the first front embossed column.
Step 1 Step 2 Step 3 Step 4
How to knit a concave double crochet
To knit a concave, or purl, embossed column with a crochet, we do everything the same as in the previous version, only we put the hook into work from the wrong side and knit the loops behind the work. This is not very convenient, so it is better to turn the hook with the nose up.
Step 1 Step 2 Step 3  Step 4
Now let's try to knit alternately facial and purl columns... We will get such a vertical elastic band, it stretches remarkably. A very, admittedly, useful drawing when you need to make cuffs or a neckline. You can also create a whole product with such an elastic band - for example, a snood or an elastic scarf.
Important: the row when using this technique will turn out to be lower than usual, therefore at the end, when you reach the lifting loops, it is better to knit not in them, but under the chain in order to equalize the height.
Simple drawings
And for the promised dessert, we picked up a few simple drawings that you can easily complete after today's lesson.
With a common base
A very common and at the same time interesting pattern is obtained if we knit two or more columns in one loop of the previous row - this is called knitting into a common base. They are knitted in the following order.
Step 1 Step 2 Step 3
So that our product does not deform, we count the required number of loops of the previous row. If we knit three s.1n into a common base, skip one loop and knit in the second, if five, skip two and knit in the third - their number in the upper and lower rows should match. On the diagram, it looks like this:
After we have knitted the required number of stitches in one loop (it is usually odd), we skip the same number of loops below as before the beginning of the element, and continue working.
Important: when working on such a pattern, you need to calculate the length of the row in advance. Number of bp in the chain must be a multiple of the number of s.n.
If you need to increase the row, and when working on a round product it will be necessary to do this, use this particular technique - knit the required number of columns in one base. Of course, in this case, you won't have to skip anything at the bottom of the row.
Common top
The next figure is a mirror image of the previous one. This time we will knit in different base loops, but the top will be common. In this case, we first knit the required number of air loops - we count in the same way as we counted in the previous pattern, how many of them must be skipped: at three s. 1n. we do 1 vp, with five - 3 vp. Further we will work in the following order.
- We make a yarn, pull out the working thread from the first loop and knit the resulting loop together with the yarn. On the hook we now have two loops, which we are not yet knitting.
- Into the next loop bottom row we will knit half of the s.n. again. - and so on until the required number is available.
- We close all the half-knitted columns in one step by pulling the working thread through them.
- We make a chain of the appropriate length.
Step 1 Step 2 Step 3
The same technique - knitting with a common top - can be used to decrease the row. In this case, the chains that we performed so that the rows are the same in length will not be needed for us.
Crossed columns
Let's see how to make this pattern, using the example of p. 2n. after one VP It is indicated by two crossed lines with dashes - above and below the crosshair, and on the diagram it looks like this:

Such a drawing is made as follows.
- We carry out four vp. for lifting.
- We throw on the working thread twice and insert the hook into the fifth loop from it.
- We stretch the working thread and knit together the formed loop and the first yarn - the second is still on our hook. It turns out that we have knitted p.2n. half. Let's leave it that way for now and move on to the next one.
- We pass one loop of the base and pull the thread through the second.
- We knit the resulting loops and yarns in pairs until there are two loops on the hook, which we will also knit together.
- We do one vp. and put on a working thread.
- We introduce the hook into the crosshair under two arcs, as shown in the picture and stretch the thread.
- We finish the column as usual - knitting loops and yarns in pairs.
Scheme Step 1 Step 2 Step 3
Step 4 Step 5 Step 6 Step 7
It turned out openwork pattern, which can serve, for example, as a decorative border. Such a drawing is often used in the design of works performed in. For greater airiness, we made not one air loop in the element, but two.
Crossed columns
Oddly enough, crossed and crossed are two completely different patterns. You can cross both to the right and to the left, we will analyze both options. The number of columns when crossing can also be different. For example, we will cross three with one.
Crochet Columns Crossed Right
We skip one loop of the base and knit the number of columns we need, starting with the second, in the usual way. And now we return to the missed loop and knit the crossed s.n. into it. The length of the chain, of course, is also calculated in advance.
 Scheme Step 1 Step 2 Step 3 Step 4
Crochet Columns Crossed Left
We retreat from the edge of the row by the required number of loops - in our case, we will skip three and knit s.n. the fourth is the same as usual. Now let's go back to the beginning of the row and connect three more s.n. behind the crossing. Here we have such a pattern.
Step 1 Step 2 Step 3 Step 4
Of course, you can make a lot of patterns using our "hero of the day". We are already preparing a selection with a variety of drawings and schemes for their implementation. Stay tuned for our next tutorials! Until then, don't forget to share what we've taught you on social media.
Crochet pattern - crossed columns. Different, different types crossed columns. They are often used in vintage dresses by Vanessa Montoro, which interests me especially.
I think that not only me. Therefore, the moment for knitting dresses based on Vanessa Montoro is a fundamental thing.
Crochet lessons - crossed posts - the topic of our article today.
Crossed columns - how to knit
How to knit crossed columns so that they become the highlight of the canvas? This is not an idle question. They are often used and add a special piquancy to the products. But the knitting process itself is sometimes difficult even for experienced knitters due to various interpretations.
Sometimes it is difficult to understand which column and what kind of performance is implied in the description. To avoid wasting time on knitting and to make life easier for knitters, we will analyze how they knit and what they are - these same crossed columns.


In Vanessa Montoro's dresses, crossed columns are used very often and knowing how to knit them is very important if you want to bring one of the dresses from Vanessa's collection to life.
Or make a thing inspired by her marvelous and at the same time practical dresses.
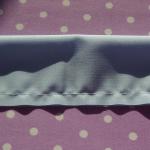
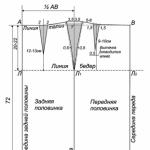
Cruciform posts
Attached in the center. The middle is compacted.
Regardless of the number of crochets or dividing air loops at the base of the report (top of the posts), there are only TWO of them.
Crossed Posts - Regular
Step by step description techniques for knitting crossed posts
Crossed concave columns


Here is a video on knitting crossed posts. In my opinion, a very clear and intuitive guide.


The list of crossed columns is not limited only to the listed types crocheted columns. There are many more. But having mastered these basic ones, you can move on to more elaborate and complex ones.
For Vanessa's dresses, a general understanding of how to knit crossed columns is usually enough. Then, from the photo, you can figure out how each specific crossed column in the product looks like.
We also recommend
 Rules for grinding and wet-heat treatment of garments
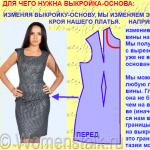 Building a pattern for the basis of a dress: Italian technique as the easiest way to make a good pattern
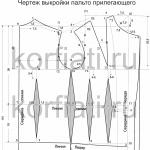
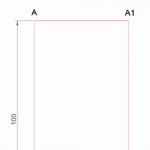 How to build a dress pattern base
 We model and sew coats!
 Skirt of the year, construction of a pattern
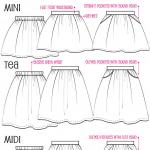 Fashionable children's skirts from old jeans - patterns and description