Leggings pattern. How to sew knitted leggings Mk to sew leggings for a girl
An excellent master class on how to sew children's leggings in 30 minutes, and besides, without spending money on material. Because leggings for a child can be easily sewn from an unnecessary T-shirt of one of the parents. How to do it - read below. And also see how it looks in practice in the video with a master class from Dana and Miranda.
How to sew leggings for a child with your own hands? What fabric to sew children's leggings from? All these questions are very clear on the eve of summer, when children are scratching their knees on trousers and leggings at the speed of sound, so that in a week the children's wardrobe can easily become empty. Plus, not all moms are ready to buy new leggings as soon as the child ruins the ones he has.
We offer a very simple and understandable master class from Dana, the author of the blog Madeeveryday, and her friend Miranda, "the queen of do-it-yourself leggings", on how to sew children's leggings with your own hands in 20 minutes.
How to sew children's leggings with your own hands: making a pattern
To make a pattern, before sewing leggings for a child, Dana suggests using the child's leggings that your toddler is wearing.
Take a piece of paper that you have, it could be brown paper or even wallpaper. If you have leggings for children that fit but are no longer needed, cut them at the inseam. Put the detail on the paper and circle it. Do not forget to make an allowance (2-3 cm) for the elastic. Cut out a pattern.
How to sew leggings for a child with your own hands: method number 1
To sew baby leggings from a T-shirt, place the pattern from the first sample onto a clean, ironed adult-size T-shirt so that the bottom edge of the pattern matches the bottom edge of the T-shirt. This way you don't have to process the hem of the leggings. Cut out the details.
Fold the piece in half, wrong side out. Sew the inside leg seam. Use a seam on your sewing machine for knitted fabrics.
After both legs are sewn together, you need to sew and together. Turn one leg right out and tuck it into the other leg, as Dana does at 7:40. Pin or sweep the crotch seams. Sew.
How to sew children's leggings: method number 2
To sew leggings from a cut of knit fabric, as Miranda does, you need to fold it in half and then fold it again. Attach the pattern, made according to the second sample, with a mark to the fold. Cut out with an allowance at the bottom.
Miranda makes the leggings with a yoga waist, padded belt, so she cuts out another detail. In order to calculate what size you need a part for children's leggings with a soft belt, measure the child's waist. If you want the belt to fit snugly, subtract 7-8 cm from the waist. This will be the length of the part. The width of the part is 16 cm, in order to get a belt with a width of 8 cm.
One more moment, Miranda sews leggings on an overlock. This does not require additional processing of the seams.
How to sew leggings with a soft belt with your own hands on an overlock. We take one leg, fold it in half, sew the inner seam. Do the same with the other leg.
Then, as Dana showed earlier, we turn one leg out onto the front side and tuck it into the other. Sew the crotch seams.
Now we take up the belt. Fold the piece in half with the wrong side out, and sew the edges to make a circle. Fold the resulting circle in half, right side out, and put it on almost finished leggings, turn it out, as in the video at 13:30 minutes. If there is a print on the fabric, you need to pay attention that the direction of the pattern on the leggings and the belt coincides; in this case, Miranda draws attention to the fact that the berries are all "looking" in the same direction.
We sew. Two layers of the belt and the actual leggings. Since the waistband is slightly shorter than the circumference of the waistband of the leggings, the waistband should be tightened slightly while sewing.
To process the bottom of the legs, tuck them in a couple of centimeters, and turn them out, as Miranda shows at 14:20 minutes. This way, when you sew on the overlock, you get a neat seam. Be careful not to cut off anything extra.
Source madeeveryday.com
.png)
Hello, friends!
Very simple!
Although initially trousers-leggings were an attribute of men's clothing (remember a hussar or a courtier) and were sewn exclusively from elk skin (hence “leggings”), now they are a favorite type of clothing made of various materials.
After fashion shows in the 80s leggings firmly rooted in the female and are not going to give up their positions.
Currently, tight-fitting trousers - leggings (leggings) are also in fashion.
Leggings are now striking in their diversity - from dense and thin fabric, with a colorful print or geometric pattern, "under jeans" or "under the skin", home and "out", adults, teenagers, children. For every taste!


I think many will agree with me that leggings or even they are called leggings (from the English word leg - leg), this.
Moreover, they can be worn as an upper layer of clothing - like trousers or as underwear, which will warm you on a country walk and on frosty days. It all depends on the material chosen for the leggings.
Leggings are very popular clothes for children, and especially for girls. It is convenient to spend leisure time, play sports, and just walk in them. Such convenience is achieved due to the material from which the leggings are sewn - elastic and bi-elastic knitted fabrics. Leggings can be combined with or, and in the cold season, leggings can even be worn over tights. In this lesson, we will tell you how to build an accurate pattern for children's leggings, and also give a master class on sewing such a product.
What types of leggings do you know?
- Classic - monophonic, which you can wear separately or under a skirt or dress.
- Capri leggings - their length can be ankle-length or slightly higher. Mostly they come in bright colors and are especially popular in combination with a miniskirt.
- Evening leggings - featuring lace trim, sequins, stones, beads, etc.
Sports leggings - for sports, outdoor activities and walks. - Leggings (jeggings) - a combination of leggings and jeans, sewn from jersey under jeans, elastic and tight-fitting legs.
- Treggings - in appearance they imitate tight trousers, are sewn from dense fabric and can be decorated with rivets and patch pockets.
IMPORTANT! Since leggings are very tight-fitting clothes that are sewn only from elastic materials, all increases are made negative, that is, they reduce the volume and length of the measurement values depending on the elasticity of the fabric.
The negative increase to the measurements of volumes is 15-20%, to the measures of lengths - 5%.
Advice! Negative gains should be increased or decreased, depending on the elasticity of the fabric.
The construction of the pattern is made for a height of 140 cm.To build a basic pattern for leggings, you must remove:
- Waist girth 61 cm
- Hip circumference 75 cm
- Hips height 14cm
- Seat height 21 cm
- Knee height 48 cm
- Calf height 13 cm (measured from the knee to the widest part of the lower leg)
- Knee circumference 31 cm
- Calf circumference 25 cm
- Ankle circumference 20 cm
- Leggings length (ankle length) 80-83 cm.
Building a pattern for children's leggings
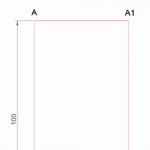
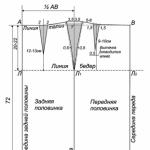
At the top in the center of the sheet, put point A. Through point A, draw a horizontal line to the left and right (Fig. 1). Along the line, set aside segments AA1 = AA2 = 16 cm (1/4 of the hip circumference by measure minus 15% (negative increase)).
Leggings length. From point A, lower down the perpendicular segment AH = 83 cm (Length of leggings as measured). AN - side line.
Hip line. From points A1 and A2, lower the perpendiculars down: A1B1 = A2B2 = 14 cm - 5% = 13.3 cm (The height of the hips as measured with a negative increase). Connect points B1 and B2 with a straight line; point B is obtained at the intersection with the side line.
Step line. Extend perpendiculars from points A1 and A2 down:
A1D1 = A2D2 = 21 cm - 5% = 20 cm (Height of the seat as measured with a negative increase). Connect points D1 and D2 with a straight line. Point D is obtained at the intersection with the side line.
Rice. 1. Pattern of children's leggings
Knee line. Segment AK = 48 cm - 5% = 45.6 cm (Knee height as measured with a negative increase). Draw a horizontal line of arbitrary length through point K.
The step width of the front half of the leggings. D2D3 = 1 / 20OB - 0.5 cm = 75 cm / 20 - 0.5 cm = 3.25 cm. Set the segment D2D4 = ½ D2D3 upwards from point D2.
Midline of the front half of the leggings. From point A2 along the waistline, set aside 2 cm to the left and 2 cm down (for all sizes) - point A3. Connect points A3, B2 and D3 as shown in fig. 1.
The step width of the back half of the leggings. D1D5 = 1 / 10OB - 1.5 cm = 75 cm / 10 - 1.5 cm = 6 cm. Set aside D1D5 = 6 cm.
The middle line of the back half of the leggings. From point A1 along the waistline, set aside 3.5 cm to the right (for all sizes) - point A4. Connect points A4, B1 and D5 as shown in the drawing (Fig. 1).
Drawstring allowance for elastic. Connect points A4 and A3. Add a drawstring hem to the top edge of the 2cm leggings.
Step seams. Along the knee line from point K, set aside ½ of the knee circumference to the left and right with a negative increase: KK1 = KK2 = (31 cm -15%) / 2 = 13.2 cm.
Along the shin line from point L, set aside ½ of the shin girth to the left and right with a negative increase: LL1 = LL2 = (25 cm - 15%) / 2 = 10.6 cm.
Along the bottom line from point H, set aside ½ of the ankle girth with a negative increase to the left and right: HH1 = HH2 = (20 cm - 15%) / 2 = 8.5 cm. -L2-K2-D3 with smooth lines.
The cut details of the leggings are shown in fig. 2. Cut out two pieces with 1 cm seam allowances on all sides and 2 cm on the bottom of the leggings.
Advice! To make it convenient to handle the bottom edge of the leggings, from the bottom line (H1H2) draw short sections of step cuts at right angles, then along the pattern.
Rice. 2. Details of the cut of children's leggings
IMPORTANT! After building the pattern, check all the girths on the lines: waist, hips, stride, knee, lower leg and ankle.
You will find even more useful patterns for children's clothing, and interesting ideas for creativity on the website. Subscribe to our free lessons and sew baby clothes with us, because it is not only very simple, but also incredibly exciting!
Hello, my dear readers! Today we will focus on one very favorite and common among women clothes - leggings, and learn how to make them pattern... What is the secret of the comfort and popularity of leggings among girls and women?
Firstly, it's beautiful, because tight leggings, like leggings, successfully emphasize slender legs.
Secondly, it is convenient. It is convenient to go in for sports, comfortable as home clothes, it is convenient to walk, travel.
And all this thanks to the elastic knitted fabrics from which the leggings are sewn.
Leggings can be conveniently combined with blouses or T-shirts, or can be used as a stylish addition to a dress or skirt.

- classic models(plain)
- capri pants (ankle length, goes well with mini skirts)
- (for training, walking and outdoor activities)
- leather leggings(such leggings are usually sewn from artificial leather)
- evening (differ from the classic ones by the presence of lace, beads, sequins)
- jeggings (these are leggings made from jersey under jeans)
- treggings (sewn from dense jersey and decorated with patch pockets, eyelets)
What to wear leggings with? 
This is a versatile garment that goes well with T-shirts, tunics, extra long sweaters, dresses and skirts.
Leggings go well with ballet flats, high boots with or without heels, and with sports shoes.
When building a pattern of leggings, negative increments are taken, since leggings are sewn from tight-fitting materials, thus reducing the volume and length of the measurements taken. The size of the negative increments depends on the elasticity of the fabric.
What measurements should I take for my leggings? 
Now, as an example, I will build a pattern for size 46 leggings. So, my measurements:
Semi-girth of the hips - 49.5 cm
Seat height - 25.5 cm
Knee height - 57 cm
Shin height - 16 cm
Thigh circumference - 57 cm
Knee circumference - 38 cm
Calf circumference - 35 cm
Ankle girth - 22 cm
Leggings length - 100 cm
Building a pattern of leggings

The basis of the pattern was originally taken from the site http://xn--e1aialfecu4d.xn--p1ai/korfiati.ru/2016/03/vyikroyka-legginsov/
In the upper left corner we put point A.
We put aside to the right in a straight line AA1 = 49.5 - 5 = 44.5 cm (we subtract a negative increase of 5 cm from the half-girth of the hips).
Negative increments:
- for knitwear with synthetics - 7-8 cm
- for cotton jersey with elastane - 4-6 cm
You select your increase for your fabric, and we continue the calculations.
Divide AA1 in half, set point A2. From point A2, we lay down the perpendicular along which we postpone: A2D2 = 25.5 (seat height), A2K2 = 57 (knee height according to the taken measurements), K2G2 = 16 (shin height), A2H2 = 100 cm (leggings length according to the taken measurements ).
Draw a horizontal line through point D2. On this horizontal, we lower the perpendiculars from points A and A1. We get points D and C. Now we have drawn a step line.
Now we draw a line of the hips: from point D2 we put aside D2B2 = 7.95 (round up to 8, to calculate this value, add 3 cm to 1/10 of the half-girth of the hips)
We draw a horizontal line through point B2, at the points of intersection of straight lines we put points B and B1.
From point D2 horizontally to the right and to the left, set aside half hip circumference according to the taken measurement minus 2 cm = 26.5. We put points D1 and C1.
From point K2 we measure horizontally to the left and to the right half of the knee circumference according to your measured measurement = 38/2 = 19 cm. We put points K and K1.
From the point H2, set aside half of the ankle girth minus 2 cm = 22/2 - 2 = 9 cm.
We connect the points D1K, KN, C1K1, K1H1 with straight lines. In the area of the thigh we bend these lines under the pattern, in the area of the lower leg we bend these lines under the pattern.
For the convenience of processing sections of leggings from the bottom line of HH1, we make step cuts at right angles, and then under the pattern.
From point A on the waist line, lay 4 to 6 cm to the right.Connect points A4 and B.
From point A1, set aside 6 cm to the left and set aside 2 cm down. We connect this point with B1 with a straight line.
We draw a slightly curved waist line under the pattern.
To make a belt on leggings, you need to build a one-piece edging for the elastic. To do this, draw a parallel to the waist line at a level of 2.5 - 3 cm above the waist line (marked in gray in the drawing).
Now let's draw out the cut line of the bow. We measure the segment CC1 and put half of the obtained value upward from the point C. We get the point C2. We connect points C1 and C2. And now we connect points C1 and B1 under the pattern.
We also make out the cut line on the back half. Under the pattern we connect points B and D1 with a curved line.
With the construction of the pattern, we are finished. Cut out both halves of the leggings in one piece. Then they will be without a side seam. We take 1 cm allowances along the side cuts, and 3 cm along the bottom.
In the next article, I will show you how sew leggings yourself.
Well, it can hardly be called MK ... More precisely, it is impossible at all, tk. in my understanding, mk is learning something new, presenting my original idea or technology ... And now I'll just show you how, with quite a bit of effort, to save a little bit on children's clothes :) Why did I spend so much time? ... Well, after I decided to take part in one handicraft marathon, and set the task of sewing leggings for my daughter for the summer, a couple of people puzzled me with a request to give a link on how I would sew them ... maybe someone already described how this is done, but finding a sensible explanation is sometimes more difficult than doing it yourself ... Task: make leggings Materials:
- jersey fabric 50x80 cm (approximately for a girl 122cm)
- knitted lace about 50 cm (it is possible without it ...)
- elastic band (I take a thick one, it looks neater, but you can take a thin one as for panties)
- threads to match
- a sewing machine with a zigzag or overlock stitch (but a zigzag is fine too)
- old leggings worn or small but not much.
Well let's get started :))) 1. Carefully cut the old leggings along the seam, cut the elastic at the top and you can cut the lace at the bottom, if any (I didn't cut ....) You should get the same 2 parts + cut elastic ... 2. fold the fabric with the right side inward to fit the resulting details of the old leggings. I have a double-sided fabric 100% cotton, I once bought it on the Internet for dolls (trial meter), but it did not match the color, but its quality is much better than the quality of even expensive store fabrics, and I decided to leave it and not mess with with a return, the more the color itself is very nice :) We apply the resulting pattern and pin it well, we do not stretch or bend the fabric. ALWAYS CHECK THE WEAVING OF THE FABRIC it should match the weave of old leggings, or for the more knowledgeable with a share thread ... 3. Depending on the size of the elastic, set aside the extra-double width of the elastic + 1.5 cm for the seam + 5 cm for the height, or if the old ones were in size, then do not add the extra 5 cm ... Draw a line parallel to the pattern line I'm too lazy to draw, I cut like that :) Outline around the pattern, leaving 1.5 cm for the allowance or 2.5 cm for the growth ... I like looser clothes on children, so I leave about 2.5cm and they will last longer :) We add from the bottom to the outgrowth Cut along the drawn line. We check if we cut correctly. The seam of the legs should be the same size, the groin seam on one side should be longer than on the other I have problems with the accuracy of the pattern, the old pants were frayed in the groin to the holes in just a couple of months of wearing in the kindergarten, but what is so beautiful about knitwear, it hides small work flaws, so do not be afraid to do something wrong ...And it's even better to sew more babies GROW UP, the less, if you, of course, do not have a second daughter, less :))) 4. Tighten along the groin seam on both sides with a zigzag, do not pull the fabric, otherwise it will excite, the distance between the stitches is not very small, I usually take about 2, the stitch width is maximum ... allowance and then cut it off, then you will generally get rid of the wave on the fabric. I have a special overlock seam on my typewriter and I sew it right along the edge :) 5. We measure the lace on the bottom, I always prefer to cut a little more, by bitter experience, often well-measured lace ended 1 cm from the edge when basting :( We outline the lace, bend the edge inward, put the lace on top ... We check if the front side of the lace matches the front side of the groin seam:) We sew everything in the same zigzag 6. We remove the pins, admire :))) we chop off in the groin, combining the seam as much as possible, we chop off the lace on both sides, straighten it and chop off the trousers between the groin and the lace. If you did not miss checking the cut out pattern, then everything should come together, if there is a skew, then we split the groin, straighten the trousers and cut a little in the groin where there is more ... But it is better to check once again at the pattern stage: (Do not prick the pins close to the seam , otherwise it will interfere with a straight line We sew, turn out, We are glad that it is almost done :))) 7. From above we bend the fabric to the width of the elastic + by the seam and sew. If you are not sure about the evenness of the seam, for example, like me, then it is better to bend more, then the curvature will not lead to the fact that the elastic will not fit, and you will have to look for a thinner elastic :))) Leave room for the elastic! 8. We insert the elastic band, measure the length of the elastic band on the child, fold the elastic band and sew it across on a typewriter, cut the elastic band ...
All is ready:))
P.S. Writing this post took more time than sewing the shorts itself :))) A paper pattern for all children's sizes can be found in Ottobre winter 2004, the technology is the same, only the allowances do not need to be made so large ....We also recommend
 Rules for grinding and wet-heat treatment of garments
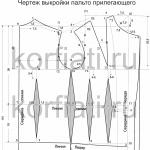
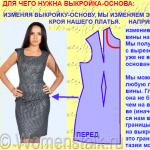 Building a pattern for the basis of a dress: Italian technique as the easiest way to make a good pattern
 How to build a dress pattern base
 We model and sew coats!
 Skirt of the year, construction of a pattern
 Fashionable children's skirts from old jeans - patterns and description