As a pattern drawing a corset to size 48. Sewing a corset
Throughout the ages they have been the main clients of tailors. And to please, the tailors came up with - special clothes that tightened what needs to be pulled and supported what needs to be supported. Corsets were made like an hourglass, but they had a thin waist and high chest.
Modern - this is not a brutal structure as it was in the Middle Ages. Today it is not customary to pull the waist down to the size of the lover's neck, as it was before. However, having a waist is still fashionable today. Therefore, corsets are sewn today in order to slightly correct the figure in some places.
For sewing linen corset first of all, you need to make a pattern. Take some measurements of your figure and measure the circumference under the bust (the centimeter goes at the level of the bottom plank of the bra), the circumference of the waist. A centimeter covers your waist where you choose to position your waist.
If you want to tighten your waist, then reduce this size by the required number of centimeters, only within reasonable limits. Hip circumference - a centimeter runs along the protruding bones, the distance from the waist line to a point under the chest, the length of the product below the waist - measured along the side line from the waist to the bottom of the product, the length of the product below the waist along the belly line - measured in a sitting position with a ruler from waist to bottom belly so that the ruler does not get in the way.
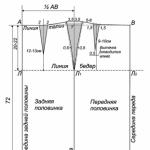
The simplest underwear corset consists of seven parts: a back part with a fold, the side part of the back - 2 parts, the side part of the front - 2 parts, in front - 2 parts, because the lacing will be located here. Take a piece of paper (preferably graph paper) and build a rectangular grid for the future pattern. The width of the mesh is equal to the half-girth of the hips, the length of the mesh is equal to the height of the product, which is the sum of the measurement of the distance from the waist to the chest plus the length of the product below the waist.
Divide the horizontal line of the hips in half and draw a vertical line. This will be the sideline of the corset. Now on the left is in front of the corset, on the right is his butt. Divide the front of the corset in half and draw a vertical line. Also divide the back of the corset. Find the centers of the side pieces of the corset and draw a dotted line. From it you will postpone basic measurements.
Divide the half-girth measurement under the bust by four and set aside the resulting centimeters on the top segment. On the front details, the resulting centimeters are deposited from left to right from the extreme left point, on the sidewall details this number is located equally on both sides of the central dashed line (divided in half), on the back details 1/4 of the half-girth of the chest is deposited from right to left from the extreme right point.
Many do not undertake to sew such products due to lack of experience and special knowledge. In fact, or a corsage dress is not difficult - "the eyes are afraid, but the hands are doing." The main thing is to follow the instructions exactly and know some of the features of sewing this beautiful garment.
Corsage or corset?
To begin with, let's figure out the definitions of what is what, in order to avoid confusion.So what is it? It is a stand-alone piece of women's clothing that tightens the lower chest and abdomen to give the figure the desired shape. The corset favorably models the silhouette, reduces the girth of the waist. Its main distinguishing feature is its slimming function. As a rule, a corset is a multi-layer product with pads between the layers. The corset keeps its shape due to specially inserted rigid elastic bones, and is pulled together with the help of lacing, which is usually located at the back, but can also be in the front, on one or both sides. The permissible limiting reduction of the waist without harm to health is 8 cm.
A bodice is a part of a woman's dress tightly fitted over the body, covering the chest, back and sides; it does not have a slimming effect. It can be either an independent product or a part of a dress.
Corset bodice
is an adapted version of the corset. Cups can be inserted into the bodice of such a product, which visually increase and raise the bust. On its basis, you can sew a dress. Bodice details are cut out without allowances for freedom of fit.If it is necessary to achieve a tightening effect, excess fabric is taken into the relief seams during fitting.
Features of sewing a dress with a bodice
- Plastic bones are inserted into drawstrings (tunnels), sewn from the seamy side to the seams, or formed by stitching allowances on the part. From the front side, these lines look like finishing lines.
- Across the drawstring, into which the bones are inserted, they are overlaid with bartacks along the seam line.
- Corsage sticks or tape with corsage sticks are inserted into the embossed seams of the front, back and right side seams. There will be a zipper on the left.
- If the bodice of the dress is below the waist, then it is better to refuse from whalebone and other plastic inserts. Since in the process of wearing, they bend, leaving creases that cannot be fixed. In this case, for a dress with a bodice, special sticks are used on a dense fishing line, the ends of which are packed and rounded. They come in different lengths, bend well, but then restore their original shape without the formation of creases on the product.
- If it is necessary to tighten the tummy more, make the maximum adjustments to the pattern in front.
- If you want to emphasize the waist, we make adjustments to the side seams.
- To strengthen the details from the inside out, it is better to use cotton coarse calico for collars and cuffs as an adhesive.
Corsage

Corsage Dresses

How to sew a seductive bodice with your own hands, you will learn from the master class.
From personal experience
I made two bodice dresses. The first is in jacquard fabric, model 107 from Burda 3/2010. The second dress (pictured) is model 125 from BURDA 1/2012.
In both the first and second cases, I used cotton with elastane, in density like denim. I cut out the outer and inner details of the bodice and back from the main fabric. Each detail was duplicated with fabric doublerin. The bodice turned out to be quite tight, so I decided not to use bodice sticks or ribbon with bodice sticks. The dresses are very comfortable, the bodice does not wrinkle, does not move out and keeps its shape perfectly. After washing in a typewriter, the products have completely retained their original appearance.
Do-it-yourself bride with an hourglass figure? Patterns of the bodice, front and back with a corset on the side bones.
The corset is the main part of the dress. It is on him that the general appearance of the outfit and how it will sit on the figure depends. But not only will it complement your image, you also need to decide what other functions you assign to it. This will determine what kind of corset for the wedding dress needs to be sewn.
Types of corsets
Taking into account what kind of figure you have, what material and decorative elements you will use, the following options for corsets are encountered:
- Decorative is a great option for slim brides. It is perfect for any style of wedding dress. The process of creating it is quite simple, and you can always decorate it in any way you like;
- Slimming - perfect for girls who have a good figure, but would still like to make some adjustments: tighten thallium, making it thinner, raise the chest, making it more attractive. In addition, this corset perfectly supports the back.
What do you need?

Each bride presents her ideal dress differently. And it's great when you can bring your idea to life with your own hands. First, pay attention to the fabric that you will use on the lining and directly on the top of the dress. If you decide to sew a bodice yourself for the first time, then choose cheap fabrics on which you can easily and comfortably practice. Give yourself a so-called master class. Thanks to him, you will be able to understand well the sequence of work, what and how to do in order to avoid mistakes and defects, to work out the details. After training, you can proceed directly to sewing the corset. So, in order to sew a suitable corset for your wedding dress, you will need:
- A dense cotton option is perfect for the lining. Such material not only holds its shape perfectly, but also does not create uncomfortable sensations in contact with the body;
- Top fabric - here you can use any option you like, but the most practical will be cotton stretch satin, satin, guipure or lace;
- Regilin;
- Reps tape;
- Only the fittings that you plan to use: locks, eyelets, ties, hooks, whalebone (if you decide to sew a tightening corset), spiral bones for both straight and curved seams;
- All the necessary equipment for taking measurements, creating patterns, cutting out the material and directly sewing.
Corset sewing technology

So, let's start sewing a corset with our own hands. We decide on the style and appearance of the bodice, its length and overall appearance. If you have already decided everything for yourself how to sew everything, then you need to proceed to a very important and responsible stage - creating a pattern. If you are doing this for the first time, then you can flip through modern magazines, as well as surf the Internet. There are many guides out there on how to make a corset pattern and you may find one that is right for you. But remember that the pattern must be created in accordance with your figure and your parameters. Therefore, the next part of the work is taking measurements:
- chest girth;
- waist circumference;
- hip girth;
- the distance from the waist to the point under the bust, to the bottom along the side seam, to the lower abdomen.
We draw a pattern according to the measurements taken, and then proceed to cutting. Cut out the details of the pattern as accurately as possible. This will help to more correctly cut the details from the fabric itself. When you start working directly with the fabric, unfold the pattern so that the center cut of the back is parallel to the shared thread. Due to this, when you connect all the available elements of the corset, their places of contact along the waist line will be parallel to the thread, which means that the corset will keep its shape perfectly and will not stretch. This moment is very important if you decide to create a slimming corset.
Sewing a corset

When you already know how to sew a corset for a dress and have done all the preparatory work, you can start. It is necessary to make a preliminary version. To do this, sweep the central parts of the product with the side front ones. In the same way, connect the backrest parts, and then all together. Now try on and correct those parts that you think have a defect. After that, the seams can be sewn, and the lining itself can be ironed well with an iron.
Now we turn to the outside of the corset. It is necessary to do the same and do not forget about the changes made to the lining, if any. We connect the upper part with the lining. Next, we move on to smaller, but very important details. After that, it is necessary to stitch the drawstrings at the side seams. This is where the bones will be inserted to give the corset rigidity and to keep it in shape.
Depending on what purpose your product is, it can be fastened on the back with a snake, buttons, hooks, or have a lacing. The lacing is perfect for a tightening corset and can be located both in the front and in the back. Thanks to the lacing, you can adjust your figure to the sizes you need and the wedding dress will fit you perfectly.
Decor
The main sewing work is over. The corset is ready and the wedding dress will be flawless. In order to make it special, decorate the corset with the decor you like. It can be rhinestones, artificial pearls, fabric elements, ribbons, beads, lace - everything that seems appropriate and attractive. Such a dress will be a worthy decoration for a charming bride.
Fashion designer
Hello dear readers! Today our lesson is about corset. The interest in the corset is very great, because it is he who helps us, women, to model the figure in the most advantageous way. By learning how to create this piece of wardrobe, you can look stunning in any situation! So, let's begin.
To begin with, I would like to make a reservation - today we will not talk about a corset, in its classical sense, but about a lightweight, so to speak, corset - oh bodice... The thing is that the corset, in the modern world, does not have that wide popularity as before. A corset is a product that shapes a figure, it consists of many parts, is made on special equipment, using special corset accessories (usually metal bones, busts, planes for eyelets, has lacing, with which the pulling process takes place), which makes the manufacturing process in a non-professional workshop is almost impossible. Pulling at the waist, in a corset. can be very large - 10-20 cm, which, of course, cannot be achieved in corsages.
It is difficult to use a classic corset in everyday life, so let's turn our attention to a corset that meets all aesthetic requirements and, moreover, is more comfortable. The differences between corset and bodice are now clear. But !, in ordinary life, corsage everyone calls a corset, it so happened in a non-professional environment, so we decided to call our lesson Corset pattern, to make it easier for the reader to find this material. If you want to delve into the topic of corsets, perhaps we will create another lesson where we will tell you about the history of the corset and give options for building,this is really a very interesting topic! So, let's begin.
The construction of a corset (bodice) pattern will be carried out on the basis of an adjacent product. The corset (corsage) implies a strong fit, and in some cases a tightening, therefore, we will set the increments to the girths to the minimum (negative values of the increments are also possible). Negative increases are used mainly to the waist circumference and the third chest circumference (because it is in these places that the figure can be pulled a little without creating much discomfort). Measurements from the figure should be removed with a tight-fitting measuring tape, without tightening, but not too loosely. It is required to take measurements of the Bust measurement on linen, the height of the chest and the volume in the finished product depend on it.

Increase to OT = from 0 to -2 cm
Exhaust gas increase = 2 to 0 cm
Increase to OT = from -3 to -6 cm
Increase in exhaust gas = from -1 to -3 cm
We remember that the increments are given to half measurements, because the construction takes place on half of the figure and cutting is meant, as well, on the fabric folded twice.
Corset pattern

Drawing grid
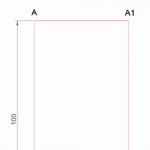
Let's determine the length of the base pattern, by the way, you can use it to create a tight-fitting dress or, for example, a bottom cover for a dress (combination). We postpone this value vertically, from top to bottom - AH, placing a segment at the left edge of the graph paper (For example: AH = 110).
Draw perpendicular lines through A and H to the right.
From point A to the right we iron the size of the half-girth of the chest with an increase in freedom (For example: AB = POG + Pr = 48 + 2 = 50cm.). We put point B.
Draw a line from B down to the intersection with the lower line and set the point H1.
From point A downwards we put off the segment AT, the length of which is equal to the length of the back to the waist plus an increase (For example: AT = Dts + Pr = 38 + 0.5 = 38.5 cm) and put point T.
From T to the right we draw a line to the segment BH1, at the intersection we put the point T1. Section TT1 is the level of the waist.
Then, from T downwards, we postpone the height of the hip line. The size of this segment is equal to half the length of the back (For example: TB = ½ * TPA = ½ * 38 = 19 cm). We put point B.
From B to the right we draw a line of the hips, the intersection with the segment BH1 is denoted by B1.

Back neck construction
Initially, from point A to the right, along segment AB, we postpone the width of the back plus an increase (For example, AA1 = SHS + Pr = 18 + 0.5 = 18.5 cm). Set point A1.
From point A1 to the right, set aside the segment A1A2 equal to 1/4 of the half-girth of the chest (For example: A1A2 = 1/4 * POG = 1/4 * 48 = 12.0). Set point A2.
Now from A1 and A2 downward we draw lines of arbitrary length. Segments A1 and A2 - are the boundaries of the width of the armhole.
Then, from point A to the right, we postpone the segment AA3 equal to 1/3 of the half-girth of the neck plus an increase (For example, AA3 = 1/3 * NOS + Pr = 1/3 * 18 + 0.5 = 6.5 cm). We put point A3. AA3 stands for the width of the back neckline.
From point A3 upwards we draw a segment A3A4 equal to 1/10 of the half-girth of the neck plus an increase. (For example A3A4 = 1/10 * POSH + Pr = 1/10 * 18 + 0.8 = 2.6 cm). We put point A4. A3A4 - the height of the back neckline.
In order to draw the neckline beautifully, the angle AA3A4 at point A3 should be divided in half and draw a line. On this line, we postpone the size of the auxiliary segment A3A5 (For example, A3A5 = 1/10 * 1POSH - 0.3 = 1/10 * 18-0.3 = 1.5 cm) and set point A5. We connect the points A4, A5 and A obtained as a result of construction with a smooth curve - this is the line of the neck of the back!
Construction of the shoulder section of the back
Initially, from A1 we put down the segment A1P and set point P. (The size of the segment A1P depends on the shape of the shoulders - for normal A1P = 2.5 cm, for sloping A1P = 3.5 cm, for high A1P = 1.5 cm).
We connect points A4 and P with a straight line. Then from A4 we set aside the segment A4P1 equal to the length of the shoulder plus an increase equal to the size of the tuck solution (for example A4P1 = DP + 2 = 13.5 + 2 = 15.5 cm) and set point P1.
On the resulting line A4P1 from A4 to the right, set aside 4 cm and set point O. It is from point O that we will build a shoulder dart on the bulge of the shoulder blades.
From O vertically downward we set aside 8 cm - we get the point O1. Then, also from the point O, we set aside 2 cm to the right - we put the point O2. We connect O1 and O2 with a straight line.
Segments OO1 and O1O2 are the sides of the tuck, but we need to equalize them. To do this, from point O1 through point O2, draw a segment O1O3 = OO1 and set point O3. Then we connect the points O3 and P1.A4O + O3P1 - the length of the shoulder.

Now let's define the level of the chest line. To do this, from point P downward we postpone the segment PG = 1/4 * Pog + Z. (We choose the Z coefficient depending on the posture: 7 cm - for a normal figure, 7.5 cm - for a stooped figure, 6.5 cm - for a bent one). (For example PG = 1/4 * 48 + 7 = 19 cm).
Draw a horizontal line through point G to the left and right - it determines the level of the chest and the lower level of the armhole. The point of intersection with the straight line AH is denoted by Г1, with the line of the width of the armhole - Г2, with the line ВН1 - Г3.
From point D upwards, we postpone the value of the back angle of the armhole, equal to GP2 = 1/3 of the distance PG + 2cm, and put P2 (For example, GP2 = 1/3 * 19 + 2 = 8.3 cm).
Divide the angle at point G in half and draw a segment GP3 equal to 1/10 Width of the armhole + 1.5 cm and set point P3. These manipulations will help us draw the armhole line beautifully. (The width of the armhole = the size of the segment A1A2). (For example GP3 = 1/10 * 12.0 + 1.5 = 2.7 cm).
Divide the line ГГ2 in half and set the point Г4. By connecting points P1, P2, P3 and G4, we get the line of the back armhole!
We proceed to building the line of the armhole of the shelf
From the point G2 upwards, we postpone the segment G2P4 = 1/4 * Pog + W. (We also choose the W coefficient depending on the type of posture: 5 cm - for normal; 4.5 cm - for stooped; 5.5 cm - for kinky). (For example: Г2П4 = 1/4 * 48 + 5 = 17 cm). We put point P4.
From point P4 to the left, set aside P4P5 = 1/10 * POG and set point P5. (For example: 1/10 * 48 = 4.8 cm).
From point G2 upward, draw a segment G2P6 equal to 1/3 of the value of G2P4 and set P6. (G2P6 = 1/3 * 17 = 5.7 cm).
Now let's perform several auxiliary constructions to draw a beautiful armhole. We connect points P5 and P6 with a straight line and divide them in half.
Then to this line to the right, at a right angle, set aside 1 cm. Divide the angle at point G2 in half and draw a segment G2P7 equal to 1/10 of the width of the armhole plus 0.8 cm (for example, G2P7 = 1/10 * 12.0 + 0.8 = 2.0 cm). We put point P7. P5,1, P6, P7, G4 we connect with a smooth curve - the front armhole line.

Building the neck of the shelf
From the point G3 upwards, we postpone the value of G3V1 = 1/2 * POG + R. (We choose the R coefficient depending on the posture: 1.5 cm for normal and kinky; 1 cm for stooped shoulders) (For example 1/2 * 48 + 1.5 = 25.5 cm). And then we put point B1.
From the point G2 upwards, we postpone the value equal to G3B1 and set the point B2. Then we connect B1 and B2.
From point B1 to the left, set aside B1B3 = 1/3 * POSH + 0.5cm and set point B3. В1В3 - neck width. (For example: 1/3 * 18 + 0.5 = 6.5cm).
From B1 downwards we put off the segment B1B4 = 1/3 * POSH + 2cm and set point B4 (For example 18: 3 + 2 = 8cm). We connect B3 and B4 with a straight line and divide it in half. В1В4 - throat depth.
From point B1 through the division point, draw a line on which we lay off the segment B1B5 = 1/3 * POSH + 1cm and set point B5. (For example 18: 3 + 1 = 7cm). We connect points B3, B5 and B4 with a smooth line and get the neck of the shelf.
Building a dart
From the point G3 to the left we lay off the segment G3G6, which is equal to the position of the center of the chest. Let's designate it by point Г6.
From G6, draw a perpendicular line upwards until it intersects with the line B1B2. At the intersection we put point B6. From B6 downwards we put off B6G7 = VG and set the point G7.
Then, in the same way, from point B6, we put 1 cm down and set point B7. Then, we connect points B7 and P5 with an auxiliary segment.
Along the line П5 В7 from point П5 to the right, set aside the segment П5В8 equal to the length of the shoulder minus the size of the segment В3В7 and minus 0.3 cm (For example, В3В7 = Дп-В3В7-0.3 = 13.5-3-0.5 = 10.2 cm) ... We put point B8.
From point Г7 through point В8 draw a segment Г7В9 along the length equal to the segment Г7В7. The resulting point is denoted by B9.
We connect points B9 and P5. G7V9 and G7V6 - dart sides, P5V9 + V7V3 - shoulder length.


Back side seam
Let's extend the line A1G down, perpendicular to the waist and hip lines, until it intersects with BB1. At the intersection, points T2 and B2 are formed.
Backrest retraction
From point T to the right, set aside 1.5 cm and put point To. Connect in series points A To B. From point To to the right at right angles to line A To, we draw a line until it intersects with straight line GT2, we get point T21.
Shelf side seam
Point Г6 lies on the straight line ГГ2, from Г2 to the left at a distance of 1/3 of the width of the armhole (Г6Г2 = 1/3 ГГ2 = 1/3 * 12 = 4cm) From this point we lower the perpendicular down to the intersection with the straight line BB1. Points T3 B3 are formed. From point T3 upward, a distance equal to T2T21, set point NS T31. We connect points T21 and T31 with a straight line, slightly extending it to the right, by about 2 cm.

Calculation of the depths of darts at the waist
The sum of all darts along the waist (denote V) is equal to the Width of the drawing grid minus the amount of the take-off, minus OT (half-girth of the waist) and minus the amount of tightening of the bodice, if a tightening bodice is planned. V = (AB-1.5 cm) -OT = (50-1.5 cm) -37.8 cm = 10.7 cm is the total sum of all solutions, which must be distributed over the sections of all darts along the waist:
- on the back - 2.7 cm
- on the shelf - 2.5 cm
- side seam 3 cm
- side dart on the shelf 2.5 cm.
Locations of darts at the waist
Dart on the back. Divide G1G in half and from this point lower the perpendicular line down to the intersection with BB2. This is the center line of the dart on the back. At the intersection with the waistline, it forms the point T21.
Dart on the shelf. From point G7, lower the perpendicular down to the intersection with B3B1. This is the centerline of the dart on the shelf. At the intersection with the waistline, it forms the point T31.
Side dart on the shelf located on the G6B3 axis
Dart in the side seam- on the GB2 axis.

We form darts
To begin with, we need to determine the degree of fit of the pattern on the thighs. Vbed. = (OB + 1.0 cm) -BB1 = (51 + 1) -50 = 2 cm. Now 2/4 = 0.5 cm. We postpone this value on the straight line BB1, on both sides of the points B2 and B3. We put points B21, B22, B31, B32.
On both sides of the T22 point, set aside segments equal to 1/2 * 2.7cm = 1.35cm. Further, from the point dividing G1G in half, down through the points of these segments located at a distance of 1.35 cm from the center line of the tuck, lower two lines connecting at a point on the center line located at a distance of 4 cm up from the line BB2.
Axial groove GB2. From point T21 on both sides by ½ * 3cm = 1.5 cm. The lower end of the left side of the dart ends at point B22, right at point B21.
Side dart on the shelf. From point T31 on both sides ½ * 2.5cm = 1.25cm. The lower end of the left side of the dart lies at point B32, the lower right end at point B31. Dart on the shelf From point T32 on both sides ½ * 2.5cm = 1.25cm. The right (closest to the middle of the front) of the newly formed points will be designated T32a. The lower end of the dart does not reach the BB1 line by 4 cm.The upper end of the dart does not reach the center of the chest by 4 cm.

If Vperiod = zero, then nothing needs to be done.

If V = negative number, then pay attention to the design of the details at the level of the hips, they should be narrowed.

Top and bottom lines of the bodice
Top line of the bodice. Along the middle line of the back, at a distance of 18 cm from the waistline (TT1), put a point from which we draw a smooth line to a point lying on the side of the breast dart at a distance of 10 cm from point G7 - point P61. The line connecting these points is a smooth curve with a deflection at point P7.
In the chest area, the upper cut of the bodice is limited by a straight line going from the point of the breast dart lying on the side at a distance of 10 cm from point G7 - a new point G61, to a point on the line of the middle of the front up from point G3 by 2 cm.

Decoration of the central part of the corset
From point T32a draw a straight line through point G7, until it intersects with the arc drawn from point G7, radius G7G61.
Measure the distance from point G61 to point P61 +1.5 cm (this increase in the solution will help to avoid lagging of the top of the corset from the figure) and set it aside in an arc to the left of the point formed at the intersection of the arc with the straight line T32aG7. Draw a straight line from point Г7 to the intersection with the arc at the newly formed point.

Re-arrange the upper cut of the bodice, taking into account the newly built dart.

Making the lower cut of the bodice passes through a point lying on the line of the middle cut of the back, at a distance of 10 cm from point T0 downwards. To a point on the side seam of the back, 10 cm from the waist down. And further, from the point of the shelf symmetrical to it on the side seam to the point on the right side of the lateral dart of the shelf lying on a straight line from point T31 down, then continue construction from the point symmetrical to it on the left side of the dart, then to the beginning of the waist dart on the shelf and further to the middle of the front at right angles. The line of the lower cut of the bodice is a slightly convex curve passing at right angles at the mating points.

We will correct the configuration of the embossed part of the bodice in the chest area with smooth lines, in accordance with the natural curves of the body. On the left side of the newly formed, translated, breast dart, a slightly convex curve, repeating the roundness of the chest, through point G7, then down to the point formed by the dart solution at the waist, on its left side, slightly bending the curve under the breast, for better fit to the figure ... Further down to the bottom of the bodice. All lines of the bodice details should also be smooth.

The bodice pattern is ready.

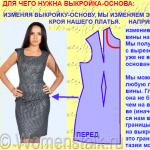
It is built around a custom tailored silhouette to ensure you get the best fit possible from other methods. takes into account all the nuances of the figure. Having it at hand, you can always simulate a variety of bodice models, changing the location and slope of the reliefs, the configuration of the top and bottom lines. Leaving unchanged such important components as the solutions of the darts, the position of the center point of the chest, the total volume of the corset.
Corsets were popular at the end of the 16th century, but even now they are worn as underwear or as part of ball gowns, or simply used as an original wardrobe item. Usually, making a corset requires a lot of time and effort, but if you have some sewing skills, even a beginner can cope with sewing a corset if he uses some methods that simplify this process.
Steps
Part 1
Preparing the fabric- Remember, beginners are better off using simpler patterns rather than complex ones. Sewing corsets according to complex patterns is quite difficult, so do not over-burden yourself the first 1-2 times.
- You can use both free and paid patterns, but usually the latest ones are of higher quality. You can definitely find a simple corset pattern that suits you, either on the Internet or in a sewing magazine.
- Alternatively, you can independently calculate and draw a pattern, but this process is quite laborious and requires the use of graph paper.
-
Determine your size. As already mentioned, a good pattern is designed for several sequentially increasing sizes at once. In most cases, sewing patterns will include a back gap of about two centimeters (to tighten the corset with lacing), so do not be alarmed if your size pattern seems too small for you. Determine your size by measuring your bust, waist and hips. Then cut out the pieces of the pattern to your size.
- To measure your bust, put on a regular bra and measure the widest part of your bust with a tape measure.
- To find your waist, measure the circumference of your narrowest torso (usually about 5 cm above your belly button). The corset belongs to the modeling type of lingerie. Usually, to build a corset pattern, the waist circumference is reduced by 10 cm.
- Hip circumference is measured at the widest part of the hip (usually about 20 cm below the waist line).
-
Choose a fabric for your corset. For sewing a corset, it is best to use a special corset fabric, which is made of pure cotton, breathes well, has high strength for its weight and does not stretch well in any direction. If you do not have corset fabric, you can use thick cotton or high-quality linen.
- When using linen or linen, the corset will be more stretchable than when using corset fabric, so the finished product will be designed for a slightly larger size.
- The corset can be padded for extra comfort. Use a thick cotton or cotton blend on the lining and cut and sew corset pattern details from it.
- When choosing threads for sewing a corset, you must first check their quality. You should be fine with a general-purpose thread, but before using it, unwind a short length of thread from the spool and try to break it with your hands. If it does not break even with great effort, then it can be used. Do not use threads that break easily in your work, since in the finished product they will carry a heavy load, and the corset itself must be strong.
-
Prepare your fabric. Wash and dry the fabric before using. Iron the fabric just before cutting to remove any wrinkles or wrinkles.
Pin the pattern to the fabric. Lay the details of the corset on the fabric vertically in the direction of the greatest extensibility of the fabric (along the weft thread). You need to avoid unnecessary stretch of the fabric along the waistline of the finished product. Pin the pattern to the fabric.
- Also, the pattern can be fixed to the fabric using some kind of weight (stones or other heavy objects). When using this method, it is recommended to transfer the contours of the pattern with chalk onto the fabric itself and only then cut out the details. Sometimes this method is even preferable, since it excludes accidental displacement of the fabric during cutting.
-
Cut out the details. Cut out the details of the corset strictly in accordance with the instructions for the pattern you are using. Be careful with allowances. If the details do not turn out the same as provided by the pattern, the finished corset may not fit you in size.
Part 2
Sewing a corset-
Pin the corset pieces together. Gather all the parts together in accordance with the instructions for the pattern. They must be chipped off so that the material does not move during sewing.
- For the same purpose, parts can also be swept with threads (temporary stitches).
- For precision cuts, the width of the seam allowances should be the same everywhere. In such a situation, the parts can simply be aligned along the upper edge and the edge of the allowances and immediately sewn on a typewriter without using pins or basting stitches.
-
Sew the seams. Set the sewing machine to a straight stitch and sew the parts in the order the pattern requires. Start sewing from the top edge of the seam and work your way down slowly to ensure that the fabric feeds evenly under the needle (no shifting or wrinkling). After this operation, two separate halves of the corset are usually obtained (but not in all patterns).
- When sewing parts, be sure to carefully match the desired parts. It will be useful to pre-number them with chalk on the seamy side.
-
Iron out the seam allowances. When all seams have been sewn, their allowances will need to be ironed out. After this procedure, all allowances will be adjacent to the main corset fabric.
- If necessary, trim off the excess seam allowances slightly so they clump less.
- Note that the seams can be ironed out during further work on the corset.
-
Hem down the vertical edges of the corset halves to keep them from falling off. After this step, the main corset sewing process will be completed. The details will be connected with each other with a fastener and lacing, so their vertical cuts must be carefully processed.
- Do not hem the top and bottom cuts of the corset parts, as they will be seamed later.
-
Sew in a bodice at the waist. Take two pieces of inextensible bodice tape (for both halves of the corset). Attach the tape to the line of greatest tension in the corset, or the waist line (pull the piece out to the sides to see and find this line). Sew the tape at this level to the seam allowances on the seamy side of the part, after basing it on the corset.
- A rep or any other dense, inextensible tape 1.5-2 cm wide can also be used as a bodice tape. To determine the required length of the tape segments, take the desired waist circumference in the corset, increase it by 5 cm and divide it in half. Take two pieces of tape of the estimated length.
- When you sew the corsage tape to the corset, make sure that it runs symmetrically on both halves by folding them together.
Part 3
Sewing underwire, fastening and sewing-
Make drawstrings for the underwire of the corset. Fold and press the raw edges of the bias tape towards the center of the wrong side. Then sew a bias tape over the seams of the corset (so that its seams go along the center of the tape), creating a 1 cm wide drawstring from it. the drawstrings fell strictly into the seam of the corset.
- In sewing a corset, you can use both a ready-made and a home-made bias tape made of 2.5 cm wide strips of fabric cut out along the bias.
-
Sew on the right side of the corset fastener (with loops). Take the wrong side of the right half of the corset and draw a vertical line 1.5 cm from the front edge of the corset with chalk. Then attach the half of the loop fastener to this line, 2cm from the top of the corset, making sure you are looking at the wrong side of the fastener. Sew the fastener to the corset.
- A hook and loop fastener attaches to the front of the corset and connects the two halves at the front (so you don't have to unlace the back of the corset each time to remove it). You can find this clasp at a fabric and craft store.
-
Sew on the left side of the corset fastener (with hooks). Take the other half of the hook and loop fastener and align it with the half of the loop fastener. Then attach the left front edge of the corset to it and sew the fastener securely to it from the wrong side of the fabric.
-
Choose or make a pattern yourself. Beginners are advised to look for a corset pattern for themselves on the Internet or in a fashion magazine, and not try to calculate and draw it yourself. A good pattern will be designed for several sizes at once (including yours) and its use should completely suit you.
We also recommend
 Rules for grinding and wet-heat treatment of garments
 Building a pattern for the basis of a dress: Italian technique as the easiest way to make a good pattern
 How to build a dress pattern base
 We model and sew coats!
 Skirt of the year, construction of a pattern
 Fashionable children's skirts from old jeans - patterns and description