Wet heat treatment of the dart is called. Rules for grinding and wet-heat treatment of garments
20:55 Unknown 11 Comments
Hello! In this article we will talk about the wet-heat treatment of joining seams and darts when sewing products.
They say that a good seamstress must have two qualities: perseverance and love to iron. Yes, yes, exactly ironing, since wet-heat treatment is an important and integral part in sewing clothes, which makes up 50% of the entire sewing process and to a greater extent affects the quality of the product itself.
Why is wet heat treatment so necessary and important? The fact is that when sewing the stitches, even on a very well-adjusted machine, the fabric shrinks a little. This is due to the teeth of the machine, which move the fabric and slightly smoothen the bottom layer of the fabric, and the foot, in turn, straightens the top layer of the fabric. As a result, the seam of the product turns out to be so wavy and gathered.

After wet heat treatment, the fabric is straightened, and the seam looks smoother and more aesthetically pleasing.

That's why it is necessary to iron the parts after each sewing operation, after every stitched stitch, be it a seam or decorative stitch.
Moreover, it is necessary to iron some of the seams made by hand, for the same reason - the shrinking of the fabric. Yes, even when we sweep or sweep details, we slightly shrink the fabric. For some fabrics or products, this is not critical, however, the swept hem of the bottom line (sleeves, skirts, trousers), as well as the swept-up step and side seams of the trousers are always ironed.

Now let's talk about allowances. According to the method of processing the allowances, the connecting seams differ into three types: seams on the edge, seams in a seam and seams in an iron.
Edge joining seam (Figure 1) ironed from the seamy side of the product on both sides, while the allowances are ironed together and left in this position (such seams are used in the lower part of the armhole when the sleeve is sewn in, in trousers along the line of the seat, in the details of the burlap pocket).
Jointed seam(Figure 2): first, the allowances are ironed on the edge from the seamy side of the product, and then they are ironed on opposite sides of the seam. It is necessary to iron the allowances in two steps: first, without steam, with the iron spout directly into the seam chip, opening the allowances, and only then the open allowances are ironed with steam and allowed to stand. (Padded seams are usually used in products made of dense fabrics).


WTO allowances
Let's take a closer look at the seam by ironing. From the foregoing, it follows that the allowances of such a connecting seam are ironed on one side, and when processing a certain sewing unit, it is necessary to strictly observe the technology and iron the allowances in the desired direction. But what's the difference in which direction to iron the allowances? It is rather a question of the quality of the work. The fact is that a sewn product is considered to be of high quality if the connecting seams on the front side of the product are invisible to the eye. When the allowances are ironed, an additional thickness is formed, and from the front side, the part on which the allowances are ironed slightly protrudes from the seam chip, and the connecting seam "hides" under the thickness of the fabric, when viewed from the side of this part. So, for example, if the allowances of the shoulder seam are ironed to the side of the shelf, then we will not see this seam in front of the product.

Based on this, the allowances of the following connecting seams are ironed as follows:
Side seams
in shoulder and waist products, they are ironed on the side of the shelf.

In trousers, the side and crotch seams are ironed onto the front halves (for trousers made of thin fabrics).
However, in the event that a dart is present in the side seam, which forms an excessive thickness of the fabric, then the allowances of the side seams are ironed onto the back side.


Other vertical seams
in both shoulder and waist products, they are ironed towards the midline of the part (shelf or back).


Allowances horizontal seams
ironed up.


WTO darts
Wet-heat treatment of darts is carried out in three stages:
from the seamy side of the product, the stitched dart is ironed onto the edge on both sides, while the iron should not go beyond the top of the dart;

in accordance with the technology, the dart is ironed in the desired direction without leaving the top of the dart with the iron.

if the dart is made of a very dense fabric, in this case, the dart solution is cut off at a distance of 1 cm from the seam seam, the remaining cut sides of the dart are ironed out;

at the end, the formed bulge is pressed near the top of the dart.

(how to stitch the fabric correctly, read ).
By technology vertical darts
in shoulder and waist products, they are ironed towards the middle line of the part (shelf or back),


WTO allowances and darts of the sleeve
As in other details, the seam allowances in the sleeves are ironed on for heavy fabrics or ironed on one side for light fabrics.
In the two-seam sleeve, allowances side seams ironed onto the side of the upper part,

in a single-seam sleeve - on the side of the shelf,


Horizontal elbow dart
, like all horizontal darts, is ironed up.


The seam allowances of the sleeve stitching are ironed to the side of the sleeve only along the upper part of the armhole / ridge of the sleeve, the rest of the allowances remains ironed on the edge.

These are the most basic principles of WTO seams and darts. Of course, each specific product has its own nuances when performing wet heat treatment, I will consider them in more detail in master classes.
Darts are details, without which it is impossible to correctly form the relief of adjacent clothing and ensure a beautiful fit of things to the figure. On the finished product, they are sections of fabric, separated from the part by a stitch. In the drawing, they are indicated by wedge-shaped triangles or slightly curved lines.
As a rule, elements that change the relief and outlines of things are made invisible. But there are also decorative external details. You can do without them only when designing very loose, "flying" clothes. In most adjacent and semi-adjacent styles, they are provided. In some cases, relief seams can be made; in general, it is the darts that are responsible for the sculptural fit. The craftsman must not only know how to design them, but also carry out the wet-heat treatment (WTO) of the products so that the finished thing looks presentable.
lady-i.ru
Depending on the type and thickness of the fabric, the type of the element itself, they work with it in different ways. The most common option is darts with expansion on one side and narrowing on the other. On a longer length, open cuts are usually made. For such parts, the lateral lines are beveled - this is how the desired depth is formed. Elements on the bodice or skirt of the dress must be smoothly finished to the top so that there is no sharp angle, if this is not provided for in the style. To fulfill this condition, even during construction, the part is slightly bent along the sides. This is what needs to be reflected when smoothing the part.
Basic rules for constructing darts
To build a dart on paper and then correctly execute it according to the material, you need experience, a steady hand and knowledge of the matter. Difficulties often arise with this element, including at the final stage of sewing. A lot of controversy raises the question of where to iron the darts on a dress, jacket, skirt. By choosing the right direction, you will provide your clothes with a neat and integral appearance without ugly folds, creases - the thing will beautifully "sit" on the figure. Most of these parts are located in conspicuous places, so their imperfections are visible to others, and it is difficult to redo them.

woman.rambler.ru
Before sewing, to maintain shape, it is necessary to sweep or chip the elements with pins, bending them in half. Which side to choose for ironing depends on the location of the part.
Generally accepted rules for processing a part
- Details on the front are ironed towards the side seam.
- Darts on the back, as well as waist ones, along the skirt should be smoothed out to the central seam.
- On the shoulders, details can be ironed to the center or in different directions (but on “problem” fabrics like chiffon or stretch knitwear, many tailors choose one).
- In some cases, chest darts emerging from the side seams should be ironed down, like the elbow darts on dresses with long sleeves.
- The side parts are ironed downwards.
Based on the rules, each master independently decides where to direct the element when smoothing. The individual characteristics of the product, personal taste, and any special private wishes are taken into account. When making darts, the correctness of the smoothing of the seams is also taken into account. On the sides, they are ironed to the shelf, if there is no relief, and to the back, if provided. In dresses with bust darts, allowances at the shoulder seams are smoothed out according to the same principle. On single-seam sleeves, in which there is no elbow relief-forming element, allowances are smoothed out. If there is a dart, they are ironed to the shelf.

burdastyle.ru
It is desirable to iron on special rounded wooden decks. They absorb excess liquid that appears during wet heat treatment and help to maintain shape. In the most inaccessible, narrow places it is advised to use spoons with long handles. Placing the product on the ironing board with the wrong side up, put the neck on the left hand - you need to iron the part away from you. Also, when working, take into account what fabric the dress is sewn from.
How fabric affects the ironing process of darts
The main characteristic of the fabric, which influences the choice of the “direction” for darting and the peculiarities of work, is its density. On the thickest materials, the element is cut along the central part, without bringing the cut to the tops by 1-1.5 centimeters - this must be taken into account when ironing the sides. Transparent, "airy" materials require careful handling: they must not be pulled when ironing. When transferring the darts, they use a soft disappearing marker and make the "snares" with a back seam. After sewing, before smoothing, the ends of the seam are checked - the threads must be well secured (for example, with two knots).
During processing, pay attention to the texture of the fabric. On velvet, velveteen and similar fleecy and dense fabrics, the elements are ironed, slightly touching the surface of the canvas, without pressing it. If there are wrinkles on the front side, they are removed with brushes over steam or a damp soft cloth folded in several layers. When sewing things made of silky velvet, it is advisable to iron the details by weight.

mos-fashion.ru
Darting Progress for Standard Medium Duty Suiting
- The part is folded along the central axis, pinned and swept away.
- A line is laid on a part on a typewriter (along an oblique). At the beginning, you will need a back-and-forth bartack, and at the end of the thread is left free.
- On a folded dart, the edge is ironed without bringing the iron below its corner.
- The part is turned in the desired direction. It will have to be smoothed along the edge, trying not to go on it, so that there are no prints left on the front surface.
Ironing thick fabric
Small items made of dense materials can be handled in two ways. The first is more often used with dresses made from the warmest fabric and with outerwear. You will need a separate rectangle of fabric, which is aligned along the center line with the side of the dart.
Progress
- The part is cleaved along the line of the rib, scribbled on a typewriter, bartacked from above and brought the line to the end of the part from additional fabric.
- A strip of fabric is folded in half and ironed along the edge.
- Unfold the dart and additional fabric to the sides.
- The element is ironed out.
- An additional segment is cut exactly and, if necessary, its edges are "overlocked".

wildberries.by
The second method is used for darts with considerable depth - on the chest or waist. The fragment is sewn on the machine to the full length, lower and upper bartacks are made. Then cut along the rib line, leaving about 2 centimeters intact at the corners. The sides are ironed with a steam iron in different directions, pressing the fabric until it cools completely. To prevent the flying parts from showing through on the front surface, the moisture-heat treatment is performed under them, cutting off excess matter if necessary. If you are sewing a dress with a lining, the split part will be invisible.
Processing darts at the waist and skirt
Vertical darts, which are used to shape the waist, are processed differently. The elements have sharp corners along the edges - the machine stitch is laid from one of them to the other.
- The part is folded along the center line and steamed.
- Iron each side in turn, straightening the fabric.
- Unfold the part to one side.
- Pull the fabric along the edge so that there is a straight line on the front surface.
When working with things made of dense materials on a lining, you need to cut the element in several areas. If the fabric is thin, it is better not to make a dart, but to work out the relief. Otherwise, it will look rude.

youtube.com
The details of the skirts are smoothed out to the middle to make it look like a wedge-triangle. Its end is brought to naught, and the line is laid from the waist level to the bottom, along the entire length. The remaining threads can be pulled over to the wrong side with a knitting machine needle. For ironing, it is advisable to use a special pillow on which the dress is placed face down. In order for the wet heat treatment to be done correctly, the iron is impregnated with water, squeezed well (for reliability, steamed) and placed on the seamy surface of the dress.
Progress
- Place the dart in the center of the garment.
- Gently walk the iron along the part on which the iron is located - in the direction from the waist, to the full length.
- If a “bubble” appears on the dart on the skirt, it is leveled by making circular movements with the iron. The easiest way to perform the operation is on elongated "wedges", smoothly converging to the top.
Chest details are ironed towards the waist. If the dress has embossed seams, they are ironed to the midline.
Before cutting and making a skirt, it is necessary to learn how to perform the main units and technological operations on samples. During the processing of the main units and parts of the product, it is necessary:
- observe the rules of safe work when performing manual, machine and iron work, studied in grade 5;
- check the quality of work after each technological operation.
Let's consider in detail: processing of darts (table 18) and folds (table 19, 20); processing the fastener with a zipper tape (Table 22); processing of the upper cut of the skirt with a stitched belt; processing the bottom edge of the skirt with a hem seam (Table 23).
Table 18.
Dart processing
|
|
Graphic image |
|
1. Find the middle of the part. On the seamy side, draw a small line in the middle of the part. Lay straight basting stitches on it with a length of 1-1.5 cm | |
|
2. On the seamy side, mark the darts in turn with three lines: middle, lateral and transverse, limiting the length of the dart. The length and opening of the tuck are chosen arbitrarily. For example: dart length 10 cm, solution 3 cm |
|
|
3. Fold the part right side inward along the center line of the dart. |
|
|
4. Sweep close to the side line of the dart, starting from the top edge to the end of the dart, securing the thread at the beginning and end of the stitch. |
|
|
5. Stitch symmetrical darts along the side line - one from top to bottom and the other from bottom to top. When sewing at the top, secure the dart with a machine bartack 0.7-1 cm long.At the end, gradually reduce the line to nothing, leave the ends of the threads 5-6 cm long and tie them in a knot. Cut off the ends of the threads. Process the second dart in the same sequence. Remove basting threads |
|
|
6. Iron the darts first, then iron to the middle of the part. |
|
|
7. Press the slack at the end of the dart by moving the iron from one place to another, rather than sliding it over the fabric. (Press down - reduce the size of individual sections of the part to obtain a bulge in other areas) |
|


Table 19.
One-sided fold processing
|
Work sequence |
Graphic image |
|
1. On the wrong side of the part, mark the one-sided fold with three lines: middle (fold line), side (seam line) and a line defining the seam length. Mark the depth of the fold as desired. For example, the depth of the fold is 4 cm. The allowance for the fold is equal to the depth of the fold, multiplied by 2, i.e. 4 x 2 = 8 cm. |
|
|
2. Bend the part along the center line with the front side inward. Sweep laterally along the entire length of the fold. Stitch length 1 - 1.5 cm |
|
|
3. Stitch the fold to the marked line and finish sewing with a machine bartack so that the seam does not tear the fold at the end of sewing. Bar tack length 0.7-1 cm.Remove the basting threads in the sewing area |
|
|
4. Lay the part face down along the ironing board. Fold back the fold (depending on the model) and iron it along the entire length |
|
|
5. Sew a finishing stitch or bartack on the right side of the part according to the model. |
|
|
6. After sewing a finishing stitch or bartack, remove the basting threads along the full length of the fold. Wet-heat the fold |


Table 20.
Counter fold processing
|
Work sequence |
Graphic image |
|
|
|
|
2. Mark an opposite fold on the wrong side of a 20x20 cm part with three lines: middle (fold line), side and a line defining the sewing length. Freely mark the line defining the sewing length |
|
|
3. Bend the part along the centerline with the front side inward. Sweep laterally along the entire length of the fold. Stitch length 1-1.5 cm |
|
|
4. Sew the fold to the marked line, ending with a machine bartack 0.7-1 cm long. Remove the basting threads in the sewing area |
|
|
5. Lay the part face down on an ironing board. Spread the crease allowance along the entire length, aligning the center line with the seam line; iron |
|
|
6. Secure the fold from the right side with a finishing stitch according to the model to avoid shifting the seam allowances. |
|


Processing of the fastener in the side seam of the skirt with a zipper tape
Consider the processing of the zipper tape, as it has more advantages in comparison with other types of fasteners and is the most comfortable to wear.
Advantages of the webbing zipper:
- reduction in processing time;
- beautiful appearance;
- speed and ease of use.
The skirt fastener is processed at the top of the left side seam or the middle seam of the back panel. When choosing a zipper tape, it is necessary that its color matches the color of the fabric of the skirt (product).
Fasten the zipper with a finishing stitch on the front side of the product with threads in the color of the fabric. If the fastener is located in the side seam of the skirt, then its links are displaced under the front panel (Fig. 41, a). If it is located in the middle seam of the rear panel, then the edges of the front and rear panels cover the links in the middle (Fig. 41, b).

Rice. 41. Securing the zipper tape:
a - in the side seam; b - in the middle seam
To properly process the zipper tape, you need to distinguish between the main details of the skirt. To do this, they need to be marked (Table 21).
Table 21.
Skirt parts marking
Table 22.
Processing of the fastener in the side seam of the skirt with a zipper tape
|
Work sequence |
Graphic image |
|
1. Fold the two parts right-side in. | |
|
2. Draw a small line of the side seam at a distance of 2 cm from the cuts of the parts |
|
|
3. Sweep the side cuts of the panels along the entire length |
|
|
4. Set aside from the upper cuts of the part 16 cm (zipper length) and draw a horizontal line, limiting the length of the fastener. Stitch side cuts from horizontal line to bottom line. Remove temporary threads at the sewing area |
|
|
5. Press the seam in the seam area. Then press the seam allowances along the entire length. Remove the basting threads at the fastening area |
|
|
6. Direct the opened zipper under the fold of the allowance on the back panel fastener so that the beginning of the links is 1 cm from the top edge of the skirt, positioning the fold of the fastener along the edge of the links. Baste, starting from the top edge of the skirt down to the end of the fastener, at a distance of 0.2-0.3 cm from the fold with straight stitches 0.5 cm long |
|
|
7. Close the zipper tape. Sweep its second side, directing the fold of the front panel to the fold of the rear panel so that they coincide |
|
|
8. Sew the zipper tape from the front side from the upper edge of the front panel to the upper edge of the rear panel, laying a line along the front panel at a distance of 0.8-1 cm from the fold, and along the back panel - retreating 0.2 cm from the fold. Remove temporary threads. Quality control: the machine stitch is straight, laid at the above distance from the folds of the front and back panels of the skirt |
|


Belt processing, processing of the upper cut of the skirt with a stitched belt
The belt is cut in such a way that the warp thread runs along its length. The length of the belt is calculated as follows: (C t + P st) x 2 + the width of the allowances. When determining the width of the allowances, take into account the amount for turning the ends of the belt: 1 cm x 2 cm plus an allowance for the fastener of 3-4 cm.The width of the part is equal to the width of the belt in the finished form, multiplied by 2, plus 2 cm for sharpening. If there is not enough material, then the length of the belt can consist of two parts. In this case, the seam of the connection must coincide with the side seam of the skirt.
The belt is treated with an adhesive-coated fabric pad to give the piece the required rigidity. The width of the glue strip is equal to the width of the finished belt. It should not go into allowances.
Belt processing
- On the seamy side of the belt, mark the fold line along the length. It is located in the middle of the belt width (Fig. 42).

Rice. 42.
- Place the gasket on the inside of the belt parts from the wrong side. Glue it with an iron so that the upper cut of the gasket reaches the belt fold line (Fig. 43).

Rice. 43.
The connection of the belt with the upper cut of the skirt
- Open the zipper. Fold the belt with the product with the right sides inward, aligning the upper cuts. Release by the edges of the fastener allowances for turning the ends of the belt: along the front panel - 1 cm, along the back panel - 4-5 cm. Sweep from the belt side with straight stitches at a distance of 0.8 cm from the cuts (Fig. 44).

Rice. 44.
- Sew on from the side of the belt with a seam width of 1 cm (fig. 45).

Rice. 45.
- Remove temporary threads, press the seam towards the waist (fig. 46).

Rice. 46.
- Bend the belt in the middle with the right side inward, equalizing the cuts. Sweep and overstitch the ends of the belt with a seam width of 1 cm. Remove the basting threads. Cut off the seam allowance in the corners, leaving 0.2-0.4 cm (depending on the fabric shedding) (fig. 47).

Rice. 47.
- Turn the corners of the belt to the front side. Bend the belt along the fold line (in the middle) and lay a basting at a distance of 0.5-0.7 cm from the fold (Fig. 48).

Rice. 48.
- Bend the cut of the inner part of the belt by 0.7 cm and sweep. Baste, overlapping the seam of attaching the belt by 0.3 cm (Fig. 49).

Rice. 49.
- Place the machine stitch from the right side of the garment into the seam of the belt (fig. 50).

Rice. 50.
- Remove temporary threads and iron the belt.
Processing the lower edge of the skirt
The lower section of the skirt is processed after fitting and specifying the length of the skirt.
There are two main methods of processing the bottom edge of a skirt, which can be done either by hand or with a sewing machine:
- hem seam with a closed cut (Table 23);
- hem open seam.
Table 23.
Closed hem hemming of the skirt
|
Work sequence |
Graphic image |
|
1. Draw two lines with a chalk on the seamy side of a 15x18 cm part: |
|
|
2. Place straight basting stitches 1 - 1.5 cm long along the marked lines. |
|
|
3. To sweep the allowance for processing the bottom cut along the marked line, retreating 0.5-1 cm from the folded edge. Quality control: the width of the machining allowance for the bottom cut is the same along its entire length. Iron on the swept allowance |
|
|
4. Fold the allowance by 1 cm and sweep it along the second marked line by 0.1-0.2 cm from the fold. Quality control: the hemming allowance of the bottom cut is the same along its entire length. Iron on the swept-out hem allowance for the lower cut of the part |
|
|
5. Expand the part so that the hemmed edge is directed away from you. |
|
|
6. Sew blind hem stitches with cotton threads No. 50-60 in the color of the main fabric with a frequency of two to three stitches of 1 cm. Insert the needle into the fabric, retreating 0.2-0.3 cm from the fold of the hem allowance, and at the level of this puncture, grab the underlying tissue at half its thickness. When sewing the following stitches, insert the needle into the fabric where it exits from the fabric from the previous stitch. |
|
|
7. Remove the threads for temporary use. Iron on the hem of the part |


New words and concepts
Processing of darts, fastening with a tape-zipper, marking of parts of the skirt.
Self-test questions
- What must be observed and checked during the processing of the main units and parts of the product?
- What does the term "poke around" mean?
- What are the benefits of zipping the fastener?
- What are the two main ways to handle the bottom of the skirt?
Features of processing darts in the manufacture of lightweight women's clothing:
1. The darts are continuous.
2. Stitch darts without additional strips of fabric.
3. In products made of cotton fabrics, the darts are not ironed during processing, they are only laid in the right direction or laid out, and the ironing work is performed during the final WTO of the entire product.
4. Bars at the end of the darts are replaced by tying the ends of the threads into knots.
5. If the darts are sewn (or frustrated), then the finishing line is performed without bartacks at the ends of the darts (this rule is also used in outerwear). The ends of the finishing lines are brought out to the wrong side, tied.
Undercut processing
1. Cutting out undercuts.
2.1. Seam undercut.
studfiles.net
2.4. Methods for processing darts and undercuts
Darts are used in the manufacture of all types of men's, women's and children's assortment. At the location, the darts can be elbow, shoulder, top, on skirts and trousers - along the waistline, on the front - along the waistline, directed up and down. Darts can be split, continuous, can go into folds and tucks.
The cut darts are grinded, starting from the cut of the part, with a seam 7-10 mm wide, reducing the width to nothing and ending the line 10-15 minutes below the cut. If the dart is located in the middle of the part, it is grinded, starting and ending the line 10-15 mm from the ends of the dart. The ends of the darts are fixed. The dart is ironed out, the slack is pressed out at the end and it is fixed in products with a lining with a strip of material with an adhesive coating. You can also lay a strip of material when sewing a dart, followed by notching and bending this strip to one side.
In products made of woolen suit and coat fabrics, a strip of fabric is placed along the entire length of the dart. When ironing out the tuck, the allowance is placed on one side, and the strip on the other, which is necessary to obtain a uniform thickness in the tuck area.
Continuous darts are used in products made of thin fabrics, as well as in outerwear made of dense and thick fabrics, if the dart length is not more than 160 mm. Allowances for the seams of cut and continuous darts can be stitched or stitched in products made of materials that are difficult to wet heat treatment.
In accordance with OST 17-745-78, the unification of the main parameters of straight-line continuous darts in products for men, women and children has been carried out. The unification of the shapes and sizes of darts made it possible to create a semiautomatic device for grinding them.
Darts, turning into soft folds, can be made in the form of tucks, one-sided and two-sided soft folds. The darts, turning into one-sided folds, are grinded along the marking line, first across the allowance, and then along the sides.
Darts, turning into opposite soft folds, are grinded from the transverse marking line with one line. The seams of the darts are ironed only in the sewing area. The un-ironed dart is secured with a stitch.
Darts-folds (tucks) are grinded in the same way as uncut darts, along the marking line.
Undercuts are usually used in women's and children's dresses, coats to create a loose fit, replacing darts on the front of the dress, skirts, and sleeves.
In the undercut, one cut of the part is cut out longer than the other to the depth of the tuck solution. On this cut, a line is laid on a two-needle lockstitch machine with a device for forming gathers. Then the cuts of the parts are grinded (like darts), a line is laid along the cuts with assemblies. Depending on the model, the undercuts are also connected with a topstitching seam. If the distance between the lines exceeds the width of the seam allowance, insert a strip of material from the inside out under the sewing line.
2.5. Processing methods for finishing items of clothing
braids, stripes, trims, flounces, frills, appliques,
puffs, ruffles, embroidery, etc.
The processing of parts with a finishing strip of fabric consists of elements for connecting the strip to the part and sealing the ends of the strip. The strip is sewn on a two-needle machine with a distance between the needles of 12, 19, 28 and 32 mm, folding the sections on both sides using a device and feeding the strip from a roll.
If the finishing strip, during further processing, reaches the cut of the part, then its ends should go into the sewing seams of these parts; if, according to the model, the strip of fabric does not reach the cut of the part, it is adjusted to the markup. Then the strip is cut off and the free end is stitched on a stitching machine, bending immediately inward. When tuning a strip of fabric along a closed contour, the end of it is tuned by bending the sections inward by 1-2 mm from the cut and going into the other end of the strip by 7-10 mm. Individual stripes can be adjusted with the tool at the same time as the piping.
The finishes are parts that are connected to the main part without folding the sides. These finishes include braid, lace, cord. For stitching the braid along straight and slightly curved contours, a two-needle machine 852x10 class is used. with the device 1-22 MOMZ TsNIISHP, and for stitching the finishing tape on a part with one bent cut - a machine 803x6 cl. with device 1-58 MOMZ TsNIISHP.
For sewing lace on a piece with an overhead seam, use the device 1-37 MOMZ TsNIISHP, which is installed on a machine 335 cl. firm "Minerva", performing shuttle zigzag stitches and having a knife for trimming the cuts of parts near the line.
To trim parts with a cord or shaped tape, a special foot with a hole for a cord or tape fed into cassettes or bobbins is installed on the sewing machine. Tacking a tape or cord on a part can be done so that the stitching is not visible from the front side.
Processing of ruffles, shuttlecocks, trims, basok consists of joining their parts with stitch seams 2-5 mm wide with and without overcasting, depending on the properties of fabrics; registration of open cuts of parts with edge seams with overcasting; overlapping open or overcast cuts, edging or melting cuts. In flounces, drapes and basques, it is possible to design cuts with overturned seams if there is a lining or a sub-edge strip of fabric
Shuttlecocks, frills are sewn parallel to the cuts on a two-needle machine with a device for gathering, the distance between the lines is 1-4 mm. Shuttlecocks and assemblies are connected to the main parts with stitching, topstitching, patch seams and can be sewn into finishing tuck seams and folds.
The ruff with the finished edges is sewn with parallel lines in the middle with smocking, the distance between the lines is 2 mm. Then the ruff is sewn onto the detail along the outlined line in the middle between the lines.
To obtain a ruffle with a curly edge, the line is laid in zigzag lines. The line parameters are taken according to the model.
Pads can be machine-sewn by sewing parallel, loose-stitch stitches on the right side using the guided foot. At the beginning and at the end of the line, they are fastened, the fabric is evenly collected on the lower threads. To protect the stitches from unraveling under the puffs, place a lining made of main or lining fabric. The ends of the stitches that form the puffs must subsequently fall into the seam or they are closed with folds. Embossed pads can be made with a cord.
Applications are applied to the parts using a two-head semi-automatic zigzag stitching with simultaneous trimming of the stitching, and also applied by duplicating with an adhesive film.
The embroidery on the details of the product is filled on special machines and semiautomatic devices. On semi-automatic machines, the embroidery pattern is set by the program.
Materials such as suede, corduroy, felt, split leather, etc. can be used for finishing products. For finishing, decals are also used by thermal printing (transfer of a drawing from paper to fabric at a pressing temperature of 180-200 ° C).
Task 3. Establish methods for processing clothing parts.
Based on the study of processing methods for garment parts, establish various processing methods for the selected part and present in accordance with table. 4.2.
Table 4.2.
Part processing methods
Task 4. Choose a progressive processing method for one of the details of clothing.
The choice of a progressive processing method and the sequence of operations are based on the study of processing methods. The sequence of drawing up - in accordance with the table. 4.3, 4.4
Table 4.3.
Technological sequence of parts processing
(name selected parts)
Requirements for the laboratory report:
1. Study the constructive variety of clothing details.
2. To study processing methods: slices, fill in table 4.1.
3. Establish methods for processing clothing parts: valves, patches, leaflets, shoulder straps, straps, belts, belt loops, details of patch pockets, yokes, inserts, darts, undercuts, trim elements (braids, shelves, trims, flounces, gathers, ruffles, appliqués , puffs, embroidery, etc.), fill in table 4.2.
4. Choose a progressive processing method for one of the garment parts, fill in table 4.3.
5. Draw conclusions, write in the report.
Control questions:
1. How are cuts of parts processed depending on the type of fabric?
2. More progressive methods of processing small parts (valves, leaflets, shoulder straps, etc.).
3. What methods are there for the top edges of patch pockets?
4. What are the types of darts and methods of their processing?
5. What are the finishing elements of clothing and their processing methods?
1. Gvozdev, Yu.M. Chemical technology of leather goods. M .: ed. Academy, 2006.
2. Kryuchkova, GA Technology of sewing and knitwear products. M .: ed. Academy, 2009.
3. Terskaya, L. A. Technology of cutting and tailoring of fur clothing. M .: Academy, 2004.
studfiles.net
20. Processing of darts in various products.
To give the product a certain shape in accordance with the figure of a person, as well as for a better fit of the product to the figure, darts are made on the main parts. The solution of the darts and their number depend on the tightness of the fit of the product. Depending on the location on the product, the darts are divided into upper ones and from the waist line. Top darts are located from the shoulder seam, neckline, armhole or side seam. These darts are necessary to create a bulge in the product in the chest area. Darts from the waist line are necessary to obtain a snug fit of the product on the figure in the waist area. According to the method of processing, the darts can be split and continuous. In a light dress, the darts are continuous. Depending on the model, the darts can turn into soft folds, they can be replaced by darts-tucks, folds, undercuts and raised seams. The darts coming from the cut are marked from the inside out of the part along the auxiliary pattern with three lines, and the parts in the middle with four lines: middle, lateral and lines defining the beginning and end of the dart. The part is folded with the front side inward along the center line, first the darts are swept along the side line, and then grinded. The darts coming from the cuts of the parts are grinded, starting from the cuts, and end strictly at the transverse lines that define the end of the dart. The darts located in the middle of the part are grinded starting from one of the ends. Depending on the model, darts can be stitched from the front. The tuning is performed with silk threads at a distance; provided by the model. In this case, the upper thread is taken inside out and tied with a knot. Darts, turning into soft folds, are also marked from the inside out with three or four lines. Darts designed along curly lines must be swept away before sewing. The length of the basting stitch is 1.5 cm. The basting threads are removed after sewing, the darts are ironed on one side, depending on the model.
21. Processing of yokes and their connection with the product.
Coquets come in various shapes: straight, oval and curly. According to the method of connection, the yokes can be stitched and overhead. The bottom edge of the yoke can be stitched and detached, as well as trimmed with edging, frill, flounce, lace, etc. Processing overhead yokes with straight edges. A fold line is marked on the yoke, and the edge of the yoke is marked on the main part. The yoke cut is bent towards the wrong side along the marked line, in products made of woolen and silk fabrics it is swept with straight stitches 1-1.5 cm long and ironed, and in products made of fabrics on which traces of sweeping threads are difficult to remove, they are ironed without preliminary sweeping ... The yoke is placed on the main part, aligning the folded edge of the yoke with the marked line on the main part. In products made of woolen and silk fabrics, the yoke is basted with hand stitches 1.5-2 cm long and stitched at the distance provided by the model. The threads of sweeping the edge and basting of the yoke are removed, the seam of the connection of the yoke with the main part is swept over. The lower edge of the yoke is ironed on.
studfiles.net
3. Processing of darts and undercuts.
Sweep the dart from the end to the wider part, and grind it from the wider part to the tip. When sewing, the stitching should taper off well towards the end of the dart.
When ironing, the darts are laid out on two or on one side. When ironing darts to one side, the fold of the fabric from the wrong side should always be directed towards the middle of the front or back. If the products are made of thick fabric, then the darts are cut and ironed on two sides.
Features of processing darts in the manufacture of lightweight women's clothing:
1. The darts are continuous.
2. Stitch darts without additional strips of fabric.
3. In products made of cotton fabrics, the darts are not ironed during processing, they are only laid in the right direction or laid out, and the ironing work is performed during the final WTO of the entire product.
4. Bars at the end of the darts are replaced by tying the ends of the threads into knots.
5. If the darts are sewn (or frustrated), then the finishing line is performed without bartacks at the ends of the darts (this rule is also used in outerwear). The ends of the finishing lines are brought out to the wrong side, tied.
Undercut processing
Undercuts are a type of darts and a finishing piece of clothing. Undercuts can be on the bodice, skirt and sleeves, depending on the model.
Undercuts, both simple and curly, are processed with a stitching seam, edge stitching and stitching of any width, depending on the style.
When processing undercuts with a stitching seam or stitching in the edge on the front side of the product, undercuts are made 1 centimeter shorter than necessary, and the line is continued further than the undercut by 1 centimeter.
When processing an undercut with a stitch of any width, the upper and lower undercut lines are grinded with a piece of the same fabric, then cut along the undercut line, the lower side is assembled and the upper undercut line is stitched onto it.
1. Cutting out undercuts.
The undercut is designed so that one cut is longer than the other (to form gathers or folds).
2. The formation of assemblies at undercuts with assemblies.
Along the allowance for the long cut of the undercut, two parallel lines (1 and 1 ′) are laid, the lower ends of the threads are pulled together; the formed assembly is straightened evenly (or according to the model). The length of the sides of the undercut is equalized.
2.1. Seam undercut.
The undercut is grinded down by leveling the cuts of the sides (by analogy with grilling cut darts). The line is laid from the side of the assembly.
2.2. Processing the seam seam.
The seam is directed to the sides without assemblies, ironed on. If provided by the model, then the undercut allowance for the part is adjusted.
3. Processing undercuts with folds.
Unlike undercuts with gathers, undercuts with folds instead of gathers, folds are made on the long side of the undercut.
studfiles.net
Summary of the lesson on the topic "Processing darts"
Lesson topic: Skirt-by-knot processing. Darts.
Lesson objectives:
Educational: to acquaint students with the types and purpose of darts, to form students' knowledge and skills in processing darts in a light dress;
Educational: foster a culture of work and a sense of responsibility;
Developing: develop attentiveness and accuracy, observation and independence in work.
OUUN - To form the ability to compare objects in shape, design and material characteristics. Develop logical and spatial thinking.
Basic concepts: darts, constructive lines.
Teaching and visual aids: a mannequin, one half of which is wearing a garment without darts, the other half is a garment with darts, sewing samples (unusually large size) of step-by-step processing of darts, slides, video clips.
Lesson type: combined.
Interdisciplinary connections: history, drawing.
Preparatory stage: students are asked to collect material about the styles of clothing from different historical eras. Preparation for the lesson consists of students' independent work with additional literature, preparation of an electronic presentation and individual teacher consultations.
On the blackboard: lesson topic, epigraph; cards with names of lines, cards with measurements and calculation formulas, sizes of women's clothing, drawing of a straight skirt.
Lesson plan (2 lessons of 40 minutes).
Organizational moment (1 min.).
Presentation of the topic and purpose of the lesson (1 min.).
Knowledge test (5 min.).
Presentation of new material (together with students) (10 min.).
Questions to consolidate knowledge (5 min.).
Exercise “Processing a dart” (18 min.).
Physical education minute (1 min.).
Practical work No. 1 "Technology of processing darts"; Practical work No. 2 “Making samples for processing darts” (35 min.).
The final part of the lesson, summing up and giving marks (3 min.).
DURING THE CLASSES
1. Greetings to students, roll call, checking the readiness of workplaces.
2. Scoring the topic of the lesson. The epigraph for the lesson (written on the blackboard) is read by the teacher: “People are not born with skill, but they are proud of the craft they have acquired” (proverb).
From history: A tailor and a furrier are one of the most difficult professions associated with the art of dressing a person. Since ancient times, these crafts have been taught since childhood. The study was long and difficult. The work of a tailor in the XIV-XVII centuries. was a fairly hard physical labor. But with the advent of universal sewing machines, sewing has become much easier.
The purpose of our lesson: with the help of modern sewing equipment and tools, learn how to mark darts on fabric and process darts on details of garments.
3. To restore the concept of the drawing in the students' memory, the students are offered a task at the blackboard (4 people):
1) On the board with the help of magnets, cards with the names of the lines are fixed - the chest line, the waist line, the horizon line, the hips line, the life line.
The task is to correctly select and place the cards on the mannequin and the drawing of the skirt and show the direction of the conditional lines for taking measurements and building the drawing;
2) Cards with measurements and calculation formulas are fixed on the board: Sat: 2 + Pb, Zp, Dts / 2, Di.
The task is to correctly select and place the cards on the lines of the drawing of a straight skirt;
3) A drawing of a straight skirt is fixed on the board.
4) The size of women's clothing is written on the board: 158-96-104.
The task is to explain what these numbers mean.
The rest of the students observe the implementation of the assignment, determine its correctness and point out mistakes if they are made.
Additional questions:
On what scale is a drawing of a garment built?
What dimensional signs are halved when recording?
4. What is a dart and what is it for? To answer this question, consider the costumes of different historical eras.
Students show slides prepared for the lesson. Annex 1
The female costume of Ancient Greece was very simple. The fabric was fastened on the shoulders with a knot or special clips and belted at the waist, thereby creating large volumes in the chest and hips. All the lines of the female figure were hidden by drapery (a garment without darts on the mannequin). Over time, the costume changed, it became more refined, elegant. But large volumes still hid the female body. Modern fashion makes many demands on clothes, and first of all, convenience and practicality. The emergence of new materials contributed to the development of modern youth fashion - clothes that are super-tight, bright and beautiful (a garment with darts on a mannequin).
How can one obtain a product from flat parts that corresponds to the volumetric shapes of a female figure? This is the main task of the sewing process. Of the means by which this problem is solved, the most common are darts, they help to create the necessary fit for the figure.
Conclusion: Excess fabric on the figure is removed in darts.
Before continuing the lesson, let's write down the topic and set ourselves the task of finding out: what are the darts by location and by design (we will present the data in the form of a diagram).
Darts can be made from the cut and in the middle of the part. Cut darts - 1 - (Fig. 1, garment with darts) have the shape of a triangle and are used in waist and shoulder products. Three darts are located along the waist line in belt products - front, side and back (drawing of a skirt, samples of garments). By design, these darts are divided into split and continuous. Split darts are used when processing products from thick inexpensive fabrics (sewing samples).
The darts in the middle of the part - 2 - (Fig. 1, a garment with darts) have the shape of a rhombus and are mainly used in shoulder products.
On the model, the darts are shown using constructive lines in the direction of the dart seam (Fig. 1, Appendix 1). The number and shape of the darts depends on the style and size of the product. To generalize what was said, students are offered a diagram (Fig. 2, Appendix 1).
From history: Since ancient times, boys have been taught the craft of a tailor. The case was passed from father to son. When a student could sew and finish a suit himself, he was awarded the title of master. Such a costume in all craft workshops bore the name - "masterpiece".
Marking darts.
The darts extending from the cut are marked with chalk or soap from the seamy side of the part (drawn in a notebook) with three lines: middle, side and a line limiting the end of the dart (Fig. 3, Appendix 1). The darts located in the middle of the part are marked with the help of four lines: the middle, lateral and lines defining the beginning and end of the dart (see samples of operational processing).
To process the dart, the part is bent along the center line with the front side inward. So that the layers of fabric do not move during processing, the dart is cleaved with pins, placing them perpendicular to the seam line (students work with samples). Crumpling is performed along the lateral line, starting from the top of the dart to the cut of the part. And they grind from the cut to the top, gradually reducing the line to nothing. At the beginning and at the end of the line, a bartack is made (Appendix 2).
If the dart is located in the middle of the part, the bumping and stitching of its sides starts from one of the vertices.
The fold of the dart and the seam are ironed on. Then the part is unrolled, the allowance of the dart is bent to the side and ironed. For darts located vertically, the allowance is ironed towards the middle of the product, for horizontal and inclined darts - upwards. The fabric allowances at the split dart are ironed out (Appendix 1, sewing samples). At the top of the dart, after sewing, a slack in the fabric (bulge) is formed, it is pressed from the seamy side with an iron with moistening.
5. Physical education
6. Questions to consolidate knowledge:
What are darts used for?
Which suit has more darts: womens or mens?
In what products are cut darts made?
How do the darts show on the sketch of the model?
How are the darts outlined on the details?
How are darts in products ironed?
Looking at someone else's work, you will not be full. (Proverb)
7. Exercise. Dart processing.
Equipment, materials and tools: a piece of cotton fabric 25x30 cm in size, scissors, threads, a needle, tailor's pins, a thimble, a ruler, a sewing machine, an ironing table, an iron, samples of step-by-step processing of darts. Instructional cards.
Work order:
Safety when working with hand tools, when working on a sewing machine, when working with an iron;
In the middle of the flap of fabric, on the wrong side, outline a dart: length 18 cm, solution 8 cm (4 cm each from the middle of the dart to the left and right), draw the sides of the dart.
Fold the part right side in, chop the dart with pins, sweep it, aligning the sides of the dart, starting from the top to the cut.
Stitch the dart along the side line, starting from the cut to the top, gradually reducing the stitching to nothing. Do bartacks at the beginning and end of the stitching. Remove the bunching threads.
Press the fold of the dart and press the seam. Press the dart on one side. Press the slack at the top of the dart from the wrong side.
Attach the sample to the album.
Self-control: the dimensions of the dart correspond to the given; the stitching line is straight, starts from the cut of the fabric, ends at the fold, at the top of the dart; at the beginning and at the end of the stitching there are bartacks.
During the exercise - target walks of student workplaces:
bypass in order to check the start of work;
bypass for the purpose of individual instruction with lagging students - clarification of educational material, demonstration of the implementation of work techniques.
Analysis of students' work.
8. Physical education
9. Practical work No. 1. Technology of processing darts.
For students, cards of various levels of complexity have been developed with questions and assignments on the topic (Fig. 4). All tasks must be completed for the “Excellent” mark.
Work order:
In tasks No. 1 and No. 2, circle the letter of the correct answer;
Task number 3 should be done with a pencil.
10. Practical work No. 2. Manufacturing of samples for processing darts.
For students, cards of various levels of complexity with tasks on the topic have been developed (Fig. 4). All tasks must be completed for the “Excellent” mark.
Equipment, materials and tools: scraps of fabric 17x20 cm in size, scissors, threads, a needle, tailor's pins, a thimble, a ruler, a sewing machine, an ironing table, samples of step-by-step processing of darts, cards with tasks.
Work order:
1) Get acquainted with the drawings - schemes of darts;
2) Perform processing of the specified darts;
3) Check the quality of the work performed;
During the assignment - target walks of students' workplaces bypass in order to check the start of work;
a walk-through to check student compliance with safety rules;
bypass to check the correctness of the work performed;
Lesson on the topic "Processing a fastener in a side seam of a skirt with a braid - a zipper."
Learning element, time Learning material with assignments Guidance for mastering the materialUE - 0 Objectives: To consolidate the material on the topic: "Preparing the sewing machine for work."
Get acquainted with one of the methods of processing a fastener with a tape - a zipper.
Learn to process the fastener in the side seam with a tape - a zipper. Read the objectives of the lesson carefully.
UE - 1 Take the test on "Machine Science".
1. Indicate in numbers in the left column the sequence of actions when starting work on the hand-operated sewing machine.
Conduct a cross-check A. Lower the presser foot. B. Insert the bobbin into the bobbin case. B. Thread the upper thread. D. Pull the bobbin thread up through the hole in the needle plate. E. Holding the upper and lower threads with your left hand, sew 2-3 stitches by turning the handwheel towards you with your right hand. E. Insert the bobbin case into the hook.
Mark the correct answer with a "+" sign 2. The long groove of the needle when it is installed in the needle holder must be turned: a) to the left; b) to the right; c) working behind the machine; d) towards the shuttle; e) from the side of the upper threading.
Fill in the missing word 3. The larger the number of the machine needle, the __________ the needle itself: 4. A quality stitch is considered to be one in which _________ __________ and tension ___________ and _____________ of threads are regulated. 5. Check the correctness of the answers according to Appendix No. 16. Evaluate your work according to the scheme. 9-10 correct answers - "5"; 7-8 answers - "4"; 5-6 answers - "3"; Fewer number - "2" Enter the result in rating sheet.
For fastening in skirts, hooks, buttons and a zipper are usually used. The most common and comfortable zipper. It is used when sewing any kind of skirts. In a skirt, the zipper can be located in the left side seam, in the seam on the back or front panel of the skirt. Such a fastener is practical and aesthetically pleasing. Correctly sewn in, it is hidden in a seam, crease or in the cut line, lies smooth and does not tighten the fabric. The length of the zipper should correspond to the length of the fastener, and the color of its tape should correspond to the color of the material of the product. Zipper tape is usually sewn on a sewing machine using a special foot
Work individually UE-3 Purpose: To carry out practical work using the instruction card and graphic image
1. Knit the side cuts of the skirt. Fold the loose side cuts of the skirt to the wrong side along the marked lines, sweep and iron
Refer to Appendix # 2 Work individually, pay attention to the graphic image.
UE-4 2. Baste the zipper. b) close the zipper and baste its second side so that the folds of the fabric, converging, completely cover the zipper links. Refer to Appendix No. 3 Work individually, pay attention to the graphic image. UE-5 3. Adjusting the zipper. front side) by 0.1 ... 0.2 cm from the zipper links. The line at the end of the zipper should run perpendicular to the side seam or at an angle at a distance of 0.2 ... 0.5 cm from the last zipper links b) sew the edge and the lower ends of the zipper tape to the seam allowance c) check the correctness of the work performed according to Appendix No. 4
Evaluate your work according to the scheme: score "5" - for independent high-quality execution of the product with the size and frequency of finishing set by the teacher. teachers can be eliminated without spending a lot of time. grade "3" - for independent execution of the product with significant deviations in accuracy and frequency of finishing, but which can be used for its intended purpose after its completion, requiring a significant investment of time. grade "2" - for non-performance work.
Record the result on the score sheet. Work individually, pay attention to the graphic.
UE-6 Purpose: summing up. 1. Read the lesson objectives again. Have you met your goals? 2. Evaluate your work in the lesson, enter your grade on the final sheet. 3. At home, continue working on the project. (Record all the work you did in class while zipping the side seam of the skirt.) 4. Write the assignment in your diary Appendix 1.
1.1-B; 2-E; 3-B; 4-D; 5-A; 6-D.2. b; 3. thicker. 4. stitch length; top and bottom.
Appendix 2.
1. To sweep - means to secure the folded edges of the part with a sweeping stitch. 2. To iron - to reduce the thickness of the seam, fold or edge of the part.
Appendix 3.
Basting means joining parts of parts or small parts with the main part with a sweeping stitch.
Appendix 4.
Self-control. Check: 1) the uniformity of the width of the seam of the attaching of the zipper; 2) whether the zipper links are covered with the folded edge of the fabric; 3) the accuracy of the work.
Lesson number 5. Topic: "Branches of modern production
Goals and objectives of the lesson
In the lesson we will explain the concepts of "world community", "scientific and technological revolution", "metropolis", "social inequality", "Internet", "information revolution". We will characterize modern society, analyze its positive and negative sides, and discuss the role of technological progress in the development of human society. We will continue to learn to do comparative analysis, solve problems, participate in discussions, evaluate events and phenomena from different points of view. During the lesson, we will try to express our attitude to the world of entrepreneurs and reflect on the balance of material and moral interests.
Plan for learning new material:
Modern production, its distinctive features. Composition of modern society. Problems associated with modern production. Economy, its role in the life of society.
Let's think ...
What is modern society like? What can we be proud of, and, conversely, what problems urgently need to be addressed by humanity in the modern world? We will talk about this in the lesson.
1. Modern production and its distinctive features
Assignment: working with the paragraph material and additional material, give a characterization of modern society, complete the assignments and answer the questions.
Questions for the class:
What are the predictions of modern scientists about the future of human society? What are the signs of modern society? Which industries are leading today? How has the nature of the work of modern people changed? How is the supervision of out-of-home work organized? Describe the state of development of television and telephone communications. What are the future plans for these industries? What new inventions did you learn about during the lesson? What conclusion does the author of the textbook make?
List what technical means you already know how to use. How does technology help you?
2. Composition of modern society
In the 21st century, most of the world's population lives in cities. What is the reason for this? Why have megacities become a symbol of our time? What role does agricultural labor play in this? Describe the composition and interests of people in modern society.
Let's draw conclusions ...
The composition of modern society
These are people of various professions: programmers, managers, designers, etc.
The main requirements are: a high level of knowledge, skills, professionalism and responsibility.
Modern man has enormous opportunities for an interesting and dignified life.
3. Problems associated with modern production
Unfortunately, not everything is so smooth and cloudless in the modern sky. What are the consequences of the transition to new production? How does a person feel in it?
Let's play a game called Debate. I will now introduce you to two positions regarding technical progress. Your task: 1. Having divided into groups, defend a certain point of view. 2. Try to convince the opposite side in your favor.
Position one:
“Technology helps a person to live easily and interestingly. Airplanes and trains carry people anywhere in the world. Food processors free housewives from housework. TV tells and shows what is happening in the world. "
Position two:
"Yes it is. But computers for many replace communication with other people. Waste from production pollutes the air and water around people. Tons of harmful substances are dumped into the ocean. And the available nuclear weapons can destroy the Earth several times. Contradictions are growing between developed and developing countries. Social inequality has not been eliminated ”.
Summing up the results of the lesson
Continue the phrases: I like it in modern society ... I am worried about modern society ...
Homework:
Learn § 4 of the textbook, complete a creative task: imagine that you are a photographer and you need to make a photo report about modern society. What kind of photographs would you take to show the main, characteristic features of modern society? Present your work as a collage and present it.
infourok.ru
3.7.3. Processing darts from the waist line
Continuous darts (Fig. 44) are processed in the same way as breast ones - with a strip of fabric along the entire length, placing it on the side of the side cut. Before ironing out, the allowance for the dart and the strip of fabric at the waist level are laid out and pulled back for a better fit of the dart.
Processing split darts from the waistline is similar to processing split bust darts. Darts that turn into folds are sewn down to the marked line, depending on the model. When sewing a dart in a section that turns into a fold, the line ends at a right or obtuse angle to the fold. The ironing of the darts is performed simultaneously with the ironing of the folds.
Darts-tucks create soft folds on the product at the top and bottom of the waist line by stitching them on the front or wrong side of the waist line in length, depending on
from the model. Ironing is performed only on the grinded area.
3.7.4. Shelves processing
WITH CUT-OFF SIDE-PIECES
To obtain a tighter fit of the product in the waist area and to facilitate the performance of wet heat treatment in products made of woolen fabrics containing wool fibers in a mixture with synthetic fibers, the shelves are designed with cut-off side parts.
The processing of the shelves begins with the processing of the front darts, after which the soybeans are processed. 44. Processing darts Dash the sides of the cut of the pocket end-to-end along the waist line with oblique stitches 10-12 mm long or
with a glue edge. Then the main and side parts of the shelf are folded with the front sides inward, equalizing the cuts, and grind on the side with a 10 mm wide seam. The seam is moistened and ironed out (fig. 45).
3.7.5. Embossed seams
Relief seams, which have both constructive and decorative purposes, can be of various types: stitching, overlapping, overhead with a closed cut, stitching, with a hole, with an edging, etc. Relief seams are performed using feet with a guide ruler.
Stitch relief seams are at least 10 mm wide. Stitching is performed with equalization of cuts and control marks from the side of the most straight cut with bartacks at the beginning and at the end of the line. Slices of one seam are grinded from top to bottom, and the other from bottom to top. Wet-heat treatment of the seams is carried out in accordance with the requirements of technical conditions - ironed out or ironed out. The seams are ironed using the model. In vertical relief seams, seam allowances are often ironed towards the middle of the part. Before sewing, for training purposes, it is recommended to sweep the sections with a 9 mm wide seam on a special machine or straight hand stitches, aligning them with the alignment of control marks. When sweeping, the product is placed on the table (when processing products of a straight and extended silhouette) or lifting it above the table (when processing products of an adjacent silhouette). One seam is performed from top to bottom, and the other from bottom to top, the most oblique cut of the part should be from above. When sewing, the stitch is placed next to the basting stitch and performed along the most straight cut.
The stitching relief seams are of two types: stitching from the front (Fig. 46, a) and seamy (Fig. 46, b) sides. Depending on the model, stitching relief seams can be located on the details of the coat in one or more parallel rows. Before stitching the embossed seam from the seamy side, mark its direction with chalk, then the part is bent along the outlined line with the front side inward and stitched parallel to the fold, retreating from it by 2-4 mm.
Rice. 45. Processing of a duplicated shelf with a cut-off side part
The next raised seams are made parallel to the first using the foot with a guide fence. Embossed seams on the front side perform
in the same way as described above, but the lines are laid on the front side of the part. Curly embossed seams are overlaid, interrupting the stitching at the corners.
Rice. 46. Treatment of stitching relief seams:
a - overlapping on the front side; b - the same from the seamy side
Applied relief seams with a closed cut are processed on parts consisting of two parts, or on solid parts. In the first case, one of the cuts is first processed with a hem seam with an open cut. The width of the allowance depends on the width of the finishing stitch. The cut of the upper part is folded over and swept from the side of the allowance on a special vehicle at a distance of 10-15 mm from the fold. Then the seam is ironed on from the side of the bent cut. The processed edge is applied to the lower part of the part, equalizing it with the cut, according to the control marks, one part is bent over the other and stitched with a finishing line. To sew a raised seam on a solid piece, an allowance equal to twice the width of the finishing line and a seam allowance is required. Along the marked line from the side of the allowance, the part is bent and swept at a distance of 10-15 mm on a special car. After ironing, the upper part of the embossed seam is applied to the lower one, aligning them along the outlined lines, one part is bent over the other, and then tweaked.
Stitching relief seams can be processed on parts consisting of one or two parts. When making a seam on parts of two parts, first, the parts are connected with a stitching seam with a width depending on the finishing stitch and the type of the stitching seam (with an open or closed cut). After sweeping on a special machine, the seam is ironed on the seamy side. The finishing line is laid on the front side along the seam. Stitching relief seams on a one-piece part are performed with an additional strip of fabric in the following ways.
1st method. A relief seam line is applied to the shelf from the seamy side and transferred to the front side. A strip of thin woolen, cotton or linen fabric with a width equal to twice the width of the finishing line plus 20-30 mm and cut in length along the weft thread is applied to the seamy side along the line of the embossed seam. The middle of the strip should coincide with the line of the embossed seam (Fig. 47, a). The strip is fixed with pins to avoid shifting and secured with a machine stitch, laying it along the marked line from the front side of the shelf. Then, along the line, the shelf is bent in one direction, and the strip - in the other, and the relief is covered along the main part from the wrong side at a distance of 3-5 mm from the fold (Fig. 47, b). The strip is bent to the side, the seam is swept out, ironed on from the seamy side, placing the shelf along the table. Then perform a finishing line (Fig. 47, c).
Rice. 47. Processing of stitching continuous relief seams
2nd way. The shelf is folded with the front side inward along the marked line of the embossed seam and stitched at a distance of 3-5 mm from the fold, at the same time placing an additional strip of fabric under the shelf so that its width on the right is equal to the width of the finishing line plus 10 mm (Fig. 47, d ). The embossed seam is swept out, ironed on, then a finishing line is performed (Fig. 47, e).
3rd way. After stitching the relief of the shelf at a distance of 3-5 mm, a single or double strip of fabric is applied to the fold, fixing it on a special machine with a zigzag stitch (Fig. 47, e). Sewing in, ironing in and finishing stitching (Fig. 47, g) is performed in the same way as in the processing of the 1st method.
Embossed seams with a cord are processed in the following way. A strip of cushioning fabric is placed under the main fabric and the first line is laid along the marked line from the front side. A cord is inserted between the fabrics and a second line is laid, tightly bending around it with the upper part. The seams are processed using a single-edged foot. The number of rows to be sewn in depends on the model.
Embossed seams with edging can be performed both on a solid part and on a split part. The processing process consists of two stages: stitching a double-folded strip of finishing fabric at a distance of the edge width to one part and fixing the second part to the edge-turning stitch.
studfiles.net
Practical work - Sewing a product - Working with fabric
Instruction card
Tools and accessories: work box, cut products.
1. Sew shoulder darts from shoulder to end. Press on shoulder darts on both sides.
2. Press the shoulder darts towards the center of the back, pressing the slack at the end of the darts through a slightly damp iron.
Note: Chest straps are treated in the same way. darts. They are ironed towards the bottom of the product.
Sew a dart on the fold starting from the shoulder and press it towards the center of the back (a).

Note: If the tuck is opposite, then it must be ironed out (b).
Self-control
Check:
- the length and width of the darts;
- the accuracy of the bartacks at the end of the stitches;
- correct ironing of the darts.
- Where should you start to grind darts?
- What is the sequence in which the darts are wet-heat treated?
- How is the slack in the ends of the darts cushioned?
- What is the processing sequence for the dart coming from the armhole?
Instruction card
Processing side and shoulder cuts
Tools and accessories: work box, cut details.
Work sequence
- Stitch side cuts from the front, slightly pulling the fold of the fabric at the dart.
- Iron the seam seams, machine overcast with a zigzag or oblique overlock stitches by hand.

Note: On thin fabrics, side cuts can be ironed. In this case, the stitched sections are ironed towards the front, and then two sections are swept over at once.
- Stitch shoulder cuts from the front side.
- Press the stitching cuts towards the back and overcast them.

Note: Shoulder cuts can be cut and flattened. In this case, the processing sequence is similar to the processing sequence for side slices.
Self-control
Check:
- whether the seam on the side and shoulder is evenly made;
- the accuracy of overcasting of the side and shoulder cuts;
- the accuracy of the wet-heat treatment of the side and shoulder sections.
- How to process a shoulder slice in a waddle?
- What is the processing sequence for the side cut with ironing?
- What is the shoulder and side seam allowance?
"Serving Labor", S. I. Stolyarova, L. V. Domnenkova

Practical work Instruction card Performing the second fitting Tools and accessories: work box, product. Work progress: Put on the product, pinch along the line of the fastener, aligning the center lines. Check the correct processing of the side and shoulder sections, their direction. Check the length, direction of the darts, the accuracy of their processing. Check the fit of the product along the armhole, neckline. Check the symmetry of the patch pockets. Check the length of the product….

Pockets are of various types: patch pockets, welt pockets, in seams, internal. Most often, patch and welt pockets are used. In appearance, patch pockets are simple and complex, they can consist of one, two or several parts. The figure below shows the most common types of patch pockets: a - simple, b - with a facing imitating a valve, c - with an opposite fold, ...

Cut trims are used to process armholes, necklines and other cuts that have the shape of oval lines, corners, etc. (notches with cape, square). They are cut out after trying on the product, when the shape and size of the cutout for the details have already been specified. The direction of the common thread in the facing and the part must match. Practical work: Instructional card Making a neck trimming Tools and accessories: working ...

Instructions card Tools and accessories: work box, cut products. Sequence of work Processing the bead with one-piece hem 1. Overcast the edges of the hem on the sewing machine with a zigzag seam or hem with an open cut. 2. Bend the hem to the front side along the bend line, sweep the lower cuts of the hem, grind. Straighten the corners, turn to the front side, sweep the sides along the line ...

After the first fitting and correction of defects, the product is prepared for the second fitting: the darts are processed, the pockets are processed and swept, the side and shoulder sections are ground and swept, the sides and finishing details are processed. Then wet-heat treatment of darts, shoulder and side seams, sides and finishing details is performed. Wet-heat treatment of the product Wet-heat treatment is an important part of the technological process of making clothes. Appointment ...
www.ktovdome.ru

Darts are structural elements of clothing, thanks to which products of any shape and degree of fit to the figure can be obtained from flat fabric.
By location on clothes, darts are chest, shoulder, tackle, elbow, etc. An excess of fabric is taken into the dart, called an allowance, the widest part of it determines the depth of the dart.
Darts can be continuous and split. Continuous darts are made on fine fabrics; their entire allowance after processing is ironed in one direction (Fig. 36a). In products made of thick fabric, in order to prevent the dart from running through, a strip of woolen, cotton fabric or non-woven fabric (non-woven, prolameline) is laid when sewing. At the end of the dart, after sewing it off, one layer of the strip is cut, not reaching the line by 1 mm. The dart, stitched with a strip of fabric, is ironed out from the cut towards the end (Fig. 36e).
Split darts are commonly used in lined thick fabrics. After grinding, the allowance for such darts is cut along the fold, not reaching the top (sharp end of the dart) by 4-5 cm, and is unstressed (Fig. 36b). You can insert a thick needle into the uncut end of the dart during ironing to keep the ironing seam straight.
Rice. 36.
If the dart has only one vertex, and its wide part is tucked into the seam, then it is necessary to grind such a dart from the wide end, first performing a bartack with a reverse stitch. At the top of the dart, it is better not to do a machine bartack, but to leave the ends of the threads, which, after sewing, must be tied and hidden in the fold.
On one-piece products, tackle darts have not one, but two tops. For a better fit of the product, the allowance for such darts after sewing must be pulled along the fold or cut in the center, not reaching the seam by 5-7 mm (Fig. 36c).
In some products, the darts are not stuck in to the end, but go into a fold. Such darts can be found, for example, at the waist of trousers or skirts. In these cases, the dart is sewn to the required length and then the stitch ends at right angles to the fold. The dart should be ironed only in the area of its grinding (Fig. 36d).
When wet heat treatment of continuous darts, the following conditions must be taken into account:
- tackle darts are ironed towards the side seams;
- shoulder darts on the back are ironed from the center;
- chest darts with a horizontal direction are ironed down;
- chest darts, which have a basic position (from the shoulder seam), are ironed from the center;
- the elbow darts are pressed down.
Darts-reliefs are a special case of ordinary darts and perform the same functions in clothes. However, the use of reliefs is often preferable, since they are more decorative, their vertical orientation visually makes the figure more slender, in addition, thanks to them, the technological processing of some nodes is simplified.
The use of reliefs makes the use of conventional darts superfluous - all darts (tack, chest and shoulder darts) are removed in the relief line.
There are two types of vertical darts-reliefs - reliefs coming out of the shoulder seam, and reliefs coming out of the armhole line. In both cases, the reliefs divide the part into a central part and a barrel.
When processing reliefs, the details of the central part and the barrel are folded with the front sides, fastened with sewing pins at control points and swept away from the side of the barrel, which has a more convex cut. Stitching of relief seams is carried out from the side of the central part.
Relief allowances (their size can be 10-15 mm) are ironed on products made of thick fabric, on products made of thin fabric - they are usually ironed towards the center.
If the lines of the reliefs are accentuated by a finishing stitch, it is made according to the allowance at a distance from the seam determined by the model. In this case, the size of the allowances should be greater than the width of the finishing line.
Review questions
- What is a dart and what is its role in the fit of a garment on a figure?
- How are darts divided depending on the purpose?
- What darts are used in garments depending on the thickness of the fabric?
- What conditions must be observed when wet-heat treatment of darts?
- What are the types of relief darts?
- In what cases is it more expedient to replace conventional darts with reliefs?
- How are relief darts processed?
We also recommend
 Rules for grinding and wet-heat treatment of garments
 Building a pattern for the basis of a dress: Italian technique as the easiest way to make a good pattern
 How to build a dress pattern base
 We model and sew coats!
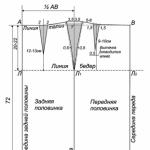 Skirt of the year, construction of a pattern
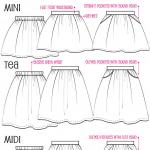 Fashionable children's skirts from old jeans - patterns and description