Vest with a one-piece collar. One-piece high stand-up collar with bodice.
Good afternoon, our dear readers!
In the next modeling lesson, we will analyze one of the most interesting and extensive design topics - collars.
To start modeling collars, we need to have (fig. 1). To do this, there is no need to carry out calculations and build it using rulers and a pencil - just go to the main page of our site, select the "basic dress pattern" and indicate your measurements. Then the program will instantly build your individual pattern, you can even print it on an A4 printer. Instructions on how to do this are on the page.
.png)
Let's start our "immersion" in the topic of collar modeling with the simplest and most understandable - stand-up collars.
All stand collars are built according to the same one in sequence, only they have different values of sizes and configuration of lines. Collars can be with rounded or straight ends, go over each other and be modeled end-to-end, more or less close to the neck. The clasp can be located both at the front and at the back.
.png)
Let's now analyze the construction of the stand collar as on a green blouse (Figure 2a).
To build a stand collar, it is necessary to measure the length of the neck of the back and the shelf. We get a specific number (for example, 20 cm). Then we subtract 0.5 cm from this value and postpone this value in a straight line. To prevent the stand from moving away from the neck, raise the front angle by 3-4 cm (the larger the value, the tighter the stand will fit to the neck). Now set the desired rack height (3 cm). And we draw the smooth lines of our collar - the stand. Remember to keep the post height constant! The blue control notch separates the front and back of the collar - when sewing the collar of the stand, you will align it with the shoulder seam.
Figure 2b shows a drawing of the stand collar as on a blouse with an ornament.
The order in which the collar is drawn remains the same. In a straight line, we set aside the length of the back neckline minus 0.5 cm. Raise the front corner by 2-3 cm. Set the height of the rack according to the model - this value is arbitrary (4-6 cm). And we draw a beautiful rack! Also, do not forget to check the height of the rack.
.png)
.png)
You can often see sweaters and coats with a one-piece stand. This cut of the collar fits well to the neck due to the transition of the darts in the line of the stand.
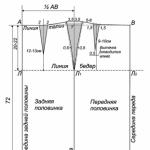
As shown in Figure 3, we will initially set the width of the bead (this is the value by how much one part of the shelf will go behind another). Usually this is about 2 cm for the central fastener (buttons in one row as in the photo) and 4 cm for the so-called double-breasted fastening (two rows of parallel buttons). To prevent the collar from cutting into the neck, you need to expand the neck of the shelf and back by 1-1.5 cm and deepen 0.5-0.7 cm. We connect the resulting points with lines (red).
We decide on the height of the rack. In the example with a one-piece strut, the strut height gradually decreases - the largest value is deposited along the middle seam of the back of 5-7 cm, along the shoulder cut it is already 4-6 cm.Along the middle seam of the back, we postpone the height of the strut on the continuation of the line, and in the area of the shoulder seam, draw perpendicular to the red construction lines. We understand that the line of transition of the stand to the shoulder seam should be smooth, so we adjust the line by cutting off the corners a little (green lines). The final step is to draw the upper cut of the rack, rounding out in front.
.png)
.png)
Now next in line flat collars... Also one of the easiest to build.
Let's pay attention to the jacket in the first photo. Initially, we need to translate the shoulder dart on the back and the chest dart on the shelf in the line of the armhole - this way it is much more convenient to draw a flat collar. Now we put the back part on the shelf, winding 1-1.5 cm along the shoulder cut. We decide on the width of the collar and draw it directly on the folded parts (blue line)! Set aside the largest value (5-6 cm) along the middle seam of the backrest, slightly less along the shoulder seam (4.5-5 cm) (Figures 4 and 5).
.png)
.png)
.png)
Stand-up collars... Probably each of us has some kind of thing with such a collar. Most often they can be found in shirts. To simplify sewing, the collar is made with a one-piece stand.
Let's start drawing a stand-up collar like on a blue blouse. As in the stand-up collars, initially we draw the length of the neckline minus 0.5 cm in a straight line.From one edge (where the middle seam of the back will be), to set the required bend of the lower collar line, we postpone 3-4 cm perpendicularly, then the size of the stand (2, 5 - 3 cm), and the so-called "width of the back of the collar" (5-7 cm). To draw the front corner of a standing turn-down collar, set aside 5 cm to the left and about 9 cm up, (there may be others, depending on the height of the rack and the width of the departure you choose). And we try to fit the pattern, draw a collar !!! The stand can be either cut-off or one-piece (Figure 6).
.png)
.png)
Collar fit shawl... These collars are very effective and not time consuming compared to jacket collars. The upper collar is cut along with the hem, which greatly simplifies all the work. So if you want to sew a jacket for the first time, we advise you to start with just such a model.
Pay attention to the configuration of the lines on the last two models of jackets - we see clearly visible corners. This type of shawl collar is called apache.
Let's make a model shawl collar design as in the first model. First, set the width of the bead to about 2-2.5 cm (Figure 7). Now, according to the model, you need to determine the depth of the cut and put the point x. We expand the neck of the shelf (and back) by 2.5-3 cm - we get point a. Then, in the opposite direction, set aside 4 cm - put point b. We connect x and b with a line and continue this line a little to the top. The resulting line is called the collar fold line (red). Now we measure the length of the neck of the back and using a compass from point a, we make a notch (point c) on the collar bend line. The segment ac is equal to the length of the neck of the back.
To determine the position of the lower point of the middle of the collar (point d), from point c along the tangent, we postpone the amount of collar departure plus 0.8 cm. (For example: the departure width is 6 cm, then the segment cd = 6.8 cm). We put point d. Now we connect points d and a with a smooth line, end the line at the neck - we get the lower cut of the shawl collar.
We set aside the width of the shawl's departure perpendicular to the lower cut of the collar (6-7 cm).
The last action is to draw a smooth line of the upper cut of the shawl collar (green line) from point x to the middle seam.
.png)
Now let's figure out what details we ended up with (Figure 8).
Podbort. We need to draw up the inner line of the hem, to which the lining is sewn (blue dotted line), we draw it in a straight line, at a distance of 3 cm from the midline, and then with a slightly convex line and end at the shoulder seam, at a distance of 3-4 cm from point a. On a separate sheet of paper we transfer the part along the green line, then from point a along the shoulder seam (it is important that there is a right angle at the transition section of the hem to the back trim (Figure 8a)), along the inner and outer hem line (blue solid and dotted lines) ...
The lower collar in shawl-type collars is made detachable. Also, on a separate piece of paper, we transfer the upper part of the collar (green lines) bounded by a blue dotted line.
The shelf is copied completely, only without a section of the lower collar.
.png)
.png)
.png)
And lastly, we have left the most interesting!
Jacket collars... Such collars are made of four parts - the lower and upper collars and two parts of the stand. Sometimes the racks are made in one piece. The depth of the cutout varies - the first button can be located above or below the chest level, or completely go down to the waist area. The width of the lapel is also varied - from very narrow, to covering most of the shelf. The jacket collar is a very important element. Such a collar must be made with special care, otherwise the appearance of the entire product will be spoiled.
We will carry out a model design of a jacket-type collar as on the latest model of a jacket made of black fabric with a white print. The first steps of construction are very similar to the collar of a shawl - we draw a bead 4 cm wide (if the fastener is double-breasted) or 2-2.5 cm (for the central fastener). We expand the neck by 1-1.5 cm, we get point a. To determine the position of the collar bend line, set aside 1.5-2 cm to the left, put point b. Determine the desired depth of the neckline and draw a collar bend line. From point a we make a notch with a compass, the radius (segment ac) is equal to the length of the neck of the back - we put point c. Then, from point c, tangentially, we postpone the width of the collar departure from the back plus 0.8 cm. We get point d. We connect points d and a with a smooth line. Now, at point d, we restore the perpendicular to the line dа and on it we set aside, first, the height of the rack (2-2.5 cm), then the width of the collar departure (4-5 cm). (Figure 9 and 9a)
And now we will need to arrange the departure lines of the collar, open-cut and lapel. To understand these concepts, take a look at Figure 11.
To more clearly imagine how the collar will look in the finished product, draw it on the right side on the shelf details (blue lines). The depth of the lapel is about 5 cm, the width is set to 7 cm. The point of the base of the opening is 3 cm down from the neckline along the collar bend line. After we like the configuration of the lines of our collar, we will reflect it relative to the inflection line (green lines). The most convenient way to do this is with tracing paper.
Now it remains to draw the entire rack. Draw the upper cut below the fold line by 0.5 cm, leave the width 2-2.5 cm (blue line).
.png)
Figure 10 shows all the resulting details:
- Podbort. Drawn similarly to a shawl collar. Dotted line at a distance of 4 cm from the middle of the shelf.
- Collar (bottom and top). Copied completely with the stand.
- Shelf. We translate everything, only without a collar.
.png)
.png)
The collar theme is voluminous, varied and quite complex. So, if you still have questions - do not hesitate, ask them in
Probably every modern woman has a vest in her wardrobe, or even more than one. It is fashionable, practical, beautiful. The vest can be of a wide variety of styles, different lengths, and different purposes. Modern vests are made from a variety of fabrics and materials, including leather and even lace. Hence the conclusion: there are no many vests.
We offer a pattern for a women's vest with a collar and framed pockets.
This pattern can be used for sewing a classic vest from a suit fabric, fabric in a cage, a strip, and you can also choose an elegant fabric, use bright materials as decoration, embroidery, beads, sequins, etc.
A ready-made vest pattern with a collar is given for women with a bust of 100 and 104 cm.
Bust: 100 104 cm
Waist: 78 82 cm
Hip circumference: 106 110cm
A pattern for a bust of 96 cm can befree download .
It is easy to download the pattern, the instruction is
Instructions on how to print a pattern is
A ready-made pattern of a women's vest with a collar is given without allowances at the seams.
Print the pattern sheets on the printer and connect them in accordance with the diagram. A diagram is the order in which the pattern sheets are joined. It is printed on the first sheet.
Be sure to check the scale is correct. On the printed sheet with the 10x10 cm square shown, the sides of 10 cm should correspond exactly to 10 centimeters. To do this, in the printer settings, set the document print scale to 100% (no scaling).
Additionally to the main details you need to cut out piping for pockets in the frame 18 x 2.5 cm - 4 parts and valances for pockets 18 x 6 cm - 2 parts.
Before cutting, check again for compliance with your measurements with the parameters of the pattern.
Ready-made patterns are given for a conventionally-typical figure. If your figure differs from the conventionally typical one, you must correct the pattern taking into account the characteristics of your physique and only then proceed to cutting.
Don't forget to give seam allowances, as well as additional allowances in those places where refinements are possible when fitting.
Having swept the details, try on the product, make all the necessary corrections and start sewing.
The vest can be lined or unlined. The lining is cut according to the main details without taking into account the hem and piping.
No special recommendations for sewing this vest model are required. It is only worth noting that the armholes can be processed not only with the proposed edging, but also in another way, for example, an oblique inlay or wide edging. The main thing is that the processing method chosen by you corresponds to the type of fabric and the purpose of the product itself.
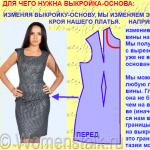
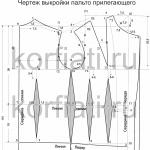
For those who want to build a pattern for a specific figure according to the measurements taken, we have a detailed semi-adjacent silhouette. With such a basic pattern, you can create a variety of styles of clothing.
Leave your questions, wishes and suggestions in the comments to a specific article. We will definitely consider them.
Follow the site's news, subscribe to our RSS news feed, and you will always be in the know. The subscription forms are in the right column. You just need to enter your e-mail and click on the button "Subscribe".

Download pattern >>>
Shawl collar pattern or shawl collar, various shapes Today we will talk about building a shawl collar pattern. This is not the first lesson in sewing collars, we are preparing a course on sewing a collar so that you understand the construction of a collar, but for now the next topic is one-cut shawl collars.
Shawl collars in products are either one-cut with the product or sewn-in. Today I have prepared two options for shawl collars for you. For this, we have already prepared a model of the bodice, for which we will build a shawl collar.
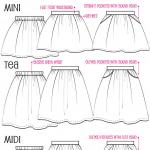
Fashion magazines offer products with a shawl collar, some of which are shown in the photo
Shawl collars and their variety

 1:31, 1:56, obviously sewn-in collars, here you can see it even by the stripes on the fabric, 1:58,

Shawl collars in models from fashion magazines
This photo shows that it is very open and yet it is still a shawl collar. We'll talk about these collars in this video. Here is my basic pattern according to the cut system of 10 measurements. 
2:27 The pattern is cut to the waist, since the construction of the collar is important for us. On the fabric, mark the center of the front and the width of the semi-skid. To prevent our one-piece collar from digging into the neck, it is necessary to remove a little from the neckline, a little more from the shoulder line than from the sprout line, 1.5 cm and 0.7 cm is the largest, see photo 2:47

basic pattern We do the same with the neckline on the shelf 3:07

adjusting the neck pattern
Then, at right angles to the shoulder seam, set aside 10-11 cm for the sprout 3:34, 
and 7-8 cm at your discretion we postpone the collar width, 3:46  Such a collar will not be narrowed or widened, average comfortable size.

construction of a one-piece shawl collar
After that, you need to decide on the location of the first button, mark this place on the pattern (in our case, it is at the level just above the chest height point). 
After we have decided on the level of the collar length (according to the position of the first button) with a smooth line, as in the photo, we connect the upper and lower points of the future collar. This line goes beyond the semi-skid line, see photo 4:50

determine the place of the first button to determine the length of the collar
In order for our collar on the back side to have a good fit, we need that section of the collar that we have completed to a length of 10-11 cm and a width of 7-8 cm, additionally transfer it to tracing paper, and then make several (three are enough) cuts , in order to slightly push this area apart, open each incision by 3 - 4 mm, see photo 
5:07, as is usually taught to make a collar pattern - first make a common collar on tracing paper, then push it apart, 5:34  We parted, fixed and cut out, in the place where the shoulder line along the shelf we make a notch, see photo 6:03,

adjusting the shawl collar pattern
so that we have the opportunity to neatly and competently sew part of the collar into the sprout. This is what our pattern looks like, a shelf with a one-piece collar and a back. On this one basis, I will now show you two types of collars. Swept the bodice, this is what our pattern looks like 8:23  Please note that the one-piece collar, like the one-piece stand-up collar, goes into the shoulder and here the notch, 8:46,

we sew in a collar
one corner goes into the shoulder, the other into the sprout. After we swept everything, we try it on a mannequin, we find the center of the front,

mannequin fitting

fitting on me
and this is how everything looks on me, since the mannequin did not fit my pattern.
Pay attention to how the one-cut collar looks, everything is beautiful, but I do not like that the shawl collar is too straight for this cut. Now I will show you how you can change a one-cut shawl collar so that the line is slightly softened, rounded. To do this, we determine the place of the fold of our lapel, on the finished product we draw this fold line

fold line to determine the location of the tuck 11:47,
now, not reaching the location of the first button and not reaching a few centimeters to the line of the shoulder seam, 11:51  along the fold line, fold it in half and pin the fabric with pins and make a dart for the entire length, which we marked and cut it out with a smooth line. 12:33,

change in the cut of the one-piece shawl collar for a softer neckline
under our collar, we got such a hole, which will help us change the shape of the simple line of the one-cut collar to a slightly modified one, since the collar will now lie more rounded along the neckline.
When you cut out the hem, you will need to preserve the shape of the shelf and collar, and for us, so that there is no seam now, we sweep, like a dart, on the contrary, the offset seam of 0.5 cm.
Now let's try our sample so that you can see the difference - on the left is our straight shawl collar, and on the right is a slightly rounded line after small manipulations with the finished simple one-piece shawl collar, 14:43

Two options for one-piece shawl collar
Two options for a one-piece shawl collar will help you to diversify your wardrobe. By changing the collar width and a larger dart, the shawl collar will have an even more rounded neck shape.
* Collar building course
You can see other collars on the site:
Collar pattern. One-piece stand-up collar with cutout
An original stand with a corner for warm clothes
The topic of collars is inexhaustible, so the continuation on shawl collars follows, and I was glad to show you these two options for a one-cut shawl collar, so that you can learn and independently add variety to your wardrobe.
All the best, I was with you, Irina Mikhailovna Paukshte and Alexey Yastrebov!
The collar is an element of the product, characterized by the "flexibility" of the form. There are a huge number of its modifications, so you can choose the ideal option for each type of face, physique and other individual characteristics. Most collars have a similar design - a visible part and a stand that is hidden from the eyes, separated from each other by a kink. The key difference between the details is the way in which they are connected to the bodice.
The element can be cut-off (it is stitched in along the cut line) or one-piece. In the second case, as a rule, it is cut out in one piece with the front and back. So you can model:
- classic one-piece stand-up collars - with the height of the hidden part from 3.5-4.5 to 7-8 cm;
- standing-turn models with racks 2.5-3.5 cm;
- semi-erect and flat-lying varieties - with a height of up to 2 cm and 5 mm, respectively.
The racks can vary the width of the fly-off part (up to 25 cm), blind or open fasteners. They fit snugly to the neck or effectively frame it, leaving a short distance. The choice of the final form depends only on the wishes of the future owner of the thing. The racks that are cut out along with the product have features - they must be taken into account when sewing clothes.
vigostore.ru
Features of one-piece racks
It is convenient to build a one-piece collar on widened necks. This is due to the peculiarities of the style - it is most often used for outerwear, jackets, dresses and tops made of dense fabric, which is organically combined with a strict cut. To make the part look beautiful, the product is processed with a wet-heat method using an iron. Fabrics that are used for uprights rarely stretch and their WTO on a narrow neckline can be problematic.
Most often, when building such collars, craftsmen start from the basic drawings of jackets, jackets and coats. The degree of expansion of the neck depends on the style of the product and the personal preferences of the owner. The size can range from one to 5 centimeters and even more. There is a general "constructive" principle: as the height of the rack increases, the expansion along the neck should also grow. When creating a pattern, be sure to take into account the presence or absence of a middle seam on the back of the product. The sequence of modeling is different in the two cases.
If there is no seam connection, you need to line up the part vertically, focusing on the middle line along the back. The top of the collar is slightly displaced, and the connection of the stand to the shoulder is carried out smoothly. In most cases, the extra width is removed into the darts. Their end should be located at a distance from the edge of the stand (not less than half a centimeter), and the length depends on the height of the collar.

studfiles.net
Building a basic drawing of a one-piece rack
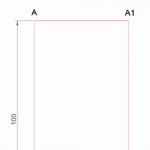
The pattern of the classic version of such a collar is built according to the standard pattern. The work begins by drawing a right angle - the vertex is in the upper left corner, the rays are directed to the right side and down.
First, the embedding line is drawn up:
- from the original top, lay a horizontal line by the measure of a half-girth in the neck (with an increase of half a centimeter);
- from the end of the cut to the right side, an allowance is made for the half-cut (its edge rises by 3-5 mm);
- from the original top, lay 2-4 centimeters along the median line, marking the end with a dot;
- the resulting marks are connected with an auxiliary line - it must be divided by three, indicating the division points;
- from the first point of dividing upward, a perpendicular line is drawn and half a centimeter is measured;
- smoothly connect the auxiliary intermediate marks of the curve.
The construction of the rack begins from the auxiliary points along the vertical, and its protrusions are made out smoothly, in the form of rounded curves. Next, an outgoing cut is constructed by depositing along the median line up to 9-10 cm (along the width of the part from the back side). From the end of this segment to the right, a horizontal line is laid after crossing with a vertical line extended by 1-4 centimeters. Then you need to deduce the length of the corner and smoothly connect the marks.

sdelala-sama.ru
Constructing adjacent racks
Depending on the degree of fit of the one-piece rack, it is built on the drawing in different ways. If the collar needs to wrap tightly around the neck, the back must be modeled first. Circle the main pattern and find the high and low points. Continue the line up the center of the backrest to the height of the rack and mark the end of the segment.
Progress
- From the highest point of the sprout, set aside vertically the height of the stand along the shoulder (the value along the median line minus 1 centimeter).
- From the end of the segment, horizontally to the left and vertically, build up lines 1 centimeter long and smoothly connect the ends, continuing the curve to the cut on the shoulder.
- Circle the drawing of the front (the shoulder dart should be moved to the side cut) and mark the highest and lowest points along the neck.
- From the highest mark, to the right, build a cut line along the shoulder and from its end upward, draw a half-height segment along the stand (the angle must be right).
- Draw a smooth curve from the end, built above the segment, to the highest point on the neck.
The height of the rack in the center of the front part is adjusted according to the parameter in the shoulder cut - they must be equal (although you can determine the value from the model). It is permissible to bring the upper cut of the part to the depth of the cutout or arrange along the edge of the bead, if a fastener is provided along the front. When building, be sure to set control marks - at the highest points on the sprout and neck.

stylefashion.com.ua
Designing neck collars
The one-piece stand can be designed "at a distance" from the neck. The modeling technique is similar to the tight-fitting varieties: first, the back is built, tracing the main details on a paper sheet, and then the sprout is expanded by 1-3 centimeters.
Progress
- Continue up the midline to the height of the rack.
- From the point at the end of the extension of the sprout, vertically postpone the height of the stand in the shoulder (the corresponding parameter in the center minus 1 centimeter).
- Connect the ends of the two lines above by smoothly drawing a concave curve.
- Make a side cut along the control point along the bottom of the sprout.
- Make a dart - a new sprout line is divided in two, on one half an element is performed with a solution of 1 centimeter and a length along the height of the rack.
The construction of the front also starts from the main pattern. It is circled, on the resulting drawing, the highest and lowest points along the cut are marked. If the product needs to have a fastener, in the middle you need to make an allowance of up to 3 cm for a half-nose.
- from the end of the expansion, a vertical is drawn - the height of the stand from the seam in the shoulder;
- from the point at the end of the segment, draw a horizontal line about 2 centimeters to the right;
- from the extended segment for the half-nose upward, measure the height along the rack with a centimeter increase;
- from the obtained point to the right side, a horizontal line of 2 centimeters is drawn.
The resulting auxiliary points are smoothly connected by concave curves - these are slices from the top and sides. When making darts, ⅓ of the length at the new neck is taken as the height, and 1-1.5 centimeters are left for the solution.

club.season.ru
Designing products with a seam in the center of the back
Many fashionable oversized coats with one-piece racks have a seam in the middle of the back. To design a collar for such a product, you need to expand the neck to the required volume and, accordingly, increase the height of the collar. The details of the clothing are copied separately, and the element is modeled on them, starting from the back. An extension is made on it (about 2-2.5 cm) - the value is laid off along the cut on the shoulder and marked with a dot. From it, they outline a line along the neck again (it will be needed for the design of the darts).
Progress
- Set aside the height of the rack and lower it along the shoulder cut (the height decreases by 5-10 mm).
- Bevel about 5-20 mm and draw a new center line for the strut.
- Make a bevel along the shoulder line equal to or less than the center.
- Carry out the top cut of the element - straight or smoothly, along the model.
- Draw a smooth curve along the shoulder line.
- Build a dart to fit along the neckline on the back: a solution of 7-10 mm (evenly distributed on both sides), the length is two heights along the stand.
The next stage is modeling the part along the shelf.
- If the product must have fasteners and buttons, an allowance will be needed in the center of the front part (step back from the middle 3-4 cm).
- The edge along the board is drawn along the entire length of the shelf. It is necessary to expand the cutout by 2-2.5 cm, mark its end with a dot.
- From this point, set aside the height of the element minus 5 mm (the cut along the shoulder is lowered similarly to the back).
- Smoothly shape the shoulder line in the form of a curve.
- Draw a bevel along the front line in the form of a straight line, and the upper cut in the form of a smooth curve.
- Remove the extra width in the dart, the location of which is selected according to the style and shape (as standard, it is placed perpendicular to the neck) - a solution of 1-1.5 centimeters, the length is on the rack.

liveinternet.ru
To find where the central axis of the dart is located, you need to measure its length and set aside ⅓ of the value from the midline of the shelf. The solution is distributed along the cutout, and the top is finished without bringing half a centimeter to the upper cut on the rack. In a similar way, collars can be modeled on other bulky items - jackets, jackets.
We also recommend
 Rules for grinding and wet-heat treatment of garments
 Building a pattern for the basis of a dress: Italian technique as the easiest way to make a good pattern
 How to build a dress pattern base
 We model and sew coats!
 Skirt of the year, construction of a pattern
 Fashionable children's skirts from old jeans - patterns and description