Open the skirts of the year. Skirt of the year, construction of a pattern
Sewing a skirt is absolutely not difficult, as it might seem at first glance. This article provides detailed instructions for building a pattern that will help you create a unique outfit, even for beginners. After reading the article, you will find out what measurements are needed and how to take them correctly, how to correctly create a base pattern, what it is used for and how the future product is cut correctly.
Skirt measurements
The diagram perfectly displays all the measurements that are necessary for construction. First, you need to make measurements in full, without any additional divisions. In this article, 42 sizes are taken as an example, and you substitute your data.
- The length of the finished product is 50 cm (measured from the waistline to the level of the desired skirt length). Do not forget about seam allowances and hem. Standard stock is 2 cm on each side. That is: 50 cm + 4 cm = 54 cm.
- Waist circumference - 66 cm (measured at the narrowest point of the torso).
- Hip circumference - 92 cm (measured at the most convex part of the buttocks).
Then, the measurements of the circumference of the waist and hips must be divided by 2 to obtain a half-girth. It turns out:
- St - 33 cm (half waist measurement).
- Sat - 46 cm (half hip measurement).
That's all. All measurements have been taken, now you can proceed to the construction of the drawing itself. Take graph paper, or a regular Whatman paper, pencil, ruler, eraser and off you go.
Building the base of the skirt
First, in fact, the pattern itself.

Now step by step how to build it. Don't forget, in this example, measures 42 sizes for women's clothing. You, along the way, substitute your data, which were obtained by measurement.
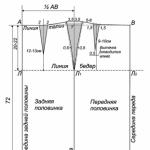
- Construct a rectangle ABCD. Side AB = CD and AD = BC. Sides AB and CD are equal to Sb + 1 cm (for all sizes). 33 cm + 1 cm = 34 cm. Sides AD and BC are identical to the length of the product, i.e. 50 cm
- Next, you need to draw up the line of the side seam. Divide the segment AB in half and put a point T. From the obtained point, draw a perpendicular until it touches the line DC.
- From point A down, along line AD, set aside 22 cm (for all sizes) and put point L. From it to the right, draw a straight line, and at the intersections with lines T and B put points L1 and L2.
- Now you need to determine the depth of future darts. To do this, subtract the waist half-girth from the measurement of the half-girth of the hips. The measure must be taken taking into account the increase of 1 cm, which you did at the very beginning: 47 cm - 34 cm = 13 cm. Half is removed into the side dart (going from the side seam), i.e. 6.5 cm, 3.25 cm on each side. The depth of the front dart is slightly less than the back one, by 1-2 cm, - 2.5 cm, i.e. 1.25 cm per side. And the back one "takes" in itself the remainder - 4 cm, 2 cm per side.
- Now you need to transfer the calculations to the pattern. From point T to the left and right, set aside 3.25 cm (half of the side dart). The dart should be raised above the waistline by 1 cm (for all sizes). From the resulting point 1, draw a straight line to point L1 on both sides of the dart, as shown in the figure.
- Divide the segment 1L1 in half, and measure 0.5 cm at the point of division at a right angle.Put a point.
- Using a mold, draw a curved line. If you do not have a template, do everything by hand, the main thing is that the line is smooth.
- Form the front dart. From the calculations, it is clear that the depth of the dart is 2.5 cm. From the side seam line to the right, set aside 6 cm and at a right angle lower the straight line to the line of the hips. Front dart length 10 cm (for all sizes). On the waist line, from where the perpendicular was laid, set aside 1.25 cm to the right and left (half of the front dart) and connect the points obtained, forming a full dart, as in the diagram above. For beauty, you can shift point 10 by 0.5 cm to the side, the main thing is to make sure that the height of the sides of the dart is the same.
- Create a back dart. Its depth is 4 cm (from calculations). Divide the AT segment in half and at the point of division, set aside 2 cm on each side. Draw a straight line down, on which measure 13 cm from the waistline - this is the length of the dart, the same for all sizes. Connect the dots by creating a back dart.
- Skirt halves decoration. On the rear side: connect lifting point 1 to dart point 2. On the front half: connect lifting point 1 to dart point 1.25.
It's so simple, literally in 10 steps, a pattern-base of a skirt is built.
How to cut a skirt
As soon as the pattern according to your individually taken measurements is ready, it must be transferred to the fabric. As a standard, the pattern is positioned along the lobar thread that runs parallel to the edge.
The pattern must be pinned to the fabric with needles so that the first does not crawl throughout the space. When transferring the pattern to the fabric, do not forget about the allowances for the seams. It is customary to leave from 1 to 2 cm for processing.
If the skirt is made with an elastic band, then there will be 2 parts of the product - the front and back halves. The same applies if the future new thing is sewn on a side lock. But if the skirt is locked at the back, then there will be 3 parts - the front half and 2 rear ones.
Finished parts are processed on an overlock and only then stitched together. Do not detract from the role of ironing the seams, and always steam the garment before trying it on. It is said that most of the mistakes of a tailor can be corrected by an iron.
Hello my dear blog readers! Today we will model a skirt-year... This skirt model will suit any woman, it is elegant, stylish and visually lengthens the legs. You can sew it from absolutely any fabric (both summer and winter). The standard length is 70 cm, but if you wish it can be made both shorter and "to the floor".
We take the base of the skirt - the front and back panels.
From the hip line, lay down 20-30 cm and draw a horizontal line across the entire drawing.
From this level will begin skirt wedges.
Wedge skirts can be of two types:
- one-piece
- set-in
Based on the name, we cut the one-piece wedge in one piece with a part of the skirt panel, and cut the set-in wedge separately with allowances, and sew it to the details of the skirt.
A year-old skirt can have 4, 6 or 8 gussets. So it will be convenient to divide the skirt scheme into these equal parts. But with a special flight of fancy, the skirt scheme can be divided into unequal parts, and the wedges can be made of different widths and lengths. Feel like a fashion designer and experiment! And I will show the basic principle of constructing the wedges of the skirt-year.
Six-section skirt

In order to get 6 wedges on the skirt, you need to build 3 wedges on the skirt diagram, since in the drawing we are building half of the skirt (half of the front of the skirt and half of the back of the skirt). You can position these three wedges absolutely anywhere, but for symmetry, it is better to do it this way:
- we make one wedge in the side seam
- we make one wedge from the center line of the groove of the rear panel
- we make one wedge from the center line of the front panel
We make a wedge in any desired size. For example: the angle of the wedge starts at a distance of 25 cm from the hip line. To do this, draw a horizontal line at a distance of 25 cm from the level of the hips. Along the bottom line of three vertical lines (the centerline of the front recess, the centerline of the back recess and the side seam), lay 10 cm to the right and left. We connect these points with the wedge angle point.
You can cut the whole part with a wedge, or you can cut the wedge separately.
If we cut one-piece parts, then the front of the skirt will be in three parts, and the back of the skirt will be in three parts.
Four-piece skirt
A four-blade is built according to the same principle as a six-blade, only for the verticals to build wedges we take the side seam and the fold line in the center of the front. Everything else is the same as in the description of the six-piece skirt.
Eight-piece skirt
The eight-piece skirt combines the principle of four-piece and six-piece construction.
Verticals for drawing wedges:
Back panel:
- center line of the back groove
- back middle seam line
- side seam
Front panel:
- front fold line
- center line of the front undercut
- side seam
This adds up to 4 wedges at the front of the skirt when fully expanded, and 4 wedges at the back of the skirt.

Fantasy variations of "godet" can be created by applying traditionalmodeling techniques ... We considered an example of such modeling with the addition of folds above, and in this part of the article we will perform a flaring of the wedge.
Option 1. 6-wedge model shown on fig. 6 modeled on the basis of a straight skirt ... Below the level of insertion of the wedges, the base is cut with identical triangles. In their place, modeled year wedges will be stitched in. In the cut-out triangle, draw a new line for the bottom of the curved wedge ( point 2, fig. 6). Next, we divide the wedge into strips parallel to the long side of the truncated triangle ( line a) and separate them spirally, keeping the integrity lines with... A new line for the bottom of the wedge (now, however, more like a shuttlecock) is drawn with a smooth curve through the lower points of the divorced stripes ( point 3, fig. 6). Such spiral inserts should be cut out of transparent or guipure fabric and sewn 2 pieces into each cutout overlapping each other. The result of our actions is a light and elegant model!
Option 2. The basic godet wedge creates a monotone extension of the skirt from the top of the stitching to the bottom. It is in our power to change this monotony by increasing the flaring downward like a silhouette."gypsy" or tiered skirt ... And we will do it using a fresh design technique. "wedge-year nesting"... According to this technique ( fig. 7) the smallest wedge-year (4) stitched between two larger wedges (3) ... These wedges, in turn, are stitched between even larger wedges. (2) , and finally, the resulting package of wedges 2-3-4-3-2 stitched between base wedges (1) ... Each of the wedges is a basic godet wedge, the width of which is M may differ from the wedge-neighbor, the main thing is that the length of the insertion line (radius R) the older wedges had more wedges than the younger ones. Of course, you can choose the number of such investments according to your taste and design. The result is a very fashionable and spectacular skirt style, looking at which, it is not so easy to guess about cut!
Recommendations for assembling a nested "year". Start with the smallest wedge and, only after collecting all the "year" as a whole, sew this compound wedge into the seam of the skirt. The seam options for assembly depend on the style of your item, be it a skirt or a dress. Wedges can be adjusted on top of each other and double stitching (like on jeans), and a simple overlay without processing the sections (especially if the fabric is shaggy well on the sections!), And a neat thin seam for transparent fabrics. Everything is in your hands, dear needlewomen!
 For all its versatility, a ready-made dress does not give room for women's imagination to combine.
Blouses and skirts, in this vein, are preferred. But then the question arises about the style. We suggest talking about skirts of the year.
 Godet style, also known as "fish, mermaid tail" is a combined skirt.
A distinctive feature is a tight-fitting upper part of the hips, a smoothly widening bottom. A sort of bell of various lengths.
Mini-skirts are options that have appeared relatively recently. Initially, there were only medium and very long skirts. Until now, the classic length is 70 cm.
The peak of popularity fell on the 1930s of the twentieth century, now the question of fashion in relation to the style is not worth it - this has long been a classic.
Who will fit the skirt of the year?
Due to the smooth expansion of the year downwards, this type of skirt stretches the silhouette. It is difficult to find a woman for whom this cut would not suit.
However, there are some nuances:
- Tall girls are suitable for a year - midi, they will not make you disproportionately tall, but add elegance.
- Women with a bulging tummy, regardless of weight, should not choose skirts that fit the area under the belly. Let the top be slightly looser.
- Wide hips and buttocks are balanced with a strong flare for a harmonious look.
- For owners of long, slender legs, mini-options are suitable. The wide flared wedges of the year will not allow passers-by to see more than necessary, even in strong winds. The kilt effect will work.
 Materials (edit)
These skirts are made from various materials, both traditional skirt fabrics and a wide variety of textured fabrics:
- tweed;
- twill;
- denim;
- natural, artificial leather and suede;
- velvet, plush, corduroy;
- thick cotton fabrics;
- viscose;
- mixed fabrics, including those with silk thread.
Light, flowing fabrics are also perfect for the year; they will give their owners airiness and grace. No wonder that wedding dresses with a mermaid skirt have not lost their relevance for several years.  We offer you to create interesting models with your own hands with step-by-step instructions for beginners.
Interesting! The denser the fabric, the narrower the gussets along the hem. In this case, the skirt will not bulge.
Types of skirts year
Such a skirt assumes the presence of wedges from which the product is sewn. Most often they are the same width and length, but there are exceptions. There are even number of wedges - 4, 6, 8, less often 10 or 12.
 The expanding part of the wedge can be one piece or sewn to the bottom. In the latter case, the inserts can be made of fabric in a contrasting color.
Advice! Inserts from guipure, chiffon, mesh, lace, including those knitted by hand, look interesting.
You can also classify skirts by length:
- Mini - length above the knee.
- Midi - most often they sew just like this - length 70-80 cm, do not cover the ankle.
- Maxi, as well as to the floor or below the ankles.
 Due to the peculiarities of the cut, the year is often sewn with a gradient of height - in front or on the side it is shorter, or they make a train.
Features of the construction of wedges
In order to build the simplest pattern of a skirt for a year, you do not need special skills and adaptations.
 First, we need to decide how many wedges the future product will consist of, what its length will be, and whether our wedges will be one-piece or one-piece.
Measurements
Necessary take the following measurements:
- Waist circumference - measured at the narrowest point of the torso.
- Hip circumference - over the protruding parts of the hips.
- Hip Height - The distance from the waist to the hip. It is more convenient to tie a thread on the waist and on the hips and measure the distance between them.
- The length of the product is from the waist to the estimated hem.
- Height of the year - at what distance from the hip the flare begins.
- The width of the skirt at the hem.
 The progress of the pattern
- We choose how many wedges your product will have, we divide all the obtained volume figures by this number. For example, the waist is 60 cm, there are 6 wedges, which means that the width at the waist of one wedge is 10 cm. In the same way, we calculate the width of the wedge along the hips.
- On a sheet of paper - Whatman paper, graph paper, wallpaper, draw a line of symmetry.
- Mark some horizontal lines. These are the lines of the waist, hips, bottom line.
 In detail, it happens like this:
- We set aside the width of the waist, symmetrically from the center line.
- Lay down the height of the thigh.
- Draw the thigh line perpendicularly.
- We measure on this line the width of the wedge along the thigh.
- We mark the length of the product.
- We choose from what place the year line will begin, and at what angle it will pass. See drawing.
- We outline the hem line.
 Thus, a classic year of any length is cut out, this pattern is perfect for a floor-length skirt.
Skirt pattern yearsix-bladesmiddle length
Would need:
- The fabric is 2.5 m long, 1.5 m wide.
- Zipper 20 cm.
- Buttons - 2 pcs.
- Threads to match.
The pattern is given for size 46-48.
 Cut details:
- Wedge - 6 pieces.
- Belt - 1 piece with a fold.
Important! In this model, different wedges have a different direction of the lobar.
 Sequence of work.
- We cut out the belt. Its length is 80 cm, plus 3 cm for fastening. Belt width 8 cm for double piece, after sewing - 4 cm.
- We place the patterns on the prepared fabric, whitewash.
- We cut out, taking into account allowances, 1.5 cm for the seam and 2.5 cm for the hem along the hem.
- We sew the wedges, having sewn all the seams, except for the back one, where we leave room for the zipper.
- Sewing in a fastener.
- Fold the belt in half lengthwise, sew the side seams.
- We turn it over to the front side.
- Sew the outer half of the belt to the upper edge of the product, turn the inner half, then sew it to the stitching seam.
- We stretch the belt to the edge, then sew 2 loops on it.
- Sew on buttons.
- We attach an allowance for the hem of the bottom of the skirt at a distance of 0.5 cm.
Pattern of an elongated skirt in the year of ten
Skirt model year - ten-link
This model stretches the figure, which means that this is what a plump woman needs. In addition, it is comfortable, elegant and easy to implement.
Advice! The main thing is to sew the seams evenly and not to stretch the oblique cuts.
This model is sewn with an elastic band at the waist, you do not need a zipper.
 It can be sewn from almost any fabric - from cotton to wool.
Would need:
- Skirt fabric - double skirt length, with a fabric width of 1.5 m.
- Threads to match.
- Rubber band for the belt.
The pattern is given for size 56.
Cut details:
- Wedge - 10 parts.
- Belt - 1 piece.
Sequence of work:
- We place the details of the cut on a damp and ironed cloth, and coat them.
- We cut out taking into account the allowances for seams and hem.
- Sew the wedges, iron the seams, then overcast.
- Align the bottom, hem the hem.
- Sew on the belt, leave a small area.
- Sew on the belt, leaving room for the elastic.
- Pull and secure an elastic band 2.5 cm wide.
- Iron the skirt carefully.
Modeling options
By varying the height of the gussets, it is easy to create a skirt with a gradient hem. In this case, the symmetry of the paired wedges is important, each pair is lined up after the previous one.
 Skirts with elongated wedges, the so-called fantasy year, look unusual. This model uses set-in wedges that are spread apart for extra volume.
 In these cases, a pattern is first built - the basis of the skirt, modeling is done already on it. See pictures.
 Advice! If a pattern is problematic to build the basics, a comfortable straight skirt in size is fine.
The principle of sewing for all skirts is the same, only the ways of constructing wedges differ.
Retro style description: you can read more about the retro style itself in our article: "Retro with a wedge: skirt-year". Of the five proposed patterns, the first three pattern patterns are classic six-wedge-style skirts made on the same constructive basis and differing in different wedge options. The fourth model of the retro year skirt is a straight skirt with four half-sun wedges inserted into the base of the canvas. The fifth model is again a variant of the six-ribbed skirt.
3 golden rules
Before you start working on this wonderful style, you need to familiarize yourself with the three golden rules for designing and sewing year skirts.
1. In a skirt of the year, clutching should be started 5-7 centimeters below the most convex point of the figure. Above this point, flaring cannot be performed otherwise the very silhouette of the year skirt will be lost.
2. Peeling can be started from different points (lower or higher) in accordance with the type and characteristics of the figure, and at the same time the angle of plucking can also vary depending on the specific need.
3. The sum of the wedges is equal to the measurement of the hip circumference, while the width of each wedge can be varied as desired.
How to design a style: The patterns for the first four skirts are for size 48. The finished length is 75 cm, but, of course, you can make the skirt longer or shorter. The fifth pattern is designed for size 44.
Pattern - scheme 1.
Drawing of a symmetrical wedge. Its maximum width at the bottom is 44 cm.
-%D0%B2%D1%8B%D0%BA%D1%80%D0%BE%D0%B9%D0%BA%D0%B0%201.jpg)
Pattern - scheme 2.
One side of the wedge is straight, the other is flared at a 45 degree angle. This version of the skirt has one feature: both sides of the wedge - both straight and flared - must be equal in length. The gussets are cut one at a time to get the front cut. The corner at point 3 must be pulled off with a hot iron.
-%D0%B2%D1%8B%D0%BA%D1%80%D0%BE%D0%B9%D0%BA%D0%B0%202.jpg)
Pattern 3.
Stitch the wedges from the waist to the hip line, or 7-8 cm lower, then insert wedges into the incisions, the upper corner of which is 45 degrees.
-%D0%B2%D1%8B%D0%BA%D1%80%D0%BE%D0%B9%D0%BA%D0%B0%203.jpg)
Pattern-scheme 4.
In the folds of the middle of the front and back, as well as in the side seams, we cut out strips of fabric 4 cm wide (unfolded) and 35 cm long. We insert "half sun wedges" into these cuts.
-%D0%B2%D1%8B%D0%BA%D1%80%D0%BE%D0%B9%D0%BA%D0%B0%204.jpg)
Pattern 5.
Skirt-year with six gussets.
-%D0%B2%D1%8B%D0%BA%D1%80%D0%BE%D0%B9%D0%BA%D0%B0%205-1975.jpg)
Material consumption: for models 1, 2.3, you need 1.6 m. with a width of 150 cm. For a straight skirt with a wedge, a half-sun - 1.4 m of fabric with a width of 150 cm. Approximate consumption of fabric for model 5 is 1.6 m. with a width of 150 cm.
What material is preferable for sewing: You can choose any fabric, depending on the purpose for which the skirt is made. If this is an office option, then it is better to choose practical fabrics, and for summer models, lightweight fabrics are better suited.
Sewing difficulty level: the retro cut itself is of the medium difficulty level. Sufficient experience in sewing clothes is required. However, the fourth model is an option for those who are already good at sewing - skills in processing will be required.
What clothes and accessories can be combined with: it is best to combine such a skirt with light blouses, tight-fitting badlons and cropped jackets. You should not combine such a skirt with coarse-knit sweaters, but with a voluminous pullover, the style can look quite good. The gode skirt goes well with a short leather jacket, creating an interesting brutal romantic image. As shoes, you should choose shoes with heels, preferably high heels. But flat-soled shoes with this style should not be combined.
See more articles on retro fashion.
We also recommend
 Rules for grinding and wet-heat treatment of garments
 Building a pattern for the basis of a dress: Italian technique as the easiest way to make a good pattern
 How to build a dress pattern base
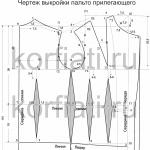 We model and sew coats!
 Skirt of the year, construction of a pattern
 Fashionable children's skirts from old jeans - patterns and description