Construction of a pattern for the basis of a women's dress with a sleeve. How to build a dress pattern base
This article describes how to build a pattern for the basis of a dress for novice craftsmen, in simple words, with a detailed description and drawing of each stage of construction.
The pattern - the base - is the basic drawing of the product, made according to individual measurements, made on paper, on the basis of which various styles are subsequently modeled. Construction of a pattern - the basics are necessary for both beginners in sewing and experienced seamstresses, and you need to treat it very responsibly. The quality of the fit of the future product on the figure, its beauty and convenience in the process of wearing depends on how well the pattern is built. The accuracy of the patterns made on its basis depends on how competently the pattern is made, and the error made in it, reaching the finished product, can develop into a serious defect.
Let's build a dress pattern based on our measurements.
Materials and tools:
- paper (graph paper is better), measuring tape, ruler, pencil
Measurements:
We measure on the figure, I indicate yours for example, you measure yours.
- Dress length (Di) = 100 cm,
- Back length to waist (Dts) = 43 cm,
- Armhole depth (GPr) = 21 cm,
- Hips height (Wb) = 22 cm (taken without measurements from 20 to 22 cm, but I prefer to take measurements from the figure),
- Shoulder length (DPL) = 13 cm,
- Semi-girth of the neck (PoSh) = 17 cm,
- Chest half-girth 1 (half-girth above the chest, PoG1) = 42.5 cm,
- Half-girth of the chest 2 (half-girth of the chest, PoG, PoG2) = 46 cm,
- Waist half-girth (PoT) = 31 cm,
- Half hip girth (PoB) = 48.5 cm
We calculate auxiliary measurements
(formulas are valid for exhaust gas> 80 cm):
- The depth of the armhole GPr = OG / 10 + (10.5_12 cm) = 92/10 + (10.5_12) = 19.7_21.2 cm. (In my case, the measured value was included in the calculated range, and GPr = 21 cm. If your values do not match, you need to take the average between the measured and calculated).
- Armhole width ШПр = ОГ / 8 - 1.5 cm = 92/8 - 1.5 = 10 cm,
- Back width SHS = OG / 8 + 5.5 cm = 92/8 + 5.5 = 17 cm,
- Chest width WG = OG / 4 - 4 cm = 92/4 - 4 = 19 cm
Choosing the degree of dress fitting
When constructing a pattern of the base, it is necessary to take into account the increase in freedom of fitting (hereinafter referred to as PSO), this is the "amount of air" between the human body and the product. The dress can be very close-fitting, close-fitting, semi-close and straight silhouette. I will build a dress pattern for an adjacent silhouette, my increments are as follows:
POG with PSO = 46 + 1.5 = 47.5 cm,
WG with PSO = 19 + 1 = 20 cm,
SHS with PSO = 17 + 0 = 17 cm,
FS with PSO = 10 + 0.5 = 10.5 cm,
GPr with PSO = 21 + 0.5 = 21.5 cm
Building a dress pattern
Step 1. Creates a base rectangle. In the upper left corner, stepping back 10 cm from the top, put point A. Draw down a vertical line with a length of = Di = 100 cm. Mark point H. From point H, draw to the right a horizontal line with a length of PoG + PSO = 47.5 cm, mark point H1 (НН1 is located in relation to АН at an angle of 90˚). From point A, draw a horizontal line to the right with a length of 47.5 cm, mark point A1. Connect points A1 and H1. The result is a quadrangle АА1Н1Н, check that all angles in it are necessarily 90˚.

Step 2. Constructing contours.
Step 2a. Chest line. From point A along the line AH set aside AG = GPr + PSO = 21.5 cm. Draw a horizontal line, mark point G1, as shown in the drawing.
Step 2b. Waistline. From point A along line AH set aside AT = Dts = 43 cm. Draw a horizontal line, mark point T1, as shown in the drawing.
Step 2c. Hip line. From point T along the line AH set down TB = Bb = 22 cm. Draw a horizontal line, mark point B1, as shown in the drawing.

Step 3. Auxiliary lines of the armhole. On the chest line ГГ1, to the right of point Г, postpone the value of SHS + PSO = 17 cm, mark point P1, from point P1 to the right, postpone SPr + PSO = 10.5 cm, mark point P2. Check the length of the segment P2G1, it should be equal to WG + PSO = 20 cm. From points P1 and P2, build perpendiculars to segment AA1, mark points P3, P4.

Step 4. Side line. In the middle of the segment П1П2, mark the point П, draw a vertical line to НН1.

Step 5. Neck of the back. From point A to the right, set aside AA2 = PoW / 3 + 0.5 cm = 17/3 + 0.5 = 6.2 cm, I will round to 6.5 cm.From point A2 we build a perpendicular, on it at a distance of 2 cm from AA1 mark point A3. We connect AA3 with a smooth concave line.

Step 6. Back shoulder. From point P3 set aside 1.5 cm, mark point P5. Connect points A3 and P5 with a straight line. Set aside DPL = 13 cm from point A3, mark point P6.

Step 7. Back armhole. Divide the segment П3П1 in half, denote the middle point by П7. From point P1, build a bisector of angle P3P1P 2 cm long. Draw a concave smooth line from point P3 to point P through point P7 and the bisector of angle P3P1P.

Step 8. Front neckline. From point G1 up, set aside G1A4 = PoG / 2 + 0.5 cm = 23.5 cm.From point A4 to the left, draw a horizontal line, set aside the segment A4A5 = PoW / 3 + 0.5 cm = 6.2 cm (I will round to 6.5 cm). From point A4 downward, set aside the segment A4A6 = PoW / 3 +1.5 cm = 7.2 cm (I will round it to 7.5 cm). Connect the points A5 and A6 with a smooth concave line.

Step 9. Shoulder shelf and bust dart. From point A5 to the left, set aside 4 cm, then down 1 cm, mark point P8. Connect points A5 and P8 with a straight line.
From point P8, lower the perpendicular to the chest line. From the point of intersection of the perpendicular with the line of the chest to the right, set aside 1 cm, mark the point G2. Connect points P8 and G2 with a straight line. Divide the segment П8Г2 in half, from the dividing point to the left, build a horizontal segment with the length = PoG - PoG1 = 46 - 42.5 = 3.5 cm. Draw a straight line through the end of the segment from the point Г2, set the segment Г2П9 = Г2П8 on it.
On the line of the armhole of the back, mark the middle of the segment П3П7 with point П10. Connect points P9 and P10 with a straight line. On it, from point P9, set the segment to the left = DPL - 4 cm (rounded length of the segment A5P8) - 1 cm = 8 cm.From the end of the segment, lower the perpendicular to the line P9P10 2 cm long, mark point P11. Connect P9 and P11 with a straight line.

When sewing, the dart will close, points P8 and P9 will be aligned, line A5P8P9P11 is the shoulder line of the shelf, its length is slightly less than the length of the back shoulder, if after modeling the shoulder lengths do not change, then when sewing the back shoulder will need to be slightly planted.
Step 10. The armhole of the shelf. From point P2 up, set aside the distance = 1 / 4P2P4. Mark point P12. Connect P11 and P12 with a straight line. Divide the segment П11П12 in half, from the obtained point to the right, draw a perpendicular to the segment П11П12 1 cm long.From point P2, draw the bisector of the angle ПП2П4 2 cm long. Draw a concave smooth line from point П11 to point П through the perpendicular, point П12 and the bisector of the angle ПП2П4.

Step 11. Tall darts. The sum of the solutions of all tackle darts = PoG - PoT = 46 - 31 = 15 cm. 1/3 of the amount  we take it to the side darts (I have 15/3 = 5 cm). 2/3 of the amount (10 cm) for the darts of the front and back, and we take a little more for the dart of the back (6 cm). With this value of the solution, when sewing a dress, it is necessary to perform 2 darts on the back (distribute 6 cm over two darts), but we are now building a base pattern, a base for further modeling of various styles, and my dress itself is small, so here I will build 1 dart with such a large mortar, and during the subsequent modeling of a particular style, decide how many darts I need on the finished product ... 4 cm remains on the tuck of the shelf.
Side darts. From point T2 to the right and to the left, we lay aside 5/2 = 2.5 cm. We connect the obtained points with straight lines with point P and with a point in the middle or 1/3 of a segment B2T2 (depending on the steepness of the hips).
Back dart. Divide the GP segment in half and lower the perpendicular to the BB1 line. On the perpendicular from the GP segment we lay down 2_3 cm, from the BB1 segment up 2 cm.From point T2 to the right and left we lay aside 6/2 = 3 cm. We build a dart.
Shelf dart. From point Г2 we lower the perpendicular to BB1. On the perpendicular from point G2, lay down 5_6 cm. From point T3 to the right and left, lay 4/2 = 2 cm. Build a dart.
Step 12. Line the side seam of the bottom of the dress. We calculate the insufficient volume along the thigh line = PoB - (PoG + PSO) = 48.5 - 47.5 = 1 cm.From the B2 line to the right and left, we postpone the values \ u003d (insufficient volume + 1 cm) / 2 = 1 cm. We build lines side seam, as shown in the drawing (red line - back line, blue - shelf line), check the values (distance from B to red line) + (distance from B1 to blue line) = PoB + 1 cm.

Step 13. The pattern is ready. I advise you to leave it in this form on graph paper, and carry out the modeling on copies, re-shot on tracing paper.


Now you know how to build a base pattern according to your own measurements and you can do it yourself.
I will reveal to you the secrets that I know. Moreover - I will teach you yourself to discover more and more secrets of the world of sewing and modeling clothes.
I will not lead you (blind and stupid) by the pen in the chaos of letters and numbers denoting the intricacies of numerous lines of the pattern drawing. NO, I WILL NOT LEAD YOU HERE:
Well, you must admit, one such picture can catch up with fear and make a girl who really, really wants to sew a dress- but I was very unfriendly in school years with geometry and drawing... Even I - who adore both of these school subjects - walked around the bush for several years - not daring to start delving into the construction of such a drawing: "Well, how long will it take to draw such a drawing, and after all, you need to calculate everything correctly and not get confused in letters ...".
And, nevertheless, today we will draw a pattern.
We will draw a base pattern (this is a piece from it you see from above.))))
But - do not rush to get scared - we will create our pattern a little differently. Away from the engineering method - and closer to human understanding.
We will draw one with you - only one and only- pattern.
And then from it we will create more and more new models of dresses. And it will be very easy and simple.
- No obscure formulas
- No messy calculations.
- And without the letter-and-digit cobweb.
How is it? Have I removed some of your concerns yet?
Relax now - we won't start drawing right now. For starters, we will take a pleasant walk through the pattern. The purpose of the walk is to get to know each other, make friends with the pattern and remove the last doubt that you can sew any dress.
So ... what is a base pattern?
To put it figuratively, this is a cast from your body. This is your personal print. Any item, sewn according to YOUR base pattern, will perfectly fit YOUR figure.
Yes, you heard right - ANY THING can be stitched based on one single pattern... All-all models of dresses are born, modeled, and sewn from one source - this is a base pattern.
I will now prove it to you with an example. Even in three examples - in the form of photos and pictures.
Here is the first photo (below). Our base pattern is, in fact, your sheath dress (the one that fits your figure perfectly). Dress tailored to your pattern based, will repeat all the bends your his body. This simple sheath dress is sewn according to the usual base pattern. See, it's like a plaster cast of a girl's figure.
And today, having drawn a base pattern, you can safely cut it on the fabric - and you will get such a dress. The only thing you can change the neckline is by giving it the shape that suits your face oval.

All the other (any-lovable) dress models are just a modification of a sheath dress - fantasies on a free theme.
This is how it works in the fashion world.
Once the fashion designer thought ...“And what if the bodice of the dress at the top is held on the shoulders by a round yoke (yellow outlines - the figure below), and the bodice itself is made in the form of opposite overlapping triangles (red outlines - the figure below). The result is what we see in the photo below.

Beautiful? Beautiful.
What did the fashion designer base his fantasies on? On a pattern basis.
And you can come up with something of your own. We - women - just have a lot of imagination.
By the way - since we're already talking about a round yoke - on this site there is already one of my articles on creating a dress for a girl on a round yoke, a simple one and a dress on a round yoke with flounces.
And another fashion designer thought: “And what if we give the sheath dress a looser cut - make it wider. And make the shoulder line longer so that it hangs on the arm. " And as a result, a new model is born (photo below) - also very beautiful. And it's very simple.

You can do that too. If you UNDERSTAND what the base pattern consists of. And according to what laws does it exist.
That's why I do not want to give you instructions stupidly to create a base pattern (like "read a line from point P6 to point P5 and mark the place of its intersection with line X with the next point ..." - ugh!).
I want to wake up in you bitch... I want you to feel the pattern, to know its soul. Have learned to see what a simple drawing in essence hides behind a photograph of any dress, even intricately tailored.
Therefore, for the next 30 minutes, we will not draw anything - we will walk through the pattern itself. Let's get acquainted with all its elements - we will find out what each line is for, and why it is located exactly here and is drawn that way.
After such a "cognitive walk" you will feel a joyful clarity of understanding of everything-everything-everything. It’s as if you’ve already drawn the base patterns many times. And take up the drawing with the feeling that this is a pair of trifles. Ha! Delov something!
As the sage said: “We are afraid only of what we cannot understand and explain logically. But as soon as a thing that frightens us becomes clear to us, it ceases to cause fear in us. "
So let's go and tame this "terrible beast" - the base pattern. We will tame and draw in 20 minutes. Yes, yes, in 20 minutes - because after a walk - the pattern drawing will seem to you an old and well-known simple drawing - like a lattice for playing tic-tac-toe.
Where does the base pattern come from?
So where does the base pattern come from - usually it is obtained from such a pair:

The drawing contains half of the back part + half of the front part.
We will also draw a similar drawing with you - only more simply and clearly.
And what these halves are for, and where to use them - now I will clearly show everything.
Here (!) I dug up a wonderful sample - below - in the photo of a black and white dress, our halves are very clearly visible - both the back half and the front half. That is to say - clearly and clearly.
Yes, in Potnov's language the halves are called “shelves”. We will draw these very front and back shelves today. But first, let's take a closer look at what elements each shelf consists of. And most importantly, I will tell you what each element is for, what it serves.
To make everything as clear as possible, I will illustrate each of the elements both in pictures and in photographs of real models of dresses.
First, let's get acquainted with two incomprehensible words: Tuck and ARMHOLE.
Of course you may know them. Or maybe not. My job is to introduce.
So, get to know - POSITION.

When drawing the base pattern, you will create exactly that bend and the size armhole that suits you - when the armhole does not pull and dig into the arm.
That is, the base pattern contains minimum size of armholes permissible... You can simulate the armhole of your choice, of any configuration. But your fancy armhole should not be smaller than on the base pattern. That is, the armhole on the basis of the pattern - these are the boundaries beyond which your imagination should not step.
Your model armhole can be as large as you want - but it cannot be smaller than on the base pattern. More - yes, less - no - otherwise it will dig into the armpit. This is the rule in modeling designer armholes.
Now let's get acquainted with the darts.
DARK BACK- shoulder dart + waist dart.

In the picture above, I wrote everything about the darts of the back - and in the photo of the dress you can find 2 waist darts - one to the right of the zipper, the other to the left of the zipper.
But you don't see the shoulder dart on this dress. And many dresses don't have it either. Because for convenience and beauty - this dart is transferred from the middle of the shoulder to the zipper (or along the edge of the armhole, where the sleeve will be, a corner is simply cut off). That is, excess fabric is not pinched at the middle of the shoulder and is not sewn inside the dart. And the extra tissue trimmed in the form of a corner at the edge of the shelf, where the zipper is being sewn in, or at the edge of the armhole - where the sleeve will be sewn.
Also darts are optional if you are sewing from stretch fabric - it itself repeats the curves of your body and shrinks both in the shoulder area and in the waist area.
Let's get to know ... HALF DRUTS.
Oh, you can write a whole poem about her.
I thought for a long time how to explain more clearly - what it is for and by what laws it lives. I thought and thought ... and came up with it.
The fact is that a woman has a breast.))) That is, in front of an adult girl is no longer flat. This means that the dress in the chest area should be convex. A dart on the front shoulder gives the dress this very bulge in the chest area. Now I will show everything in the pictures. How does this happen.
For example - we have a flat piece of fabric, and we need to make a convex piece out of it. To do this, you need to make a dart on it. For example - this flat circle made of cardboard, with the help of a dart, will now become convex.

Here's how the brisket tuck creates a bulge on the front detail

You will notice that the top of the bulge (that is, the peak of our round pyramid) is at the tip of the dart. Pay attention to this. Because when we draw the breast dart the tip of our dart will be at the top of the chest(where the nipple or dome of the bra is usually located).
Remember that sometimes you tried on a dress of your size in the store, which was somehow strangely skewed on the chest - this is because the dart in the dress was directed with its edge by the tops of your chest. Here the chest did not fit perfectly into the bulge of the dress. This product was not cut for your breast shape at the factory.
But that is not all,
what I want to say about the chest tuck.
The fact is that in almost all dresses this breast dart is located not on shoulder- a on the side just below the armpit... This is for beauty. The dart on the shoulder is more striking, and from the side, and even covered by the hand, it is not noticeable.
When creating a base pattern, we draw a chest dart on the shoulder only because it is more convenient to draw it there from the point of view of building a drawing.
And after the drawing of the base pattern is ready, we very easily and simply transfer the dart from the shoulder area to the axillary area. Do not think that for this you need to make new drawings. Nope, everything is simple here - how to open a carton of milk - one minute and that's it.
Here, in the picture below, I schematically depicted transfer of the chest dart from the shoulder to the side seam at hand.

Well, do you already feel how you have grown wiser in these 15 minutes?)))
It's only the beginning…
We continue walking along the pattern and now we will get acquainted with the lines. Horizontal lines
BREAST LINE
The first acquaintance is the chest line. (A beautiful dress, isn't it? We will sew it with you. Do not even hesitate)

The chest line is the most remarkable line on the pattern. It is so convenient to navigate on it when drawing a base pattern, because:
- We know that we finish drawing the waist dart of the back on the chest line.
- We know that we finish drawing the waist dart of the front before reaching 4 cm to the chest line.
- We know that the shoulder dart is in front - we finish drawing on the chest line.
- We know that the lower edges of the armholes also run along the chest line.
Well, no, of course, you don't know that yet. I will give all these simple rules when we start drawing. And now I just want you to find out that when drawing many elements of the pattern, you can simply focus on the chest line (and there is no need to painstakingly mark these letters and numbers).
WAISTLINE

We focus on this line when we draw waist darts - both on the details of the front and on the details of the back. The widest point of the dart is exactly at the waist line.
HIP LINE
Along this line, we draw an extension of the hem. We will need a classic expansion of the hem of 1.5 cm on the left and on the right so that during the walk the dress does not rub too much against the body, does not warp.
If you sew from stretching fabrics, then such an expansion of the hem will prevent one very unpleasant thing - when the hem of the stretch dress becomes sticky when walking, it slowly begins to crawl up the thighs, straightening to the waist - and then you have to constantly pull it down every 5-10 steps ...
Also, the expansion of the hem can be larger than the classic 1.5 cm in the event that the girth of your thighs is much wider than the girth of your chest. .. Then we will expand the hem in accordance with the size of the difference between these volumes (I will tell you more about it below when constructing a pattern).

So why is it easy and simple to draw a base pattern? You will understand now.
WHY DRAWING A BASE PATTERN IS EASY AND SIMPLE
I want to draw your attention to 2 wonderful points.
Wonderful moment # 1 - the entire pattern is created inside a rectangle (I filled it with pink to make it clear)


Wonderful moment # 2 - the most laborious is drawing the upper part of the pattern - where the neck is, and the shoulder line, and darts, and armholes.
And to make it morally easier for you to draw, I divided the upper part of the pattern into three simple zones. In each zone we will draw 2-3 simple lines - and that's it - the upper part is ready.

As you can see, if you divide a seemingly difficult job into 3 parts, each of the 3 parts itself does not seem difficult. As a result, you will not notice how everything has already been drawn.
It's simple- first we draw a large rectangle, then we divide its upper part into three zones. Draw 2-3 lines in each zone. And all that remains is to go down below and draw the waist darts and the line of the hips. Ha! Delov something!
Do you feel now how easy it is? Draw your first real base pattern.
Well then, let's get started. And we'll draw it all in 20 minutes. Time the timer.
BEGIN TO DRAW A PATTERN BASIS - WE TAKE MEASURES.
WE TAKE MEASURES
Height of the future product (from the cervical vertebra - to the bottom of the hem of the dress)
Semi-girth of the chest - (chest girth divided by 2)
Chest center measure - (distance between the tops of the chest) in your regular bra.
Back width- (at the level of the middle of the shoulder blades - from hand to hand)
Back length(from the cervical vertebra to the waist)
Shoulder length- (from the lateral point at the base of the neck - to the shoulder joint)
Semi-girth of the neck- (the girth of the neck is divided by 2) the tape passes at the base of the neck without squeezing it
Half hip - (the girth of the hips was divided by 2)
Half waist - (waist circumference divided by 2)
How to remove all those girths of the chest, waist, hips and neck - we know.
And to take other measurements, I give you an approximate picture below:

STEP ONE- draw a rectangle.
Height of the rectangle - this is the height of the future product from the cervical vertebra to the bottom of the future dress
The width of the rectangle is half-girth of the chest + a few cm for a loose fit.
How much you need to add these same centimeters for a free fit, now we'll figure it out.
Conventionally, there are 4 degrees of tightness of a sheath dress:
- Tight fitting dress silhouette
- Adjacent silhouette
- Semi-fitting silhouette
- Straight silhouette

If you need tight-fitting silhouette - then choose the fabric that has elastic fibers, that is, it stretches a little (not like a stretch, but slightly) - and then the ADDITIVE ON FREEDOM OF FITTING MAY BE LOST AT ALL - that is, the width of the pattern will be equal to the half-girth of your chest.
If you sew a dress from an ordinary non-stretch fabric, then you will not be able to completely adhere it to the curves of your body - and the maximum we can do is cut out adjacent silhouette ... And then the ADDITION ON FREEDOM OF FITTING WILL BE - 3 CM. These three centimeters will need to be evenly distributed between the back area, the armhole area and the chest area. That is, when we now divide the pattern into 3 zones - and we will calculate and measure their width - then we will simply add an additional 1 cm to the width of each of the zones - and that's it.
If you need a dress semi-adjacent silhouette (one that hides the "flaws" of the figure) - then the ADDITION ON FREEDOM OF FITTING will be 4-5 cm (1 cm will go to the back zone, 1.5 cm to the armhole zone, the rest automatically falls into the chest zone.
And if we need a basic pattern for a dress straight silhouette - then we add 6-7 cm.

STEP TWO -we zone the upper part of the rectangle into three zones: the back zone, the armhole zone, the chest zone.
Back width is a measure of the back width divided by 2
The width of the armhole is the half-girth of the chest: 4 + 2 cm
The width of the chest zone is what will remain.
ATTENTION (!!!) If at the very beginning you made an allowance for freedom of fit, do not forget to add a part of this allowance to each zone (as I described a little higher in the article).
STEP THREE - in the back area, draw 2 lines - the neckline + the shoulder line.
Neck line - lies on a rectangle eand only its extreme tip is raised upward.
What you need to know:
neck width = 1/3 semi-obchv. neck + 0.5cm
the height of the edge of the neck above the rectangle = 1/10 of the half-girth of the neck + 0.8 cm
What do we have to do:
So we divide the half-girth of the neck by 3 and add 0.5 cm. We measure this distance on the upper line to the left. We found the width of the neck and marked it with a dot.
Now this point needs to be raised higher above the rectangle. Divide the half-girth of the neck by 10 + 0.8 cm - and raise the point by the resulting figure.

We all found the edge of the neckline - now we need to draw a smooth corner. This can be done simply by hand.
Shoulder line
it goes slightly obliquely - from the edge of the neckline and slightly extends beyond the border of the back zone.
What you need to know:
Shoulder line length = shoulder length measurement + 1.6 cm for dart.
The slope of the shoulder line - for normal shoulders 2.5 (for high 1.5 cm, for sloping 3.5 cm) - mark the level of inclination on the lateral line of the back zone (measure from top to bottom).
What do we have to do.
We figured out what type our shoulders are. Measured on the lateral line of the back zone the desired value (2.5, 1.5 or 3.5)
A line was drawn - from the edge of the neck to the marked level of the slope.
And on this line we measure the shoulder length + 1.6 cm for a dart. As a result, the line lengthened slightly and went beyond the back zone.

Back dart:
What you need to know:
The dart is 4 cm from the edge of the neck
The depth of the dart is 6 cm (that is, it goes down by 6 cm)
The dart width is always 1.6 cm
The first side of the tuck is lowered perpendicularly, and the second is deflected to the side.
Both sides of the dart are equal in length, that is, equal to 6 cm
What do we have to do(see the picture) - we measured 4 cm from the edge of the neckline (put a bold point) and further measured 1, 6 cm for a dart (put a dot) - these are the edges of our dart.

Now they lowered the perpendicular 6 cm down, then went up to the other edge of the dart. Moreover, we also rose exactly 6 cm. Yes, we will rise a little above the shoulder line. But it is important for us that the sides of the dart are of the same length - after all, we will sew them together (close the dart) - and they must match in length. If they do not match in length, the shoulder line will turn out to be a broken line after closing the dart.
STEP FOUR- we find the line of the chest and in the area of the armholes draw the armhole of the back and the armhole of the front.
Back armhole line
What you need to know:
The armhole line goes down evenly to the chest line.
And the height of the armhole of the back is always = 1/4 of the half-girth of the chest + 7 cm
The extreme (axillary) point of the armhole line is exactly in the middle of the armhole zone (on the chest line).
Top 2/3 of your armhole height goes almost straight down
The lower 1/3 of your height + 2 cm - the armhole bends towards the midpoint of the armhole zone.
Draw the line of the chest
Find the height of the armhole. It is equal to = half-girth of the chest: 4 + 7 cm. The armhole of exactly this height will be optimal for your arm, it will not cut into the armpit, or pull the shoulder.
We found this value - and now we measure this distance down from the edge of the shoulder. Measured and put a point.
We have now found not only the lower edge of the armhole - we have now automatically found the level of the chest line. This very important line is found only in this way. Her level is always the size of the armhole, measured down from the shoulder.

And to draw the chest line exactly horizontally. It is necessary to measure with a centimeter the distance from this point to the upper edge of the square of our pattern. And then measure the resulting value on both sides of the pattern - slap the points - and connect them with a horizontal line.
Draw the line of the armhole of the back.
Now we will draw the line of the armhole of the back.
The lower extreme (axillary) point of the armhole is always in the middle of the armhole zone on the chest line. They measured the armhole zone with a centimeter - found the middle - slapped the point.

The line of armholes starts from the edge of the shoulder, goes down and begins to bend to the side only at the level of 1/3 of its height + 2 cm. We measure this distance from the chest line. That is, the height of the armhole: 3 + 2 cm = the distance from the chest line, where the armhole begins to bend towards the axillary point. But to be honest, I don't always remember about these additional 2 cm and always draw a bend by eye, by hand - I define approximately 1/3 and from it I start to round off.
Front armhole line
What you need to know:
The height of the front armhole is equal to the half-girth of the chest: 4 + 5 cm
The armhole has 2 bends:
The upper bend is deflected away from the border of the armhole line on 1/10 chest measurements
Bottom bend - starts at 1/3 of the armhole height from the chest line
What do we have to do:
We find the level of the upper bend of the armhole - half-girth of the chest: 4 + 5 cm - slap the point. Now this point must be moved to the left by a distance equal to = half-girth of the chest: 10.
Now we find the level of bending of the armhole to the armpit - the height of the armhole: 3. Measure this distance on the lateral line of the armhole zone - slap the point.
And we also have the same axillary point. We get only three points. Now, through these three points, draw a smooth line of the armhole.

STEP FIVE- WE DRAW THE LINE OF THE BREAST AREA (neck, shoulder and chest dart)
Neck line
What you need to know:
The width and neckline of the front is the same as the neckline of the back = half-girth of the neck: 3 + 0.5 cm
The depth of the neck is equal to = half-girth of the neck: 3 + 2 cm
Neck edge height measured from the chest line and equal to = bust: 2 + 3.5 (or + 2 cm for girls)
The diagonal depth of the neck is = 1/3 half-girth of the neck + 1 cm
What do we have to do:
We find neck width(half-girth of the neck: 3 + 0.5 cm) - measure it from the corner of the pattern to the left - slap the point.
Now raise the edge of the neck- it must be above the bust line by a distance equal to (half-bust: 2 + 3.5 cm (or for girls + 2 cm).
We measure this distance up from the chest line- and to this level we raise the edge of the neck. And do not be afraid if suddenly this point rises too high in your opinion above the edge of the main rectangle of the pattern. The larger your figure, the wider the horizontal plane of your shoulder, and the more you will have to raise this point of the upper edge of the neckline.
For example, with a chest girth of 80 cm, this point usually rises by about 4.5 cm (plus or minus 1 cm, depending on how sloping your shoulders are). And when the girth of the chest is 110 cm, then the point can rise above the main square of the pattern by as much as 7 cm. Do not let yours scare you - feel free to draw, and do not worry ... you are doing everything right.

Now that you have raised the level of the neck up outside the pattern, you need to draw weak intersection lines this new horizontal level and a line mentally extending up the side of the cutout(see in my drawing I drew these lines in a bright light green color). These lines are needed as guidelines - because it is their points of intersection that we will measure our next measurements - the vertical depth of the neckline (neckline) and the diagonal depth.
We find the depth of the neck (half-girth of the neck: 3 + 2 cm) - we measure it from the angle of intersection of imaginary light green lines downwards - we measured and slap the point.
Now, to make it more convenient for us to draw the correct rounded bend of our neckline line, we measure the diagonal size of our neckline... It is measured with a centimeter tape from the intersection of the light green lines - diagonally to the left.
Front shoulder line
You don't need to know anything. Here, in general, everything is simple - we connect the edge of the neck of the front and the upper edge of the armhole of the front - the gray line in the figure.
Breast dart.
What you need to know:
The edge of the breast dart reaches the chest line.
The tip of the breast dart should match exactly with the top of the breast (this is where the measure of the center of the breast comes in handy).
The width of the dart is found empirically, which is described below.
What do we have to do:
We find on our pattern the top of the chest. To do this, measure on the chest line from the right edge of the pattern half bust center measure + 1cm... Only half, because we have only half of the front on the pattern.

We put a point - and from it we draw a perpendicular straight line straight up - to the shoulder line. Here we have just identified the location of the breast dart, so that its point is directed evenly to the top of our breast. The chest will fit perfectly into the bulge of the dress - without distortions.
Now we need to draw the second side of the dart - BUT for this we need to know its width.
There are no formulas here. The width of the dart is determined empirically. For this we need
1.) Know the measure of the length of your shoulder (we took this measure at the very beginning)
2.) Measure the length of the shoulder line on the pattern with a centimeter.
3.) Compare these values with each other.
4.) The difference in size will be the width of our dart. In flat-chested kids, this difference is zero, which means that the width of the dart is also zero. That is, it does not exist. Well, rightly so, little girls have no breasts - why would they need a dart.
5.) Find the width and measure to the left of the edge of the dart. We mark with a dot. And from this second point we draw a line down to the edge of our dart. Ops! And the dart is almost ready.
6.) It remains only to make both sides of the dart the same length. We measure the first side of the dart. And we measure the same distance on the other side of the dart. So that they are the same and coincide with each other when we close this dart.
7.) The shoulder line turned out to be a little broken (raised after tuck). But this is how it should be. After closing the tuck, it will go down and be perfectly flat.


WE FINISHED WITH THE TOP OF THE PATTERN. URAAAAAAAAAAAAAAAAAA
It remains to separate the back shelf from the waist shelf. Then find the line of the waist and the line of the hips. On the waist line, draw a side bend and 2 waist darts (on the back and front). On the line of the hips, draw an extension of the hem to the sides.
Let's do it quickly and that's it - you can open a bar with drinks and celebrate this business.
Well, let's get started ...
STEP SIX - we divide the pattern into the back shelf and the front shelf - that is, into the right and left sides.
What you need to know:
Side seam line - divides the pattern into a back shelf and a front shelf.
The line of the side seam does not pass in the middle, but shifts towards the back (it is necessary to divide the width of the armhole zone into 3 identical parts by two points - and just through the left point, which is closer to the back), the side line will pass)
What do we have to do:
We measure the width of the armhole zone. We divide it into 3 equal segments - two points. And through the left point and draw a vertical line. This will be the side line of our shelves (back and front).

STEP SEVEN - draw the waist line and the hip line.
What you need to know.
The waistline is located below the cervical vertebra at a distance equal to the measurement of the length of the back.
The hip line is below the waist line at a distance equal to half the back length measurement.
The waistline and hip line - has a slight deflection (1.5 cm) on the half of the front (this deflection is needed for the roundness of the tummy, which even the thinnest have).
What do we have to do.
We measure the level of the waistline - measure down from the top of the pattern back length measurement- draw the line.
We measure the level of the hip line - from the waist line we measure down half back measurement- draw the line.

On the right side of the pattern, mark the points that are 1.5 cm below the lines - we bend the line to this point (as shown in the figure).

STEP EIGHT - draw the side bends of the front and back + waist darts of the front and back.
We calculate the width of the darts and side bends
What you need to know:
Front side bend width = Back side bend width = Back waist dart width = Front waist dart width. That is, in the process of fitting the dress, we remove the same amount of excess fabric in the side bends and in the darts.
To find out the width of a dart or bend. You need to know the amount of excess fabric, the one that should be cut in the side bend or hide in the dart. And divide this total amount of excess fabric by 4 (each of these 4 pieces will be tucked into its own dart or into its side bend). Means…
Dart (or side bend) width = excess fabric: 4
Amount of excess fabric = pattern width minus waist half girth.
A bit confused, but now I will show everything with a specific example….
What do we have to do.
1.) We know the width of the pattern (remember, it is equal to the half-girth of the chest + 6 cm)
2.) We know the half-girth of the waist (we took measurements at the very beginning)
3.) We subtract the half-girth of the waist from the width of the pattern and additionally subtract 2 cm.
4.) The resulting figure is the amount of excess fabric that will go into the side bend or darts.
5.) Width of one dart (or side bend) = amount of excess fabric: 4.
For example, the width of my pattern is 52 cm, and the semi-circumference of my waist is 36 cm.
The amount of excess fabric around the waist will be 52 - 36 - 2 = 14 cm.
It is this amount of fabric that should be partially cut off at the side bend of my pattern, partially hidden inside the darts of the front and back.
On the pattern there are 2 bends (at the side of the front and at the side of the back) and 2 darts (one at the front, one at the back).
This means that my surplus of 14 cm should be evenly distributed among all these four elements. That is, 14 cm: 4 = 3.5 cm.
That is, 3.5 cm will be the width of the dart of the back + 3.5 cm will be the width of the dart of the front + 3.5 cm will go into the bend of the side line of the back + 3.5 cm will go into the side bend of the front line.
Now it is clear how to find out the width of the darts and bends.
We can draw the side bends at once - we measure one size at a time (in my case, 3.5 cm) on both sides of the midline:

And in order to draw waist darts on the back and front, you still need find their correct location on the pattern.
We draw the waist dart of the back.
What you need to know:
The central axis of the waist dart of the back - runs in the middle of the back zone. That is, it is located from the left edge of the pattern at a distance equal to = back measurement: 4
The upper vertex of the waist dart of the back is located just on the chest line (where the axis intersects this line)
The lower top of the waist dart of the back - does not reach the hip line by 4 cm.
What do we have to do:
First, let's draw the centerline of the dart - that is, a straight line that will represent the center of the dart. The tops of the dart will be located on this centerline.
The center line of the waist dart of the back runs exactly in the middle of the back zone.
That is, you can simply measure the width of the backrest area and find its middle.
Or measure from the edge of the shelf to the right a value equal to = back measurement: 4.

Finding the tops (sharp tips) of the darts: Top apex lies on the bust line where the dart axis intersects. The lower one lies on the axis, at a distance of 4 cm from the hip line.
Now we draw a dart: on the waist line, on both sides of the axis, measure half the width of the dart. And from these points we draw lines to the top top of the dart and to the bottom top of the dart.
Front waist dart.
What you need to know:
Front waist dart - Lies on the same axis as the chest dart. That is, the axis of the tuck is also located at a distance equal to = half center bust measurement + 1cm
The tops of the waistline are on the line of its axis: the upper one does not reach 4 cm to the chest line, the lower vertex does not reach 4 cm to the hip line.
What do we do:
We find the axis of the waist dart of the front - either we continue down the line of the dart of the chest, or we measure from the right edge of the pattern a distance equal to = half the measurement of the center of the chest + 1 cm.
We measure this distance along the line of the chest and along the line of the hips - we put the points, connect and get the axis of the dart.
On the axis we mark the tops of the waist dart of the front - the upper top does not reach 4 cm to the chest line, the lower peak does not reach 4 cm to the hip line.
On the waistline, on both sides of the axis, we measure half the width of the dart - and from these points we draw lines down and up to the tops of the dart.

STEP NINE - draw an extension in the hips and a smooth roundness of the bottom of the product.
What you need to know:
If the difference between the girth of your chest and the girth of your waist is small (2-3 cm), then the dress expands in the area of the hip line by 1.5 cm (this is a classic expansion of the hem).
If the circumference of the hips is much larger than the circumference of the waist - then the extension along the thigh line will be equal to half the difference between the HALF hips and HALF bust.
And if you want a slightly widened hem (well, so that it is not strictly along the hips, but dangles slightly), then also make an extension on the bottom line of the product another 1.5 cm.
Anyway, when trying on, you will see the optimal width of the hem and you yourself will sew the side seam under the hip line there yourself if you want to narrow the hem.
The bottom of the product also has a slight curvature (by 1.5 cm) to the edge of the front and back shelf.
What do we do:
We find the difference in the values of the HALF hips and HALF chest girths. For example. the half-girth of the chest is 42 cm, the half-girth of the hips is 45 cm (be careful not to compare the whole girths, but the half-girths). The difference in half-girths will be equal to = 45-43 = 3 cm.
We divide this difference in half = 3: 2 = 1.5 cm. And thus we find out how much we need to expand our hem.
On the line, we measure 1, 5 cm on both sides of the side line of the shelves (we put dots).
On the bottom line of the pattern, we measure in both directions by 1.5 cm (or 3 cm if we want a slightly extended hem)

We connect these points with a smooth line, drawing the side lines of the hem of the front and back. The side lines of the front and back hemlines are drawn (as you noticed) overlapping each other - crossing each other. Then, having made copies from the base pattern, we cut out the back shelf separately, the front shelf separately, that is, we divide these halves, leaving each of them with its own outline of the hem.
Now for the curved line of the bottom of the product - we draw dots 1.5 cm lower than the bottom corners of the pattern... We connect these points with smooth lines to the extreme side points of the hem.


Done, comrades-girls !!! We with you in a sober mind and memory have just made a pattern-base !!! And at the same time, they never even turned off the brain and nicknames-cadabras with letters-numbers.
Moreover - you did not just draw under my pointer - but you understood what is hidden behind each line. And this is a little thing - oh, how useful it will be for you when modeling. And we will moderate you - all kinds of things and with pleasure and also with full consciousness of what is being done and for what purpose.
Learn to think and turn on the brain, and you yourself can model what you like without waiting for my articles-lessons.
What other master classes are there in the same clear pictures and explanations.
If you dig into the sewing heading on this site you will find a lot of things useful for the mind and for sewing.
Namely…
As you can see - there is a lot of everything !! Therefore, go ahead - learn, sew and enjoy life)))
And we will begin to sew on the TOP pattern. It is tops, T-shirts, tunics and then dresses
You ask: "Hey, why not dresses immediately?" I give the answer to this question already in the first article of the cycle "Sewing tops and T-shirts - quickly and easily." So to be continued))) Let's go….
Successful sewing!
Olga Klishevskaya, specially for the site "Women's Conversations".
Copying of the article is allowed ONLY on a personal computer and only on the pages of a personal Internet diary WITH THE MANDATORY PRESERVATION OF ALL WORKING LINKS OF THE ARTICLE.
Sewing any clothing begins with building a base (a basic size drawing). The dress is also no exception. You don't have to be an experienced craftsman to design a practical and well-fitting item on your own. It is enough to understand what is the principle of constructing the pattern-base of the dress, carefully and consistently take measurements and transfer them to a paper sheet. After you understand the fundamental concepts, the creation of any thing will become available.
Building a pattern is essentially transferring the outline of your body to a 2D drawing that reflects half the details of the back and front. The scheme "lays down" on the base rectangle, inside which bends and details are drawn. Its height is the length of the future product from the cervical vertebra to the lower horizontal of the skirt. The width is equal to half the girth of the chest, taking into account the size of the allowances (freedom of fit).
It is necessary to make patterns so that the thing sat down "like a glove". But there may be very few of them. Having built the base, you can use it for sewing any things, as it reflects the basic sizes, features of a particular physique and height. A simple drawing can be modified, each time getting a new diagram.
When designing a dress, special attention is paid to the upper part. It has three conditional areas - the back, armholes and chest. In each of them, you need to model the corners and lines. Then, moving to the bottom, create the waist and hips. The classic pattern is the basis of the dress - this is the scheme of the "case" style, which exactly repeats the curves. Having learned how to create it, you will understand how to "work" with the lines of the body, the cut of the neck, and it will be much easier to design drawings for the rest of the models.
house-sirens.com.ua
Silhouette and fit enhancements
Before making a pattern, you need to choose a silhouette. By the degree of freedom, it can be:
- strongly adjoining - the lines completely repeat the outlines of the body, there is practically no gap between the tissue and the skin;
- adjacent and semi-adjacent - the outlines of the figure are clearly expressed, but the thing does not tighten the body, it turns;
- straight or free - the silhouette does not follow the curves, the figure is either hidden, or its proportions visually change.
The construction of patterns is impossible without determining the increase in the freedom of products. They, in turn, depend on the silhouette. The same applies to the fabric: elastic materials are chosen for a strong fit (then you can do without any additions altogether, but it is better to make them). If the textile does not stretch, then it is possible to build a base from it, at best an adjacent silhouette. In it, the allowances do not exceed 3 cm - the gap is evenly distributed between the back, armholes and chest (1 cm each).
Semi-adjacent clothing patterns are made, leaving a gap of about 4-5 cm to freedom. About a centimeter is left on the back, 1.5 cm on the armholes, and the rest on the chest. The same percentage works when designing a drawing of loose clothing with increments of 6-7 cm. For a classic base, an adjacent silhouette is used, which is undemanding to the type of fabric. For him, the allowances for fit are on average:
- chest - 50-60 mm (Pg);
- waist - 10-30 mm (Fri);
- hips - 20-25 mm (PB);
- back - 8 mm (Pshs, in width);
- armholes - 3 mm (Pshpr, in width);
- shoulder - 3 mm (Pshp, in width);
- back-waist distance - 5 mm (Pdst);
- shelf-waist distance - 10 mm (PDPT).

alicdn.com
Features of modeling necks and shoulders
Before you build a pattern according to real parameters, you should disassemble the basic concepts so as not to get confused in alphanumeric designations later. At the base there is a basic rectangle: the neckline is located on its narrow side, its end is raised. The shoulder axis is tilted. On the pattern of the base of the dress, it starts from the end of the line along the neckline and steps into the back area.
When measuring the shoulders, it is necessary to leave 1.5-2 centimeters under the dart and determine the slope according to your physique:
- with a sloping shoulder - 3.5 cm;
- at high - 1.5 cm;
- the average value is 2.5 cm.
When building a basic pattern, a typical mistake is: the shoulder axis does not reach the back area. This happens if the measurements taken are inaccurate: you did not bring the measurements to the very neck or the middle of the shoulder joint, hunched over your back, applied a tape above the shoulder blades. When sewing clothes with a free silhouette, this position will not be a mistake. There should be a large allowance on the back and the shoulder will not reach this area.
At chest level, there are three base lines - along the neckline, shoulder plus dart. For the first axis, the depth is ⅓ of the half-girth of the neck (add a couple of centimeters). On the front, you need to connect the edges of the neckline and armholes from above - you get the outline of the shoulders.

modadigest.com
Features of the construction of the armhole
The bust line is very important for building a pattern. The master focuses on it, building an armhole - a cutout at the armpit, which allows you to freely move your hand. The chest level is equal to the size of the armhole, which is measured down from the shoulders. It should be horizontal. For correct construction, measure the distance from the bottom point along the armhole to the top of the conditional square - on both sides of the drawing, connecting the obtained points with a segment.
In the area of the armholes, you need to draw cutouts for the back and front. They should clearly fit the physique so that the dress in the armpit area does not pull, and the seams do not squeeze the hands. The dimensions of the real thing may be larger than according to the measurements taken, but not less, otherwise you simply will not be able to wear it. Along the back, the height of the cutout is always equal to ¼ of the half-girth of the chest (Pg) plus about 7 cm. The armholes go ⅔ vertically, and in the lower part they bend to the middle level of the basic pattern of the dress.
On the front, the height of the axillary cut is equal to ¼ of the half-girth of the chest plus 5 cm. In the armhole there are 2 curvatures - from above, by 1/10 Pg, and from below at the level of ⅓ of the height along the chest line. Next, you need to draw the lines of the waist and hips, not forgetting about the darts on the back and front.

burdastyle.ru
Waist, hips and darts
The basic pattern of a dress in the "case" style must be correctly constructed in the waist area. You also need to arrange its transition to the hips. Before drawing them, draw the shelves of the back and front on the right and left sides. They are guided by the waist when lining up the darts. In adjacent silhouettes, they show how well the item will fit. The widest darts will be exactly at the waist.
The thigh line determines how the garment should expand at the hem. Classic models diverge by 1.5 centimeters on the right and left sides. This is enough to avoid any discomfort when moving. The pattern-base for stretch materials is designed according to the same principle, otherwise the hem will "creep" upward when walking and will have to be constantly corrected. Expansion can be even greater - for example, if the "difference" between the chest and hips is significant. After the design of the waist darts, you need to smoothly draw the roundness along the bottom with a pattern.
Darts are almost the most difficult part of the drawing. In order for the product to sit well in the chest area, a bulge should be formed - a conditional cone that repeats the outlines of the bust. In most models, the breast dart is placed on the side, slightly below the armpit, so that it is invisible. However, drawing it on the shoulder is more convenient for building. The width of the element is determined "empirically" - when fitting.
Waist dart on the back ends at the top at the chest line. On the front - it does not reach her by 4 cm. By the same 4 cm, they both do not reach the thigh. On the back, all the details are at the same figure from the edges of the neckline. Their depth can be determined at 6 cm, and their width - 16 mm. They are absent on many models - for convenience, they can be moved to the lock by cutting off excess material at the sewing line of the fastener.

burdastyle.ru
Taking measurements
Required tools
- Pencil with eraser.
- Ruler with tape-centimeter.
- Tailor's patterns.
- Millimeter paper, tracing paper, Whatman paper.
- Pencil, chalk, or disappearing marker.
When designing dress models for beginner masters, it is important not to make a mistake when measuring all the parameters.
Required measurements
- Neck (SS) - at the base of the neck.
- Chest - first (Cr1), second (Cr2) and third (Cr3), along the most distant points of the shoulder blades and chest.
- Waist (St) - at the narrowest part of the torso.
- Hips (Sat) - the horizontal line runs along the bulges of the abdomen and buttocks.
You will definitely need values for the width of the shoulders (Шп), chest (Шг) and back (Шп). And also the values for height - shoulder oblique on the chest and back (Bpcg and Bpc) and chest (Bg).
The full measure is taken by calculating the lengths:
- the whole dress - CI;
- shoulder - DP, from the base of the neck to the joint on the shoulder;
- back and shelves to the waist - Dts (from the 7th vertebra on the neck to St) and road traffic accidents;
- sleeves - from the shoulder joint to the elbow and hand.
When building a grid, you need to determine the width by:
- chest (Wg) - ¼ girth minus 4 cm;
- armhole (Shp) - ⅛ chest girth minus 1.5 centimeters;
- back (Shs) - ⅛ girth plus 5.5 cm.

burdastyle.ru
Mesh construction and back and shoulder layouts
The step-by-step instructions for creating a product begin with designing the meshes.
- The first point is A0. From it on the side to the right, the width of the grid is measured - point A1.
- A line is drawn along this axis from A0 to the right of Shc (a) and to the left - the width along the shelf (a2).
- Segment a-a2 is Shp.
- From A0 downwards, the length of the thing is measured and a mark H is put. This will be the level of the bottom.
- From the same A0, the chest line is drawn down (point G), and then the waistline (T).
- From T down the same segment, the line of the hips is measured, ending in point B.
- To complete the quadrilateral, set aside the height along the grid from a1 downwards (vertex H3).
- To get marks on the H3a1 axis, horizontal lines from G, T and B are plotted - these are, respectively, G3, T3 and B3.
- For points g1 and G4 at the level of the chest G-G3, you need to draw the vertical axes from a and from a2.
- Next, the back is built. From A0 to the left, the center is retracted by 0.5 centimeters and a mark A0 * is set.
- A line is drawn down from it to the level of the shoulder blades - it ends with point Y.
- The time axis U-A0 * is drawn.
- To the left of A0, you need to line the width of the neck along the back - A0 * -A2 - and its depth down from A08 to the Y-A0 * axis. The line needs to be drawn smoothly, so use a pattern.

burdastyle.ru
From T along the T-T3 line, you need to postpone the elbow at the waist - point T1. The middle seam on the back is lined up with the same bend (1.5 cm) to the right of H (H1). The end point along the shoulder is formed by the radius of the circle, the center of which is A2. The distance is equal to Shp plus the addition to the tuck solution (about 2 centimeters). The second radius is drawn from T1, and its intersection with the first forms a mark P1.
Darts on the shoulders and construction of shelves
- From A2, you need to measure several segments with a step identical to the tuck solution - mark points I1 and I2.
- On the "serifs" made, a compass is placed, radii of about 7 cm are drawn, the points obtained by their cross are indicated by I.
- The marks I, I1 and I2 are connected.
- The sides are raised by 2 mm to correct the shoulder seam.
- The ends of the darts should be connected to its end and neck.
- Auxiliary points for the armhole are lined up along the segment P1-G1 - these are marks P3 and G2, which are located in the middle of the Shpr.
- The lines are drawn smoothly, leaving a right angle with the P2 vertex.
To build a drawing of a shelf, you need:
- mark the center of the chest with point G6;
- draw up the descent Lt with a horizontal line equal to the segment G3-G6;
- line the top of the neck along the shelf and measure its depth.
Formation of side lines
- When building the side lines, you need to start from chest level - from the center of the armhole (point G4). An axis for the side seam is drawn from it vertically downward.
- Intersecting with Lt, Forehead and bottom, it forms marks T2, B2 and H2.
- Having calculated the solution of the darts along the waist and the side seam, the size of the expansion on the hips is determined using the formula (Sb + Pb) minus B1-B3.
- The marks B21 and B22 are obtained. If the silhouette along the lower outlines is straightened, and not narrowed, on the lower line, postpone the same values to put the points H21 and H22.
- The line along the suture side will pass through G4, T21, B22, H22, as well as along G4, T22, B21 and H21.
- A smooth line is drawn, a waist tuck is designed - you need to navigate by the position of the center of the chest on the shelf.
- From Lt, lower the vertical axis to the thigh, T5. T51 and T52 are the solution points along it.
- Draw the relief of the shelf and back to the bottom line - H4 and H5. Bottom along the shelf and back - segments H22-H5-H31 and H1-H4-H21.
- The schematic drawing is ready. It remains to translate its details onto tracing paper, not forgetting about the seam allowances, secure with pins and carefully cut. After that, you can start sewing.

burdastyle.ru
The "case" style is good because it is easy to change it - to "play" with the expansion along the hem, the shape of the sleeves, the depth and geometry of the neckline. Various fabrics are suitable for him: from summer thin cotton to dense, warming woolen textiles and knitwear. When cutting, it is necessary to take into account the peculiarities of the material, but in general the style "fits" well for any. The finished dress will be a versatile starting point for further experimentation.
By following the above example description, you will be able to model your own base for the shape and dimensions. The design must be checked, paying special attention to the calculation of darts and their solutions (a separate large topic). If experience is not enough, it is good to practice on a mock fabric so as not to spoil the main matter. After building a basic dress, you can add a decor to it - a yoke, a flounce, a piping.
At first glance, the drawing of the base pattern looks very complicated. Believe me, this is only at first glance. Follow my description of how to build it and we'll get it through step by step!
The main drawing of women's shoulder clothing with set-in sleeves remains constant for all models, we will only change certain sections of the drawing and increments, in accordance with the changes in style. On this basis, you can make not only a dress pattern, but also a pattern for a blouse, jacket and coat.
Based on this construction, you will be able to cut the shoulder piece into.
To build a base pattern, measurements and increments are needed. For information on how to correctly take measurements for read in the article about. Increase tables are located.
Measurements (cm) ↓
- Ssh = 17.5
- Cr1 = 42
- Cr2 = 46
- Cr3 = 44
- St = 36
- Sat = 48
- Wd = 14
- Dts = 40
- Accident = 43
- Br = 26
- Tsg = 8.5
- Vpk = 43
- Shs = 17
- Shp = 12.5
- Dr = 55
- Op = 27
- Vprz = 20
- Di = 80
Increases (cm) ↓
- Pg = 3.5
- Pshs = 0.7
- Pshp = 0.35
- Ppr = 2.45
- Fri = 1
- PB = 1.5
- Pshgor = 0.5
- PDTS = 0.5
- Pspr = 1.5
- Pop = 3
The increase along the chest line is distributed between the sections of the back, front and armholes ↓
Pg = Pshs + Pshp + Ppr.
For products of an adjacent silhouette:
Pshs = 0.2Pg
Pshp = 0.1Pg
Ppr = 0.7Pg
For products of a semi-adjacent silhouette:
Pshs = 0.25Pg
Pshp = 0.15Pg
Ppr = 0.6Pg
For products of a free silhouette:
Pshs = 0.3Pg
Pshp = 0.2Pg
Ppr = 0.5Pg
To facilitate your task, you can use calculator tables to accurately calculate the structure or a ready-made parametric pattern. Press a plus to open a tab and learn more. ↓
Turnkey solution:
Calculator table for calculating the pattern-base of a woman's shoulder garment and sleeves
You enter your measurements, and the program automatically calculates all the formulas. You don't have to count in your head or on a calculator and be afraid to make a mistake in the count.
390 rbl
We begin to build the drawing, as usual, by building a right angle with the vertex at point A. Draw a vertical line downward, which will serve as the middle of the back (the back half of the dress), to the right, a horizontal line, which will serve as the base of the top of the back neckline.
1. From point A to the right horizontally, set aside the segment Aa1, equal to the width of the product along the chest line with an increase. Aa1 = Cr3 + Pg. Aa1 = 44 + 3.5 = 47.5. Draw a vertical line from point A downwards, which will be the line of the middle of the back. Draw a vertical line from point a1 downwards, which will be the line of the middle of the shelf (front half of the dress).
2. From point A downward we mark the distance AH. AG = Vprz + Pspr = 20 +1.5 = 21.5. Through point Г, draw a horizontal line to the right and at the intersection with the line of the middle of the shelf, put point Г1
3. From point A to the right along the line Aa1, set aside the width of the back Aa, equal to the sum of Shs + Pshs. Aa = 17 + 0.7 = 17.7.
4. Set the width of the shelf from point a1 to the left and set point a2. a2a1 = Wr + (Cr2 - Cr1) + Pshn = 14 + (46-42) + 0.35 = 18.4. From points a and a2, we drop the perpendiculars to the chest line and put the points Г3Г4.
5. The width of the armhole aa2 (or G3G4) we got as a result of construction. aa2 (G3G4) = Aa1-Aa-a2a1, that is, the width of the back and the width of the shelf must be subtracted from the width of the product along the chest line. G3G4 = 47.5 - 17.7 - 18.4 = 11.5. There is a table the approximate width of the armhole for typical shapes. ⇓
Compare the width of the armhole you received with the approximate one. For an adjacent silhouette, it should not be too small, that is, it should not be less than the approximate for your size. If you get the width of the armhole less than the minimum width of the armhole for your size in the table, then check the measurements Шс and Шг. Perhaps they are exaggerated. For control, compare the measurements with for your size.
6. Further, from point A downward vertically, set aside the segment that determines the level of the waist line. AT = Dts + Pdts = 40 + 0.5 = 40.5. Draw a horizontal line from point T to the right and put point T1 at the intersection with line a1G1.
7. Distance from the waist line to the thigh line TB = 0.5Dts - 2cm = 0.5 × 40 - 2 = 18. Hip line BB1 horizontally.
8. From point A downwards we put the length of the product. AH = Di = 80. From point H to the right we draw a horizontal HH1. The drawing grid has been built, let's start building the back.
Back construction

9. To the right of point A, set aside the width of the neck of the back - AA2. AA2 = Csh / 3 + Pshgor = 17.5 / 3 + 0.5 = 6.3.
10. From point A2 downwards let us lower the perpendicular equal to the height of the sprout.
A2A1 = AA2 / 3 = 6.3 / 3 = 2.1. Let's connect point A1 with the middle of the back with a horizontal segment and put point A0. Let's form the line of the neck of the back, connecting the points A0A2 with a smooth line.
11. The position of the final shoulder point P1 is found by the intersection of two arcs: the first arc from point A2 with a radius equal to the shoulder width Shp + tuck opening and the second arc with a radius equal to the measure oblique shoulder height Vpk + increase in Pdts. A2P1 = Shp + tuck solution = 12.5 + 2 = 14.5. TP1 = Vpk + Pdts = 43 + 0.5 = 43.5. We draw a line of the shoulder seam, connecting points A2 and P1.
12. The size of the II1 dart solution depends on the posture of the figure and on the structure of the fabric:

13. The location of the A2I dart on the shoulder seam is also determined depending on the posture of the human figure. For typical figures, the distance from point A2 to point I is 4 - 4.5 cm. If the figure is stooped, then the dart is placed closer to the middle of the shoulder cut. We put off the dart solution from point I along the line of the shoulder cut and get point I1. And we postpone the length of the dart from point I down the vertical and set point I2. The length of the II2 dart should be at least 6 cm and not more than 9 cm. The II2 line is straight, the I1I2 line is a smooth curve.
14. To design the line of the armhole of the back, we find the auxiliary points P3, в, Г2. We restore the perpendicular from point P1 to line aG3 and denote the resulting intersection point by point P2. We measure the segment G3P2 in the drawing. Now, from the point G3 upwards, we postpone a value equal to 1/3 of the distance G3P2 plus 2 cm. G3P3 = G3P2 / 3 + 2 cm.
16. Point Г2 is the middle of the armhole, which means Г3Г2 = 0.5 × 11.5 = 5.7 cm. We connect points П1, П3, в, Г2 with a smooth line - this is the armhole of the back.
Our back is built, how are you doing? If everything is OK, then we will continue and start building the shoulder product.
© Olga Marizina
Currently, handicrafts have gained unheard-of popularity, no matter what it is: a soft toy or a woman's dress. Many people ask themselves the question: why sew clothes when you can either buy in a store or ask for help from a professional atelier? The answer is simple: A hand-made thing will definitely be of high quality and unique, you can be 100% sure that no one has a second such dress, which means that the chances of meeting a double on the street are zero.

It is easy and simple to sew a dress with your own hands
At first glance, it may seem that tailoring a dress is an incredibly difficult task, which is not given to everyone. However, looking closely and typing the phrase in the search: We sew our own dresses for beginners patterns you can be sure that there is nothing difficult in this and in just a couple of evenings you can easily sew a beautiful and stylish dress. Simple sewing patterns for beginners will turn the process into an exciting game, and the process of sewing will seem not as scary as it was perceived before!
Pros of a self-made dress:
- Truly exclusive
- Custom design can be made
- Your creativity develops
- The opportunity to earn money on your hobby
- Significant savings in time and budget when buying new clothes.
As you can see, the dress, and indeed the clothes made with your own hands, have more advantages than disadvantages than purchased ones.
How to sew a dress with your own hands for beginners? Patterns below
There is nothing better in the heat than a beautiful, bright, weightless dress. But what if you sew it yourself?

But before taking on this difficult task, an amateur will have many questions: how to build a pattern for a dress for beginners? How to make a basic pattern for beginners? Which fabric to choose for your first piece? How to sew a summer dress? We are ready to answer these many questions in order. Any dress model is a "case" perfectly fitted to your body, and small changes (like a dropped sleeve or a slightly looser waist will make your image more interesting) do not be afraid to experiment, because now there are a great many master classes on the net. However, there are several general rules that should be strictly followed:
- The fabric is always marked on the seamy side.
- As a material for the pattern, you can use tracing paper or plain paper.
- Before you trace the template, you should pin the clipping with pins so that everything works out neatly.
- Spreading the fabric on a large, level surface (such as a huge table, large floor) will help to neatly cut the desired piece.
- Remember to finish the hem and edges of the garment at the end of your sewing work.
Taking into account all these simple rules, you will get a light and simple dress at the exit, just what you need for hot weather.
The shops offer a wide variety of beautiful summer clothes. But the best solution would be to make the outfit yourself and get unreal pleasure from the process. The first and most important step is choosing your fabric. It should be light and flowing. Cotton or silk works great (silk is more difficult to work with, though)

- How to take measurements from your figure (this will affect how the dress will fit on you in the future) The following body parts are required for measuring: waist, shoulders, hips and, if desired, arms.
- Draw a pattern according to your measurements on the fabric. Building a base pattern is the most understandable way for beginners = look and choose the most p
- Cut carefully.
- Stitch the details on a sewing machine, however, you can sew on your hands, then the process will take much longer.
- Process the edges of the finished product, steam.
This is a general algorithm for sewing a summer dress with your own hands.
Blouse patterns for beginners simple DIY patterns?
What is the simplest dress? That's right, two sewn rectangles of fabric, with slots for the arms and head.

However, even this miracle can be made neatly and beautifully if you remove the standard measurements from the model, which will form the basis of the future masterpiece.
How to make a basic pattern for beginners
BASIC MEASURES (WITHOUT THEM IT IS IMPOSSIBLE TO SEW THE PRODUCT)
- OG - 96
- OT - 75
- OB - 101

BACK MEASURES
- Dst (back length to waist) - 41
- Shsp (back width) - 35
- Sh shoulder - 12
Front measurements.
- Dpt (front length to waist) - 43.5
- VH (chest height) - 26.5
- CG (cent of breast) - 18
- Vgk (oblique chest height) - 24
- SHG (chest width) - 37
- Гп (armhole depth) - 20
Remember that the side seams must absolutely match, only then you will get a neat and beautiful product.
How to sew a baby dress with your own hands for beginners patterns
If our visitors have little princesses, then closer to the vacation season, the question of how to dress young beauties becomes relevant. By typing in any search engine patterns of children's dresses for beginners simple do-it-yourself patterns You will be surprised by the abundance of all kinds of styles, patterns and master classes, choose the most suitable option for yourself.

The algorithm for sewing a dress for girls is exactly the same as for adults, although their delicate skin requires only natural and high-quality fabric.
How to sew a dress to the floor with your own hands for beginners patterns
A floor-length dress looks beautiful and romantic, this is the best choice for young girls, because such clothes allow you to emphasize grace and lightness. For sewing, you can use absolutely any elegant fabric.

For beginners, perhaps the best choice would be viscose knitwear and, of course, a standard set of a needlewoman, as well as an overlock, so that the edges of the finished product look as even as possible. Many of these models do not have a pattern, but novice craftswomen should use a template in their work.
How to sew a do-it-yourself sheath dress for beginners patterns
The sheath dress is nothing more than a second skin that must be tailored to each individual's unique measurements. This work requires a lot of diligence and diligence from the fashion designer and the tailor, because it is quite difficult to achieve that the dress fits perfectly, but a beginner can try his hand and sew a simple, straight dress, based on exact measurements.

Dress patterns for beginners, simple DIY patterns ALL THIS is a great opportunity to try new handicrafts, find your hobby and possibly a new source of income, because all girls and women (and sometimes young princesses) love to dress up in beautiful clothes. Now you have replenished the knowledge base that will allow you to make truly exclusive and good clothes both for yourself and for your friends. Patterns of summer dresses for beginners simple patterns with your own hands
Ten years ago, we could not even imagine that we would again sew clothes for ourselves, and not buy them in stores and supermarkets. Nevertheless, the number of people preferring things of their own manufacture is growing.
If you are not in the mood to spend money on magazines, or prefer electronic sources of information to paper, you are not losing. By entering queries into the search engine:
Why sew clothes yourself?
There are many reasons why women again sit down at sewing machines, as in the 90s and earlier. Yes, as before, some hostesses do it in order to save money: to use a fabric that has been lying idle for a long time or to alter an unfashionable thing from a still strong material. As a rule, this is relevant for those whose budget has suffered significantly due to the economic situation in recent years.
Fortunately, the desire to save money isn't the only thing that motivates women to sew in 2016. A much more common reason for this now is to create something special for yourself, not like others. Someone leaves an order for such an exclusive to professional craftsmen, and someone does it on their own. The latter option, of course, carries with it risks, but if you are successful, the clothes made with your own hands become truly loved.

A considerable part of beautiful ladies resort to independent sewing in order to be able to wear dresses, skirts and blouses that fit exactly to the figure. After all, modern stores offer customers a variety of clothing models (of different colors, textures, styles), but all of them, as a rule, are tailored for women with standard hourglass figures (thin waist with approximately the same chest and hips) and rectangle "(the waist is not pronounced, the difference between the main volumes is minimal). It is more difficult for pronounced "pears" (the hips are much wider than the shoulders), "inverted triangles" (the thighs are much narrower than the shoulders) and "apples" (they have a noticeable tummy) to choose something that does not focus on the imbalances in the figure.
Where to start if you want to sew clothes?
Convinced of the seriousness of your own intentions, take care of the means of production, the main of which is the sewing machine. If you have it, check its serviceability and, if necessary, contact the master. If you don't have a car, get one. When it is better to be guided not by the principles “the more expensive, the better” and “the more famous the brand, the longer it will serve,” but by the technical characteristics and reviews of real people.

For example, it is fundamentally important, when purchasing a sewing machine, to understand what types of fabric you will be processing on it. Not every machine can handle thick coats or leather. Also, not all devices are suitable for sewing knitwear, thin tulle fabrics, and so on.
Then, having chosen a certain number of cars suitable for you according to the characteristics, read reviews about them. They can be found on specialized review sites, needlewomen forums, as well as on resources such as Yandex.Market.
It is also necessary to take care of the purchase of such things as tailor's scissors, measuring tape, pins, chalk, and so on.
When all the funds are ready, it is worth moving on to buying materials: fabric, threads, necessary accessories. If this is your first time deciding to sew, you should not take the most expensive one. Start with budget options.
What to sew first and where to get the patterns?
Perhaps, novice needlewomen should not immediately take on products with a complex cut, from capricious fabrics: coats, shirts, trousers. Relatively simple pieces such as straight-cut or pencil skirts and casual dresses are best suited for debut.
Patterns for future outfits can be found in several sources. For example, in sewing and sewing magazines, the most famous of which is, of course, Burda. As a rule, such publications contain not only intricate models, but also detailed instructions on how to how to sew a simple summer dress with your own hands for beginners... Here you will also find materials about how to sew a baby dress with your own hands for beginners, patterns men's clothing, in general, having accumulated magazine issues over several years, you can get a full-fledged textbook on cutting and sewing.

Handicraft books are also traditionally popular. A significant part of them is devoted to just inexperienced seamstresses. So, on the shelves of bookstores you can find publications containing recommendations for a specific type of product: “ We sew a dress with our own hands patterns for beginners», « DIY dress: easy and simple to sew. For beginners" etc.
There are also thick books, almost encyclopedias, in which you can find advice on how to sew anything from an apron to a coat. They may be called " We sew ourselves. For beginners. Patterns and recommendations "or" Dressing the family ourselves: a guide to sewing all types of clothing. "
If the book contains not only a description of the manufacturing algorithm of the product and small illustrations of the details that need to be designed, but also full-size patterns, this is usually said right on the cover. Pay attention to the publications with the titles "Patterns of summer dresses for beginners", "Simple patterns. Now you can sew everything with your own hands ”,“ How to sew a dress with your own hands? Pattern and Models "," Simple patterns of summer dresses and sundresses for beginners "or, for example," Patterns of children's clothing for beginners. Simple patterns with your own hands. "
To make sure that the book really has patterns in its composition, you need to flip through it. And when ordering books on the Internet, choose those stores that add photos of the content and sheets from it to the page of each edition. By the way, such advanced trading platforms often allow you to leave reviews for books. It will also be useful to read them, so as not to be mistaken with the choice.
If the article of any resource turned out to be successful about, for example, how to sew a dress with your own hands for beginners, patterns were also quite applicable to reality - do not be lazy, save the link to the site in bookmarks. Observing this rule every time, you can accumulate a whole selection of links, following which, you will receive high-quality "recipes" for clothes.
Summer dress pattern for beginners
Of course, within the framework of one article, it is impossible to give as much information on cutting and sewing as a specialized website, book or magazine filing can provide. However, by reading our text, you are guaranteed to benefit from it. And it will be not only theoretical, but also practical. So, we present to your attention the instructions on how how to sew a summer dress with your own hands for beginners, patterns we will give you too!
Beachwear has always been considered the simplest cut. On vacation by the sea or river, you don't need much. Nice colors, a loose or semi-fitted silhouette, a small sleeve to cover the shoulders prone to burning - these are the basis for the success of a beach dress.
In our example, a stylish dress with a V-neck and a drawstring at the waist is made in a juicy yellow color, but you can choose another one. Brown, red or young greens are perfect.
The first thing we start with is construction of a base pattern. The clearest way for beginners- building on the model. In the diagram below, you will see a reduced pattern of a beach dress for size 46-48 and height 160-170 centimeters. If you are shorter or taller, slimmer or fuller, it is difficult to how to build a dress pattern for beginners, should not arise either.
In order for the dress to fit exactly on the figure, remember that the length of the chest line (in the pattern it is 25 cm) should be a quarter of the girth of your bust. So, for a girl with a chest volume of 90 cm, 27.5 cm should be set aside in the drawing. The same principle applies to the lines of the waist and hips: their length on the pattern will be equal to a quarter of the real volume + allowance. If you want the dress to be more spacious in the lower body, add two or three instead of one centimeter.
Try not to overdo the cutout depth. It is always possible to increase it, but to decrease it can be problematic.
To make the drawstring, take a piece of fabric with a length equal to the girth of the dress at the waist. Sew on the right side, tucking the edges inside, and iron. Then make holes for the cord and overcast them. After that, you can thread the cord.
When sewing the shoulder seams, leave room for the cords and stretch them as well. This will allow you to play with the shoulder line and change the character of the dress depending on the conditions and mood.

We hope now you are convinced that it is easy and simple to sew a dress with your own hands. Having successfully finished sewing a beach dress, you have learned that building a basic pattern for beginners is not such a big problem. And this means looking for “how to make a basic pattern for beginners”, “how to sew a dress with your own hands for beginners”, “how to sew a simple straight dress with your own hands for beginners”, “how to sew a straight dress with your own hands”, “how to cut straight dress for beginners "," how to sew a straight dress with your own hands for beginners, patterns "are no longer necessary.
It is enough to sew a dress with your own hands once - the patterns and models will no longer seem like a Chinese letter. Simple patterns of dresses for beginners will not cause much difficulty, which means that soon it will be possible to realize the wildest fantasy from the freshest magazine or book.
After practicing on picky fabrics and silhouettes, you can proceed to more capricious ones: silk, woolen and others.
We wish you good luck in all your endeavors! Be unique in your own outfits!
We also recommend
 Rules for grinding and wet-heat treatment of garments
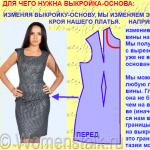 Building a pattern for the basis of a dress: Italian technique as the easiest way to make a good pattern
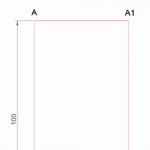 How to build a dress pattern base
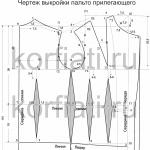 We model and sew coats!
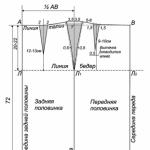 Skirt of the year, construction of a pattern
 Fashionable children's skirts from old jeans - patterns and description