Pattern of a coat of a straight silhouette with a zipper. We model and sew coats! a lot of modeling options for self-tailoring of a fashionable coat! Building a coat pattern
In order to sew a coat that fits well to your figure, you need to buildpattern- the basis coatbased on your own measurements.
To measure the semicircle of the chest, it is necessary to give an increase in the freedom of fitting. For a semi-fitted silhouettecoatit is 7.5-8.5cm, for straightcoat and free coat- 8.5-10cm. If you want the coat to be a very tight-fitting silhouette, you need to reduce this increase in accordance with the model from 5 to 7 cm.
Before you start buildingpatterns- the basics coat, check out for increases in freedom of fit.
Women's coat pattern

Women's coat pattern .
To build a drawing of a coat pattern, you must take the following measurements.
1. The length of the coat on the back is 110 cm
2. Back length to waist 38 cm
3. Shoulder length 13 cm
4. Neck semicircle 18 cm
5. Semicircle above chest 44 cm
6. Chest semicircle 48 cm
7. Waist semicircle 38 cm
8. Hip semicircle 50 cm
9. Sleeve length 58 cm
10. Semi-circumference of the wrist 9 cm
Women's coat pattern: construction
Coat pattern: the first stage of construction
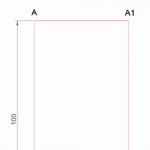
Draw a rectangle ABCD.
Coat width.The rectangle lines AB and DC are equal to 55.5 centimeters (the semicircle of the chest by measure plus 7.5 centimeters for all sizes): 48 + 7.5 = 55.5.
Coat length.The lines of the rectangle AD and BC are equal to 110 centimeters (the length of the coat by measure). The length of the coat is made as desired.
The depth of the coat armhole. From point A, 23 centimeters are laid down and point G is set (GPr = 1 / 10OG + 10.5 cm + 3 cm increase from the Table of Increases) 96: 10 + 10.5 + 3 = 23. A straight line is drawn from the point G to the right and the point of intersection of it with the line BC is denoted by the letter G1.
The waistline of the coat. From point A, 38 centimeters are laid down (the length of the back to the waist by the measure) and point T. From point T to the right, draw a straight line and the point of intersection with the line BC is denoted by the letter T1.
Coat hips line. From point T, 18-20 centimeters are laid down and point L. From point L to the right, draw a straight line and the point of intersection with the line BC is denoted by the letter L1.
Back width of the coat. From point G to the right, lay 19 centimeters and put the point G2 (1 / 8OG + 5.5 + an increase of 1.5 cm from the Table of Increases): 96: 8 + 5.5 + 1.5 = 19. From point G2 draw up a line and the point of intersection with the line AB is denoted by the letter P.
Armhole width.From the point G2 to the right, lay 14 centimeters and put the point G3 (1 / 8OG-1.5cm + 3.5cm increase from the Table of Increases): 96: 8-1.5 + 3.5 = 14.
Raising the shelf of the coat. From point G1, 28.5 centimeters are laid up and point W is set (1/2 of the semicircle of the chest by measure plus 1.5-2 centimeters for all sizes + 3cm increase in the depth of the armhole): 48: 2 + 1.5 + 3 = 28 ,5. From point G3, 28.5 centimeters are also laid up and the point P1 is set. The point of intersection with the line A B is denoted by P2. Points P1 and W are connected.
Coat side line. The segment G2G3 is divided in half and from the point of division draw a line down to the intersection with the DC line and put the point H, the intersection with the TT1 line is denoted by the letter T2, and with the hip line LL1 by the letter L2.
Auxiliary lines of the shoulder and armholes of the coat. Lines PG2 and P2G3 are divided into four equal parts.
Coat pattern: calculation of darts
Calculation of the depth of the darts at the waistline of the coat. Determine the difference between the width of the mesh of the coat and the semicircle of the waist according to the measurement, together with an increase of 5.5 centimeters (for all sizes): 55.5- (38 + 5.5) = 12.
The depth of the darts of the back and front of the coat. The front is 3 centimeters (1/4 difference):
12: 4=3.
Front side dart depthcoatequals 2 centimeters (1/4 difference minus 1 centimeter for all sizes): 12: 4-1 = 2.
Depth of tuck along the side seam linecoatequals 4 centimeters (1/4 difference plus 1 centimeter for all sizes): 12: 4 + 1 = 4.
Coat pattern: the second stage of construction
Women's coat pattern: back construction
Neckline. From point A to the right, lay 7.5 centimeters (1/3 of the semicircle of the neck by measure plus 1.5 centimeters for all sizes): 18: 3 + 1.5 = 7.5. From point 7.5, 1.5 centimeters are laid up, from point 1.5 up - 1 centimeter. Points A and 1 are connected by a concave line.
The slope of the coat shoulder. From point P, 1.5 centimeters are laid down.
Shoulder line.The shoulder line is drawn from point 1.5 (neck) through point 1.5 (shoulder slope) with a length equal to 14 centimeters (length of the measured shoulder plus 1 centimeter for all sizes): 13 + 1 = 14. Point 1 is connected to the shoulder line ...
Armhole line.From the point G2, dividing the angle in half, lay 2.5-3 centimeters. The armhole line is drawn through point 14, the midpoint of the division of the line PG2, points 3 and G4.
Side seam of the coat. From point T2 to the left, lay 2 centimeters. The side seam line is drawn through points G4, 2, L2 until it intersects with the DC line.
Dart at the waistline of the coat. The distance GG2 is divided in half and 1 centimeter is set aside from the dividing point to the left. From point 1, a line is drawn down to the intersection with the LL1 thigh line and 2 centimeters are laid up from the point of intersection. From point 1, 3-4 centimeters are laid down. From the point of intersection with the TT1 waistline, 1.5 centimeters are laid to the right and left and connected to points 5-6 and 2.
Coat pattern: the third stage of construction
Building front coat
Neckline of the coat. From point W to the left, lay 7.5 centimeters (1/3 of the semicircle of the neck by measure plus 1.5 centimeters for all sizes): 18: 3 + 1.5 = 7.5. From point W, 8 centimeters are laid down (1/3 of the semicircle of the neck by measure plus 2 centimeters for all sizes): 18: 3 + 2 = 8.
Points 7,5 and 8 are connected with a dashed line, divide it in half. From point W through the dividing point of the dotted line, lay 7.5 centimeters. Points 7.5 are connected to point 8 with a concave line.
Shoulder length from neckline to chest dart. From the point 7.5 (top) to the left, lay 4 centimeters and then down - 1 centimeter. Points 1 and 7.5 (upper) are connected. From point G1 to the left, lay 10.5 centimeters (neckline from point W to point 7.5 plus 4 centimeters - shoulder length from neckline to tuck minus 1 centimeter for all sizes): 7.5 + 4-1 = 10.5 ...
Points 1 and 10.5 are connected.
Chest dart coat. The right tuck line is equal to the distance from point 1 to the armhole line minus the increase in the depth of the floodplain (in this case, it is 3 cm). The right dart line from point 1 to point 3 is halved and 4 centimeters are laid from the dividing point to the left (the semicircle of the chest by the measure minus the semicircle above the breast by the measure): 48-44 = 4.
The left dart line is drawn through points 9.5 and 4 with a length equal to the right dart line, and point P3 is set.
Shoulder length from bust to armhole. Point P3 is connected with a dotted line with the upper dividing point of the line PG2 (back). From point P3 along the dotted line to the left, lay 9 centimeters (shoulder length by measure minus 4 centimeters - the length of the shoulder from the neckline to the chest tuck): 13-4 = 9.
Point 9 is connected to the lower dividing point of the P2G3 line. From point 9, 2 centimeters are laid down and connected to point P3.
Coat armhole line. The dotted line from point 2 to the lower dividing point of the P2G3 line is halved and 1 centimeter is set aside from the dividing point to the right. From the lower right corner of the armhole, dividing the angle in half, lay 2.5 centimeters. The armhole line is drawn through points 2.1, the lower dividing point of the line P2G3, point 2.5 and, touching the line of descent of the armhole, to point G4.
Side seam of the coat. From point T2 to the right, lay 2 centimeters. The side seam line is drawn through points G4, 2, L2 until it intersects with line DC and point H.
Making the waistline of the coat on the pattern. From point T1, 2 centimeters are laid down and connected to point 2 (side seam).
Coat hips line. From point L1, 2 centimeters are laid down and connected to point L2.
Bottom line of the coat. From point C, line BC is extended downward by 2 centimeters and connected to point H.
Dart on the waistline of the coat (front). From point 2 (waistline) to the left, lay 9 centimeters (distance from point 10.5 to point G1 minus 1.5 centimeters for all sizes): 10.5-1.5 = 9.
Point 9 is connected to point 10.5. From the point 10.5, 5-6 centimeters are laid down.
From point 9 to the left, lay 3 centimeters and connect to point 5-6.
The depth of the front dart of the coat is divided in half and a dotted line is drawn from the dividing point downwards until it intersects with the line of the thighs. From the point of intersection, 2 centimeters are laid up and connected to points 9 and 3.
Dart on the waistline of the coat (side). From point G3 to the right, lay 2.5-3 cm and draw a dotted line down to the intersection with the line of the thighs. From the point of intersection of the hip line, 2 centimeters are laid up, and 4-5 centimeters are laid down from point 3. From the point of intersection of the dotted line with the waist line to the right and to the left, lay 1 centimeter each and connect them to points 4-5 and 2.
Allowance for the closure of the coat (side). From point 8 (neck) and point 2 (bottom line) to the right, lay 4-5 centimeters and connect them.
From point 8, 1.5-2 centimeters are laid down. A smooth line is drawn through point 1.5-2 to point 5. From point C and from point 2 (descent of the waist line), 3 cm are laid.
Points 3, 3, 5 connect.
Note.Pattern drawing calculations are given for a single-breasted coat. For a double-breasted coat pattern, an increase of 8-10 centimeters on the board is made. If the semicircle of the hips by measure (together with an increase of 3 centimeters for all sizes) turns out to be greater than according to the drawing of the pattern, then when cutting, the corresponding increase is made: 1/2, the difference between the semicircle of the hips by the measure (together with the increase) and the drawing of the pattern is added to front and 1/2, the difference is towards the back.
Coat pattern: fourth stage of construction (sleeve)

Pattern of two-seam sleeves for a coat
Draw a rectangle ABCD.
Coat sleeve width.
The rectangle lines AB and DC are equal to 18 centimeters (1/3 of the semicircle of the chest by measurement plus 2 centimeters for all sizes):
48: 3+2 = 18.
The length of the sleeve.The lines of the rectangle AD and BC are equal to 58 centimeters (the length of the sleeve by the measure).
Sleeve ridge height.
From point A, 17 centimeters are laid down and point P is put (3/4 of the depth of the armhole of the jacket plus 2 centimeters for all sizes): (20: 4хЗ) +2 = 17.
From point P to the right, draw a straight line to the intersection with the line BC and the point of intersection is designated by the letter P1.
Elbow line.The PD line is divided in half. From the dividing point, 2 centimeters are laid up and point L. From point L to the right, draw a straight line to the intersection with the line BC and the point of intersection is designated by the letter L1.
Construction of the upper half of the sleeve
Front seam.From points P, L and D to the left, lay 4 centimeters and connect. From point L to the left, lay 2 centimeters. The front seam line is drawn through points 4, 2, 4.
Sleeve line.
The AB line is divided in half and the division point is denoted by the letter O. From point P, 5 centimeters are laid up.
Points O and 5 are connected with a dotted line, divide it in half, the division point is designated by the letter O1. Points A and O1 are connected with a dotted line and divided into three equal parts. The lower division point is designated by the letter O2. From point P, dividing the angle in half, lay 2.5 centimeters. From point P1, 5 centimeters are laid up and point P2 is set.
A dotted line of arbitrary length is drawn through point P2 to the right and left. From point P2 to the right, 4 centimeters are laid.
The distance VP2 is divided in half, the division point is Oz. Points O and O3 are connected with a dashed line, divide it in half, from the dividing point upwards at a right angle to the dotted line, lay 1.5 centimeters. The sleeve line is drawn through points 4, 2.5, 5, O2, O, 1.5, Oz, 4.
Elbow seam line.
From point L1 to the right, lay 4 centimeters and connect to point 4 (top). From point 4 (top) 9 centimeters are laid down. Then, 14 centimeters are laid to the right from point D (wrist semicircle by measure plus 5 centimeters for all sizes):
9 + 5 = 14. Points 14 and 9 are connected with a dotted line, halved and 1 centimeter is set aside from the dividing point to the right. The line of the elbow seam is drawn through points 4, 9, 1, 14, extending it down by 3 centimeters.
Bottom line.The bottom line is drawn through points 4, D, 3.
The fold line of the front of the sleeve. From point L to the right, lay 2 centimeters. The fold line is drawn through points D, 2, P and further until it intersects with the sleeve ridge line.
The line of the front seam is pulled back when ironing, and the line of the elbow seam is pressed.
Pattern of the lower half of the coat sleeve
Front seam.From points P, 2 and D to the right, lay off 3 centimeters and connect them.
Bottom line.From point 3 (elbow seam) 2 centimeters are laid to the left. The bottom line goes through points 3 and 2.
Elbow line.From point 3 to the right, lay 9.5 centimeters (1/4 of the semicircle of the chest by measure minus 2.5 centimeters for all sizes):
48: 4-2,5=9,5.
Elbow seam line. From point 3 to the right, lay 10 centimeters (1/4 of the semicircle of the chest by measure minus 2 centimeters for all sizes): 48: 4-2 = 10.
The line of the elbow seam is drawn through points 2, 9.5, 10 and further until it intersects with the dotted line. The intersection point is designated by the letter 04.
Top notch.The line from point 3 to point 10 is divided into three equal parts and the division point on the left is designated by the letter 05. The notch line is drawn through points 3, O5 and O4. From point O4 to the left, lay 2 centimeters and connect to the notch line (an increase in case of need to narrow the sleeve).
Coat pattern: the fifth stage of construction (collar)
Collar pattern for women's coat

When building patterns collar coata shelf with a drawn lapel is taken. The lapel of the coat is drawn by the designer based on the selected model. Then it is necessary to mark the position of the upper loop.
At a distance of 1.5 cm from the loop, point A is put down.
On the continuation of the shoulder line, a segment GG1 equal to 2.5-3 cm is deposited (the height of the collar stand).
Line АГ1 - lapel fold line. Parallel to this line, a tangent is drawn to the curve of the neck. The point of its intersection with the shoulder line is P; the point of contact with the lapel inflection line is G2.
On the continuation of the touching line from point P, a segment of the PS is laid, equal to the length of the neck of the back (along the base) plus 0.5-1 cm.
ШШ1 - 2.5-3 cm (while the angle ШШ1П is 90 degrees).
Set aside the collar width ШВ = 6-11 cm (according to the model).
The collar end and fall line, as well as the lapel ledge, are shaped according to the model.
One-piece and cut-off shawl collars are built in a similar way. The difference is that the collar departure line is formed by a line (the configuration of which is determined by the model), which smoothly merges into the lapel line.
If you are just starting to master the wisdom of sewing, but are already ready to try your hand at sewing a coat - this model is for you! There are no complicated details in this coat, the pattern is built according to basic measurements, and you will not have to waste a lot of time stitching in the sleeves. We tried to choose a model that will look gorgeous, and nevertheless, will be as simple as possible to sew. We have coped with our task - now it's your turn. Sew yourself this elegant coat for fall, and believe me, it will become a favorite of your collection. There are two colors to choose from and both are trendy!
Advice: match your coat with a matching belt and your silhouette will change dramatically!
To make the patterns open in full size, open each one in a new window.
Rice. 1-2: Pattern of a simple coat - back and front
Simple Coat Pattern - Build
To build a pattern for a simple coat (size 46-48), you need to take the following measurements:
- The length of the coat on the back is 125 cm
- Back length to waist (DTS) 43 cm
- Front length to waist (RTP) 47 cm
- Shoulder length 12cm
- Semi-girth of the neck 18 cm
- Bust 48 cm
- Half girth of hips 51 cm
- Sleeve length 62 cm
- Semi-girth of the wrist 9 cm.
IMPORTANT! When constructing a pattern for a simple coat, the main measure is the half-girth of the hips. If your hip circumference is less than bust, use the bust half measure.
Rice. 3. Pattern of a simple coat
Simple coat pattern - back
We start building with a pattern for the back of the coat. Draw vertical and horizontal lines from point A. Along the vertical line, set aside a piece AC 125 cm long (coat length by measure), to the right of point A set aside 7.5 cm (1/3 of the half-girth of the neck by measure + 1.5 cm for all sizes: 18/3 + 1.5 = 7.5 cm).
From 7.5 point, set 2 cm up for all sizes. Connect points 7,5 and 2 with a concave line. From point 2 draw a shoulder line 14 cm long (shoulder length by measure + 2 cm) so that point 14 lies 0.5 cm below the AB segment.Extend the shoulder line by an additional 62 cm (length of the sleeve by measure). Draw a line at the bottom of the sleeve at right angles to the shoulder line. Sleeve width at the bottom of about 15 cm (½ wrist circumference by measure + 6 cm for all sizes).
From point A down the line AC, postpone AT with a length equal to the TTP measurement (the length of the back to the waist) + 1 cm. From point T draw a horizontal line and set aside 1/4 of the hip circumference to the right by measuring + 2.5 cm for all sizes. Draw a vertical line downward from the obtained point until it intersects with the DC line. Draw the bottom line of the sleeve according to the pattern as shown in Fig. 3.
Set aside 10 cm on the shoulder from point 14, draw a dotted line at right angles to the shoulder line, cut off the sleeve along the line and cut out separately.
The construction of the pattern for the front of the coat is carried out in the same way as for the construction of the pattern for the back.
Extend the waistline to the right. From point T1 postpone up the measurement of the accident (Length of the front to the waist) + 1 cm - point B1 is obtained. From point B1 to the left, set aside 7.5 cm (1/3 of the half-girth of the neck by measure + 1.5 cm for all sizes: 18/3 + 1.5 = 7.5 cm) and down 8.5 cm (1/3 of the half-girth necks to measure + 2.5 cm for all sizes: 18/3 + 2.5 = 8.5 cm).
From point D to the right, set aside 3 cm (approach to the fastener). Draw up a vertical line from point 3. From point 8.5 to the right, set aside 5 cm and arrange the lapel lapel along the pattern.
From point T1, set aside 1/4 of the hip circumference to the left by measuring + 2.5 cm for all sizes. Draw a vertical line downward from the obtained point until it intersects with the DC line.
Remove the shoulder line and sleeve from the back pattern. Cut the sleeve along the line and cut it out without a shoulder seam.
Rice. 4. Pattern of a simple coat - cut details
From the main fabric, cut out all the details of the coat from the main and lining fabric. Cut out the front details from the lining fabric minus the chin. Allowances for seams - 1.5 cm, along the bottom of the coat and sleeves - 4 cm.
Additionally cut out
from main fabric: 4 slanting pockets 19 cm long and 3 cm wide, 2 burlap pockets - rectangles 19 cm wide and 20 cm long;
made of lining fabric: 2 burlap pockets 19 cm wide and 20 cm long.
How to sew a coat
Entrances to pockets, both hem, allowances on the bottom of sleeves and coat, both collar details and upper flap details.
Run welt pockets with flap. Sew shoulder seams, sew sleeves to front and back. Stitch side seams, center back seam, process and press allowances. Stitch the collar details on the outer and two short sides, cut the allowances by 0.4 cm, in the corners - obliquely, turn the collar out, sweep clean, iron. Sew the collar into the neckline.
Stitch lining details, stitch hem. Finish and iron the allowances. Fold the lined coat with the right sides to each other, stitch along the middle seams of the front, the neck, while stitching in the collar. Process the allowances.
Unscrew the lining, insert the sleeves. Turn up allowances on the bottom of the sleeves from the main and lining fabric, sweep the lining along the bottom of the sleeves with blind stitches.
Tuck the allowance at the bottom of the coat and sweep with blind stitches, tuck the allowance at the bottom of the lining and sew. Tie the hem along the bottom of the coat with a couple of stitches. Sew buttons on the markup. Now you know that it is very easy to sew a coat!
The coat is a classic element of the demi-season wardrobe, which has been gaining more and more young fans in recent years. Modern trends give us a huge scope for combinations and fantasies - you can combine a thing with classic boots, and with massive boots, and even with sneakers. Actual models (for example, oversized or balloon) are suitable for girls of any type of figure. By choosing different accessories and shoes, you can create new looks almost every day.
Changeable weather, harsh, cold or damp climates are not the only reasons for the popularity of women's coats. It is a stylish wardrobe item that completes the look and makes it relevant. Choosing the right style, you can visually adjust the parameters of the figure.
The most popular models on seasonal catwalks are a dress-coat, "tulip", trapezoidal cut, with one-piece sleeves or a belt (swing, without buttons). They are decorated with turn-down collars, stand-up collars, classic lapels or bold fur trim on the cuffs. The color scheme of many recent seasons is the classic dramatic shades of red and burgundy. A timeless win-win - a coat of graphite-gray, milky, terracotta colors or in a small pattern ("goose foot", "Vichy" check).
whatkatewore.com
Beginning of work
Taking measurements and creating a base
To correctly design a coat pattern, you must first build its base according to the parameters of the figure. To do this, they carefully take measurements, not forgetting about the increase in free fitting. Increases are up to 8.5 cm on straight styles and up to 10 cm on free ones. For a tight fit, an increase of 5-7 cm will be enough.
Before building the base, you need to take measurements to determine the parameters.
- The length of the product is along the back, shoulder and to the waist.
- Semi-grips - Neck, Over Chest, Chest, Waist, Hips, Wrists.
- Sleeve size.
For clarity and convenience, a base rectangle is built on paper, the corners of which are indicated by the dots ABCD.
- AB / CD (product width) is determined by the half-girth of the chest (Og) plus 75 mm.
- АD / ВС (product length) - by model.
Also, to build a coat pattern, you need to calculate the depth of the armhole. It is equal to one tenth of Og plus 10.5 cm and an increase (about 3 cm). This point on the grid is designated as G. If you draw a segment from it to the right until it intersects with BC, you get G1.
To determine the lines along the waist and hips from point A down, measure the length of the back to the waist - point T will appear. From it you need to draw an axis down to BC, and mark the intersection as T1. Now, from the marks T and T1, they measure down about one-fifth of the entire length (18-25 cm) and put the points L and L1, respectively, for the hips.

ucarecdn.com
The width of the back of the product is determined as one-eighth of Og plus 5.5 cm and the increase is the G-G2 segment. From G2, you need to extend the axis upward to the intersection with AB, marking it as P. If from the same G2 you measure one eighth of Og (plus an increase and minus one and a half centimeters), you get G3. Segment G2-G3 - width along the armhole.
The G1-W segment is laid up, focusing on half of the half-girth of the chest (plus one and a half centimeters and an increase in the depth of the armhole). The same distance is set aside from G3 - point P1 is obtained. Extending the line to AB, the intersection is designated as P2. The P2-SH segment is an ascent along the ledge.
The last thing to do to create the mesh is to draw lines for the side, shoulder, and armholes. On the segment G2-G3, the center is marked, the axis is led down from it to CD, marking the intersection as H, then to T-T1 (T2) and to L-L1 (L2). To line up the auxiliary axes on the shoulder and armhole, the P-G2 and P2-G3 segments are divided into four identical parts. To complete the coat pattern, you need to calculate the darts along the waist, back and front.
Building a pattern of the base model
The first step in building a basic coat model is drawing the back.
- A cutout is made on the neck - a concave line is drawn from point A to A1, starting from 1/3 of the half-girth of the neck (plus 1.5 centimeters) and bending the curve upward by 1.5 and 1 cm.
- Set aside 1.5 cm from the P point for an inclination along the shoulder.
- A line of the shoulder and armholes is drawn through P-G2 (the bisector of the angle is drawn from G2).
- A seam is formed on the side - from T2 through G4, L2 to CD.
- Waist darts are made from half of G-G2, a landmark on the waistline and hips T-T1 and L-L1.

womanadvice.ru
Before the product line up, starting from the neckline. From the mark Ш, you need to set aside a third of Og to the left (plus 1.5 centimeters - a fixed value for all sizes). A third of O must be set aside downward, adding 2 cm to the segment. The resulting ends of the segments are connected with a dashed axis and its center is measured. He is connected to Sh.
Next, you need to shape the shoulder by measuring its length from the neckline to the tuck on the chest. You will also need the distance from it to the armhole. Connect point P3 (the end of the left dart line) and the top of P-G2 with a dotted line. Along the dotted line, set the length of the shoulder as measured by subtracting the distance from the neckline to the dart on the chest. Connect the resulting point with the lower end of P2-G3, postpone another 2 cm and extend the segment to P3.
Now you need to draw the line of the armhole, the seam on the side (from T2 through G4-L2 to CD with an ending at mark H). On the pattern, draw a line along the waist, hips and bottom, make waist darts along the front and side. On a classic coat, you can make a fastener - for this, an extra board is provided (on double-breasted models it is up to 10 cm).
Having mastered the sequence of actions, it will be possible to design products of different styles and cuts.
Classic model with double seam sleeves
The pattern of a classic-style coat is well "superimposed" on cloth - for example, gray. It will need a lining, buttons and matching threads. For a standard garment of sizes 44-48 from a waist of 65 cm, choose about three meters of fabric. Another classic model can be sewn from similar material - double-breasted, with "English" collar and set-in pockets. The lining in it can be stitched or detachable.

miltex.su
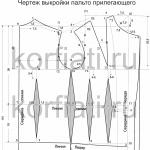
The front half of the product consists of three parts: central, side and barrel.
It is necessary to model two seams on the sides (embossed) - from the chest and waist darts and from the center of the armhole.
The seams are lined up on the pattern, rounding the lines on the chest and cutting the details along the edges of the darts. The back of the coat is constructed in a similar way. Two-seam sleeve, hem and lapel are formed separately. You can also make a flap for pockets or cut them in with a stitching sheet.
On the classic model, either a detachable collar or a stitched stand is made. For them, you must first measure the neckline front and back. It is done along the control points AB of the base rectangle. The length along the sleeve will be about 4 cm, and the width is determined by the parameters of the upper half.
The pattern of a women's coat with a modern straight silhouette is similar to the classic one, but the sleeves in it, as a rule, are single-seam and with one-piece cuffs.
The shelf is cut along the waist line. In the seams on the shoulders and waist, folds are made - one on top of the other. It is desirable to widen the shoulder girdle.
Basic drawings can also be used to design winter clothing, but additional additions will need to be added - for a layer of insulation.
Fashion coats
A-line and snug fit
To obtain a trapezoidal silhouette, you will need to add about 10 cm to the half-girth of the hips. You can balance the shape of the product with sleeves widened at the bottom by 20-25 cm. A jacket set-in collar, double-breasted fastener and decorative stitching are suitable for the style.

dd-shop.ru
Models with a snug fit are often complemented by a stand-up collar. It is necessary to enlarge the neckline and make the shirt sleeves slightly widened downwards. The shoulder is narrowed so that the armhole on the back is vertical. The chest and waist darts are transferred to the chest, from the side. The set-in belt can be decorated with stitching.
The fitted model is modified by widening at the bottom and making a single-breasted wrap and a belt that is tied at the waist.
Progress
- Increase the width of the back by 6 cm.
- Expand the neckline by a couple of centimeters.
- Change the location of the shoulder points along the back one centimeter up, and along the shelf - one centimeter down.
Another style that allows you to emphasize the figure is semi-fitted. Such a coat can be sewn with a zipper for convenience. It is also better to make a collar with a stand, fastened with buttons. Since the coat is narrow, it is worth making a slot on the back panel along the middle seam.
Pattern of a model with a voluminous collar
A coat with large collars should be sewn, modeling a drawing according to the basic scheme of a jacket. So the lines will be balanced and harmonious. Work begins with a drawing of a shelf on which you can not make darts. The side seam is adjusted to eliminate flaring, and the shoulder seam is shortened by the size of the gap along the bust. On the back, you need to make a slot for a third of the length of the product - about 8 cm wide.

ekaterinasmolina.ru
If you want to remove the bust dart on a magazine pattern, you need to cut the shelf, close it, leaving 1-1.5 centimeters per solution. The waist dart will need to be opened by pulling the side piece away. They remove it on the back.
The sleeve is modeled on the basis of a classic single-suture element scheme. Its width is determined by adding 10-12 cm to the girth of the upper arm for a free fit. To measure the parameters of the bottom, you need to measure the wrist, adding 15-16 cm to its girth.
The main decorative element - a voluminous collar - is modeled from the hem. On the shoulder line, you need to postpone 2 cm to the right, and at the waist - 7-8 cm up and to the right. From the obtained point, a vertical is drawn to the bottom of the front and up to the shoulder - this is the bend of the lapel. Its configuration is drawn by drawing a horizontal line along the lower point of the neck. The edge is cut out separately.
Cashmere Patterns
Cashmere is one of the most suitable materials for a coat. It is warm, soft, and looks elegant and respectable. To use all the features of the fabric, choose the same "status" styles - straight with a double-breasted wrap or off the shoulder. Secure the product with a belt, and the classic turn-down collar should be fixed with a button. Expand the neck according to the selected model. Make the sleeves one-piece and with three seams.

elema.by
The straight cashmere coat of the traditional cut has several features:
- the trimming barrel is closed, so there are no seams on the sides;
- the breast dart is reduced by a centimeter and transferred to the neck;
- the back width is increased by 5-6 cm.
To model straight products with a deflated shoulder, the neck is widened, and expansion and stitched cuffs are made on the single-seam sleeves. The shoulder point must be raised by a centimeter and the width of the chest and back must be increased by the same amount. The chest dart is transferred from the shoulder to the neckline, and the shoulder dart is reduced by a centimeter. Taking into account all the changes, you can build a base according to individual dimensions.
The current trend is a coat in which there are no buttons and zippers, only a belt. Its basis is a straightened semi-adjacent cut of the product with a bust dart. A large secret button can be provided to fix the shelf. If the fabric is double-faced and has a fleecy backing, no lining is needed.
When sewing items with one-piece sleeves, be sure to iron them. Preparation will help you avoid sweeping mistakes and get a well-fitting piece. To understand where to press and where to press on the sleeves, imagine what the arm looks like when bending it at the elbow.

framen.ru
A laconic basic model can be "diversified" with slant pockets, interesting sleeves, trimmed hem or one-piece cuffs along the bottom. The “robe” model is slightly narrowed along the hem, adjusting the width of the sleeves according to the product.
Today's variety of women's wardrobe is simply amazing. A huge number of unique cuts and styles, combined with bright and delicate shades, as well as contrasts and original decor, makes a modern girl simply charming. Fashion designers work tirelessly to create new looks, continually drawing inspiration from the styles of yesteryear. So they decided to turn the gaze of the beautiful half of humanity to such a popular cocoon coat in the 50s and 70s of the last century. A photo, a pattern of this product, as well as a description of the sewing process, will be discussed in this article.
Manufacturing options
The ability to sew or knit has always been valuable. Not every woman has the talent to create a unique thing from a skein of thread or a cut of fabric that will take its rightful place in the wardrobe. But if there is even the slightest ability and the desire to develop them, it's just wonderful.
The idea to sew or knit a cocoon coat with your own hands is a great option to get started. This garment will look perfect in any design. It can be a large knit from a thick thread, or, conversely, openwork weaving; a coat on a satin lining or an option warmed with padding polyester. In this case, everything is in the hands of the craftswoman, and only her imagination determines the style of performance.
Choosing a fabric for a coat
When sewing any product, it is very important to choose the right fabric. Naturally, in this case, you should choose the right materials. It can be soft cashmere, tweed or polar, or rougher fabrics such as bouclé or drape. The appearance of the fabric depends on the weave of the threads. It can be satin, twill, linen or combined.
For winter, the best option would be thick cloth fabrics, which can be duplicated with a lining with insulation or made a lining. For a demi-season version, cashmere with a thin lining is suitable. But for a very thin coat, it is better to choose a gabardine or a diagonal.

When choosing a material, you need to consider what the pattern of the cocoon coat will be. Fabrics with a plain weave, which can be classified as highly free-flowing materials, are more suitable for models with one-piece sleeves. It should be borne in mind that the material can be capricious. You should not take too soft fabrics for such a model, because the coat must keep its shape. It is also undesirable to use highly stretchable fabrics that can deform during wear.
We purchase yarn
With the choice of yarn, everything is much easier. There is just one rule: the thread must be of sufficient thickness. The composition in this case plays a secondary role. However, what prevents you from experimenting? which is used when knitting a thing, is identical to that on which the product is sewn. When knitting parts, it is only important to observe the proportions and repeat all the bends of the template. Therefore, when choosing a yarn, one should take into account the thickness of the future woven fabric. If the yarn is too thick, then you will have to slightly increase the pattern around the perimeter, but if it is thin, reduce it.

Such yarns as boucle, wool, semi-wool, mohair will be ideal for a warm knitted coat. But, of course, no one canceled the experiments, and therefore you can try to create an amazing knitted thing from yarn with beads, sequins and lurix. Yes, such a product will not come out warm and, rather, not like a coat, but like a chic jacket, but for a summer or spring evening it is quite suitable. Naturally, the pattern of a cocoon coat with this design should not be too large for a loose fit.
Measurements - the basis for work
A product template is the basis for any thing, whether it is a factory or individual production. How is the pattern built? A cocoon coat with your own hands is easy to make. First you need to take measurements from the figure, and then correctly transfer them to paper. If you have problems with the design, you can go one of the simplest ways.
What is the easiest way to make a pattern? The cocoon coat has a one-piece sleeve. And this particular option is perfect for beginner seamstresses. Constructing a workpiece is not difficult at all. First of all, measurements should be taken: the volume of the neck, chest and hips, shoulder width, sleeve length and product length, chest height, front length to the waist. You can also take a reference measurement from the wrist to the wrist across the neck to facilitate the construction process.

For the template, thick construction film is best suited, on which you can draw with a regular ballpoint pen. It is quite easy to store, does not tear or wrinkle, unlike paper. So how is the pattern made? A do-it-yourself cocoon coat is easy to create.
Building a pattern
The details of the front and back fabric are almost identical, the only difference is in the depth of the neck, and also in that the front should consist of two halves and have allowances for the design of the fastener. The drawing is based on a built of two straight right angles, where the vertical is equal to the length of the product, and the horizontal is equal to half the girth of the neck + shoulder width + sleeve length. Next, you should draw auxiliary straight lines: the chest line, which is deposited from the top of the vertical of the angle in accordance with the "chest height" measurement, the waist line according to the "front-to-waist" measurement, as well as the hip line (20 cm below the waist).

Next, you can start building the sleeve. At the point where the shoulder length measurement ends, you should step down from a straight line about 4 cm and draw a new line, continuing it in accordance with the "sleeve length" measurement. After at right angles at the edge of this straight line, you need to go down 10-15 cm, depending on the desired width of the sleeve and the thickness of the wrist. Next, you should connect the line of the chest and the line of the bottom of the sleeve, making a rounding in the armpit. After that, it remains to determine how the narrowing of the product should be downward, and continue the existing line of the sleeve with a side seam through the line of the thighs to the bottom. Everything is ready, ready. It remains to add details, and you can start sewing.
Modeling patterns
Elements such as fasteners, pockets, darts, raised seams, collar and cuffs are details that are indicated on the main pattern during the modeling process. Without them, the products would be boring and monotonous. With the help of these elements, you can correctly place accents and create just the perfect image. The pattern of a cocoon coat itself is so original that sometimes it is minimalism that gives things a special charm. However, you can experiment with the fastener, sleeve length, collar option and pockets. Modeling a cocoon coat is one of the interesting stages, since when working, a simple template turns into a unique thing.

Cutting and assembly
After the template has been prepared from the film, you can transfer it to the fabric and start cutting. Here you should remember about seam allowances of about 1-1.5 cm, depending on the type of fabric. You will also need to draw lines parallel to the edge of the pattern along the neck and the front cut at a distance of about 5-7 cm - these will be the picks of the product, they are cut out separately from the main fabric with the same seam allowances as for the rest of the parts.
The assembly of the main elements of the coat is not difficult, but you will have to tinker a little with the pockets. If there is absolutely no experience in sewing clothes, then it is better to make pockets in the side seams. They should be issued before assembling all parts of the coat. When the preparatory work with the pockets is completed, you can start sewing. First, the details are grinded along the shoulder seams, passing into the seams of the sleeves. After the shoulder seams are sewn on the details of the hem and connect this element to the main fabric of the coat.
With a knitted product it is much easier. In the process of knitting, the details are adjusted to the size of the template, and after they are ready, they are simply sewn together. If the plans include a product with a lining, then you will need to knit additional ribbons corresponding to the pattern. Proceed with the pockets in the same way as for sewing. One piece should be knitted and the other cut from
Pocket decoration
To design a pocket, you need to cut two pieces according to the pattern of the outlined hand from the wrist to the fingertips from the lining. Next, sew the lining to the side seam at hip level on the front half of the coat, and the workpiece from the back to the back. This is done so that the lining is not visible when entering the pocket. After that, the details of the coat are aligned along the side seam and connected with a straight stitch. The halves of the pockets are also grinded and steamed with an iron.
A knitted cocoon coat with pockets in the seams is made according to the same principle.

Work with lining
In order to make the lining, you first need to cut out the parts according to the prepared templates. It is worth noting that the patterns should be free of trims. Here, you should also take into account seam allowances of about 1 cm. There is little work with lining. First, the shoulder and sleeve seams are closed, then they go to the side seams. Then the lining is stitched to the bottom. The final stage is hemming the bottom of the product and stitching the details of the sleeves of the main and lining fabrics.
Knowing the pattern of which is given in this article, you can save a decent amount of money, because this thing is in trend today, and you will have to pay a lot for it in the store.
We also recommend
 Rules for grinding and wet-heat treatment of garments
 Building a pattern for the basis of a dress: Italian technique as the easiest way to make a good pattern
 How to build a dress pattern base
 We model and sew coats!
 Skirt of the year, construction of a pattern
 Fashionable children's skirts from old jeans - patterns and description