How to close the loops for snood. Scarf snood knitting
If, in preparation for the winter season, you want look bright and stylish, knit yourself a new scarf snood with knitting needles: knitting patterns, new items in 2017 and beautiful patterns for knitting snoods with your own hands are already waiting for your attention.
About the ways of knitting such a warm and insanely popular accessory, as we have already told you more than once. Diagrams and descriptions for knitting of various types of snoods you can see in our previous articles, completely free and without unnecessary searches. However, in the new season there is something to tell our needlewomen and fans of warm and cozy snoods.
This time we will tell you about how to find the right size how to knit the snood itself and how to sew a large scarf using the snood technique. It is not at all difficult if you read the instructions and choose a simple, and at the same time beautiful pattern. Detailed photo and video instructions, patterns for knitting fashionable snoods, as well as a selection of stylish models for the fall-winter 2017 season will help you.
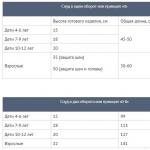
Before you start knitting snood with knitting needles, you should calculate the size of the future product... In this table you will find recommendations for the selection of parameters for a child's sled and a clamp for adults.
By these parameters, you can knit snood in one turn, and the width of the product directly depends on whether only the neck or neck and ears will be closed from the cold. After all, a wide snood replaces the hood, which will keep you warm and protect you from hypothermia. For an "adult" snood in two turns must be added to the 80 cm length.

Snood knitting needles with pearl pattern
Let's move on to knitting a simple and stylish pearl knit. To make the pattern even more expressive, use sectional dyeing yarn in the composition 49% wool and 51% acrylic(300 g, footage 684 m). We will knit a scarf snood on circular knitting needles at number 4.5. The length of the finished product will be 140 cm.

 At the beginning of work, we collect 224 loops... You can see the step-by-step process of working on circular knitting needles in the diagram.


The common edge for the snood looks like this:
- We connect knitting in a circle and continue to knit with a pearl pattern. Make sure that when you go from one circular row to another, the front and back loops alternated.
- We continue to work until all three skeins are finished.
- At the end of the work, carefully close the hinges(do not tighten).


How to connect the ends of the threads when making the transition from skein to skein?
- We take a new ball and select a section matching the color of the working thread. In the photo, two brown threads are selected - one of them is in work, and the second is from a ball.

- US it is necessary to match the color sections to connect the threads... We insert the end of the working thread into a needle with a wide eye.

- We pass the needle between the threads of the new ball(10-15 cm), pulling the threads in different directions to mask the ends.
- In the place where the threads will join, it is necessary to slightly twist the yarn between the palms.

- We take a new ball and select a section matching the color of the working thread. In the photo, two brown threads are selected - one of them is in work, and the second is from a ball.
Seamless snood - hood
And this fashionable scarf collar resembles, rather, a warm bonnet, which will tightly fit the head, covering the ears and neck. We will knit with a Polish elastic band, drawing a pattern will help clarify all the nuances.

To work for you you need 200 grams of yarn, with a total footage of 500 m and circular needles at number 5. For finishing the pattern, we use garter stitch (in odd circular rows - front, in even - purl).

- We collect 80 stitches or another number divisible by 4. We start knitting, as in the diagram about circular knitting needles.
- We connect knitting in a circle and continue knit according to the pattern of the Polish elastic band (80 rows).
- We close the loops at the end of knitting.
Continuing the theme of snoods and their creation with our own hands, I would like to draw your attention to the almighty YouTube and its numerous mk, videos and fashion selections... From all the variety, you can definitely choose the right stylish scarf collar for autumn or winter.
Knitting snood for women: new models 2017-2018
In the cold season 2017-2018, warm soft snoods in a variety of colors are relevant - from black and brown shades to pale blue and beige... Bright and saturated colors, as well as melange colors are also present, they will cheer up on a rainy winter day.
 As for the style - in the 2017-2018 season fashionistas will decorate (and warm) their neck with voluminous cords, which can be tied in 2 or 3 turns and worn over a coat, jacket or raincoat.
"Single" snood-collar, elegantly fitting a woman's neck, it is also present in a series of shows from world famous couturiers. In confirmation of all of the above, we propose to consider pictures with warm novelties for the 2017-2018 season.
Lightweight but very warm snood made of weightless fluffy yarn will emphasize your individuality. Snood is, perhaps, the most stylish winter accessory for a teenager... The tube scarf gives the image a playfulness, intricacy, sophistication. The two-tone clamp looks very elegant and stylish.
 Bright melange clamp looks amazing complete with a one-color hat.


 Female collar in pastel colors- for elegant beauties.
 The pattern can be complemented with bright buttons... You can choose various decor options yourself. The dimensions, width and length of the snood scarf is also completely up to you if you start making a fashion accessory with your own hands.


 After you familiarized yourself with the snood models and were inspired for new creative feats, we offer to watch a master class from experienced craftswomen.
How to knit snood for beginners: schemes with a description
Modern fashion for knitted items is inexhaustible, unique, versatile and very accessible even for beginners. In this section you are expected different ways of knitting, exquisite patterns and new patterns. How to knit, how many loops to make and where to get inspiration - see below in the article.

 Volumetric openwork snood with a pattern "leaves".


 Double scarf clamp can be knitted with a simple pattern.
 Trendy this season snood with gradient worn complete with a hat.
Snood or as it is also called tube scarf or scarf collar is a scarf that is closed in one ring. It can be of different widths and lengths. This accessory again confidently wins the hearts of modern women of fashion. Although the main function of a scarf is to protect from the cold in winter, snood is designed to do two things: to give warmth and to decorate its owner. In this article, we will discuss how to knit an original scarf-snood with knitting needles and crochet, we will give schemes and options for patterns, we will tell you in detail and show each step of the work.
The main thing in the article
How to knit a scarf-snood with your own hands: knitting methods
You can connect snood in several ways. Let's consider the most popular ones:
- On straight needles. One of the easiest ways. On straight knitting needles, a rectangular fabric is knitted, which is sewn over the edges. You choose the pattern that your soul desires.
- Circular knitting. Such a scarf is knitted with a solid product in a circle and it turns out to be seamless.
- Crochet... Here you can make a canvas, like on straight knitting needles, or knit a seamless product. The advantage of the crochet hook is that it can create original openwork patterns that cannot be made on knitting needles.
- With your hands. One of the novelties of modern “needlework” is knitting by hand. You can knit an amazingly beautiful snood scarf on your hands. The video shows in detail how to do this.
How to beautifully knit a circular scarf with knitting needles?
The snood scarf is one of the models that does not require supernatural knitting skills. It is enough to know how the knitting needles are held, and to be able to knit the front and back loop. For the work itself, it will be necessary:
- 150-250 g - thick yarn, it can be woolen or semi-woolen;
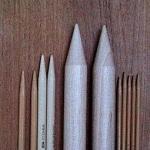
- knitting needles (circular) size 5-8.
The pattern of the product depends on the thickness of the yarn and knitting needles, the larger they are, the more voluminous the product will be.
Now let's look at the options on how you can knit snood quickly and beautifully.

Scarf snood knitting: schemes and instructions for beginners
If you still do not master the art of knitting perfectly, then it is better to choose the simplest model with a simple pattern. It is easiest to knit with a straight fabric, which is then sewn. In order for the product to be voluminous, and the work progresses quickly, it is better for beginners to give preference to the thickest yarn and number 9 knitting needles.
54 loops are typed on the knitting needles and an even fabric is knitted. As for the drawing, we offer beginners the following options:

Knit until you get an even fabric 50-60 cm long. Close all loops. Sew the edges of the canvas. This is done with the same thread that is used to tie the entire product. A beautiful do-it-yourself snood scarf is ready.
And how to knit a seamless snood, see the picture. 
How to crochet a scarf snood: ideas and patterns
Those who own a crochet hook can knit snood with it. And get your ideas below.

Patterns for knitting a scarf snood, scarf collar
In addition to the usual (standard) options for snood, you can pick up an interesting intricate pattern. We suggest considering several options:

Swedish gum: knitting pattern
Pattern rapport swedish gum- four loops, so you should dial a multiple of loops + 2 edging. Knit the first row with a regular elastic band 2X2. The second row is knitted with an offset of one loop, as in the diagram below. All subsequent ones repeat the first and second row. 
Knitting Swedish gum: video
Pattern of knitting pattern "Rhombuses"
To knit pattern rhombus can be done in different ways, it all depends on the desired end result. We offer several options for knitting patterns for the "Rhombus" pattern. 

Video of knitting pattern "Rhombuses"
Knitting pattern "Waves": scheme and video
Pattern "Waves" for knitting. 
Crochet Waves Pattern. 
Knitting a scarf with an English elastic band: scheme and video
It is quite easy to knit an English gum. There are two ways to knit it. 
As for the use of an English elastic band when knitting a snood scarf, then there are two options:

Knitting a scarf with a Polish elastic band: scheme and video
A snood scarf knitted with a Polish elastic band looks spectacular. The longer its length is to wrap around the neck several times, the more interesting it will look. 
Tie a scarf snood with braids: instructions, diagrams, photos
Consider how to tie scarf-snood with braids:

Other patterns can be used according to this principle. Here are some ideas. 


Scarf snood hood: knitting patterns, ideas with photos
We offer several schemes for creating a transforming snood, which, with a slight movement of the hand, can turn into a headdress. 


We offer photos of ideas on how to arrange such an accessory.


Models of snoods and clamps, knitted and crocheted
Conventionally, all snood models can be divided into two types:

How to tie a scarf snood and a collar: video master classes
You will find a lot of tips on how to tie fashionably and what to wear with a scarf-snood in our article "".
Snood is a nice and warm knitted scarf with joined edges. This so-called pipe can be of various sizes, density, volume and is made using a variety of patterns: from simple elastic bands to incredibly complex braids and weaves. A closed scarf, also called a yoke, can be thick and warm, or it can be delicate and airy, depending on what time of year it is selected for.
How to knit a scarf snood knitting needles - for beginners photo and video lessons
Snoods have been very popular for several cold seasons in a row, and for good reason, because they look harmonious with almost all styles of clothing, are great for women, men and children, and having picked up a beautiful color and interesting texture yarn, only snood will work as the most important emphasis on the whole image. That is why you should knit this simple but very useful accessory with knitting needles. In this article, we will consider several ways to knit a collar, including for beginner knitters. To knit snood for beginners, schemes with a description will come in handy.
Tied with an elastic band
The elastic pattern is universal when knitting a variety of products, but it looks especially good on closed things. In addition, a big plus of this pattern is its simplicity and versatility: a snood collar knitted with an elastic band is suitable for both women and men. Therefore, novice craftsmen should turn to this particular knitting method. In this case, we will talk about knitting with circular knitting needles, which are so convenient to knit clamps.

Materials for work:
- 1 pair of circular needles
- thick threads (composition to your taste: wool, semi-wool, acrylic);
- Crochet hook;
- scissors.
Progress:
We take the knitting needles and collect the loops. In total, we need 98 loops. If you want to make the snood wider, dial more loops, the main thing is that there are an even number of them.
After you have typed all the loops, you should remove one of the knitting needles.
Remove the first (edge) loop.

We start the knitting process. Please note that in the left hand we will have a knitting needle on which the loops are located, and in the right hand we will have a knitting needle on which we will put on the knitted loops. So, remove the first loop on the right knitting needle. We pry the next loop behind the front wall with a movement from left to right, grab the working thread and pull it together with the knitting needle into the loop on the left knitting needle. Transfer the loop to the right knitting needle.

The next loop will be the wrong one: we leave the working thread in front of the knitting needle (on the left side), insert the right knitting needle from right to left on the left knitting needle under its front wall, put the right knitting needle on the working thread. After that, pull the knitting needle with the working thread in the opposite direction into the loop on the left knitting needle.

We continue to alternate the loops: front, purl, etc.
We will knit in a circle, so we do not need to turn the knitting over. Watch carefully so that the loops do not twist, since we do not have a drawing yet, so the loops may twist.
The width of the product will be about 30 cm.If you want to calculate the width individually, you can use the following formula: neck height * 2 + 5 cm.

After the product gains the required width, you need to close the loops. To do this, we knit 2 front loops, remove them, and then throw them back onto the left knitting needle.

If your knitting is too tight, you can use a crochet hook as an auxiliary tool.

When there are only 2 loops left, we close the row, knit with a single crochet using a crochet. Snood with an elastic band is ready. You can wrap it inward or fold it in half.

Openwork scarf
An openwork snood can be light and decorate in the warm season, it can be dense and warm in cold winter, or it can be openwork, but dense, and perfectly protect from vert in autumn and spring. In addition, it will look original and bright. How to knit an openwork snood with knitting needles that will decorate and protect at the same time? Consider a detailed description of the knitting process.

The size:
Materials for work:
- yarn in 8 additions (75% wool, 25% polyamide, 320 m / 150 g) - 300 g of multi-colored sectional dyeing and 150 g of blue;
- a set of knitting needles;
- circular needles No. 4.5, length 60 cm.
Knitting patterns and patterns
Front surface
Front rows - front loops, purl rows - purl loops; in circular rows, constantly knit front loops.
Plank pattern
Alternately, knit 2 with a multi-colored thread and 2 purl with blue thread, while pulling the unused thread freely along the seamy side of the work.
Openwork pattern according to the scheme:
The number of loops is a multiple of 6. Knit acc. scheme. It shows only odd circular rows. In even circular rows, knit loops according to the pattern, yarns - with front ones. Repeat the rapport and the 1-8th circular rows constantly.

Knitting density
21 p.x 33 p. = 10 x 10 cm, connected with an openwork pattern;
20 p.x 28 p. = 10 x 10 cm, knitted with front satin stitch.
Progress:
Cast on 126 stitches with blue thread and close the stitches into the ring. First, knit 1 circular row with the purl and 1 circular row with the front ones, then knit with a multi-colored thread with an openwork pattern.
After 24 cm = 80 circular rows, knit with a blue thread for 51 points.the triangle as follows (set aside the rest of the loops):
1st row: chrome., knit 2 sts together with the front with a tilt to the left, 1 yarn, 2 sts together with the front with a tilt to the left, knit to the last 5 sts with the front ones, then knit 2 sts together with the front, 1 yarn, 2 sts together with the front, chrome .;
2nd and all purl rows: knit all loops and yarns with purl;
3rd - 42nd rows: 1st and 2nd row constantly repeat = 9 p.;
43rd row: chrome., 2 sts. knit together the front with a tilt to the left, 1 yarn, 3 sts together with the front, 1 yarn, 2 sts together with the front, chrome. = 7 p.;
45th row: chrome., 1 front, 3 p. knit together the front, 1 front, chrome. = 5 p.;
47th row: chrome., 3 p. knit together the front, chrome. = 3 p.;
49th row: 3 p. Knit together the front.
Pull the thread through the last loop and thread.
For the plank, cast 97 sts along the edges of the triangle with blue thread and knit the deferred snood loops with front loops = 172 sts.
Now knit 6 circular rows with a pattern for the planks, while distributing the loops so that in the 1st circular row, 2 front ones fall on the corner of the triangle.
In the 2nd circular row and 3 more times in each next circular row, knit 1 front crossed loop from the broach on both sides of the 2 middle loops and include them in the pattern for the planks. Then close the loops with blue thread.
Turn the snood so that the triangle is on the outside. Sew a button anywhere on the triangle.
For girl
It would be a good idea to knit snood with knitting needles for a girl with a wide side. Such a collar will always protect the throat from wind and frost, and the jacquard knit is a neat decoration in the Nordic style that any girl will like. To do this with your own hands, you only need a knitting pattern and a description of knitting a snood with knitting needles.

The size:
For the age of 10-16 years.
The circumference is 84 cm, the width is 36 cm.
Materials for work:
- yarn (100% wool; 100 g / 160 m) - 2 skeins of black and 1 skein of light gray for a scarf;
- circular knitting needles No. 4.5 and No. 5 with a length of 40 cm and 60 cm.
We knit patterns according to the schemes
Elastic band 1
Alternately 1 person. and 2 out.
Elastic band 2
Alternately 2 persons. and 2 out.
Elastic band 3
Alternately 2 persons. and 1 out.
Front surface
In circular rows, knit all loops with the front ones.
Jacquard pattern
We knit with the front stitch according to the scheme.

Knitting density
16 p.x 21 p. = 10 x 10 cm, knitted with front stitch with needles No. 5.
Important:
The tube scarf is knitted on circular knitting needles in a circle.
Work progress: On circular knitting needles No. 5, freely dial 140 stitches with black thread and perform 5 r. In a circle. elastic band 1.
Continue working with the front satin stitch, while in the 1st p. evenly subtract 5 p. = on the needles 135 p.
After 18 cm from the initial row, continue to work with a jacquard pattern according to the scheme.
Having finished the pattern, knit with the front satin stitch with black thread. Perform 4 p. and in the next row, evenly subtract 3 sts. = 132 sts on the needles.
Go to circular knitting needles number 4.5 and knit 5 p. elastic 2. In the next row, knit: * 2 persons., 2 sts. knit together out. *, repeat from * to *. Perform 6 more rubles. elastic 3. In the last row
close the elastic bands.
Turn the wide elastic band (facing the face) inward to hide the inside out. side of the product.
Children's snood collar for boys
If you knit scarves-collars for the whole family, be sure to knit children's snood with knitting needles for a boy. Simple patterns will come in handy here, which will look great on a warm circular scarf. For example, the alternation of purl and front loops will look great.

Dimensions:
The total width of the snood is 52 cm, the half-girth is 26 cm, respectively;
The height of the snood is 24.5 cm.

Materials for work:
- Baby Wool Gazal yarn (200m 50 gr) in 2 threads, consumption slightly less than 100 gr;
- circular knitting needles on line No. 4.
We knit the Rice / Putanka pattern:

The number of loops is a multiple of 2.
The diagram and verbal description are given for circular knitting.
1 row.
2 row. 1 front, 1 purl, alternate to the end of the row.
3 row.
4 row. Purl 1, front 1, alternate to the end of the row.
Progress:
Cast on 80 stitches on circular knitting needles, for example, as shown in the diagram:

Knitting is closed in a circle, and the first 2 rows are knitted. In order not to lose the beginning of the row, it is better to attach a knitting marker to the knitting needles.
Then row 3 and 4 are knitted: purl over the front loops, and front loops over the purl. Therefore, this pattern is called a mess.
This alternation of rows is repeated to the desired height. Snood is tied with an elastic band 2 * 2 (alternating 2 front loops and 2 purl loops).
The height of the canvas knitted with the "rice" pattern is 21 cm.
21 cm is 58 rows.
Then, without changing the needles, another 6 rows are knitted with an elastic band 2 * 2, after which the loops are closed according to the pattern. Snood for the boy is ready!

Stylish novelty for women
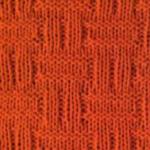
Since yoke scarves have not gone out of fashion for several years in a row, knitters have to surprise themselves with something all the time, combining the most unusual patterns and knitting patterns. The snood presented below is no exception, because it combines stripes, openwork, a dense volumetric pattern and a single braid. And in order to create such a beautiful snood with knitting needles, the knitting patterns of the new 2017 will be very useful.

The size:
Materials for work:
- yarn (51% sheep wool, 49% polyacrylic; 100 m / 50 g) - 100 g orange;
- knitting needles No. 4.5;
- short circular needles No. 4.5.
Knitting patterns and patterns
Front surface
Front rows - front loops, purl rows - purl loops.
Garter knitting
Knit front and back rows with front rows.
Fantasy pattern on 20 initial loops according to the scheme
The diagram shows the front and back rows. From the 1st to the 24th row, knit 1 time, the 9-24th rows are constantly repeated.

Knitting density
20 initial loops x 24 p. = 12 x 10 cm, knitted with a fancy pattern.
Progress:
Cast on 38 stitches on the needles and knit, straightening the loops as follows: edging, 2 sts in garter stitch, 6 sts in front stitch, 20 sts in fancy pattern, 6 sts in front stitch, 2 sts in garter stitch, edging.
After 130 cm from the initial row, close all loops.
Connect the inlaid edge and the edge with closed loops together with a loop-to-loop seam.
Men's scarf
Such a beautiful and useful thing as snood is very popular among men. This tube scarf looks good with any kind of outerwear, and at the same time adds its own zest to the image. Consider how to knit a male snood with knitting needles - a knitting pattern will help you figure it out. In this case, we will focus on a simple model of a snood with an elastic band.

The size:
Height - 24 cm;
The circumference is 57 cm at the top and 62 cm at the bottom of the snow.
Materials for work:
- blue woolen yarn Drops Karisma (50 g / 100 m) - 2 skeins;
- circular knitting needles, 4 mm in diameter, for crr work - in circular rows.
Knitting density:
from 21 pt (loops) we knit 28 crr with front stitch = 10x10 cm.
Knitting the main pattern
1st crr: only ltspt (facial fr);
2nd crr:* 2 ltspt; 2 izpt (purl pt) *; repeat * - * on crr.
For execution Main pattern we repeat the 1st and 2nd crr when knitting the fabric in a circle.
A regular 2x2 gum is obtained if you repeat 2 ltspt; 2 izpt - and so on until the end of crr.
In subsequent crr, the pt of the same name are located one under the other.
Robots stroke:
We type freely 120 pt and close them in crr.
We knit 3 cm with a regular elastic band 2x2.
After that, we go to the Main pattern, and so we knit up to 16 cm in height.
Starting the next repetition of the Main Pattern, in the 2nd crr we make an addition:
Add 1 pt every 3 pt, and so on throughout crr = 130 pt.
And in this manner we tie the snood up to the final 24 cm in height. We close all Fri freely, following the picture.
Video tutorial
So that the knitting of the first snow is not overshadowed by failures and mistakes, it is better to watch a video master class for beginners before starting work. It is best to start knitting with simple patterns, for example, an English elastic band, or a rice pattern. In this case, we will focus on a simple pattern - an English elastic band, ideal for beginner knitters. The ready-made scarf is suitable for babies.
Video for beginners - knitting snood
We knit a long milk scarf-braids
This model is based on a spikelet and garter stitch.
Creating a beautiful product with English knitting - a master class for beginners
Knitting a snood with a patent elastic band
Bulky scarf with circular knitting needles made of thick yarn
It is with large knitting needles that you can create the model that all women of fashion love this season. And we will teach you how to knit it with your own hands.
Simple openwork hood on two needles for beginners
The most beautiful two-tone pearl knit
The yoke scarf - also called the snood scarf - is very popular again. It is worn by girls, boys and children alike. The accessory received such a demand due to its excellent functions: such a scarf heats well, and you are unlikely to freeze in it. The store is full of different variations of this item of clothing, but a scarf knitted on your own will be much nicer and warmer. We guarantee by reading this article, you will learn how to knit a scarf-snood with knitting needles for beginners. Let's get started!
What is a snood scarf?
Before moving on to direct knitting, you need to understand what it is? A scarf-collar is an ordinary scarf closed in a continuous circle. It can be tied inseparably, it can be a ribbon fastened with buttons.
Advice! If you don't have enough time for this painstaking work, and you need a gift urgently, we advise you to choose one of the replica scarves of fashion brands and get a nice bonuson that website.
Varieties
There are several factors that distinguish these accessories:
- Scarf length. There are short scarves that are worn in one turn around the neck. There are snoods that can be worn in 2 or even 3 turns.
- Scarf width... How warm you will be in this scarf depends on this indicator. A wide scarf will cover the entire neck, a narrow one will serve as a simple accessory. It all depends on what kind of scarf is supposed to perform the function.
- Manufacturing material... If you start knitting a scarf from thin threads, then you will get a beautiful feminine accessory that will not keep you warm. If you want a warm and voluminous clamp, it is better to use thick and soft threads.
- Knitting technology. The presence of a seam on a scarf depends on this factor. If you knit snood like a regular scarf, at the end sewing the beginning and the end, then you will get a small seam. If you do not need it, then it is better to use circular knitting. You can also knit various patterns, patterns to make the scarf original and exclusive.
Let's move on to knitting. If you approach this business with intelligence and responsibility, then nothing will be difficult even for a novice craftswoman.
Advice! Try knitting a test pattern to see how the pattern will fit onto the threads. It will be enough to knit 40-50 rows with 20-30 dialed loops.
Examples of patterns for knitting


In order for your first snood scarf to turn out, it is better to adhere to the general instructions:
- Take care of the quality of the scarf thread. If they are thin, the scarf will not warm. If you take warm woolen threads, then you will not freeze in such a snood, but it can prick your neck. You can take 60% wool and 40% other material, not so prickly.
- Do not make the scarf very tight, as it will tighten the neck. You need to make it a little free. In this case, the optimal length of the clamp should be 60-70 centimeters.
- Do not forget about the picture you want to see. If you choose a simple pattern, then there will be fewer problems with knitting, the scarf will be "without all that is superfluous." If you choose a drawing, then you should think about whether you can implement it.
We will look at 2 simple patterns that you will definitely cope with.
Drawing "English gum"
This variation of knitting a scarf looks voluminous, cozy, such a scarf will never go out of fashion. For knitting, you need to take a not very thick woolen thread (50 g) and knitting needles No. 9. An English gum should be knitted according to the following pattern:
- First row: the first loop goes to the front, make a yarn over, remove one loop without knitting. Repeat from the beginning.
- Second row: we make a yarn, remove the loop without knitting, we knit a loop with a yarn from the previous row together with the front row. We do this throughout the entire series.
- Third row: we knit together with the front knit a loop with a crochet from the previous row, make a crochet and remove the loop without knitting.
- All next rows- this is a series of 2 and 3 rows. Tie the beginning and end together with a needle or crochet.

Figure "rice"
The scarf turns out to be spectacular and original. To knit such a scarf, take a dense yarn, which will include wool (300-400gr) and needles No. 10. The diagram looks like this:
- First row: Simple alternation of purl and front stitches. We knit the whole row like this.
- Second row: swap the purl and knit stitches in places. From such intersections of the loops, nodules resembling rice groats are obtained.

- When you knit rows of loops, it is important to keep track of the height of the fabric. It should be the same everywhere, the density should not be somewhere more, somewhere less.
- Try yourself in different designs and patterns. If you knitted one scarf and you liked it, then do not limit yourself in creativity: try all the new patterns, gradually complicating them.
- Don't forget about the huge palette of yarn colors presented by modern sewing shops. Feel free to choose a few colors to add a touch of color to your scarf.
Photo selection


Video
Check out some videos on how to knit a snood scarf for beginners.
In general, the post-New Year's relaxation has come - who is reading, who is sleeping, and who is knitting.
And she does not just knit, but ties up a scarf-snood for Sasha's friend.
Why bandages? Until, because a very experienced knitter wrote to me: "The yarn is too thick for the loop, it will stick with a stake." I listened to her words (thanks!), And I also tied the snood with thicker circular needles - 7 mm for looseness. It turned out that he drapes much better this way! I scored only 140 loops and knitted in a circle with garter stitch - purl row, front row. In principle, in my opinion, the snood turned out to be long, it would be quite possible to dial 120 loops, then it would have become taller. It took 300 grams of yarn (300 meters) for snood. The height of the snood turned out to be more than 30 cm, and the folded length was 80 cm. And I bought 400 grams of yarn, because I did not know how much would be used for it.
For the experiment I decided to close the snood in an "Irish" way.
And here is my report on the Irish way of closing loops ():
With the Irish method of closing the hinges, a kind of thickening is formed along the entire last row, as if the steering wheel is so thin. And it is very elastic, easy to stretch in length. This finishing of knitting is probably good for garter knitting, so that the product does not wrap up. But I didn't need a ruk in the snood, so I usually closed it, tying loops very freely, because the snood should stretch.
Here on the right is the Irish closure, and to the left of the paperclip is the regular one. The right row is thicker, if visible))) 
She crossed the scarf in front two (!) Times, and then threw it on her head for the second time (the colors were slightly changed here): 
And from the remaining 100 grams (100 m) I decided to make a small hat for the snood. I knitted it on 4 mm needles, also in a circle with garter stitch. I scored 68 loops and so knitted 15 cm, then began to subtract (to create the bottom) loops through the row:
First, she removed 3 loops: 68-3 = 65, then a row without decreases.
Then she reduced 5 loops through a row - it turned out 6 rows with decreases, and between them rows without decreases:
65-5=60
60-5=55
55-5=50
50-5=40
40-5=35
35-5=30
I made the reductions in different places so that it was invisible.
Then she began to decrease already 6 loops in a row for a more intense rounding to the crown:
30-6=24
24-6=18
And between them the rows are without deductions!
Then I knitted all the loops two at a time:
18: 2 = 9 and pulled them together.
The hat turned out to be slightly elongated, I inserted the laces into it from behind and tightened the back of my head "in a fashionable way." I put on such things at the ends of the lace, I don't know what they are called)))) 

We also recommend
 Ideas for decorating a table with origami products Origami from napkins light flowers with diagrams
 Knitting for beginners is the easiest
 Knitting for beginners: schemes with a description
 DIY patterns of summer dresses and sundresses: a master class for beginners
 Alginate mask: affordable recipes at home
 How to close loops for snood