Knitting tips for beginners. Knitting for beginners: schemes with a description
If you want to comprehend the science of knitting, then first of all you should get acquainted with the main types of loops, learn how to recognize and knit them. After you master the basics of knitting, you can start making drawings. For beginners to learn knitting needles, it is best to take light patterns.
The opinion that simple knitting patterns are boring is mistaken, among them there are a lot of beautiful patterns. We will introduce you to the most popular ones in this article, for clarity and ease of training, we will provide a knitting scheme for each of them.
Obscene simple knitting patterns for beginners
Among the lightest drawings, the following can be noted:
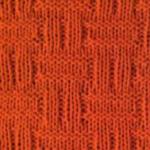
"Checkers"
They are small and large. For children, it is better to take the first, and for adults, the second. They are carried out according to the following schemes:
small checkers
large checkers
The following conventions are used for these schemes:

Only odd rows are indicated on them, and even ones should be knit purl.
"Lightning"
We read this diagram using the following notation:

"Pearl", "rice" or "tangle"
The actual "pearl" pattern is not so embossed, the protrusions are small, while the "rice" is more convex, it is also called "large pearl" or double.
"Diamonds"
The scheme uses the same conventions as for the "Checkers" drawing.
"Diamonds" will look great on a golf or sweater. It can be knitted in combination with any other simple knitting pattern, or even the usually hosiery or garter stitch.
All these patterns are recommended for making warm winter clothes: sweaters, long sleeves, hats, mittens and scarves. This is due to the fact that knit and purl loops are used for knitting them, but in different combinations.
Openwork simple patterns with knitting needles with patterns
Having mastered several non-shaded patterns, you can proceed to openwork. For their implementation, it is not enough to know the front and back loops, you should also get acquainted with the performance of the yarn, broach, knitting of two or three loops at the same time as the tilt.
"Simple openwork"
In the diagram for knitting, only odd rows are indicated, since all even (purl) are made with purl loops.
If it is very small for you, then by adding a few loops, you can get a larger drawing.
"Leaves in the Wind"
The diagram shows how to knit odd rows, and even ones should be done according to the pattern, only knit yarn overs. As a result, you get the following picture:

"Spikelets"
The broach indicated in the diagram is performed as follows: remove 1 loop, knit the next one with the front one and pull it through the removed loop. In this figure, as in Leaves in the Wind, there are only odd rows on the diagram, so here we also knit all even rows according to the pattern, and the yarn overs are purl. The result is a canvas like this:

"Openwork rhombuses"
To get the pattern, you should knit 14 rows in height. The odd rows should be knitted according to the pattern, and the even ones should be knitted like this: the 2nd, 4th and 6th - completely purl, and the 8th, 10th, 12th and 14th - according to the pattern, and the nakida - purl ...
Due to the presence of holes in the canvas, such patterns are recommended to be used for things intended to be worn indoors or in the warm season. It can be sleeveless blouses, sundresses, dresses, light hats and scarves.
It is recommended to initially knit a pattern on the sample, typing 16-20 loops, when you work it out, you can start knitting the whole product with it. Knitting patterns for beginners are best done gradually. To move on to a new one, only after you have learned well (without mistakes) to knit the first one.
/ 06.02.2017 at 11:51
Hello dear knitters, friends and blog guests!
I would especially like to appeal specifically to novice knitters - those who tried to learn how to knit from the lessons from this blog. Thank you so much for your feedback and comments. Thanks to them, I better understand what exactly may be incomprehensible to you, and, as far as possible, I try to improve the information conveyed to you.
This article will rather not be a lesson, but in some way a "guide" how you can move in learning further for those who want to learn how to knit, well, let me give you some advice. I think I have the right to do so, based on my almost 40 years of experience as a knitter and the trial, error and some experience that have been acquired over the years.
But I will also turn to experienced knitters. Dear ones, if you do not regret your time to read this article, and you can add something from yourself, or correct me - please write in the comments, share your experience!
This blog contains the most basic things you need to know and be able to know how to knit from scratch. Some of the initial skills can be learned by going through the stages of lessons for beginners... So, you already know how to dial loops, knit front and back loops in different ways. Knit 2 and 3 loops together, make yarn overs, add loops, close loops at the end of knitting. In principle, this is already enough to start knitting the first patterns and the first simple things.
More in-depth information and further techniques and "subtleties" are described in the articles of the heading "Improving knitting skills"... In particular, there you can find a step-by-step master class on offset loops (or how to knit braids), about elongated loops , armhole design and necks knitting raglan from the top, and other. Of course, these materials will continue to grow, as will the lessons for beginners.
And you can find information about the terms most used in knitting in "Dictionary of terms"... Look in there too, what if ...
If you are satisfied with the description given in the article - leave this article in bookmarks so that you can return, share on social networks. If something is not clear - do not hesitate to ask directly in the comments to the article - I always try to answer, and in some cases, thanks to your questions, I supplement the article, or eliminate my shortcomings.
And now here are some tips for beginner knitters.
About the choice of knitting needles and yarn.
Girls starting to knit now - how lucky you are! Now there is such a huge selection of knitting needles, yarn, and various accessories for knitting! When I learned to knit somewhere in the mid-70s, there was a shortage of all this.
I remember that my dad made the first knitting needles for me himself at the factory - several pairs of different lengths, but the same thickness (approximately 2.5 - 3 mm) - from strong stainless steel wire, sharpened the ends, and fixed turned wooden balls at the other ends ... These first knitting needles of mine are still kept, as a memory of the first steps in knitting, and a memory of my dad ... Later they bought me a set of factory knitting needles.
And the threads? It was not so easy to buy normal yarn in the store, especially high-quality imported yarn - such happiness did not often fall out. What did we not knit from? Basically, they dismissed old factory things, knitted acrylic braid, pulled thin threads from scarves, connected, tied ... eh!
However, I got distracted. So, for a start, I would advise you to take both knitting needles and yarn of medium thickness. Spokes 3 - 3.5 mm, in my opinion, are the most convenient for training. It is more difficult to pick up the loops with thick knitting needles, they need to be knitted freely, to take thick yarn - it is difficult to hone the skill, as it seems to me.
Do not use wooden, plastic, bamboo knitting needles. The yarn glides on them worse, they bend in the hands (and beginner knitters can hold the knitting needles with tension). In my opinion, smooth, durable steel spokes are the first thing!
Take straight or circular - at your discretion. They say that on straight knitting needles knitting is smoother, that is, the loops are smoother. But it happens to me uncomfortable when their non-working ends rise sweepingly along with the knitted fabric - somehow it's hard on my hands, so I often knit on circular ones. But this is all very individual. And I think it's still better to study on straight, but not too long knitting needles.
But take the simplest and most inexpensive yarn - better woolen, or half-woolen, not slippery (without silk, viscose, nylon in the composition). If you suddenly accidentally miss some kind of loop, on slippery yarn it will quickly bloom down the rows, “shoot an arrow”, like on tights.

However, you should not take fluffy yarn with mohair. On the contrary, it clings to the villi, and if suddenly it is necessary to dissolve the sample (and beginners, and not only beginner knitters, have to do this quite often), then it will be quite difficult to do this, and the yarn then deforms, becomes thin and with lumps.
And don't take on multiple yarns at first. This is a yarn in which the thread consists of several thin threads. In knitting, of course, it lays down smoothly and beautifully, but beginners may have problems when it is difficult to "keep" all the thin threads in the loop at the same time - you can miss one or two threads from the knitting needle and then knitting gets confused, has no appearance.
How to read diagrams and descriptions of patterns.
 For knitting, there are many different patterns- both simple and more complex. To figure out how to knit them, there are diagrams and descriptions.
In the descriptions, in detail, in rows, it is described which loops, how and in what sequence to knit, taking into account rapport(repeating combination), which, as a rule, is marked with "*" signs, or is enclosed in parentheses.
Knitting patterns are more visual, since they better show the relationships between the elements of the pattern. The patterns should be read from right to left, in the same direction as we knit a row. However, it should be borne in mind that on different diagrams, different loops (elements) can be depicted in different ways, so you should always carefully follow the symbols and explanations for the diagrams.
The typesetting row (a row of a set of loops) does not apply to schemes or descriptions. This is not the first, but, as it were, the zero row, and the first is the one where the loops are already knitted directly. Edge hinges, as a rule, are also not mentioned in descriptions and diagrams. The first loops of the row according to the description or pattern are knitted after, as if taken for granted, the edge loop. However, there are exceptions, and then the edging is discussed separately in the description.
About some psychological aspects of the knitting process.
 So, the basic techniques are mastered. And how you want to quickly knit something!
My advice to you - do not immediately grab knit something complicated, ornate. Everything has its time. Any handicraft requires skills that need to be honed. And they are honed, sometimes, for years and this process has no boundaries. Everything comes with practice.
If you immediately take on something difficult for you at the initial stage, and you suddenly do not succeed, then some may be disappointed, and the desire to continue studying further may disappear (although this is all very individual).
Therefore, try to knit samples of various patterns first, in order, as they say, to fill your hand. If something does not work out - do not be discouraged: everything will work out, but a little later, or from the next attempts. Start with something you can do so that you see the result and it brings you satisfaction. The process should be fun!
If something does not work out for you, then you should not get angry, nervous, or conclude that knitting is not yours, and that you do not have enough patience for this. Knitting only causes tension in the early days, while you are learning. Later, you yourself will understand how it is exciting and relaxing. After all, it is not for nothing that there is an opinion that this activity helps relieve stress, relaxation and contemplation.
And when the process comes to you almost to the point of automatism, you will be able to do knitting and between cases, and combining with other cases. And even the very question "where to get time for knitting?" will recede into the background ...
What products should you start with?
If we talk about which products to start with, then, in my opinion, the ideal option is with some kind of scarf: an even, not too wide canvas, and you can choose a simple pattern. So what, what a long and long knit. But the hand is gradually filling up, the loops are aligned, and at the exit you will have a finished product, about which you can proudly say: "I knitted it myself!" That's at least how this, or this scarves. Or, if for a beloved man - tie English rubber band, there is a win-win.
In general, do not be afraid to try to knit everything! Well, something complicated did not work out - okay, put it off for now and tie something simpler. But just don’t quit and don’t retreat if you want to learn. Remember - practice and patience, combined with your desire, will definitely bring results!
Feel the strength in yourself - start knitting something more complex: children's blouses, hats, some cushion covers, simple clothes for adults, socks ... And always know for yourself:
there are no things that you don’t know how to knit - there are things that you just haven’t knitted yet!
Many begin to knit according to ready-made descriptions from magazines. But in my opinion, the description in the magazines is already designed for more or less advanced knitters - much is not explained in detail there. And then, infrequently, according to the description, you can get a product that fully matches the sample in size and appearance - you need a very accurate hit with the yarn and
Knitting has always held a special place in the lives of many women from different generations. But if earlier knitted things were more likely a necessity, which was due to a shortage of goods and an extremely small choice of models and colors in general, today they personify the creative abilities of the hostess and her ability to create comfort and warmth for her relatives.
Learning to knit is not as difficult as it might seem from a simple observer. Having grasped the basics, many go headlong into this lesson and achieve amazing results in the shortest possible time. Specialized sites, blogs and courses, designed to simplify and accelerate the development of the theory and practice of knitting, are especially helpful along this path.
We present to your attention the most valuable and high-quality sources that will help you start knitting from scratch and realize any creative ideas as quickly as possible.
Knitting Video Channels
Recently, YouTube channels have gained immense popularity. And this is not surprising, since there is no easier way to learn something other than to see it with your own eyes.
Very high quality and affordable knitting training. The channel offers hundreds of short and at the same time exhaustive videos, the study of which will not require you a huge amount of time and effort to understand. Everything is as simple and clear as possible.
Author's project, which has collected more than 100 thousand subscribers. The author conducts master classes quite regularly, and also answers the questions of his subscribers, among which you may be. Many will appreciate the existence of such a connection, since there are always questions that are difficult to find answers to on their own.
A very popular channel in which Irina pays a lot of attention to lessons and instructions for beginners in the most simple way. The author's presentation and accessibility of the submitted information have already attracted tens of thousands of subscribers who are eagerly awaiting the next video.
A very large channel, which already has over a thousand videos. Lots of tutorials on creating specific patterns and incredibly beautiful things. A detailed analysis of some of the techniques takes dozens and even hundreds of videos, which speaks of the author's scrupulousness and professionalism. Subscribe to the channel and learn to create awesome clothes and crafts.
The channel is mainly aimed at beginners, for whom many basic concepts and techniques are not yet known. The training is based on the example of creating not only beautiful, but also useful things, which is very important for many housewives. Over 100 thousand grateful subscribers have already appreciated the author's enormous work, which is a selection of more than 400 detailed video instructions.
Video blogs and their authors can become your real friends, from whom you will gladly learn from experience. Watching such channels is useful not only for improving your skills, but also for getting emotional feedback, for feeling the impressions of other people, because many knit also because this process allows you to relax and calm down.
Video tutorials for beginners and advanced
If you do not want to devote a large amount of time to studying all the channels listed above, then pay attention to several video tutorials that will help you to tie the necessary thing in the shortest possible time.
How to learn to knit
Professional video that will be useful for beginners in a new business. Colorful presentation of material with detailed explanations of how to start knitting yourself.
How to learn to crochet
The first lesson in learning to crochet from scratch. All the author's explanations are simple and accessible.
Hat with braids
In this tutorial, you will get an easy, step-by-step guide to knitting the very popular braid hat.
Knitting mittens for children
Especially useful material for caring mothers who want to envelop their children with warmth and care.
Knitting gloves
A slightly more complex lesson in which you will learn the intricacies of knitting warm and beautiful gloves.
Men's or women's sweater
A video for those who decided to aim for more and knit a real sweater right away.
Fashionable scarf in 30 minutes
An awesome guide for those who do not know how to knit at all, but want to make a very beautiful and fashionable chunky knit scarf with their own hands.
Free mobile apps
There are not many high-quality and decent products among smartphone applications. Most often they are a simple set of knitting patterns or images. But there are some interesting programs that are worthy of your attention.
- the application contains detailed master classes on knitting toys for beginners. Stunning toys will be a wonderful decoration for your home or a gift that will delight not only a child, but also an adult. And lots of free knitting patterns, which are updated every week, will allow you to find and create the toy you dream about.
- the most popular knitting app on the Android platform, which contains detailed lessons and patterns for knitting bracelets, children's clothes, toys, socks, booties, slippers, hats and much more. Install the application and create your models based on the available patterns and styles.
Websites and blogs to help a beginner
Personal blogs and large knitting sites are the most popular sources of information. Below are three of the most famous and high-quality resources, the study of which is definitely worth doing for anyone interested in knitting.
- one of the largest portals, which contains information only on the topic of knitting. The site has author's lessons, clear navigation, a special section dedicated to the topic of knitting for children, as well as a separate forum where everyone can ask a question and get an answer from a more experienced reader.
- the project is completely devoted to the issue of training. There are two main sections - crochet and knitting. Choose what you like and make your first successes today.
- a project dedicated not only to knitting, but also to needlework in general. Hundreds of diagrams and tutorials are provided that can be a great step-by-step guide to creating amazing things.
- a highly specialized and constantly updated project, on the pages of which you will find everything you need to knit almost any thing.
These sites and applications will later become for you an excellent source of schemes and ideas for your work, where you can always find excellent models and detailed instructions on how to create them with your own hands. Viewing other people's work will motivate you to go all the way from start to finish and create such things with your own hands.
Many people have hobbies that they love to do. Knitting is just such a pastime. Thanks to this type of activity, a variety of crafts, toys or beautiful clothes are obtained. If you have never done it, but really want to, then in your head, most likely, there is a question of how to learn to knit from scratch. If you really like this leisure option, and you strive to master this business, acquire the necessary knitting attributes and use the step-by-step instructions below.
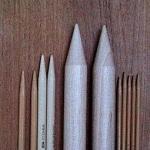
Necessary materials and tools used when knitting
To start knitting, prepare everything you need in advance. You won't be able to do anything without basic tools, so go to a special store where everything for needlework is sold to buy:
- The yarn of the required color (of your choice).
- Regular knitting needles.
- Knitting needles to knit braids or plaits. Looks like normal, only curved in the middle.
- Circular. Regular knitting needles connected with a special fishing line. Needed for knitting products in a circle or large canvases.
- Hosiery. Comes in a set of five. Used to knit in a circle socks, necks, hats, mittens. Four knitting needles are located on the canvas in a circle, and with the help of the fifth, the loops are knitted. In this way, you get a one-piece product that has no seams.
- Large needle with a large eye. It will help to stitch the details of the product together.
- A paper clip for marking.
- Loop pin to keep stitches untied.
Step-by-step instructions and knitting patterns from scratch
Once the tools and materials are ready, it's time to learn the basics of knitting. Start with the very first steps: a set of loops, making the front and back surfaces, knitting small napkins or fragments of any product. Don't be discouraged if something doesn't work out. In the process of learning, you will have to redo everything in a new way more than once. Below you will see step-by-step instructions on how to learn to knit with regular knitting needles from scratch.
Loop set
The very first step in the knitting process of any piece is a set of loops. To do this, use one of two main methods. From the first time, the patterns described below may seem difficult to complete, but this is all easy to remember in the process of regular knitting. Practice a few times using both options to find the one that works best for you. After the description, you will find a video that clearly shows how the loops are typed.
The main method of dialing the first row using two knitting needles:
- Place the thread in the middle of your palm (the end should be at the bottom, and the side that leads to the ball is opposite). Circle the upper part around the thumb with a movement from right to left and lead to the index finger, clasping it from behind. Draw the thread between the second and third fingers, put it in the palm of your hand so that both ends are grasped by the middle, ring and little fingers.
- Take both knitting needles in your right hand and pry them from top to bottom on the loop that is on the thumb (on the back).
- Continue moving towards the thread on the index finger, prying it from top to bottom, and again thread the ends into the first loop.
- Remove your thumb by tightening the knot on the right spoke. In this case, both working fingers must fix the ends of the thread.
- Holding the resulting loop on the needles with the index finger of your right hand, lower them down towards you. It turns out that the thread is again around two fingers.
- This time, knit the thread on the thumb from the bottom up from the palm side with knitting needles and again drag it into the loop on the index finger.
- Then again perform the actions from p. 4.
- Repeat what is indicated in step 6 to dial a whole row.
With one spoke:
- Place the thread in your palm so that the end goes down.
- The second side, which goes through the hand from above, bending around the index finger, and originates in a ball, then squeeze between the ring and little fingers.
- With a knitting needle, pry the thread towards you where it touches your index finger. Rotate the tool away from you immediately to twist the yarn around it.
- Draw a knitting needle around your index finger and insert it under the thread, pulling it towards you (you will be able to remove the yarn from your finger).
- For each new buttonhole, follow the movements indicated in step 4.
How to learn to knit knit and purl loops
The knitting process of any product is always based on a certain technique, which consists of two types of loops: front and back. Only their number changes in accordance with the instructions of the selected drawing. Study the diagram carefully before starting work so as not to get confused. After reviewing the step-by-step description, you can consolidate the instructions by watching the video.
Front loop in the first way:

- Hold the thread at the back of the product.
- Pass the free knitting needle into the middle of the loop.
- Pull the thread leading to the ball from the back wall, grasping it with a knitting needle in a downward motion. Drop the loop that was on the left spoke.
Face loop in the second way:
- The scheme remains the same as in the first method, only this time grab the working thread from the side of the front wall of the loop.
Purl stitch, first method:

- Always hold the working thread in front of the product.
- Insert the free knitting needle behind the front wall of the loop.
- Place the working thread under the tool in your right hand.
- Pull the caught thread into the loop.
Purl type of knitting, the second way:
- Insert the free knitting needle behind the front wall of the loop, move the tool to the right so that the satin stitch is under it.
- Throw the working thread over the knitting needle to pull it through the loop.
Gum knitting lesson 22
The technique of knitting elastic band 22 is an alternation of two types of knitting: front and back, two loops of each option. This is how the bottom of sweaters, vests, sleeves, necks, cardigans are knitted. For how this technique is performed, see the step-by-step instructions below. After studying it, consolidate your skills in the video below. The sequence of execution of the elastic band 22 is as follows:

- Fold the first loop onto a free knitting needle. This is necessary for the edge to be beautiful.
- From the second loop, knit two knits, then two purl.
- Continue this way to the end of the row.
- Always knit the last buttonhole as purl, regardless of the pattern.
Knitting a tourniquet
Knitting of any pattern always involves counting loops and rows. You will perform them both with purl and front satin stitch. A tourniquet is a pigtail, its creation requires alternating knitting options through a certain number of loops. Check out the step-by-step instructions below for how to fit this pattern correctly. Here's an example of knitting a 12 stitches wide fabric. If the description turns out to be incomprehensible to you, reinforce the technique by checking the steps in the video.

- In this case, the pigtail is made in the center and consists of six loops. Begin the row with purl three.
- After - knit 6 loops with the front stitch.
- The last three are purl.
- Repeat the next row, only this time first knit three loops of the front surface, and then according to the pattern.
- When the braid posts need to be rotated on the canvas, tie at least up to four rows as described above.
- When you reach the next front row, where the pattern changes, knit three purl loops.
- Then the pigtail begins, which is knitted with the front satin stitch. Skip the first three loops of the rope, and continue knitting with the fourth.
- Remove all 4 hinges carefully. You can put them on a pin.
- Place the knitted stitch over the right knitting needle. And three unconnected - return to the left.
- Then knit according to the picture.
- Be sure to remember how many rows there are before each twisting of the tourniquet so that the pattern turns out to be beautiful and neat.
How to tie an English rubber band
This knitting method provides for a technique that is also based on a combination of the purl and front surface. English elastic is used to create the bottom of sweaters, sleeves, the edges of socks, cuffs on slippers or mittens. For a comprehensive lesson, study the step-by-step instructions and video below, in which the wizard shows the sequence for performing the English gum.

- Cast on two knitting needles, knit one row 11: alternating the front - purl.
- From the next line, the drawing of an English elastic band begins: throw the first loop onto the tool in the right hand, and knit the next one like the front one.
- After - sew the yarn over the right knitting needle. Work in a purl loop. Continue in this style, alternating between the two knits.
- Knit the next row like this: remove the first loop, and knit the second knit in two with a crochet at the end.
Knitting a pattern "Bumps"
After looking at the following diagram, you will get acquainted with an interesting pattern in the form of openwork patterns called "Bumps". To do it, you need a special technique that you can learn. This pattern is used for knitting various sweaters, hats, scarves, mittens. Follow the step-by-step instructions below to learn how to do this. The video below will help you consolidate the lesson.

- In the new row, transfer the first loop to the right knitting needle, and knit the second with a purl stitch. The next five will be knit with a crochet (as described in the English elastic knitting lesson), but knit them from one loop of the current row.
- This is followed by three purl loops.
- Continue alternating to the end of the row. Stretch it out and move on to the next one.
- Here the knitting sequence changes: first comes the front loop.
- Each "Bump" is located on five rows, and the sixth one covers the drawing.
- Throw the first loop to the other knitting needle, knit the next one as knit.
- Then there are 5 loops - pass a knitting needle through them and knit another knit one.
- Knit the next three loops with the front stitch.
- Repeat the above steps to the end of the row.
- Knit the next row completely with purl loops.
How to close the hinges
When the product is ready, you need to finish knitting correctly. For this, the loops are closed so that the canvas does not bloom. You can learn such a technique by reading the step-by-step instructions below. If at some point it is not clear or you need to fix the knitting method, watch the video tutorial attached below.

- Work the first two stitches. From them you will get a new one - throw it over the left knitting needle.
- Repeat the movement, only using the resulting loop. Pull the product slightly and continue knitting.
- Pull the thread through two loops: you will again have a new one - throw it over to the left knitting needle.
- Continue this to the end of the row until all the loops are over.
- At the very end, you will be left with one loop. Knit it, pull out the knitting needle and tighten the thread.
How to learn to read knitting patterns
To facilitate the process of creating a conceived product with any pattern, there are detailed schemes with a description of the knitting technique. However, these instructions are sometimes difficult to read, especially if you are an inexperienced knitter, because they use certain abbreviations. Be sure to pay attention to the transcript, which is given at the end, or remember the basic abbreviation. Additionally, there are some rules for reading diagrams. You can familiarize yourself with them below.
- If you are using a pattern that describes knitting in a circle, then read it from right to left.
- Always read the instructions before knitting so you don't waste time reading while you work.
- The edge loop is indicated by a plus sign, and its abbreviation looks like this: “chrome. NS.".
- The purl is abbreviated as “out. NS.". You can find it in the diagram using the white square, which is crossed out inside.
- The front loop in the schemes is shortened as "l. NS." and denoted by a black square.
- The nakid is abbreviated as "n." and has a sign in the form of a triangle without a base.
Knitting video tutorials for beginners
If you are enthusiastic and seriously decided to learn how to knit some models of things beautifully, first try to create a simple product - footprints. Then use the different beginner tutorials to get your knitting skills. For example, watch the four videos below that show in detail how to knit an original scarf; independently create two options for warm socks for the winter; make cute baby booties for the youngest member of the family.
A detailed lesson on knitting a scarf
Video course on knitting socks
An easy way to knit booties for beginners
If you really want to learn how to knit, but still do not know how to do this type of needlework at all, first solve a number of questions for yourself. Think about how and where you will study. Of course, you can go to special courses, but you have to pay for them. What if ? There are many knitting technology sites on the Internet, and there are video courses that will help you find.
If you do not have a computer and the Internet, it is best to find a friend who is happy to tie up her whole family and acquaintances. She will show you the basics of this type of needlework and will be able to suggest something later.
What you need to buy for knitting
Have you already decided what to knit or crochet? Knitting needles are usually knitted in sweaters, scarves, hats. Crocheting the canvas turns out to be denser and better holds a complex shape, so they knit some styles of hats, blankets, blankets, toys, as well as the edge of an already finished product made with knitting needles. Lace shawls are also usually crocheted. It is much more difficult to create a complex drawing.
To knit socks and mittens, you will need 4 knitting needles. Newbies in this business probably don't need to start right away with so many knitting needles.
Knitting needles and hooks are available in metal and plastic. As practice shows, mastering knitting, beginner needlewomen usually tighten the loops very much. Therefore, for a start, it is better to choose metal knitting needles - the loops glide over them better.
It is preferable to choose good semi-woolen, thick enough threads, it is much easier to make or crochet from them. Knitting needles and crochet hooks vary in thickness and are numbered. When choosing them for a specific yarn, remember that knitting devices should be one and a half to two times thicker than threads.
And one more little secret. When you knit several times and then dissolve the product, the threads deteriorate, "curl", the part connected from them looks worse and worse. To prevent this from happening, when you realize that you are already ready to create a good thing, dissolve everything that you knitted before, wind the thread in a loose ball and hold it over the steam. This will straighten the thread.
Your first knit
Now you can start knitting. For the first time, choose a simple blouse or just knit a beautiful scarf. To calculate how many loops you need to cast, tie a 30 by 30 loops sample, steam it with an iron and see how many centimeters of the product are obtained with this amount. Based on the desired width, for example, a scarf, calculate how many loops you need to cast.
Getting started knitting, you need to be patient: not everything will turn out the way you would like, but over time you will be able to create a masterpiece that is not inferior to the samples shown on the podium.
The mating process is not very fast. Earlier, on long winter evenings, doing this kind of needlework helped pass the time. Now, when every minute counts, you want to do everything quickly. But this does not happen with knitting. You will have to unwind the yarn several times, and start again, and put it off for a while, so that you will again have a desire to continue.
But there are pluses, and there are quite a few of them. Having suffered a little, you will get, for example, a wonderful blouse, which no one else has. In addition, nutritionists strongly advise learning to knit: concentrating on work, you will rarely go to the table to put another cookie in your mouth. Also, when you learn this needlework, knitting will be very good at calming your nervous system.
Remember: it's never too late to learn to knit!
We also recommend
 Ideas for decorating a table with origami products Origami from napkins flowers light with diagrams
 Knitting for beginners is the easiest
 Knitting for beginners: schemes with a description
 DIY patterns of summer dresses and sundresses: a master class for beginners
 Alginate mask: affordable recipes at home
 How to close loops for snood