DIY napkin origami, paper and fabric crafts. Ideas for decorating a table with origami products Origami from napkins flowers light with diagrams
1. In the initial position, the napkin should be folded into 4 parts. Lay it so that four separate leaves are at the bottom.
 2. Now fold the left side towards the right to find the middle of the napkin.
 3. And unfold it to its original position.
 4. Fold the right side of the napkin towards the center.
 5. And bend the left side to the center too.
 6. Place the napkin with the back side up.
 7. Fold the right and left sides towards the center again.
 8. Turn the napkin over with the sharp end facing you.
 9. Fold about center.
 10. Approximately so that the sharp end of the napkin reaches the top edge.
 11. Fold the narrow end of the napkin as shown in the photo. You will get the head and neck of a swan.
 12. Bend the swan in half.
 13. Straighten his neck and head.
 14. It will turn out something like this.
 15. It remains to fluff the tail of the swan. To do this, pull up one layer from the napkin.
 16. There are 4 layers in total.
 17. Swan from a napkin using origami technique is ready. Just keep in mind that it is not very stable, so it is better to put it on a napkin, in which one corner is bent inward, as if creating a bump that will not let the swan fall.
For a serving table, you can make this or that.
Beautiful table setting with origami from paper napkins is a real art. Knowing how to fold paper napkins for table setting, you can create masterpieces in the form of flowers, butterflies, boats and interesting compositions. Most importantly, folding such origami takes a few minutes, and the effect is stunning - guests will be delighted with the perfectly set table and the skills of the hostess.
Exquisite table setting is an opportunity to turn an ordinary breakfast or dinner into a festive meal. Sometimes this is also a great way to improve the situation if guests are arriving, but there is not a wide variety of dishes. Remember how a table is served in a restaurant: beautiful cutlery, exquisite dishes and festive table setting. Whatever one may say, but she creates a special atmosphere at the table. At the same time, every housewife can master the skills of creating beautiful compositions.
Correctly selected color and original compositions allow you to transform any festive table

Beautiful origami from napkins - an opportunity to make any table festive
How to choose paper napkins

Compositions on the table will look beautiful if multi-layered, dense and preferably large napkins are used - it is easier to create beautiful shapes from these
In order to fold origami from paper napkins on the table, you need to choose the right napkins themselves. Thin single-layer or small-sized ones are definitely not suitable - it is better to give preference to high-quality two- or three-layer ones.
In general, the selection rules are as follows:
- The density should be at least 17-18 g / sqm. This will allow you to create different shapes, as well as comfortably wipe your hands - the paper will not tear or "creep" into pieces.
- To create origami from napkins with your own hands, you should choose multi-layer products - they keep their shape much better.
- The size should be large enough - 35x35 centimeters squares will be required to create the simplest compositions. If the plans are more complex origami from paper napkins, then you can choose products that are 46x46 centimeters in size.
- Any color can be. At the same time, if you plan to create complex origami and clear geometric shapes, then you should give preference to monochromatic products. And flowers, abstractions and some other compositions can be made from models with a picture.
When is it appropriate to decorate the table with napkin crafts

A little bit of "magic" - and ordinary paper will turn into beautiful butterflies
Literally any meal - from a tea party with the family to a dinner party - can take place in a completely different atmosphere if you fold napkins beautifully in a napkin holder. Although in this matter there are certain rules of etiquette:
- for a tea party or lunch, it is enough to put napkins on the table on the plates or make neat compositions under the cutlery or a bowl of fruit;
- for a dinner or a festive table, you can think of more sophisticated compositions - for example, a complex flower, a figurine of a swan or a horse;
- if you are planning gatherings with friends or a picnic in nature, then you can fold the composition with an accordion or fan and tie it with rings for serving - simply and beautifully.
It is especially chic if paper napkins are in harmony or contrast with the color of the dishes or tablecloths.
How to learn to fold origami from napkins

In case of lack of time, you can use special rings - with their help, you can beautifully decorate the table in just a minute
Each hostess strives to lay the table beautifully. But every day, due to lack of time, it is possible only to fold napkins in a napkin holder. Nevertheless, it is worth learning how to make beautiful and unusual figures in order to:
- be able to turn any meal into a festive meal;
- encourage children to sit down more willingly when they flatly refuse to eat.
The best part is that it's very easy to fold a napkin beautifully for serving - just practice a few times, guided by the diagrams below. In the future, it will only take a couple of minutes.
How to fold napkins beautifully: schemes with a description
There are many ways to decorate the table with paper napkins with your own hands. Let's take a look at the step-by-step processes for creating small paper masterpieces.
Origami from napkins for every day

It is easy to make such a “cover” for cutlery even every day. Moreover, you can use materials of different colors, which will diversify the serving.
Original origami for cutlery is very easy to make. In addition, it not only looks beautiful, but also makes it possible to serve cutlery in an unusual way.
The step-by-step process for creating such origami is as follows:
- First, take square paper napkins folded in four layers.
- Then we begin to wrap the ends diagonally in centimeter stripes: we fold the first layer almost to the middle, the second one centimeter less, the third even less.
- It remains to turn the product over to the wrong side to wrap its halves.
Thus, an envelope is formed into which you can put a knife, fork, spoon. And if necessary, the structure can be easily expanded to use the product for its intended purpose.
Graceful flower on a plate

A little workout - and in just a couple of minutes you can fold such festive napkins for table setting
This arrangement is very much like a flower. To create such origami, you can use both colored and monochromatic products, the latter contrast perfectly with multi-colored plates.
Consider a step-by-step algorithm for creating such origami:
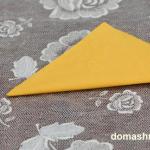
- Take square-shaped paper napkins folded in four layers.
- Then we fold them in a triangle and again in a triangle.
- Fold the halves of the resulting triangle in half so that the lower ends hang down a little.
- The next step is to wrap the hanging ends inward.
- And then fold the resulting triangle in half again.
- It remains to pull the core out of it - it should look like a boat with a mast. And then you should separate the layers from each other to create volume and a beautiful shape of the flower.
Tender rose

Such a rose is suitable for serving both a festive table and a family tea party.
It will take a few minutes to create such a flower. You can even make such roses with children - this is such a simple and quick way to create origami for serving.
The step-by-step process for creating a rose is as follows:
- Fold the square napkin in half to form a triangle.
- Then we begin to twist the canvas into a roll.
- When a small triangle remains, you should proceed to transverse twisting - as if to form a rosebud.
- The last step is to carefully remove the side petals so as not to damage the twisted bud.
Tall cone-flower

When the hostess prepares a festive dinner for guests, the table setting using tall cone-shaped compositions will look especially beautiful
Making tall compositions seems tricky. In fact, it is enough to understand the basic principles of folding volumetric origami and, as they say, fill your hand. The algorithm for creating such a cone is shown in the figure:

- First, fold the paper napkin into a large rectangle. If initially it is packed in packs of squares, then we fully unfold the product and then fold it into a rectangle. We wrap the ends of the resulting rectangle.
- Then, as shown in the figure, we turn the bottom of the figure as well.
- Then we unfold the composition with the other side and fold it into a cylinder, while putting one edge into the resulting “pocket”.
- The final touch is to shape the product to place it on the plates during serving.
Flat flower

It is very simple to fold such a figure - you can master the technique literally before the arrival of guests. But on the dishes it looks very impressive.
It is quite easy to fold such a flower from napkins for table setting. If you make it from products, the color of which contrasts with the tone of the plates, then the composition will look especially advantageous. Step-by-step instruction:
- We unfold the napkin with a diamond and fold all four of its corners in the center.
- After that, fold the 4 corners of the resulting figure to the center again.
- Then we turn the composition upside down and again fold the corners to the center.
- It remains only to make the petals of the flower, for which we hold the figure in the center and carefully pull out the tips.
Video master class: 6 ways to fold napkins
The easiest way to master the art of serving is using a visual example video. Therefore, we suggest looking at 6 ways to create original compositions from paper napkins, given in this video:
Alternative to paper napkin

Fabric products will cost more, but they will last much longer than paper ones.
You need to understand that paper napkins are a disposable product. In addition, their size and paper weight do not always allow you to make such compositions as you would like. Therefore, fabric products look more appropriate on the festive table.
When choosing the latter, the main emphasis should be on quality:
- It is advisable to choose linen or cotton. In any case, the percentage of natural threads should be maximum. Synthetic thread can be in the composition, but in a small amount and only to facilitate fabric care.
- The color of the fabric can be universal - white, light green or with a light floral print, so that they fit different dishes.
- A special chic - napkins, thematically suitable for various holidays and family celebrations. For example, it can be embroidered items or napkins with a print suitable for a certain date - for children, for Christmas, or, for example, for a Halloween theme.
In short, the main thing is the desire to exquisitely decorate the table. Beautiful serving options - the sea. If the hostess really prepares dishes with love and sets the table, then any kind of folding napkins for table setting will be appropriate.
If you want to beautifully set the festive table
, then in addition to interesting dishes, your table can be decorated original folded napkins.
There are many ways to fold both paper and cloth napkins.
After learning about a few of them, you will be able to decorate as everyday and solemn table, thereby creating cozy and festive atmosphere.
Table napkins - "French envelope"
Beautiful napkins on the table - "Bow tie"
How to decorate the table with napkins - "Heart"
Table decoration with napkins - "Rabbit ears"
How beautiful to fold napkins - "Bag"
Schemes of beautiful napkins - "Tie"
Crafts from napkins - "Swan"
How to beautifully fold napkins on the table
1. Flowers from napkins (master class) - "Train"
* Now you need to align the left and right corners of the resulting triangle with its crown.
* Now connect the right and left corners to the back of the napkin and insert one into the other.
* Rotate your shape and drag the upward-looking corners to the right and left.
* It remains only to carefully put the napkin in an upright position.
2. DIY napkin lily
* As in the first case, the napkin must be folded in half diagonally.
* The napkin now needs to be folded in half along the horizontal axis again.
* Fold back the top of the upper triangle.
See also: Paper flowers
3. Crafts from napkins with your own hands - "Megafon"
* Fold your napkin in half.
* Fold the napkin again in the same direction.
* Now you need to symmetrically bend down the sides of the resulting narrow rectangle.
* Turn the resulting shape with the front part away from you and twist the ends so that you get "pouches".
* It remains only to connect the "bags" with each other.
4. Napkins on the table (photo) - "Almaz"
* Fold the napkin in half horizontally.
* Now fold the napkin in half again to make a square (4 layers).
* Peel back one layer of the square and fold it in half to almost the opposite corner, just short of it.
* Peel back the second and third layers of the square in the same style.
* Flip the shape over.
* Fold the left and right corners as shown in the image or video. The main thing is that everything is symmetrical. Fold one end inside the other.
* Turn the napkin over again. Ready!
5. Beautifully fold napkins on the table - "Pinwheel"
* Connect all ends of the napkin in its center.
* Fold the bottom and top so that they meet in the middle of the figure.
* Rotate the shape and fold the bottom and top back down to the middle.
* Begin to bend the tips of your future turntable out of the shape. Do it as shown in the image or video tutorial. The lower left corner needs to be bent to the left, and the upper right corner to the right. The same goes for the rest of the corners.
Video lesson:
6. How beautiful to roll napkins - "Artichoke"
* Place the unfolded napkin on the table with the wrong side up.
* Fold all corners of the napkin towards the center.
* Bend the corners again towards the center.
* Now turn the napkin over and fold the corners back to the center.
* Gently start pulling the tips of the napkin out of the rectangle.
Video lesson:
7. How beautiful to fold napkins - "Handbag"
* Place the unfolded napkin on the table and fold it vertically in half.
* Fold the napkin in half again, this time from bottom to top.
* Fold the top corners of the first layer towards the center (similar to how a paper airplane is going), and fold the resulting triangle down slightly below the base.
* Repeat the same with the corners of the second layer and fold the resulting triangle over the first triangle.
Video lesson:
How to make flowers from napkins
DIY napkin rose
From an ordinary paper napkin, you can make a beautiful rose and decorate the table with it, as well as make something pleasant for loved ones.
The scheme is not very complicated, which means that anyone can make a rose. Here are both a photo instruction and a video tutorial.
Option 1
* Spread the napkin on a flat surface and start rolling it into a tube. To make this easier, grab one end of the napkin with your index and middle fingers.
* One end of the tube must be bent.
* While holding one part of the tube, start twisting the other (larger) part. You do not need to twist until the very end - stop slightly below the middle.
* Gently lift the bottom, not twisted, up to make rose leaves out of it.
* Press down in some places your rose leaf so that it stays in the position you want.
* You can also twist the lowermost part of the flower.
* Tweak the top of your flower to make the rose more realistic.
Photo instruction:
Video lesson:
If it doesn't work the first time, don't despair - everything comes with practice. Practice and you will succeed.
Option 2
How to make a rose from a cloth napkin
A beautiful rose can also be made from tissue napkins, and the process is even easier than paper napkins. You will need two napkins, one green and one red, and a glass.
Option 1
The video tutorial can be found after the description.
First we make the leaves
* Fold the green napkin in half diagonally.
* Now fold in half again.
* If necessary (if the size of the napkin allows), fold the triangle in half again.
Making a rose
* Fold the napkin diagonally.
* Connect the crown of the resulting triangle to its base.
* If desired, you can bend the lower part (the one that is longer) of the figure to the middle.
* Roll the shape into a tube - you get a rosebud.
We connect
* Place the bud into the leaves.
* Place the entire structure in a glass.
* If necessary, touch up the leaves and bud to make them look more realistic.
Option 2
* Fold the red napkin in half diagonally.
* Roll the napkin into a strip.
* Now the strip needs to be twisted into a bud and then tucked into the protruding corner.
* Prepare a green napkin and fold it in half diagonally.
* On the left and right, fold the ends for a couple of centimeters - see the picture. You will have rose petals.
* Place the "leaves" in a glass.
* Insert the red bud into the green leaves.
The table decoration is ready!
Paper napkins can be not only a hygiene item, but also a decoration for any table. Why not create a good mood for yourself and your loved ones by spending a few minutes on origami from a napkin? For a festive table from paper napkins, you can fold real masterpieces in the form of flowers, boats, tents and even butterflies.
It is enough to show a little imagination or choose one of the proposed options in the article. This table setting looks impressive, does not require special skills from the hostess and does not take much time.
The original version of origami napkins for table decoration
Serving option for breakfast and lunch
If during the Middle Ages the napkin was a luxury item and was made of expensive materials, today it is assigned a less solemn role. The first paper napkins were used only in the 20th century after the end of the First World War. They became more practical and were present in almost every home, regardless of status. From that moment on, it became unnecessary to tuck napkins behind the collar of a shirt or dress.
Today, the abundance of colors, textures and styles of paper napkins is able to reincarnate a long tradition of beautiful table setting. A huge number of original ideas and affordable ways of folding napkins allow you to make any breakfast, lunch and dinner festive.

Simple tea drinking and lunch does not provide for complex structures, so it is better to leave the most solemn options for dinner. In the first case, it is worth taking napkins 35 × 35 cm, and for the evening 46 × 46 cm. During tea drinking, napkins are folded under the side of the plate, under guests' utensils, a bowl of fruit or for dessert.
It is enough to carefully fold napkins with an ornament and a pattern, as well as an openwork edge, in a tube, envelope or in the form of a triangle on a plate.
You can use the serving rings or in the handle of the cup, fold the origami napkin like an accordion, and also tie up the dessert spoon.

Napkins folded in the form of cylinders and cones give the table a solemnity.
Do not overdo it with table decoration so that guests do not forget about the direct purpose of paper napkins.

Choosing a color palette of paper napkins

Using several colors at once, you can twist red napkins into roses, and lay out the green ones with leaves in a circle.
If a strict dinner is provided or the interior is made in a high-tech style, then you should take gray or metallic napkins.

Rules of etiquette in the use of napkins

It is indecent:
Spectacular options for origami napkins
Fold the origami napkin vertically in half. The fold goes on the right side. From the bottom up, fold the napkin in half. Then you need to take the 2 top layers in the left corner and fold them towards the center. We do the same with the right corner. Bend the upper triangle to the lower edge of the origami napkin. For the 2 remaining layers from below, it does the same.
Fold the paper napkin face down. Then we bend the corners to the center as in the picture. We turn over the structure and again bend the corners to the center. At the bottom of the origami napkin are non-folded triangular edges. We hold the corners in the center and pull these edges up. It turns out pretty petals.
A beautifully decorated table is the center of any celebration. You can add originality to it with the help of decorations in the form of various figures made using the origami technique from napkins. For serving festive meals, textile and paper work is used. For their manufacture, beginners can use schemes that are widely distributed on the Internet.
Paper is the most common material used for serving a meal. It can be used to make both very simple shapes and complex structures. Even small children can make decoration on the table according to origami schemes from napkins on their own.
Children's table
Origami from napkins for children is made in the form of simple shapes. They can be used to decorate the table during a children's party or a family meal.
 For a cute fish, you need to take a standard square napkin and unfold it completely. Then fold the square twice diagonally, carefully ironing the seams with your fingers. The center points of the sides are brought together to form an isosceles triangle. Each side of it is bent to the center line and returned back, obtaining two symmetrical diagonal lines. Opposite corners of the workpiece are alternately brought to them. All lines are carefully ironed and the craft is turned over to the other side. The fish is ready.
Origami "Shirt" can be used when serving a festive meal for boys. It is very easy to fold it. The napkin is expanded to a large square. Its corners are brought to the middle, ironing the lateral fold lines. The opposite sides of the resulting figure are bent towards the center line. You should get an elongated rectangle.
Approximately 2 cm at the top were made to be folded back. The upper corners of the rectangle are brought to one point on the center line, forming the shirt collar.
The lower corners from the center are bent to the sides. They should go beyond the contour of the part. Then this part of the craft is raised, winding it under the ends of the collar. All fold lines are gently pressed with your fingers. The shirt is ready.
For girls, you can fold tulip flower origami. To make it, you need to prepare 2 napkins (green for the stem and colored for the bud).
 A colored square napkin, without unfolding, is placed in front of you in the form of a rhombus (the open sides should be at the bottom). The lower corner is connected to the upper one, forming a triangle. The right and left corners of the triangle are bent in the opposite direction so that the tips protrude beyond the lateral line. The figure is turned over and a bud is obtained.
The green square is folded diagonally and unfolded back. Two adjacent sides are pressed against the diagonal line. Then the figure is folded in half. The bottom corner is folded up. The stem with the leaf is ready.
Finally, combine both parts of the flower on a plate by placing the tip of the stem in the fold on the bud.
Rose on the stem
A rose napkin flower can be made in several ways. The next method is the most famous and easiest to implement.
A paper rose that you can put in a long glass they are made from an ordinary single-layer napkin according to a simple scheme:

Water lily or water lily
 A beautifully folded napkin using origami technique can be made in the form of a water lily.
For its manufacture, it is better to use thick paper products.
The napkin is fully unfolded and folded into an envelope. It turns out a small square, the corners of which are bent to the center. The workpiece is turned over and the previous steps are repeated. The folded corners are pinned in the center. With the other hand, gently pull the lower corners upward, forming the flower petals. This operation is then repeated with the remaining lower corners. All details are straightened. The water lily is ready.
Modular napkin holder
To decorate the table, you can use an unusual napkin holder made using the modular origami technique. To make it, you will need the following materials:
- 4 green napkins;
- 40 colored napkins (white, red or pink);
- a small piece of wire.
 The green square blank is expanded to a rectangle, which is folded in half, marking the horizontal center line. Four corners are bent to this line. Then the long sides are joined at the center of the workpiece. The resulting figure is folded in half. In the same way, three more strips are folded, which are folded together and fixed in the middle with several turns of wire. The base beams are spread in the form of the sun.
To make a petal, the napkin is folded diagonally. Sharp corners are lowered to form a rhombus. It is turned over and the upper corners are bent up. The resulting triangle is folded in half with corners inward. The angle is straightened, bending the shape in the form of a petal. All other petals are folded in the same way.

To facilitate the formation of the bud, it is necessary to prepare a flat blunt object (pen, spoons or forks). The corners of the petal are inserted into the adjacent rays of the base and tightly shifted to the center. An auxiliary tool is used for this work. In this way, the first row of the bud is created. Modeling the subsequent lines of the petals, new parts are inserted into the adjacent elements of the previous row. At the end of the work, all the petals are corrected, forming a rounded bud.
Figures from textile napkins
 Cloth napkins are a less common material for table decor. But the figures from them look more representative and noble.
For work, it is necessary to select thick cotton napkins that can be pre-starched.
Glass decoration
It is possible to decorate beautifully with the help of figures from napkins not only a table, plates, but also glasses. For example, glasses decorated with irises from cloth napkins will look original.
The starched square fabric is folded diagonally. The corners of the resulting scarf are raised, leaving a small distance between them. The lower corner is wrapped inward and the workpiece is folded in the form of an accordion. The figure is placed in a glass and the petals are straightened.
Romantic origami
In the decoration of a dinner or a wedding banquet you can use textile napkins folded in the form of a heart.

A square cloth napkin is folded diagonally. Acute angles of a triangle are raised to a straight line. Then the two small top corners are folded inward. Two small isosceles triangles should form on the top layer of the napkin. The workpiece is turned over to the other side with small triangles downward. The lower part of the rhombus is folded up. The figure is turned over again and laid out on a plate.
Rose bud

Rose is one of the favorite colors of handicraftsmen. A napkin rose can be made from both paper and tissue napkins.
A square piece of fabric is folded into a scarf. From the side of the base, the triangle is rolled up to the middle. The workpiece is turned over with the folded part down. Taking hold of one of the ends, the workpiece is twisted into a roller. The free corner is fixed between the layers of fabric. Then you need to pull in different directions the corners located at the bottom of the roller, forming two sheets. You can decorate the table surface with the finished craft, place it on a plate or in a glass.
Table decoration is an important element not only of a festive feast, but also of daily meals. Beautifully folded napkins can make a simple family dinner a special occasion.
Do-it-yourself beautiful flowers from paper napkins.
Simple paper napkins give amazing imagination for creativity.
Hand-made crafts serve as a wonderful decoration for home and office interiors, table setting.
Such an affordable material is often used to decorate festive events.
DIY napkin flowers for beginners: diagrams, templates, photos
Humble carnation Fluffy dandelion
 Bright aster
 Delicate poinsettia
  Yellow peony
 Flowers for topiary from napkins: schemes, templates, photos

 An original way of making wood blanks
 Using the proposed schemes for making flowers, you can create wonderful trees of happiness.

 European tree from ordinary napkins
 Happiness tree made of napkin decorations
 Video: DIY napkin topiary
How to make flowers from napkins for a volumetric figure?
To make a figure, 50 cm high, 30 by 10 cm wide, you will need:
- Napkins - 270 pcs.
- Glue - 3 small tubes of medium size
- Cardboard or carton box
- Scissors
- Medium-width scotch tape
- Stapler
Let's get started:
- With the help of scissors, we make blanks in the shape of the desired number. In our example, it is a unit
- We glue all the details with scotch tape

 The basis for an unusual gift decoration
 - We mask the cardboard with napkins, fixing them with glue
- While the workpiece is drying, we make flowers
- Twice fold the napkin in half
- We fasten the center with a stapler
- Cut out the circle
- Raise each petal up to form a flower
- We do not touch the lower leaf, in the future, with its help, we will attach the flower to the base
- We prepare 250-270 flowers
 The next preparatory stage
 - We glue our figure
- It turns out very effectively if you use napkins of different colors.

 This is the kind of beauty it turns out
 Volumetric flowers from napkins - origami
Doing everything clearly according to the scheme below, you get a very unusual and beautiful flower. The main advantage of which is that its production does not require a lot of experience and laborious cutting.
 Using the ancient art of paper folding to make beautiful jewelry
 Lotus flower from napkins
Necessary materials:
- Green napkins - 8pcs (33/33 cm)
- Regular white - 24 pcs.
- Yellow - one 33/33 cm
Manufacturing process:
- We fold the factory napkin without expanding it into a triangle
- Bend the corners of the triangle from the top down

 Step 1
 It will look like this
 - The resulting ponytails, wrap from the back side up

 Step 2
 - Fold in half outward. The first base for the leaf is ready
- We make eight such blanks

 Step 3
 - Using a stapler, we connect the formed greens

 Step 4
 The green base is ready.
- To make flower petals, we make 24 leaves from a white napkin, in a similar way
- We spread over the green base 3 rows of white petals

 Step 5
 - Add diagonally twisted yellow stamens for brightness.
 Step 6
 - If you wish, you can modify the flower by folding several yellow napkins in half, and then twisting them diagonally.

Large napkin flower
Fluffy flowers are irreplaceable when decorating banquet tables and festive premises. Any composition can be created by learning how to make this simple decor.
- Fold a single-layer white napkin with a small accordion. The smaller the step, the more voluminous the flower will be.

 Gently folds
 - We fold it in half. At the ends we form triangles using scissors

 Cut off with a corner
 - We get a blank for the central part of the decoration
 We get a cogged fence
 - We do similar manipulations with a red napkin, only round the edges


 Duplicate all actions
 - We connect both blanks, as shown in the figure

 Combining multi-colored napkins
 - We fasten with a thread in the middle

 We fix
 - Raise the petals gently up
- Thus, we prepare the required number of flowers of different colors.
 Straighten the layers
 - We add the resulting lush flowers to the selected composition.

 Beautiful decor from lush flower blanks
 Flowers napkin applique
A great opportunity to spend joint leisure time with kids 4 - 5 years old, taking up the manufacture of this simple work.
Ancillary material:
- Napkins - blue
- Cardboard - white and colored
- Paper - green
- Brush
- Scissors
- Pencil
Progress:
- Cut wide strips from blue napkins, roll them into lumps
- We take white cardboard, draw bells on it
- Cut out the flowers, glue balls formed from napkins on them
- Draw a twig and leaves on green paper
- Cut out
- On yellow cardboard or thick paper, alternately glue: sepals, flowers, twig, leaves

 Handmade bells
 DIY poinsettia flower from napkins
 Best New Year Gift
 A very elegant and festive flower. It is one of the most popular New Year and Christmas decorations.
Necessary materials:
- Pink and green napkins
- Pieces of white napkin
- Some golden paint
- Scissors
Let's get started:
- We draw on napkins:
- pink - 1 small and 2 medium flowers
- from green - 1 medium
- Cut out

 We make blanks
 - Cut the round petals slightly, in the form of a triangular shape
 Forming the natural shape of the petals
 - Cut green blanks into:
- 2 leaves with two petals
- 1 single
 We divide the green base into separate leaves
 - We glue the flowers, shifting the petals together, leaving no space
- First two medium-sized pink flowers, then a small pink
- Twist the stamens from small pieces of a white napkin
- We cover them with golden paint
- We fix with glue in the center of the flower
- Glue green leaves on the bottom of the flower

 Putting everything together, securing with glue
 - Lovely New Year flower is ready

 Poinsettia from napkins
 DIY flowers from sweets and napkins
Prepare in advance:
- Round chocolates - 5-7 pcs.
- Several pieces of green and yellow napkins
- Toothpicks - 5-7 pcs.
- Narrow scotch tape
- A piece of plastic or cling film
- Scissors
- Plastic cup or any jar for a stand
- A beautiful thin ribbon
Step-by-step instruction:
- We wrap the candy with cling film to get a twisted tail
- We fix the toothpick with tape to the twisted polyethylene

 Packing sweets
 - A napkin folded in four, cut to the same size - 6 by 4 cm
- Twist each workpiece in the center
- We connect the formed halves with each other
- We get such a petal
 Form a yellow petal
 - We wrap the bud with a petal
- We fix it with scotch tape

 We connect with the base
 - Cut the green napkin into 4 parts, each of which we cut into 2 more parts
- Cut deeply and twist the ponytails, as shown in the example.

 Sepals
 - We wrap the flower with the finished sepals

 Delicate, barely opened buds
 - We glue the plastic cup with yellow napkins
- We fill it with foam

 Vase for a bouquet
 - We cut green napkins on wide "noodles", stick on foam
 Additional greens for decoration
 - Decorating the cup with a bow

 Candy bouquet
 How to fold a flower from a napkin on the table with your own hands?
A very simple napkin folding option used when setting the table:
- We close the unfolded napkin so that its two sides are connected in the central vertical line
- We make folds on both sides of the horizontal strip dividing the napkin in half
- We get two even folds in the center of the form

 We decorate the table with flowers from napkins
 - Next, we form an accordion in the direction of the resulting folds.
- We squeeze out the folds carefully
- We grasp the center of the resulting "butterfly" shape with our fingers, fold it into triangles, in the opposite of the formed fold of the triangular side
- Expand the finished serving flower
 Ideal for serving
 Napkin flowers - roses
A very simple option for making roses, for the subsequent formation of various compositions.
- We do it very carefully, using the proposed scheme below.
- We collect ready-made roses in a bouquet or topinarium
 Making a bouquet of ready-made flowers
 - After making many small roses from napkins, put them in a voluminous vase. This will serve as a wonderful decor for a festive table.
 Beautiful decoration with a napkin rose
 Flowers from napkins in pots
Necessary materials:
- Plain napkins
- Ordinary balloon
- Paste
- Scissors
- Stapler
- Clipped plastic bottle or flower pot
Let's get started:
- Inflate the balloon of the desired size. It must fit the volume of the pot in which it will be located
- We stick napkins on it, leaving only the tail

 The ball should be the size of the pot
 - While the ball is drying, we make flowers
- We put two standard napkins on top of each other, fasten them in the center with a stapler
- We give, with the help of scissors, a round shape to the workpiece
- We make about 30 such templates
- We form flowers by lifting each layer up to the center

 For greater splendor, we make cuts along the edges of the form
 To brighten the composition, add colorful napkins
 - We proceed to pasting the dried ball with ready-made flowers
- We apply it very tightly, add green napkins in between
- Putting a colorful ball in a pot
- Decorate with a bow
 Volumetric composition in a pot
 Flowers from viscose napkins
- We start with the manufacture of cardboard forms in the form of petals in length: five, four, three centimeters

 Cardboard blanks
 - We transfer templates to a viscose napkin
- Cut from pink fabric: 7 large and 7 medium petals, one 4 cm circle
- We make 7 small petals from pale pink viscose

 Viscose petals
 - Pour glue on a wide base of a large petal
- Roll the petal inward


- We attach all seven large petals to a round pink base using glue

 Distribute evenly
 - Add a row of middle petals
- We finish with a row of pale blanks, placing between the petals of the previous layer
 The main part of the future accessory
 - From a strip of light pink napkin (2 by 8 cm) we form a core
- To do this, fold the strip in half.
- We make cuts along the bend
- Gradually twist

 We make the strip the size of the desired core width
 We get just such a core
 - For greater expressiveness, we make a border of bright pink color, from a strip of 2 by 8 cm, formed, as in the first case
 Central part of the flower
 - We fix the resulting shape in the center of the blank from the petals
- A wonderful accessory is ready
 Viscose addition to your wardrobe
 Flowers from openwork paper napkins
By themselves, openwork napkins are very beautiful. Using the proposed schemes, you can get very original decor elements.
 Delicate pink bouquet for gift decoration
  Yellow rose for a beautiful table setting
 The napkins can be folded in an original way in a few minutes. And the decorations made with their help look very impressive.
Video: How to make beautiful flowers from paper napkins with your own hands?
We also recommend
 Ideas for decorating a table with origami products Origami from napkins flowers light with diagrams
 Knitting for beginners is the easiest
 Knitting for beginners: schemes with a description
 DIY patterns of summer dresses and sundresses: a master class for beginners
 Alginate mask: affordable recipes at home
 How to close loops for snood