How to make paper kusudama. Kusudama made of paper, schemes for making a magic ball
One of the most pleasant chores is decorating the house for the New Year. In this business, you always want variety, find and try something new. An excellent solution would be kusudama balls - "medicine ball" if translated literally. Kusudama is a creation modular origami, whose history goes deep into the past.
Once upon a time in Japan, collected flowers and plants, sometimes incense, were placed in such balls. A lot of time has passed and now these crafts are used as gifts or decorations. They are made of paper by folding the modules and then connecting them.
To make a standard paper ball you will need:
- paper;
- scissors or knife;
- glue;
- threads.
Although more modern masters also invent such types of kusudama that do not require cutting or gluing, and the threads for them are required exclusively for hanging. The simplest and most New Year's kusudama is “Icicles”. You can pick up glitter paper for it, then the finished product will shine and sparkle in the sun - just like real ice!


The variant is a little more complicated - “Blooming icicles”. The beginning of folding the modules is exactly the same, but at the final stage in this version they are given a large opening. A very beautiful and lively decoration option! You can also choose a suitable pendant for the colors of the paper and attach it to one of the ends - this will visually lengthen the ball and add new colors. 

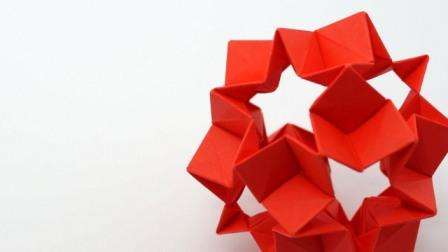
More “twisted” model “Talita Star”. Making such a kusudama is not as easy as the previous ones - it takes fourteen steps to fold one part. But the "Star" looks brighter and gives out in its author a real master.


If the idea is to make paper balls I liked the tree, but there is not much time, the way out of the situation can be “Mandala Karl”. Unlike previous models, which require thirty component parts, the Mandala is assembled from only eight. Plus, they fold and connect with ease. The product looks more pointed, which gives it a certain charm.
Another option of thirty modules is “Little Roses”. If you choose paper in warm colors for them, you can get a very delicate and cute decoration at the exit. Such a “rose” will be the perfect decoration for the New Year's decoration in the apartment of a couple in love!


For those who like bright and stylish things, you can try to make "Little Island". For him, too, thirty blanks will need to be folded, but the result of the assembly will seem to be the very reflection of the creative, especially if you choose restless colors. A great option for young people.


Kusudama "Clover" will require some endurance and perseverance when folding. However, efforts will not be wasted - such a ball looks incredibly beautiful and technologically advanced.


The aforementioned “Small Roses” can be made more realistic with curling corners. This variation looks more like a flowering plant. Its difference is in the blanks for the modules - at that time they were rectangles, here squares are used. A good find would be to make “Roses” in either technique, and alternate them when hanging.


It is pleasant to look at an apartment decorated for the holiday, but it is much more pleasant to know that the decorations are made by hand. Origami art - like any art - is capable of giving this joy. Made kusudama balls can be presented to friends and family in order to convey to them a piece of your joy and holiday atmosphere!
Kusudama is a volumetric figure collected from a large number paper modules... This art movement originated in ancient Japan, when kusudama balls were used to mix dry herbs and incense. Today, these balls are popular among designers and handmakers who use kusad for decoration interiors.
Simple kusudami schemes for beginners
It is believed that kusudama is a kind of origami, although in reality this is not entirely true. Distinctive feature true origami is that no glue is used to fold the paper. But the modules with kusads will have to be glued together to get a three-dimensional figure.

Photo of assembly by kusudami
One of the simplest types of kusadami is called, which means "cookie cutters". Its elements resemble iron forms, which were used to squeeze out the figures on the dough before. In order to make such a shape, you need to prepare 30 identical squares of paper measuring 7 * 7 cm. Give preference to thick paper so that the shape holds well. Read making from simple modules, which are then connected to each other.
How to collect kusadama flower look at the assembly diagram for beginners:

Kusudami assembly diagram

Simple kusadam diagram
You need to bend the side corners and you will end up with a rectangle from a square. Fold the lower right corner up, bending it so that it forms the side of the parallelogram.
Building the Cookiecutter step by step in the diagram:

Bend the upper left corner down. As a result, you will get a full-fledged parallelogram. Now you need to hide the corners with the pencil inward.
After that, the module is turned over, folded in half and diagonally. A double triangle should form inside the module. It remains to bend the corners on both sides up and the module is ready. From all the squares, you need to make such modules, and then collect them into a Cookiecutter kusudama ball.
Watch the video: Cookiecutter kusudami master class
Master class with a photo: a ball with kusudama flowers
Original and bright decoration paper can be made not only by an adult, but even by a child. You need to prepare the following materials:
- Colored paper
- PVA glue
- Scissors
- Ruler
Cookiecutter assembly diagram
One ball will consist of 12 ready-made flowers, each of which is assembled from small modules. Slice colored paper into squares measuring 7 by 7 cm. Since you need to use five squares for one flower, you will need all 60 squares. You can make them different colors or combine 2-3 colors.

Kusudami assembly diagram
Each square is folded diagonally twice to create clear lines and a center. Fold the square diagonally into a triangle, and then fold the edges towards the center to form a diamond.
Now you need to unfold the corners and bend each of them inward. As a result, the triangles will decrease and you will get a figure as in the photo. It has three leaves, so it can be called a shamrock.
Fold the corners of the resulting trefoil, and then fold the module so that the triangles are inside. Press down only the edges to make the figure three-dimensional. You have one module ready for making a kusudama flower for beginners.

When you have made several of these modules, you can assemble a flower from five. Connect the modules together with glue so that they hold well.

Photo of balls by kusudami

As you can see schemes for assembling kusudama balls simple enough for beginners, so you can make original shapes. Master new techniques of the art of working with paper and do or to decorate the interior of the school, kindergarten or at home. Kusudami is not just an art, because with its help you can unleash your creativity. Working with small modules has a positive effect on hand motor skills, so try making kusudama balls with your children.
Kusudama is the Japanese art of making paper jewelry. it creative activity accessible to people of all generations and statuses. All you need is to show your imagination and make a beautiful decor element. If you are a creative person and are not afraid to learn something new, then you can try to make a small craft, for example, a kusudama ball made of paper. The magic ball, the schemes of which can be easily found on the Internet, is done very simply and quickly.
General information
The art of making paper decorative elements came to us from Japan. In this country of children from the very early age teach how to make paper animals, birds, lanterns and other figures. This not only develops their creativity, but also teaches them to be accurate and calculating. Adults don't mind this kind of entertainment either. They gladly take a piece of paper and begin to come up with various figures.
This art form has become very popular due to its affordability. The work uses a minimum of materials and tools that you can easily find in your apartment or buy inexpensively. Ready-made crafts can not only decorate the interior in an original way, but also become a good gift for a person close to you.

The art of kusudama itself is a variation of the well-known origami. It provides for the manufacture of a figurine-ball from modules glued together (in most cases, they are flowers made from a square sheet of paper).
If you have at least an hour, you can keep it busy with paper origami art. Kusudama balls can not only decorate the living space, but also calm the nerves and also lift the mood. Researchers in Japan and different countries Europe have proved that kusudama and other origami varieties have a beneficial effect on human attention and memory. Passion for this art improves the well-being of people of all ages.
Before making the kusudama magic ball, you need to choose all the right necessary materials and choose one of the varieties of this art. Kusudama is not limited to strict frames and can be performed using various figures, shapes and shades of color. The modules that make up the finished figurine can be made in different style and gather in all kinds of flowers. The attractiveness of the appearance of the finished origami ball made of paper depends on these parameters. Schemes and varieties can be as follows:

The most commonly used is the classic kusudama. It is based on triangles from which the module is created. With their help, an original and very beautiful ball... At first glance, it may seem that making such a craft takes a lot of time and effort, but this is not the case. Classic ball done quite simply and quickly. Everyone who takes their first steps in origami is advised to start acquaintance with art with them.
In addition to simple and accessible schemes for everyone, there are more complex ones, for example, a kusudama flower. Such a craft takes much more time and is done after obtaining certain skills in the manufacture of simpler figures.
There are many ways to make an origami paper ball. All of them are simple, but they require tolerance and accuracy. If you do everything right, then the finished product will turn out to be original and unusually beautiful.
One of the most unusual is the openwork ball-kusudama. This paper craft will be a wonderful decoration for your apartment or office. Such a ball can be hung in any corner of the room or decorated with it. christmas tree... To make it, you will need the following materials and tools: 30 paper strips white and of blue color, strong thread for knitting, PVA glue.
The process of creating an openwork ball is simple and consists of the following steps:

This craft option is perfect for inexperienced needlewomen. You can involve your children in working on the ball. This will not only help them develop fine motor skills, but also will allow you to show your imagination, as well as creativity.
To complete the work, you will need the following tools and materials: 30 squares of paper of any color, decorative tape, glue.
Such a figure is made as follows:


Bells are popular with most flower lovers. It is very easy to make them out of paper and combine them in the form of a ball. For a beginner, this technique will seem complicated and obscure, but if you go into the details a little, all difficulties will be eliminated by themselves. To work on such a ball, you need: 60 squares of paper of any color, paper clips, PVA glue, bead big size, thread for knitting.
Detailed description of making the ball:

The floral theme is one of the main themes when creating a modular kusudama ball. She is characterized by bright colours and shades of materials from which the product modules are made. The finished result turns out to be colorful and cheers up everyone looking at it. To work on such a craft, you need: a sheet of colored paper, a pencil, scissors, PVA glue, a ruler for drawing circles.
This is done original decoration in the following way:

The kusudama technique is becoming more and more popular every day. Manufacturing paper crafts from simple and accessible materials captivates handicraft lovers around the world. This creative process allows you to make the most of your time and create original product that you can use to decorate your apartment.
Attention, only TODAY!
What can you achieve on the way to realize your extraordinary fantasy? After all, with your own hands it turns out to create unusual and amazing things. For example, kusudama flowers will be an excellent decoration or gift that will keep the warmth of the creator's hands. Do you want to try to make something amazing out of scrap materials? In this case, kusudama for beginners is just what you need.
A bit of history
Translated, the word "kusudami" means "healing ball". Kusudami are used in the countries of the East as amulets that protect the house from troubles, diseases and evil spirits. Kusudama is a craft made of several identical origami figures that are glued together.
For the first time, such decorations appeared in Japan and were made not from paper, but from plants and flowers and were used as incense. Then they began to use paper to create them. Traditionally, kusudami were made in the form of a ball, inside which were placed dried flowers, incense or incense.
Kusudama for beginners is a great way to relax, unwind, stretch your hands and create a cute DIY jewelry piece.
How to make kusudami?
There are many variations on how kusudama is done for beginners. The diagrams presented in this article are quite detailed and simple to implement, they require a small amount of manipulations and details.
Let's start by doing simple flower arrangements... To make it you will need:
- Pencil.
- Ruler.
- Paper clips.
- Scissors.
- Glue.
- High-density colored or white paper.

Progress
The kusudami flower will become a beautiful decoration for an author's postcard or wedding invitation. But a ball of these colors looks just amazing! Let's take a closer look at how to make such a wonderful piece of jewelry.
First you need to prepare squares of colored paper with a side of 8-10 cm. You can take ready-made squares from the block for notes, which are sold in stationery stores. Let's take the first square and start working with it. It folds diagonally to form an equilateral triangle.
Then the left corner should be bent up towards the center so that its border goes along the center of the triangle. Bend the right corner in the same way.
After that, the first corner should be folded back and expanded as shown below. The second unfolds in a similar way.

As a result of the manipulations, you got sash parts with corners on top. These corners need to be folded to align the borders with the edges of the paper. A bend is formed in the center of each sash, along which each part must be bent inward. You now have the first blank to start the kusudama with. A flower for beginners in this technique is performed as follows.
The resulting rhombus must be bent in half and glued so that the sashes are connected to each other. This will be the first petal. In order for the petals to stick better, they should be secured with long paper clips and grease the gluing place from the inside of the petal with glue stick.
Now it remains only to make five such petals and glue them together. To make a ball, you need twelve of these flowers.

When gluing the ball, work carefully, from the center in a circle. In this case, it is important to ensure that the glue dries well and securely fasten the parts together. finished product... First you need to make one hemisphere of six flowers, then the other. Only after the glue dries well can both hemispheres be glued together.
This is how the simplest kusudama is made easily. Assembly diagrams for beginners are suitable even for those who have never assembled origami, but really want to learn how to do it.
More about paper
Any thick paper weighing about 80 g is suitable for creating with bites. Using paper from blocks for notes will save you time on preparing the squares. Blocks come in a variety of colors. But if you want to make a bigger ball, you can use a colored or even dense wrapping paper- here you can fantasize.
What to look for to get the perfect origami kusudama? For beginners, the schemes presented in the article are quite simple. But there are some more tips for beginners to help you achieve great results:
- You need to take it seriously, but you shouldn't take the biting process to heart. First of all, the activity should bring joy. The first time, the result is not always pleasing to the eye.
- Relax, enjoy the process and just relax. Skill will come with experience.
- All steps should be taken sequentially. First you need to make one element, then the second, the third, and so on. You should not make blanks first, and then materials for connection, so as not to get confused.
- To create with bites, you should use thick paper, since thin paper can get wet under the influence of glue.
- You can use a good glue stick to make the process easier and reduce the annoying drips.

How to turn kusudami into an elegant decoration?
You should definitely experiment with decorating the balls with kusuds. The highlight can be the use of single-sided colored paper. A product decorated with beads looks very impressive. To hang the finished ball, a regular thread is used, which is attached from the bottom with a button. Beads are also suitable for fastening, or you can make a thick knot and tie the brush close to the ball. Another option is to do long tail, decorated with beads, and tie a small tassel to its end. Such a product will be a great decoration for your apartment.
When kusudama for beginners is perfectly mastered, you can move on to more complex and interesting schemes.
Japanese origami has long been popular among the population of different countries. This technique allows you to create stunning masterpieces from plain paper. Moreover, it is not so difficult to learn, almost everyone can make simple fakes. One of the directions is spherical models, which are assembled by gluing different figures... This technique is called kusudama. For beginners, it is perfect.
Kusudama appeared in Japan many centuries ago, even at the time of serving the cult of the Sun, it was used in various rituals. The sun was depicted as red carnation balls with medicinal herbs inside ("kusuri" in translation - medicine), which were hung on the four cardinal points. This tradition continues to this day, and kusudama can be seen at every Japanese festival.
But there is another theory of the origin of this word, but it is also associated with medicinal properties... Earlier, the medicinal fruits of the camphor tree ("kusu" in translation - camphor) were invested in fakes and placed in a room in order to free it from harmful microorganisms and disinfect the room as a whole. It was believed that the scent of camphor is able to heal human body and soul.
But, wherever the story begins, in any case, it is associated with treatment, which means it will be useful to know how to make kusudama on your own.
Preparation for work
Before you start creating a masterpiece, you need to take care of the set necessary tools and materials. As already clear, the most an important milestone selection of paper is considered.

It can be absolutely anything, moreover, at the very beginning it is best to experiment on ordinary colored paper, with which children work in creative classes.
After the technique is more or less mastered, you can look for a professional basis in the city's shops or use the glossy pages, they will give the future ball an individuality.
Of course, you can't do without sharp and adhesive objects, as well as decor. Necessarily needed:
- scissors;
- PVA glue;
- a spool of thread of a suitable or contrasting color;
- needles;
- beads, ribbons, sequins, buttons, etc.
 By the time the material is prepared, the idea of the future product should already exist; you can search for kusudama schemes in pictures for beginners using the Internet or books. Most often, balls are collected from separately made various modules, for example, a bell, a lily, a rose, as well as sakura flowers.
If there are no ideas at all, then you can use the classic scheme, which has been known for many years.
Classic version of the product
To make a classic kusudama ball scheme for beginners, you will need 24 sheets with equal sides, in other words, squares of paper. They can be either the same color or contrasting. You also need the tools listed above. The assembly of a magic item begins step by step with the folding of the constituent parts or modules. For this:
- Take one square and fold it in half diagonally to form a triangle. Its sharp corners are bent into the center so that the result is again a square.
- Further, the folded corners are folded back from the center, while maintaining their shape.
- With the help of a finger, the triangles obtained on the sides are straightened so that the center line of each is extended to the surface.
- The protruding parts of the triangles are bent to the center from the top to the sides so that the lower part again takes the shape of a square, after which two wings should turn out on both sides. Glue is applied to one of them and the figure is fastened in a semicircle with paper clips or a clothespin. 24 more elements are made in the same way. In the photo, the diagram looks like this.

After each petal is ready and the glue is dry, the origami flowers are harvested. They consist of 4 modules, but you can use more if you want the figure to be more voluminous.
At the final stage, you should get 6 flowers that connect to each other. Four in a circle, and the fifth and sixth above and below. The classic version is ready. Of course, you can also decorate the ball with decor, if there is such a desire.
Usually, when getting acquainted with the technique, they start with the classic kusudama schemes for beginners, because they are the easiest to understand.
But this does not mean at all that they are less beautiful, so you should not immediately chase after complex options, but you should pay attention to simple products.
Master class balloon Butterfly
Another good and uncomplicated version of the paper kusudama ball scheme for beginners is a butterfly. It is very beautiful and is said to bring happiness to its owners. It differs from the classic version in that in this case, not squares will be needed, but rectangles, and the smaller side should be related to the larger 1: 2. For a more original performance, it is better to use in equal parts plain paper and corrugated. Thus, you need to prepare 30 sheets of both. Start with a strip of plain paper:
- Fold an even rectangle in half, then unbend and bend the upper left and lower left corners to the center.
- Next, the corners are folded towards the center again so that the result is a rhombus.
- Free opposite corners are bent in half. The resulting rhombus is folded in half in a triangle, after which the product is returned to its original state and proceeds to work with the corrugation.
- The sheet is folded in half with the wavy side inward. Further, the two sides are bent to the middle, two rectangles should be visible from above and one from below in the center. The lower right and upper left corners are evenly folded.
- Now they start assembling the module. On the first blank, the second is laid in the center and the lower part is folded along the pre-marked lines to fix the corrugation.
- Before the last fold into a triangle on corrugated paper apply glue and fix until dry. We can assume that the first module is ready, and the remaining thirty pieces are also added.
- The final stage, as always, is the general assembly. In more detail, all the steps can be seen in the image.

The main thing is not to forget to glue the tape or thread in the center if you plan to hang the figure... Additionally, the butterfly can be decorated with rhinestones and sequins, but you don't need to get carried away much, because the resulting masterpiece already looks wonderful.
Origami kusudama is a rather interesting hobby that can be mastered with children, and the ball patterns presented on the network will help you acquire a new hobby on your own and simply.
We also recommend
 Rules for grinding and wet-heat treatment of garments
 Building a pattern for the basis of a dress: Italian technique as the easiest way to make a good pattern
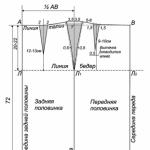
 How to build a dress pattern base
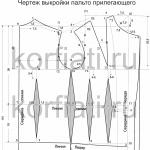 We model and sew coats!
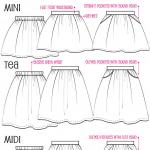
 Skirt of the year, construction of a pattern
 Fashionable children's skirts from old jeans - patterns and description