Knitting bouquets. How to crochet flowers - patterns, technique, unique photo ideas
Knitted flowers have become very popular. Crochet flowers, then decorate clothes, hats, use them as keychains for a phone or a backpack. Highly beautiful bouquets can be created as a gift: flowers as decoration will please any girl or woman!
In the photo below you will find a lot of options for using such an accessory. But, besides this, a simple mk (you can watch videos on YouTube for free) will help you figure out how to knit correctly, a detailed lesson with a description and useful understandable patterns will be very useful for beginners! So let's get started!
How to crochet a flower for beginners?
To tie beautiful flower relying on diagrams with pictures is very simple. You can not only choose the desired color, but also the flower itself: lilies, roses, chamomile. Such products can not only act as a separate composition, they can be used as a decorative element. By the way, when knitting, you can use beads for decoration or beads to create unique designer jewelry.
Crochet flowers video
In this master class you will learn how to knit the simplest flower for beginners in this type of needlework. We need yarn of two colors: yellow for the middle and white for the leaves. Of course, you can do the work with one color - then the middle will not be visible.
So, we need very little yarn, you can use the leftovers. And also - hook number 3. 
- 1 R .: 5 S. B. N. in the amigurumi ring.
- 2 R .:(2 V.P., P.R. from S.S.N., 2 V.P., S.S. in the same P.) * 5.
Thus, the number of S.B.N recruited at the beginning
... corresponds to the resulting number of petals. If you want not five, but 6 petals - dial 6 С.Б.Н.
Thus, we got beautiful flower, which can be sewn on top of a children's panama hat, make a brooch for clothes out of it, decorate a children's hat or a small knitted amigurumi figurine, as in the video tutorial below. What to decorate - you choose yourself, but how to correctly tie such a flower will tell our video:
Popular articles:
Crochet flowers in stages
In the master class above, you have already learned how to knit flowers from 5 petals. And now we bring to your attention cute flower of eight petals
... This is a very practical option, it can be used to decorate hats, as a brooch or to decorate gift wrapping with it. 
We chose saturated green shade from which to tie 10 V.P. and closed in a ring with the help of S.S. 
- 1 R .: 3 V.P.P., 23 S.S.N., S.S. at 3 P.P.
- 2 R .: V.P.P., 8 arches from 3 V.P. (AR.), Each AR. Secure S. B. N.
- 3 R .: 3 VPP, in each AR. - 2 S.S.N., V.P., 2 S.S.N., S.S.
- 4 R .: Let's start with the petals. Under V.P. m / at S.S.N. - 7 S.S.N. Start the very first column with 2 V.P.P.
- Our beautiful element is ready!
Crochet flowers patterns and descriptions
With a crochet and two knitting needles, you can knit absolutely any elements, napkins, make a beautiful thing with a pattern. The main thing is to make your work enjoyable! For beginners, we recommend trying crochet flowers. Any needlewoman can handle them!
Crochet crochet potted flowers with a description
Flowers in a vase will be an excellent gift. They will decorate the interior well!
We chose yarn " Iris»Pink, yellow, brown and green colors.
Our work begins with knitting a vase. For her, we take the hook number 0.9. We dial in a brown shade 5 V.P. in the circle of S.S. 
- 1 R .: V.P.P., 11 S.S.N .. close S.S.
- 2 R .: 3 V.P.P., S.S.N. in 1 P.P., (2 S.S.N.) * 10. It will turn out 12 times in total. S.S.
- 3 and 4 R .: 3 V.P.P .. 2 S.S.N. in the next. S.S.N. prev. R., (S.S.N. in the next. S.S.N. S.S.
- From 5 to 16 R .: 3 V.P.P., S.S.N. in S.S.N. prev. R., S.S.
Flowers we make in the amount of 12 pieces. We dial 6 V.P. in pink. in the circle of S.S.
1 R .: 6 V.P., 3 unfinished S.S. 2 N., knitted together in a ring, 5 V.P., (S.S.N. in a ring, 5 V.P., 3 unfinished C .C.2N., 5 V.P.) * 4. S.S.
Middle of the flower in the amount of 12 pieces: dial 3 V.P. in yellow. in a circle. 1 R .: V.P.P .. 10 S. B.N. S.S. Leave the thread 20 cm - cut the rest.
Stem(12 pcs.): Wrap a piece of wire with the yellow yarn we just left. Smear with pva glue - m on top.  6 pieces of leaves: in green we dial 12 V.P.P. 1 R .: S. B. N., 9 S. B. N. in the next. 9 V.P., 2 V.P., 8 S. B.N., in the next. 8 V.P. 2 R .: V.P.P., 7 S.B.N. in the next. 7 S. B. N. prev. R., 2 S. B. N. in the arch, 2 V.P., 2 S. B.N. in the arch, 8 S. B. N. Then we continue according to the scheme of direct and inverse R.
We collect neatly, all details starch, put the vase on some form, preferably a palstic one. Such crocheted flowers in pots will look very beautiful on your desktop near your computer.
Crochet roses
Another master class with a video tutorial on knitting roses made of pink thread. We dial 48 V.P.
- 1 R .: S.S.N. in 4 P., (we skip P., S.S.N., V.P., S.S.N.) - to the end.
- 2 R .: V.P., (2 S.S.N., 2 V.P., 2 S.S.N.) - in each arch. We turn the canvas over.
- 3 R .: V.P., 7 S.S.N. into the arch, S. B. N. - between them.
Cut off the thread, leaving 5 cm, insert them into the needle, sell them in the loops of the typesetting chain. We pull together. If the description seemed too complicated for you, we suggest looking at a simple video tutorial.
Volumetric crochet flowers: schemes with a description of the master class
Most often, voluminous flowers become such due to knitting using lush columns.
How to do it correctly - you will learn now! So, a flower with lush petals begins with choosing a crochet hook (we have number three) and yarn (red, 100% cotton).
Legend:
- V.P.P. – air loop lifting.
- S. B. N.- single crochet.
- S.S.N.- double crochet.
- S.S. – connecting post.
- PST- lush column.
Knitting description:

Now we will describe in more detail the knitting process itself PST: we start as S.S.N. (N., P. pull out), do 2 P. (total 2 P.), repeat 1 more N., take P., knit 2 P. (total 3 P.), finish knitting 3 P. (6 items in total). We tie together 5 P., then those 2 that remain.
Let's make one more volumetric flower.
It will differ from the previous one in that it will multi-layered... For him, we took a finer yarn and a smaller crochet hook. 

Crochet crochet flowers master class video
In the master classes below, we will show you how to create unique masterpieces!
Crochet flowers for decoration - crochet accessories
Often needlewomen knit flowers not as an element. decor
, but as an accessory for to sew on baby hats or jackets
... Today you will find patterns and descriptions of knitting just such flowers! 


How to crochet a flower on a hat?
Volumetric rose on a hat made of red thread .

Thus, the rosette turns out to be very volumetric and beautiful and very suitable for headdress decoration! 
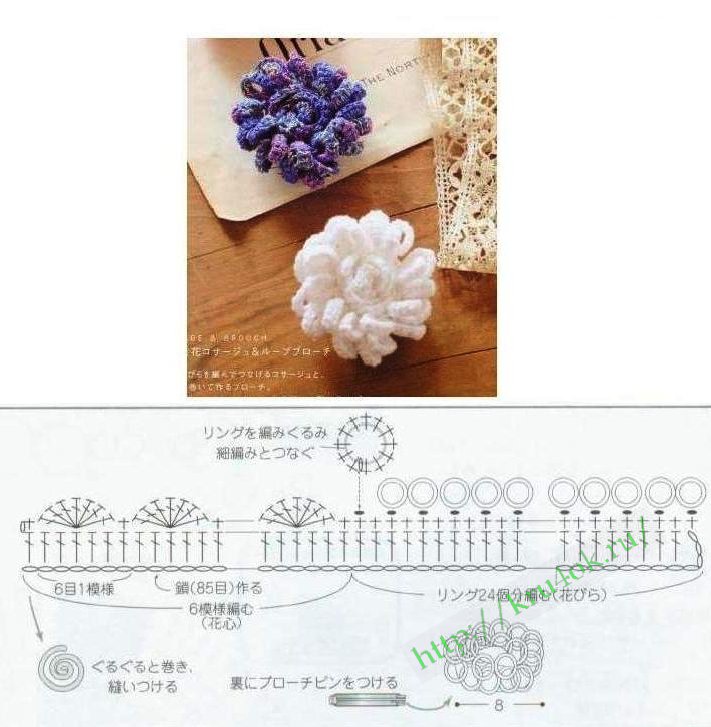
Jewelry for clothes
We suggest making a beautiful brooch for clothes
of related pansies
from dark purple and lilac yarn. It will take a little more yellow color for the middle of the flower. So, take the hook number 2. We make a ring from VP, then we knit according to the scheme. 
 Another option, already more difficult for experienced needlewomen with the description in the pictures.


Good afternoon, today I want to show you how you can create flowers with your own hands using the crochet technique. I have collected in this article the simplest and most understandable lessons crochet flowers. Today we will knit lilies, daisies, poppies, pansies, orchids, and I also prepared an article on crocheting roses (in full bloom and in buds). I'll show you the tying method narrow petals, I will give schemes c vets with oval petals, I'll tell you how to tie volumetric flower with multilayer petals and much more This article is addressed not only to advanced masters, but also to beginners in this business. So I will explain as detailed and understandable as possible even for the most novice hookmakers.
Here I will consider several ways to create flowers at once crochet. And in. But before I start giving diagrams, descriptions, and instructions - I want LOVE you with this idea. I want you to understand how beautiful flowers can be, crocheted... I want to show what opportunities will open before you when you understand that you can crochet any flower and even from a photograph (without a diagram and description) understand in what technique it is connected.
So, let's see what prospects the ability to crochet with a variety of flowers opens up before you.
FOR WHAT PURPOSES flowers are knitted
(which can be decorated with crochet flowers)
Knitted flowers can be used as table decorations.
They can be simply put in the center of each plate (as in the left photo below) or decorated with a knitted flower napkin ring (right photo below),

Knitted small flowers can decorate a greeting card (of course, the size of the threads and the crochet should be chosen smaller) so that the made flower is suitable in size for our greeting card... Also with such knitted flowers you can decorate gift wrapping - tie with a cord and glue the crocheted flower on top.


Your first knitting of the simplest colors can be used as a bookmark for the book you are reading.

Knitted flowers can be used as decorative elements for knitted jewelry. For example, in the photo below we see wide crochet bracelets, decorated with flowers of the most different sizes and flowers.
When you understand how easy it is to crochet a flower, you will be able to believe in your ability to knit such bracelets.

Crochet flowers can decorate a hand-made bag (as in the photo below).

And even if you knit flowers small crochet and with thin threads, it turns out a work of gem quality and such flowers can be used as part of crocheted costume jewelry.

The ability to crochet flowers can also come in handy when decorating a wedding. From knitted flowers you can lay out this volumetric flower heart(as in the photo below).

Also the bridal bouquet can be crocheted. This is a good alternative to live flowers. A bouquet that will never fade and will always be kept by the one that catches it in flight.

You can do gift bouquets crochet do it yourself for family and friends.

Knitted volumetric flowers are used as a decoration on hats and caps for girls.

So I liked the idea of decorating not only hats with knitted flowers, but also caps with a visor. Beautiful bright headdress for a gentle girl.

The colors you knit can be used in home decor too. For example, decorate sofa cushions with them.

Or you can make such a developmental rug for your child (or a cushion for a stool).

You can put knitted flowers in a frame in the form volumetric elegant panel paintings. And decorate the living room with them. Here are some pictures that illustrate this idea in the most convincing way.

Well, now that you have already seen the full potential of the beauty of knitted flowers, let's start our work and create our first crochet flower. We will start with the easiest flowers to make, and then we will make the schemes more complicated.
So the simplest crochet petal flower.
HOW TO CONNECT
THE SIMPLEST FLOWER
(for beginners)
The most simple circuit flower - this is the MIDDLE(a ring of air loops, tied with posts) + PETALS(alternation of low and high columns).
That is, to make the petal in the form of a SEMI-CIRCULAR SHAPE, we knit low columns along the edges of the petal, and high columns with a crochet in the middle of the petal.

Often, in a simple flower, PETALS look like pillars with a crochet, knitted IMMEDIATELY SEVEN PIECES in one air loop bottom row(as in the photo below). The end of each petal is a connecting stitch (similar to a single crochet, but only with an instant single crochet stitching the entire stitch).

Having learned how to knit a FLOWER ON THIS SCHEME, you can use this skill to create cute little things for your daughters or nieces. For example, such knitted sandals for children.

And if we want there to be a HOLE in the middle of each petal ... then the petal row must be started as a SERIES OF AIR LOOPS, connected around the middle-circle. (In the diagram below, this hole-forming row is highlighted in red).

This principle is ROUND MIDDLE + PETAL from high and low posts IS THE BASIS ALL PETAL FLOWERS. And each new crochet flower pattern is a slightly complicated version of this principle common to all flowers.
Here in the photo below we have the same principle of tying a flower, but slightly modified (there are teeth added along the edges of the petals). One additional detail to the GENERAL PRINCIPLE OF THE SCHEME - and we already get a flower of a different shape.

VOLUME FLOWER crochet
(how to knit layered flowers)
Many crochet flowers have more than one layer of petals - when the petals bigger size peek out from under the smaller ones.
Here in the photo below we see an example of such a voluminous multi-tiered flower.
(front view + back view)

Here I am attaching the MASTER CLASS in step by step photos... This tutorial shows exactly how these circular petal layers are created. Each layer-layer of petals tied with threads different color, so that it is overhead to see how and what to do in order to tie a volumetric flower.

And now that we understand the basic principles of knitting simple flower, let's start COMPLICATING THE PROBLEM. And consider the flowers more interesting.
ANYUTINA EYES crochet.
Simple description
FOR BEGINNING MASTERS knitting pansy flower (see photo below).

It also fits simply - a round middle of chains (tied with connecting posts). And the petals - with high posts in several yarns.
This flower has knitting in 3 steps.
The first stage is to create the middle (yellow chain, tie with connecting posts). Then tying the middle with dark violet ..
Second stage - 2 purple petals are knitted (first, 2 arches of air loops - in the upper part of the core) And then over each of the two arches we build up the petal itself (columns with two crochets on the sides and with three crochets in the center of the petal).
The third stage - we knit three light petals - usually like other petals (the main thing is to divide the middle circle itself INTO THREE EQUAL PARTS - and tie each of the parts in the shape of a petal.
Pansies can be tied and according to a different scheme - like in the photo below.

Or you can come up with your own design and crochet this flower. (examples in the photo below).

The next simplest flower is the daffodil.
How to tie flowers
crochet daffodils.
Here in the photo below we see on what basis the daffodil flower is connected. Here first knits yellow (or orange) MIDDLE CUP… And then petals are gathered from the DONYSHKA of this middle.
Each petal is columns with a different number of crochets... on the edges of the petal, single crochets - and the closer to the center, the more crochets on the column. And in the very center of the petal there is ONE AIR loop (so that the petal has a sharp corner).

For example, a description of knitting such a petal may look like this - connecting column + st. without crochet + st. with crochet + st. with two yarns + st. with three yarns + one air + st. with three yarns + st. with two yarns + st. with one crochet + st. single crochet + connecting column. That is, first we go in an increasing number of yarns - and after the center of the petal we go to diminish yarns in a column. And we get a pointed oblong daffodil petal. (from the left photo below).
And if we want to tie daffodils from the right picture in the photo above, then the description of knitting a petal will look like this:
FIRST HALF PETAL(going uphill)
connecting column + 2 vozdushki (for lifting) + st. with crochet + st. with 2 nakids + st. with 3 yarns + st. with 4 yarns + 2 air vents (for a small corner at the top of the petal) ...
SECOND HALF PETAL(we go downhill, therefore the same alternation, but in reverse order)
Art. with 4 yarns + st. with 3 yarns + st. with 2 yarns + st. with yarn + connecting
Highly funny idea to give someone a bouquet of live daffodils, among which voluminous knitted flowers are unobtrusively lost - I think the gifted person will not immediately notice that not all flowers are made by the hands of nature.

How to crochet
LANDY FLOWERS
And since we have already learned how to knit a central cup for daffodils, we can also knit a bunch of lilies of the valley - the cups of lily of the valley flowers are knitted just like the cups inside a daffodil. We also knit in a circle ... and add so many loops so that our circle is not flat, but wrapped in a deep cup.
It remains only to tie wide lily of the valley... Below in the photo I am attaching a knitting pattern for a lily of the valley leaf.

And here is another knitting pattern for a lily of the valley flower ... Already with a large number of rows in the calyx, because the threads are thin and the size of the hook is smaller. But the principle is clear from the photo, without any schemes - we knit a cup of a flower and along the edge of the cup we knit small ARCHES OF LACE, so that we get a fringe-ruffle along the edge of the flower(The RIM is knitted according to the same petal principle of adding and decreasing yarns).

How to tie flowers
WITH NARROW PETALS.
Here in the diagram below we see by what principle flowers with fringed cutting of petals are created. Every petal of this knitted flower this is chain of chain stitches UP and descent from the connecting posts ALONG THIS CHAIN DOWN to the middle of the flower.

Chamomile petals knit according to the same principle - only each petal is a double passage of the columns - two rows on each side of the petal.

And as seen on photographed master class- the petals do not knit around the already finished center. And just into chains of air loops - AND ONLY THEN this chain folds into a circle and the petals move apart in a circle like rays.
You yourself can choose the FORM OF PETALS, decide how many of these petals should be around the middle, independently determine the LENGTH of the petal ...
In any case, you will have a pretty chamomile ... and there is no need to be afraid that you knit differently than in the scheme. You are your own master- try it yourself and see what happens. More petals means they are tighter (picture 2 of the photo below). Fewer petals means there will be a distance between them (picture 1 of the photo below).

And when you learn how to crochet daisies, you can then turn them into elegant cup holders - simply by tying them in a circle in a contrasting green color (as in the photo below).

Or you can crochet a nice flowerpot with daisies. Buy small flower pot, sew a small bulky pillow - such that it fits tightly into the flowerpot. Then tie daisies and green branches - and sew them over the pillow tucked into the pot. For greater weight and stability, sand can be poured into the pillow (the weighted flowerpot will not fall).

By the same "chamomile" principle they knit lily petals. Just the beginning of knitting NOT A FLAT MIDDLE, and the volumetric middle in the CUP FORM. And then around this cup are knitted petals like a chamomile. And we get a lily like in the photo below.

Knitted flowers
WITH WIDE PETALS.
Flowers with wide petals include poppies and orchids. Let's take a look at how to tie these flowers.
The photo below shows that at first THREE petals are knitted around the black center. And then the hook goes under them and the NEXT THREE petals are knitted already from the back of the flower (so that they look out from behind the first petals).

But you can do poppies with a flat arrangement of petals in one row... As in this photo below (it will still be beautiful).

You can make the petals climbed on top of each other. Such an overlap of petals on top of each other turns out by itself - because each new petal starts its stitching from the middle. First, the middle (central part) of the petal is knitted, and then its edges are knitted around this center. And so the edges stick out by themselves - overlapping to the neighboring petal. The diagram below shows how such a flower is knitted.


And here is the scheme for knitting wide petals of an orchid flower.

Here are the larger white orchid flowers from the photo above.

If you do not have a diagram, but want to knit the correct flower, then you need to start with a PATTERN FROM PAPER. First, we cut out the petals of the desired shape from paper, then we fold them into paper flower... And if we like the image of this flower - its size and proportions of the petals relative to each other - then we can start knitting.
The orchid with the photo above has 2 lower petals and the central petal are simple ovals (the diagram is in our article).
But the two side petals have the shape of "ears". They fit simply. You need to carefully look at the photo and then you will understand how does it move hand of the master, where is the beginning of knitting. where is the continuation, and what he does at the final stage.

The ear-petal is knitted in 3 steps.
1 step (red)-direct chain of air loops (in the figure there is a red line - I counted 12 air loops in a row)
Step 2 (light green)- single crochet stitches are knitted around this chain in a circle to form an even oval (in the figure there is a light green line of the rows). At the place where our oval turns - we knit 2 columns in one airflow of the bottom row (there is an oval scheme in this article).
3 step (green)- now it is necessary for the EARS to grow on the left and right of the even oval ... that is, the expansion of the petals of the orchid. First, we knit the "lower ear" - you see how the dark green line goes to the bottom - and how it zigzags to the left, increasing the rows of this ear to the right.
And then we go upstairs and knit the upper ear - with the same zigzag arrangement of rows ...
Finally, we tie the entire petal in a circle so that it has a smooth edge.
RUSHEVY METHOD
For knitting flowers.
If you knit a simple circle - but add in each row a large number of loops... then our the circle will begin to frown and worry- and we get a round ruffled flower. Like the voluminous poppy flower in the photo below. There are no individual petals in it. It's just a circle - which itself twisted in waves, due to the excessive addition of columns in each row.

Try it yourself - simple any number of columns- for example, three columns in each loop of the previous row ... or four (so that the wave is steeper) ... or five columns in each loop (so that the wave swirls very strongly). Here in the photo below is an example of a poppy with a slight waviness on the petals.

And you can make the waviness of the petals VERY STRONG. According to this principle of strong swirl, the waves are knitted voluminous flowers CARNATIONS ...

First, a wrinkled wavy circle is knitted. Then another circle. And you can have another one. And then these circles are folded together (not on top of each other, but next to each other) - in a wrinkled bundle WITH THE EDGES TO THE TOP. This bunch-sponge is stuffed inside the CUP - the green cup of the inflorescence. And it turns out a carnation flower, with crochet.
FLOWERS HOOK
with OVAL petals
You can still learn crochet ovals. And then we can knit flowers with oval petals and leaves. For example, here are such knitted tulips or crocuses or water lilies.


For such oval-petal flowers, crochet you need to learn how to knit an oval. It fits simply - according to this pattern. The beginning of the diagram is the central row - a chain of air vents and the first row of columns on it.

That is, first we knit the CENTRAL ROW of the oval ... and then knitting goes in a circle - around this central row.

If we want our oval to CONTRACT on one side, and on the other hand WAS EXPANDED - then we can knit fewer columns on one edge at the turn - and on the other edge of the oval there are more columns.
This is how it is shown in the diagram below.

According to the same principle, LEAVES of a pointed shape are knitted. Let's take a look at crocheting the leaves. Let's look at a master class for knitting a heart-shaped petal.
LEAF FOR FLOWERS WITH A HOOK
(master class and schemes for beginners)
Below I am attaching a photo-master class for knitting a sharp leaf (it is suitable for lilacs, roses and other crochet flowers).
Knitting of this leaf starts from the center (like an oval) - the row should have an arched shape, so we start knitting with low stitches (without a crochet) and in the middle of the row we knit high stitches (with 2 and 3 crochets).

Or such a sharp little heart-shaped leaf can be tied in a circle ... that is, first we make a ring of air. And then in a circle we alternate single crochets (in the lower part of the leaf) and columns with a large number of crochets (in the elongated part of the leaf. And then in a circle we make a strapping around the entire leaf (to create a green rib-edge.
And here is a diagram of a clover leaf below.

I also collected photographs of the leaves different forms... where you can see exactly how they are knitted.


Here is a master class below shows how one of the complex crochet leaves is created.
Here are some ideas for crocheting flowers and leaves. I hope the master classes and diagrams laid out here will help you understand and feel that knitted flowers with your own hands are simple, it is fast, and this is such a scope for imagination.
Fall in love with this idea ... Think of a hat with flowers for your daughter, booties with flowers for your granddaughter. Create warm and lovely things for your loved ones. And may you succeed.
Olga Klishevskaya, specially for the site

The article about knitted flowers turned out to be quite popular. Therefore, we continue to publish a collection of knitted flowers.
Pansies:
we knit the first flower
scheme 1. Cast on 6 air loops with eggplant-colored yarn, close them in
ring. 1st and 2nd row knit according to scheme 1. Knit orange
3rd row.
Knit the second flower according to the scheme 2. Cast on 6 air loops,
close them in a ring. Orange yarn and knit from 1st to 4th row of pos
scheme 2.
Bud: cast on 6 air loops of eggplant-colored yarn, close them into a ring. Knit from 1-4th row according to scheme 3.
Assembly:
starch the flowers and the bud, put the second flower on the first,
put on a plastic stem and fix with stamens. Buds
plant on plastic stems.
 |
 |
 |
Trefoil knitting pattern - brooches  |
 |
 |
 |
 |
 |
 |
 |
 |
 |
 |
 |
| The following flowers are very easy to combine.
|
 |
 |
 |
 |
 |


We continue to publish a collection of knitted flowers.
Knitted daisies.
The core and petals of the flower are knitted with contrasting threads.
We knit a small flower:
cast on 5 air loops and close them in a circle with a half-column.
1st row: one air loop for lifting, 12 single crochets.
2nd row: * 7 air loops, in the second loop we knit a column without
crochet and then 6 single crochet, knit the 6th column in the second
circular column*; repeat from * to * 5 more times (total 6
petals).
3rd row: tie all the petals according to scheme 1.
Core small flower:
cast on 2 air loops.
1 row: 5 single crochet in 2nd chain stitch
2nd row: 10 single crochet stitches we knit behind the back wall of the loop of the previous row.
3 row: we make increases through 1 loop = 15 loops.
For a small flower, you need to finish knitting and break the thread. For a large flower, knit row 4: make increments through 1 loop = 22 loops.
We knit a large flower according to scheme 2.
 small flower and center of small flower |
 big flower |
| Knitting pattern for daffodils:
|
 |
 |
 |
 |
 |
 |
 |
 |
 |
 |
 |
| Copyright flowers from Nelia Nightingale:
|


A master class on knitting a flower "Poppy ordinary, field" from Elena - koluchka.
 |
1. 8 VP close the ring. (Yarn "Tenderness")
2. In half-loop, knit 12 sc.
3. In the same half-loops, knit the third row of 16 sc.
4. In the fourth row, 21 sc is knitted in the center of the "berry".
5.6. Turn over the "berry" and knit a row of 21 sc.
7. Take a thinner yarn ("Tulip"), pull the loop from the center of the "berry".
8. Stick a hook and loop in front of the last row of RLS, pull out and knit a loop from the thread under the "berry".
9. Knit sc for the edge of the "berry", 3 VP, sc for the edge of the "berry".
10. Perform the remaining six jumpers in the same way, pulling the loops from the center of the "berry"
11. Knit a row of 21 sc.
12. On each loop of the previous row, perform a "stamen": 16 VP, SS (21 pieces)
13.14. For the petal, attach from the inside out. column and knit
first row 10 VP, SS. Second row: tie the first row of 12 sc. Third and
fourth row: 14 PRS. Fifth and sixth row: 16 PRS. Seventh, eighth,
ninth: 18СБН. In the tenth row, add 10 loops evenly (total 28
loops). Eleventh row: SBN, PS, SSN, SS2N, SSN, PS, SBN
(repeat three times).
15. Tie the second upper petal in the same way. Lower petals do
a little more, increasing the chain from the first row VP by 2 -12 VP.
Accordingly, the number of columns in each row of the lower ones will increase by 2
petals.
16. In conclusion, tie the poppy petals with a crustacean step (yarn "Canaris" 203 m -20gr).
This flower can be used for decoration knitted goods or
as a motif of Irish lace. Elena's website has an open topic on-line
knitting products in the technique of Irish lace for lovers of poppies

To knit flowers, you will need: Iris threads in 2 additions, a 1.3 mm crochet hook and a flower pot.
Knit petals according to the scheme 1 - 6 pcs.
The middle of the flower:
Knit in a circle
1 row: 2 vp, from the first vp knit (st.b / n, 6 vp) 6 times.
2nd row: From each st. b / n of the previous rows, knit 2 tbsp. b / n, at
this is a chain from 6 in. p. before leave a row in front of knitting.
3rd row: st. b / n.
See the result in photo 1.
 |
| Now you need to tie the petals with connecting posts at 2 reception of 3 things to the middle of the flower. The first 3 petals are tied to row number 2 of the middle of the flower, and the second 3 - to row number 3 (photo 2). For the stalk, you need to tie a number of Art. b / n for connection columns and beyond knit in a circle, if the stem turns out to be too wide - do decreases in the first rows, knitting 2 tbsp. b / n together. I reduced to width row 8 tbsp. b / n. Then the cocktail tube just goes into the stem. (for stability) (see photos 3 and 4). |
 |
| Potted soil: In the last row of the stem, change the thread to brown. 1 row: 1 st.b / n, (2 st.b / n from 1 st.pre. row) 3 times, 1 st.b / n, (2 st.b / n from 1 st.pre. row) 3 times. 2 row: 1 st.b / n, (1 st.b / n, 2 st.b / n from 1 st.pre. row) 3 times, 1 st.b / n, (1 st.b / n, 2 tbsp. B / n from 1 item of the previous row) 3 times. 3 row: 1 st.b / n, (2 st.b / n, 2 st.b / n from 1 st.pre. row) 3 times, 1 st.b / n, (2 st.b / n, 2 tbsp. B / n from 1 item of the previous row) 3 times. Then we sew the resulting hexagons of the earth of several colors by short sides. We tie in a circle to the required width of the pot. To keep the flowers in the pot steady, I cut out a piece of styrofoam along the size of the inside of the pot and stuck the tubes of the stalks there, and the bound earth was glued along the edge to the circumference of the pot. |

Petal:
Dial 5 c. etc. and knit in a circle.
1 row: 1 vp lifting, 4 st. b / n., 2 st. b / n in the extreme v.p. chains,
2 vp, 2 st. b / n in the same extreme century. n. chains, 3 tbsp. b / n, 2 st. b / n in
1st vp chains, 2 vp, 1 tbsp. b / n in the same loop.
2nd row: 2 tbsp. b / n, 3 half-columns with a crochet, 2 tbsp. b / n, in a chain from
2 vp tie (1 item b / n, 2 vp, 1 item b / n), 2 items b / n, 3 half-st. s / n,
2 items b / n, in a chain of 2 vp tie (1 item b / n, 2 vp, 1 item b / n).
3 row: knit with columns b / n, in a chain of 2 vp. tie 1 item b / n.
4 row: we knit with connecting posts one in one article b / n.
 |
The middle of the flower:
1 row: 2 vp, from the first we knit 6 items b / n.
2nd row: 1 item b / n, 2 items b / n from 1 item. the previous row - repeat to the end of the row.
3 row: knit st. b / n without increments.
Sheet:
1 row: we collect 20 vp, 19 st with a crochet, 5 st with a crochet from the extreme st. n. chains, 19 st. with a crochet.
2nd row: st. b / n.
Assembly: Attach 3 petals with connecting
columns to the last row of the middle of the flower Then with threads of green
colors on the connecting posts we knit a row of st. b / n and further in a circle to
the required stem length. Sew 2-3 leaves to the base of the stem. V
the stems are inserted for stability of the straws for cocktails, and for
bases tied around 2 old CDs. To keep the flowers from falling
sewed the middle through the hole of the disc tightly to the harness from the bottom.

Several crochet flower patterns to your piggy bank. They can decorate a hat, dress, panama hat or make a brooch.
MATERIALS
Remnants of yarn of various colors.
HOOK
Select the size according to the thickness of your yarn.
Types of loops:
Air loop (v. P.): In p.
insert the hook, throw the thread over it and pull it through the loop.
Column without crochet (st.b / n): insert the hook into the loop of the chain or bottom
rows and draw out a new loop, grab the thread and knit 2 loops on
hook in one go.
Column with a crochet (st.s / n): make a crochet on the hook, insert it into
chain loop and pull out a new loop, knit 3 sts on the hook in pairs in
2 receptions.
Column with 2 yarns (st. With 2 / n): make 2 yarns on the hook, insert
hook into the loop of the chain and pull out a new loop, knit 4 sts on the hook
in pairs in 3 steps.
Flowers: according to schemes 1, 2 and 3.
DESCRIPTION OF WORK Flower "A".
Dial a chain of 16 c. etc. and knit according to scheme 1.
ASSEMBLY
Fold the resulting tape in a spiral and secure the center from the wrong side with several stitches.
DESCRIPTION OF WORK Flower "B".
Dial a chain of 52 c. p. and knit according to scheme 2. After finishing the 4th p., cut the thread.
ASSEMBLY
Collapse the resulting braid in a spiral and secure in the center from the inside. sides with multiple stitches.
DESCRIPTION OF WORK Flower "B".
Dial a chain of 40 c. etc. and knit according to scheme 3.
ASSEMBLY
Collapse the resulting braid in a spiral and secure the center from the inside. parties
several stitches. In the case of using flowers as a brooch,
attach from the inside. side of the safety pin.


Crochet has always been in demand, but to a different extent. Today
this type of handicraft is more popular than ever. The classic
types of knitting: the pattern of sirloin knitting becomes a border summer jacket;
elements of guipure tablecloths - lush decor of blouses. Napkin patterns
they knit the brim of hats, the motives of the collars are the yokes of jackets. There are many examples.
This is a natural process, a kind creative play... In value in
preservation of traditions and their modern embodiment.
Have you noticed, dear craftswomen, that the emphasis in knitting is on
complex variants that cannot be reproduced on knitting machine?
One of these areas is guipure. It is designed to imitate a complex and
expensive Venetian embroidery.
The best examples of such knitted lace were obtained by the Irish
nuns, so over time it began to be called "monastery", and later
- Irish guipure. Please do not confuse with irish lace which according to
the way of execution differs from guipure. Classic guipure knitting
complex and painstaking. Since he imitated needle-embroidered lace,
then they used lace linen, thin cream or white paper threads
for knitting elements and very thin for nets and brides. Modern fashion
takes into account our busyness, the rapid pace of life, desire faster
to embody the conceived product. She is supportive of models.
large knit from thick yarn. This plays into the hands of novice craftswomen.
You may have noticed that the mesh that holds the elements together is rarely
used. Relevant canvases of "coupling" guipure. Steel elements
larger, the thread is thicker.
So, suppose you are planning to knit a blouse completely or
fragment with guipure elements. It is advisable to pre-draw
sketch on a pattern, you can improvise as you knit. Most
the composition is occupied by the leaves. Various books and magazines provide
many patterns of knitting leaves. It is impossible to discuss them within the framework of this article.
manifold.
For example, it is customary to knit a classic guipure leaf in two ways: with
extension from one RLS (scheme 1) and with an extension on the arch (scheme 2).
At the same time, knitting methods can be different: for both half loops, for
back half loop, behind the front half loop, behind the back horizontal
half-loop of the columns of the previous row.
The texture of the sheet in the first photo turned out to be flat, in the second - ribbed.
Photo1. The sheet is crocheted according to scheme 1 for both half-loops:  |
Photo 2. The sheet is crocheted according to scheme 1 for the back half loop:  |
Photo 3. Composite sheet.  |
Crochet leaf pattern 1 and 2:  |
Photo 4. Sheet 1 is crocheted according to scheme 2.  |
Scheme 3. Crocheting a sheet.  |
Scheme 4. Crocheting a sheet.  |
The shape of the leaf, tied according to scheme 1, is wide at the handle and sharp at
end. The additions on the arch according to scheme 2 create a sharper one at the cutting
leaf shape. At a large number dialed air loops (10-12) and
the generally accepted indentation of 2 single crochets, the sheet turns out to be wide.
The leaf teeth are concentrated in the front part, the leaf is smooth at the cutting.
This shape is good when joining them into a complex sheet (photo 3). At
small amount air loops of the original chain (4-6) sheet
it turns out to be narrow and with multi-row knitting - long. Denticles
are located along the entire length of the sheet (sheet 2 in photo 4).
And if the composition requires a large leaf with denticles along its entire length? Increase the number of single crochet indents (Diagram 3).
For clear, ornamental compositions, one or two types are used
leaves. Leaves of different sizes and shapes are drawn in the sketch: small and
large, straight and curved. Turning the sheet is obtained when knitting
different amounts RLS on the left and right sides of the arch: 1 and 2, 2 and 3
give a small turn of the leaf, and 1 and 3 - more abrupt. Sheet 4 in photo 4
connected with a turn in one direction (diagram 4). Such a variety of shapes and
the size of the leaves only decorate the composition.
To be continued …

We continue to talk about knitted leaves.
Diagram 5 shows a sheet in which the turns are connected alternately in
different sides. The variety of leaf shapes decorates the composition, gives
her expressiveness. Experiment, too. How else can you
get curved leaves? Besides the cast ones, there are rounded and
arbitrary leaf shapes. Often found in compositions are small
leaves connected by different-sized columns. For stiffening and
beauty tie them with single crochet posts with "pico" or "crustacean step"
(see diagram 6 and 7).
Tip: do not knit more than 2-3 half-columns in a row. Their function is to create
Smooth transition from single crochet to double crochet.
Similar to knitting
small leaves seem logical to knit medium sized leaves
columns with 2 and three crochets. Yes, it is possible, but the sheet even after
the strapping turns out to be somewhat loose. Medium-sized leaves will
look better when knitted with single crochet, half-crochet, and
columns with one crochet on both sides of the VP chain (Scheme 8).
Tie such a sheet with single crochets twice in the same
column heads. Of course, in the rounded places of the sheet, add
single crochet. For the cutting, knit 6-7 air loops and in
in the opposite direction, tie single crochet on them.
 |
Another version of the sheet: knit different-sized columns on columns without
nakida, with which tie a chain of air loops on both sides
(Scheme 9).
Tie this sheet with a bourdon: fold the knitting thread in half (this
bourdon), fasten the single crochet in the middle of the bourdon, fold the threads
bourdon together. Then hold the thread along the canvas and tie
single crochet. Having tied the sheet completely, tie 6-7 RLS around
threads (on a bourdon) for the cutting of a leaf. Tie up the VP, cut off the bourdon
unevenly, attach the leftovers to knitting and knit RLS in the opposite
direction. Tie the connecting posts at the base last.
sheet, break the thread and pull it to the wrong side. Use the tail of the thread
for stitching elements together.
If you have conceived a canvas of openwork, transparent elements, then
the way the leaves are knitted is changing. The diagrams show options for such
leaves: small (Scheme 10) and medium (Scheme 11). Strapping in two rows
RLS will give shape.
 |
 |
 |
Two more options for openwork leaves are shown in Scheme 12.
To be continued …

We continue to publish patterns of knitted leaves. In this part, the leaves
real flowers and plants: clover, oak leaf, etc. They are perfect
for knitted appliques, brooches, color compositions.
Knitted clover leaf  |
Knitted oak leaf  |
 |
 |
 |
 |
For an example, how you can use knitted leaves in a composition:  |
Knitted Maple leaves |
 |
Crocheting is not always the embodiment of clothes for the whole family - it is also about creating coziness in your own home. Every needlewoman at least once thought about knitting artificial flowers - they will always remain bright and airy, and there is no care for them. Moreover, every needlewoman has a lot of yarn leftovers, which take up a lot of space in cabinets and storage boxes. To get rid of the leftovers usefully, you can resort to crocheting a whole bunch of flowers. The article presents crochet flowers, patterns and descriptions for free.
Crochet roses
Crocheted roses only at first glance seem difficult to perform. In fact, knitting them turns out to be the simplest and most promising - in a short time, literally in a few hours, you can create a whole bouquet. It is also a great opportunity to please loved ones with a bouquet of flowers, especially in winter and on an unplanned visit.
So, crocheting roses will require the following materials and tools:
- red and green yarn;
- hook of a suitable number;
- small diameter wire;
- double sided tape.
Crocheting roses occurs in the following sequence:
- Choose a knitting pattern for a rosebud. Here you can use a simplified knitting pattern in the form of a long strip, which later twists and folds in the shape of a bud. Such knitting requires sewing up the base of the formed bud.

- The second option for crocheting a rosebud involves knitting each petal separately - it's easy, but painstaking. After tying the required number of petals, they are simply collected into a bud and tied at the base with wire or thread.

- After choosing a pattern for the pattern, make a bud. Sew the base or tie it with wire. Individual petals are easier to collect on the base - it may already be a stem made of wire with a cotton or thread tip. The tip should be completely covered with petals.
- Next, tie the sepal according to the presented scheme. Of course, the green thread should now be used.

- In the same way, using the above scheme, tie the leaves. For beginners, there is no need to start knitting a whole shoot with leaves - it is enough to knit from 3 to 7 leaves, depending on the length of the main stem. When knitting leaves, leave the long end of the thread at the base.
- If you used the first method of knitting a bud - knitting a strip that folds into a bud - insert the wire designed to form the stem in the middle. Put a sepal on the bud and wrap the bud from the bottom with the second piece of wire - this will form a peduncle.

- Use double-sided tape - wrap the stalk with tape, grabbing the peduncle. As you wind it, attach the leaves, grabbing their base by 5-7 mm, wrap the stem with a piece of thread from the leaves and also secure with tape.
- From the sepal to the end of the stem, carefully and evenly, without leaving gaps, wrap the wire with duct tape with green thread.
- Make several roses in a similar way, arrange them in a bouquet.
Several other variations can be made in the presented manner. Some needlewomen prefer to simply put such bouquets in vases. Others want to make a bush, resorting to using a simple flower pot, pre-setting the roses in pieces of styrofoam. Still others crochet the pots separately to complete the composition. The following is a selection of ready-made compositions. different variations and a video with a master class for beginners in knitting. 


Knitted peonies

Similar to a rose, peonies are knitted. Here you should also use the diagram below and tie the bud. Further, the pedicel is formed with wire or thread. For knitting leaves, you can use the above scheme. A stem is similarly made of wire and leaves are attached. 
Tied peonies often form into a regular bouquet of flowers that looks great in a long, narrow glass vase. A peony knitting master class is offered in the video.
Knitted daffodils

After crocheting the simplest flowers, you can start embodying the most complex ones, namely, knitting daffodils. You can knit them in the same sequence as presented above, with the exception of using other patterns and threads.
So, start knitting daffodils in the following sequence: 
- Start knitting with a whisk - use pattern 1 in the picture below. The color of the corolla can be different - white, yellow, brown or even black.
- Attach a thread of yellow or Brown color to the base of the corolla and continue knitting the core, according to scheme 2.
- Attach a thread of yellow, orange, or white for knitting bud petals - use scheme 4.
- At the end of the knitting of the bud, attach a green thread to the base and tie the cup according to scheme 3. The cup can be tied separately and then attached to the bud.
Stems and knitting of leaves occurs in the sequence presented earlier. The only difference here is the shape of the leaves - to match, they are knitted according to the proposed pattern in the picture. 

Irises

Attract craftswomen knitted irises, which are also formed into bouquets and placed in vases. There are two ways to knit irises.
The first way 
The first method involves knitting the petals of the bud in a more airy way. Here they resort to the scheme presented below. 


Otherwise, the technique of forming a flower does not differ from others. So, after the required number of petals are connected, they begin to form a bud - you will need to connect the petals and attach them to the wire, which also acts as a stem. This stem may have a base at the tip - it is either knitted or formed by winding a thread, cotton wool (it should be painted over in diluted paint). The leaves can be knitted according to the pattern used for knitting daffodil leaves.
Second way

The second method offers denser petals and "massive" buds, using two schemes.
The first scheme is designed for knitting the lower petals of the bud - detailed technique is shown in the photo. There is also a schematic interpretation of the proposed knitting - the numbers on the diagram indicate the number of single crochets.


 The second pattern is knitting more wavy petals - the upper ones. It also offers a complete instruction and sequence in the photo, as well as a diagram of the number of single crochets for each row.


Both types of petals are collected as shown in the picture, the formation of the stem occurs in the same technique as before.

Tie some irises and place them in a vase - they will look attractive in every interior.

Tulips

"Yellow tulips, oooh!" - this phrase and melody comes up every time it comes to these beautiful spring messengers. They can be linked using also 2 methods - simpler or more complex.
The easy way

V easy way tulip bud is tied by columns without crochets, a cup that is clogged with cotton wool and sewn up in a certain way. In order not to read the descriptions for a long time, it is enough just to offer photos that are presented by craftswomen - their fruits of crochet needlework. 


A lot of tulips are knitted in a similar way, which are later collected in bouquets - it is better to put them in a basket, because such a composition is a spring outline. 
Second way
The second method involves knitting the petals of the bud separately. So, for a start, they begin to knit according to the scheme internal petals in the amount of 3 pieces, the scheme of which is proposed - it also contains legend. 
Next, they begin to knit individual petals. To begin with, you need to tie the petals of the second layer - for this, use a conical shape. After knitting 2-3 petals of a more rounded shape - they will be external and final. 

All petals are gathered together on a wire for the stem. Then they continue to form the flower in the same sequence as the previous flowers - do not forget about the leaves, which can be presented in the form of simple double crochets.
Crocheted flowers are always spring in the house and spring mood in the shower. Create a cozy atmosphere in the room - arrange related flowers on the windowsill and admire the spring landscape.
Crochet, knitted little things, now at the peak of popularity. Crochet flowers look especially interesting for adult and children's clothing and hats. We suggest you try to knit beautiful bright flowers... Our master class is simple and straightforward, with step by step description and schemes. Crochet flowers for decoration can be knitted from completely different threads: cotton, woolen, synthetic, silk, mixed and darning. The main thing is that they are tightly twisted and do not disintegrate into thin threads.


The most popular crochet flower is, of course, the rose. Knitted roses often decorate children's and adult hats, cardigans, bags, head stripes, and so on. We offer you the simplest master class that is suitable for beginners to crochet. The center of the rose can be decorated with a bead or a button, which is very important now.

For work you will need:
- Threads of medium thickness.
- Hook number 2.
- Scissors.
- The needle is large.
We collect an even number of loops. For example, if you crochet xxx50 loops, then the rose will turn out to be 7-7.5 cm in size. The size of the rose you want to get depends on the number of loops. In our master class, we are collecting 26 loops, we will make a small rose. The first row - we knit RLS (single crochet).

Second row: we knit 2 VP (air loops) for lifting, in the 2nd loop we make RLS + 2 VP.

Third row: in the 1st loop of the second row we knit 5 CCHs (double crochet).

The same thing in the next loop: we knit 5 CCHs.

Thus, we knit the entire row, to the end.

A spiral has formed, which must be twisted into a column and stitched with a needle so that it does not fall apart.

In order to make a leaf, you need to knit a chain of 8 loops.

Second row: 2 PRS (single crochet), 3 PRS, 2 PRS.

We continue to the end.

At the end of the work, we knit a picot.


Such beautiful crocheted flowers are easy to knit in one evening. The combination of colors in this master class depends on your imagination, because pansies can be amazing colors.

We will knit according to this pattern:

Getting started: making a sliding loop. We collect 5 RLS into it.

Next, we knit like this: 1 runway (air lifting loop), 2 sc in sc in the first row, 6 sc, 2 sc in the second sc of the previous row, 6 c, 2 sc in the third sc of the previous row, 6 c, 2 sc in the fourth sc of the previous row , 6 VP, 2 sc in the fifth sc of the previous row.

Under 6 VP we knit 1 SS (connecting column), 1СБН, 1 ПС (half-column), 1ССН (column with crochets), 10 SS2Н (column with 2 yarns), 1 СН, 1 СН, 1 ПС, 1 СБН. Under the next six VP we knit 1СБН, 1 СНН, 10 С2Н, 1 СН, 1ПС, 1 СБН.

Under the third 6 VP we will knit 1 СБН, 1PS, 8 СН, 1PS, 1СБН. Under the fourth 6 VP we knit 1СБН, 1 ПС, 8 СН, 1PS, 1 СБН. Under the fifths of 6 VP, we knit 1 SBN, 1 PS, 8 SSN, 1 PS, 1SBN.

We tie the RLS two large petals on top with contrasting threads.

These cool flowers can be crocheted to decorate clothes, stripes on the head, and so on. An excellent decor will come out of such a lotus. You can pick up melange yarn with a small print, it will look very beautiful in this product.

This flower needs to be crocheted gradually, in several steps. Three sheets are knitted first. In order to tie a sheet, you need to dial a chain of 5 VPs and close it in a ring. Next, you need to tie the RLS chain (single crochet). Then knit the leaves according to the scheme.

Next, let's move on to the petals. Let's start the lower petals with a set of 10 VPs. We tie the CCH loops (with double crochets), look at the diagram. At the end, you need to tie the RLS leaves, and then tie them with concave RLS, as in the diagram.

We knit the upper flowers neatly, otherwise the product may skew, and it will not be symmetrical. For the upper flowers, you need to dial a chain of 8 VPs and tie them with CCHs (with double crochets), as you can see in the diagram. When all parts of the flower are ready, they must be sewn with the same threads.

We also recommend
 Rules for grinding and wet-heat treatment of garments
 Building a pattern for the basis of a dress: Italian technique as the easiest way to make a good pattern
 How to build a dress pattern base
 We model and sew coats!
 Skirt of the year, construction of a pattern
 Fashionable children's skirts from old jeans - patterns and description