Interiors of different times art technique decoupage. Decoupage: history of origin, scope, design and decor of interiors
Introduction to decoupage
In our time, the fashion for things has developed incredibly " self made", For unique gifts, interior items and clothing. And now, succumbing to this fresh trend, we begin to discover with annoyance that it is not always possible to make beauty with our own hands. For something there is not enough patience, for something skills, and there is not enough time, but I really want the best, exclusive things.
Then decoupage is just for you! Decoupage is an applique, but the applique is special - varnished, it looks like a painting. Everything is much easier than it seems! Probably the most easy way achieve amazing results by creating unique, spectacular objects with your own hands.
The word decoupage is of French origin, meaning to cut. Therefore, decoupage technique is a technique of decoration, decoration, decoration using cut paper motifs. This decoration technique was invented by Chinese peasants in the 12th century, it was they who made thin colorful paper and began to decorate various objects with it. This interesting method of decoration came to Europe in the 17th-18th centuries along with beautiful lacquered Chinese furniture, when the fashion for the "East" appeared there. The sellers could not meet the huge demand, and the production of counterfeits began. And the decoupage technique spread throughout Europe. The developed current was in no way inferior to Chinese technology. Even famous artists such as Matisse and Picasso used decoupage in their works.
Currently, three-layer napkins have become the most popular material, therefore decoupage is called napkin technique in many languages.
So, it would seem, and what can be decorated paper napkins? In fact, whatever your heart desires! Any, even the most ordinary-looking little thing is reborn into a new magnificent one, into a real work of art. These can be flower pots, dishes, candles, books, musical instruments, boxes, vessels, bottles, furniture, etc. etc. Even clothes and shoes can be decorated by you according to your taste. Wood, leather, textiles, ceramics, metal, plaster, cardboard - any surface lends itself to wonderful transformations.
The only thing that needs to be taken into account (!) Is that they should be monochromatic and not too dark, so that the translucent pattern cut from the napkin is clearly visible.
What do you need for decoupage?
1. Decoration object
The main thing here is to stop at something. There are many options. Decoupage for various pieces of furniture and interiors purchased at IKEA is very "asking".
You can "update" old furniture, decorate unusual bottles, make a beautiful handicraft box from a sturdy shoe box.
Of course, decoupage looks very beautiful on a wooden surface and often decorates the interior of the kitchen: wooden barrels for salt and sugar, cutting boards, bread bins, etc.
Ars Hobby can offer you a wide variety of blanks. We advise you to look into the catalog. There you will surely find something for yourself, your interior and the realization of your creative potential.
2.
We have a lot of decoupage napkins - the most different colors, motives and themes. Take a look at the catalog and choose your own from almost two hundred types and boldly implement your ideas!
3. Special scissors for decoupage
It is better to use small pointed scissors with rounded ends, such scissors are convenient for cutting out small parts from thin material, in this case from a napkin.
4. Decoupage brushes
It is convenient to use a flat semi-rigid brush with a width of 1-2 cm, it is convenient for it to apply both paints and varnish. For large objects, it is better to use wider brushes.
4. Bonding
We apply the motif from the napkin to the surface to be decorated and begin to glue it with a flat brush, smearing it with glue from the outside. When soaked, the napkin begins to stretch, so you need to act very carefully, straightening all the folds and bubbles with a brush. The gluing should start from the center of the motif.
5. Work with paints
If you decide to use paints in your work, then the time has come. We finish drawing all the necessary elements, make the work complete.
6. Coating with varnish
When the work is painted and pasted over, it must be covered with at least two layers of varnish to protect it from mechanical damage and moisture.
7. Additional processing
Some surfaces require additional treatment.
If the drawing is applied to textiles, then it is necessary to cover with several layers of varnish. Once dry, the patterned fabric can be gently ironed with a warm iron through a cloth.
How we did it
As a basic blank, we have chosen a tray from the set 62 087 00 (tray size 31x20 cm).
At the stage of preliminary preparation, the surface of the tray was covered with a primer. And the fun began - the selection of drawings on napkins, their cutting and division into layers.
In many cases, the drawings on the napkins are quite small and it is more convenient to use scissors with short blades to accurately imagine where the cut on the napkin will go.
For our composition we used two types of napkins - 82 955 00 ("Three Chefs" napkins) and 82 124 00 ("Breakfast" napkins). These napkins are made in a similar colors and perfectly complement each other with small "tasty" details
Do not forget that the napkin consists of three layers, sometimes in a fit of creative enthusiasm, you may not notice that there is still the last white layer.
Now we lay out the individual elements of the composition on a tray, estimating the position different characters and items.
Then, we begin to glue the large elements of the composition. Start at the center of each element and smooth out with a napkin brush to the edges.
At the bottom cook, as a result of careless movement with a brush, all the elements below the head were damaged =). In such a case, using a breadboard or collet knife, you can carefully separate the affected element and cut the element again.
Agree that all unknown words attract and beckon people to them, like the light of moths. You hear, for example, a word, or decoupage, and the hand involuntarily reaches for the search engine in the computer. And meanwhile, the mysterious and mysterious ganutel, tatting and decoupage are nothing more than species, looking closely at which, you understand that in one way or another you must have come across them in ordinary life... So, we talked about the first two "strangers" not so long ago, so today is the time to talk about decoupage. So what is decoupage, who needs it and why?Decoupage represents furniture, dishes, fabrics, etc., which consists in cutting images from a variety of materials (paper, leather, fabrics, wood, etc.) and then sticking them or attaching them in some other way to different types surfaces for decoration purposes.
From the history of decoupage
The origins of decoupage date back to the early Middle Ages. It was first mentioned in Germany at the end of the 15th century, where furniture was decorated with carved pictures. The peak of the passion for decoupage came in the 17th century, when Venetian furniture, decorated with inlays (images or patterns applied to the surface and, as a rule, differing from it in color or material), made in the Japanese or Chinese style came into fashion. Local craftsmen skillfully carved various images, then glued them to furniture surfaces and covered them with several layers of varnish for protection. With the help of such applications, Venetian furniture makers imitated expensive oriental inlays. This method was much cheaper, but was in no less demand.In Italy, the art of decoupage furniture was called Arte povera, which means “the art of the poor”. However, today this is extremely rare and it is very expensive, and many modern furniture designers imitate the Italian style.Decoupage was also very fashionable at the French court during the time of Louis XVI. The decoupage was done by Queen Marie Antoinette herself with her ladies of the court, who used the magnificent works of famous artists Fragonard and Watteau as decorations. Unfortunately, these works of art were destroyed during the French Revolution.Decoupage became widespread among almost all segments of the population in England during the Victorian era, which was associated with the appearance of inexpensive sheets on which collections were printed for cutting. By the middle of the 19th century, decoupage became a mass phenomenon among the British, who most often used for their works floral motives, pastoral scenes, images of angels. From England, decoupage moved to America, where it was widely known until the Second World War.As for Russia, here interest in decoupage appeared at the beginning of the 21st century, and subsequently received a truly massive distribution. The decoupage technique is still relevant today, it is used in many areas of our life, not only by professional manufacturers, but also by amateur craftsmen.
Where decoupage is used today
 Where not today apply decoupage
- it can be found everywhere, and sometimes even where you really do not expect to see it. The old technique of decoupage is back in fashion and is widely used when decorating wardrobe items. With the help of decoupage, they decorate handbags, hats, shoes, fashionable jewelry, etc.As before, decoupage technique is used for decoration - it can be dressers, wardrobes, chairs, armchairs, mirrored and glass surfaces of furniture and much more.
With the help of decoupage, you can also decorate kitchen utensils: trays, containers for bulk products, decorative cups, plates, pots and teapots, a variety of jars and bottles.
The emergence of new materials makes it possible to decorate almost any surface, so the decoupage technique can be used to decorate items such as boxes, chests, (including solar), Christmas decorations, candles, gift wrapping, various wooden and metal products, photo albums, notebooks, covers for passports and other documents, and even.
Modern technologies make it possible to create three-dimensional decoupage
, as well as print pictures of various contents on a copier or printer, which can be used to decorate a variety of household items. There are also enough the new kind decoupage from napkins, as well as from fabrics and on fabrics... In addition, the possibility of using such techniques as artificial aging, gilding, craquelure, volumetric and artistic decoupage give unlimited scope for creativity and imagination.
Where not today apply decoupage
- it can be found everywhere, and sometimes even where you really do not expect to see it. The old technique of decoupage is back in fashion and is widely used when decorating wardrobe items. With the help of decoupage, they decorate handbags, hats, shoes, fashionable jewelry, etc.As before, decoupage technique is used for decoration - it can be dressers, wardrobes, chairs, armchairs, mirrored and glass surfaces of furniture and much more.
With the help of decoupage, you can also decorate kitchen utensils: trays, containers for bulk products, decorative cups, plates, pots and teapots, a variety of jars and bottles.
The emergence of new materials makes it possible to decorate almost any surface, so the decoupage technique can be used to decorate items such as boxes, chests, (including solar), Christmas decorations, candles, gift wrapping, various wooden and metal products, photo albums, notebooks, covers for passports and other documents, and even.
Modern technologies make it possible to create three-dimensional decoupage
, as well as print pictures of various contents on a copier or printer, which can be used to decorate a variety of household items. There are also enough the new kind decoupage from napkins, as well as from fabrics and on fabrics... In addition, the possibility of using such techniques as artificial aging, gilding, craquelure, volumetric and artistic decoupage give unlimited scope for creativity and imagination.
Decoupage in interior design and decor
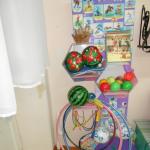
 Recently, the most popular are such decoupage styles, like millitarians, ethno, simplecity, and Victorian style, which is primarily due to modern trends in the style of interiors.Decoupage provides tremendous opportunities for, while it can be both simple and voluminous. Most simple option decoupage is the usual cutting of pictures from magazines, colorful newspapers or somewhere else - no matter where, which can be used with special glamor and glamor. Just imagine how a chest of drawers decorated with fabulous flowers, exotic plants or some old ornament for embroidery, mosaics, carvings or lace will look in your bedroom.Decoupage is very appropriate, moreover, using this technique, you can create a room in the style that the child wants to see at no special cost. For example, you can decorate a table lamp leg or photo frame with images of your favorite cartoon characters. Or you can decorate a baby cot, wardrobe, table and chair using decoupage technique. However, here it should be remembered that when designing a child's workplace, some care must be taken so that in the future too bright pictures do not distract him from classes.In decoupage it takes a special place, since often craftsmen, with the aim of artistic transformation of a room, use everything that they can get their hands on - kitchen sets, sideboards, tables, chairs, trays, wine bottles, decorative plates and other suitable utensils, switches, and even some household appliances. Decoupage looks especially elegant in combination with the craquelure technique, when, for example, an ordinary flower pot turns into an old, time-cracked object that visually takes the form of a real relic.
DIY decoupage
 In order to create, the first step is to decide on the item that you will decorate. For beginners, it's best to use something simple, like a box lid. Then you need to find a suitable picture - it can be a magazine clipping, a photograph, or something else that you decide to use to decorate the product. So now you can get to work.The surface for decoupage must be clean and dry. If it is wooden, then it must be primed, for which you can use acrylic. Then you need to cut out the prepared picture, attach it to the surface and determine the place where you will stick it.After that, the picture must be smeared with PVA glue, and then grease the surface of the decorated object with the same. After that, the picture must be carefully pressed to the surface and glued. Then you need to smooth out the picture (with a roller, napkin or fingers), remove excess glue (with a soft cloth or napkin) and let the product dry.If necessary, the picture can be additionally decorated or sparkled. To do this, cover the picture with one layer of varnish and, after it dries, apply the necessary decorative elements.
Now the product needs to be covered with several layers of varnish, and each layer needs to be dried. The finished result should look like an absolutely flat and smooth surface, the borders of the picture should in no case show through the varnish. By the way, I found an interesting historical fact: in the old days, up to 40 layers of varnish were applied to a product decorated using decoupage technique, and each layer dried for a very long time, because before no one knew about the existence of synthetic quick-drying varnishes, and in some cases the manufacturing process was delayed by several years.
Of course, the method described by us is the most in a simple way creating decoupage
, however, having mastered it, you can go to the next step and try to make decoupage, for example, from leather or wood.
Decoupage is a type of applied art, which is a technique for decorating various surfaces by applying printed pictures with a subsequent varnishing of the resulting image.
Download:
Preview:
MOU "Yasnopolyanskaya basic secondary school"
Development of a lesson on technology
on the topic "Decoupage"
Completed by: primary school teacher
Petrova Olga Ivanovna
P. Yasnaya Polyana
Goals : to acquaint students with the history of occurrence and
Development of the Decoupage technique, with the main applications
In the interior;
Teach the simplest techniques of the initial stage of the Decoupage technique
Through the elements of figurative thinking.
Lesson Objectives:
Education: Expand the horizons of students in the process of studying this
A kind of applied art,
To generate knowledge about existing types of applied
Creativity, about the features of their implementation.
Development: Develop visual-figurative thinking,
Cognitive interest,
Rational use of time and memory,
Accuracy of movements,
Artistic taste, creativity.
Upbringing: Foster artistic taste and creativity
Go to work, persistence in achieving the goal,
Accuracy, frugality, conscientious observance of the rules
Safety when working with cutting objects and varnish.
Equipment: computer, samples finished works, glass plates, iron jars, acrylic paints, PVA glue, three-layer cellulose napkins, brushes, scissors, acrylic varnish.
Lesson type: lesson of study and primary consolidation with the implementation of practical work.
Lesson plan (2 hours)
Organizing time | 3 min |
Organization of the workplace | 3 min |
Historical information about the technique "Decoupage" | 10 min |
The use of technology in the interior | 5 minutes |
Communication of the topic and purpose of the lesson | 5 minutes |
Decoupage basics | 5 minutes |
Materials and accessories | 10 min |
Safety rules | 3 min |
Physical education | 2 minutes |
Practical part | 40 minutes |
Summarizing | 4 minutes |
During the classes.
- Organizing time.
- Organization of the workplace.
- Water part.
Teacher's story about new technology Decoupage.
We all love to make appliques and paint. Firstly, the technique itself gives us pleasure, secondly, we feel like creators, and thirdly, the reward was a thing made with our own hands! Despite the fact that the stores sell a lot of unusual and interesting things, we ourselves are drawn to make something original. Today, one of the most interesting and popular types of needlework is decoupage.
(slide 1)
Decoupage is a type of applied art, which is a technique for decorating various surfaces by applying printed pictures with a subsequent varnishing of the resulting image.
Decoupage history
As soon as China learned to produce thin colorful paper, the secret of a new decorative art was discovered - decoupage. This word is translated from French "cut" and characterizes the technique of work very well. Using this type of applique, the Chinese decorated various objects, including furniture.
Subsequently, the Europeans became infected with decoupage. The women of the 18-19th centuries liked doing the decoupage technique so much that they began to paste over everything that caught their eye: musical instruments, boxes, snuff boxes, furniture, screens ...
(slide 2)
With decoupage, you can decorate almost everything that our imagination tells us: flower pots, vases, plates (decorative), glasses, cutting boards (wooden or plastic). You can sew a tablecloth and napkins from a simple fabric, and arrange them in an exclusive set. You can make a sofa cushion for our interior. But you never know what can be done, the main thing is that all things will turn out beautiful and useful in the household!
(slide 3)
- Setting the goals and objectives of the lesson.
Today in the lesson you will be designers and will be engaged in the design of tableware. You have to plunge into the world of fiction, fantasy.
- Work on the topic.
- Sample analysis.
Take a look at the sample.
To complete such a craft, we need:
(Slide 4)
- Determine the object of decoration.
(slide 5)
- Choose the desired napkin: color, motive.
(slide 6)
- Scissors are better with a pointed end.
(slide 7)
- Wide brush
(slide8)
- Decoupage glue
(slide 9)
- Acrylic lacquer
(slide 10)
- Acrylic paints
(slide 13)
- Safety rules.
Children review the basic rules for working with scissors and glue.
- Finger gymnastics.
We come to the vegetable garden.
What is it that grows with us?
Grab the tail deftly
We pull sweet carrots.
- The practical part.
When performing the work, you need to remember the main stages of work in the "Decoupage" technique
(slide 12)
- First, decide on the answer to the question, what do you want to do? Imagine, mentally imagine a ready-made thing and only then choose the material. It can be a wooden board, a porcelain mug, fabric, ceramics ... whatever your heart desires.
(slide 13)
2 ... Preliminary processing
At this stage, you carry out surface treatment, if necessary. For example, a not very even, rough wooden surface is best treated with sandpaper, apply a primer, which can be used as acrylic paint suitable color... The glass surface must first be degreased with a detergent.
(slide 14)
- Next required material - napkins, preferably three-layer. The motives of the images are varied, for example, fruits, flowers, animals, themed napkins for the holidays. Now it is important to carefully cut out the selected drawing. Let's say you have a beautiful antique vase on your napkin. You just have to pick up scissors and cut out the image strictly along the outlined contours. It's easy, but if you've chosen an image of a forest landscape, be patient. First, cut out the outlines around the picture, and then, step by step, cut out the rest of the details. You can make an unusual image, as if "touched by time", using your hands instead of scissors, simply "tearing" the edges.
(slide 15)
- The most difficult stage in decoupage is the gluing of the motif. Use a dedicatedglue for decoupage technique... Apply a thin layer of glue with a brush to the base and, using the image, smooth it well. At the same time, smooth the motif with your hands, a sponge or a brush from the center to the edges, not pressing hard so as not to tear the pattern. Then apply a thin layer of glue again. At the same time, work from the center of the motif to the edges, smoothing out the remaining small wrinkles.
(slide 16)
5. After gluing, the product must be dried well. Further, again you can give free rein to your imagination. For example, add some elements using a special outline or paint on with paints.
It remains to cover the product with varnish. The easiest way -acrylic lacquer... If you want something unusual, buyglitter varnish or varnish-volume.
(slide 17, 18)
- Demonstration of the design of various products using decoupage technique.
(slide 19, 20, 21)
- Exercise for the eyes.
Hands behind your back, heads back.
Let your eyes look at the ceiling.
We put our heads down - look at the desk.
And up again - the snowflake flies!
Turn our eyes, look for her.
And work again. A little more.
- Independent work of students.
Practical use.
- Lesson summary.
- What new did you learn in the lesson?
- Assessment of student work.
- Exhibition of students' works.
You can convert old or ordinary items into unique ones using different techniques, but one of the most popular and affordable is decoupage. The work uses available materials and tools. All that is needed "special" is paper or napkins. And how to master decoupage for beginners, we will tell you below. You don't have to buy anything super-expensive. Glue, napkins, varnish, brushes, scissors. That's the whole set of necessary tools.
Decoupage for beginners: collecting everything you need
To begin with, briefly about what and with what you will have to work. In general, decoupage is a fixing on the basis of material or paper with a printed pattern. In order for the drawing not to be erased longer, it is covered with several layers of varnish. Here is a brief description of the decoupage technique.
Decoupage is a technique that allows you to make something special from ordinary things
Base
Any weakly absorbent base is suitable as bases for decoupage. Where can this technique be applied? On the following grounds:

As you can see, the list is solid. Only very porous substrates with a lot of irregularities are not suitable for decoupage. And so you can decorate everything: from dishes of any kind to furniture and doors (and you can either the surface of the doors itself or glass inserts).
List of tools
You need few tools:

All of the tools. Unless you still need stationery - a ruler, a pencil, an eraser.
Consumables
Now we will talk about consumables. We will not talk about napkins and paper here - they are a separate item. In addition to them, to make decoupage with your own hands, you will need:

That's all that may be required, so although decoupage for beginners requires a monetary investment, it is not very large.
Napkins, paper
For decoupage, napkins and printed paper are used. They are glued to the surface and varnished. There are the following types of materials for this type of decor:

In general, they also use special pastes to create volumetric images, ordinary photographs from which the bottom layer of paper and other drawings have been removed. But working with them is not easy, and this is not decoupage for beginners, but for those who are already developing their skills.
Napkin decoupage: techniques
The main idea of decoupage is to decorate the surface with an image or pattern. The process is creative and there are no concepts of “right” or “wrong”. Surfaces and patterns are different, so different techniques are used. You just have to choose the method that works best for you.

Decoupage bottles are a good start for beginners
The easiest way to start mastering decoupage is by gluing large fragments. When you learn how to glue napkins without folds, you can move on - to master the methods of volumetric decoupage or the use of craquelure varnish. For now, let's figure out how to work with large fragments.
Preparatory work
First of all, you need to remember that napkin decoupage for beginners will have to start with preparing the base. It should be even, smooth, without pits, nicks, humps (except for those that are specially provided). To help - putty and sandpaper. After the surface is leveled, the workpiece is covered with soil (selected according to the type of material) and then covered with white paint.

The stage of applying white paint is mandatory. The fact is that the napkins are very thin, and when glued, they become translucent. If they are glued to a white surface, the pattern remains vibrant. If the surface is colored or dark, it fades noticeably, there is no desired effect. Therefore, the paint must be applied even to plastic or ceramics and, possibly, in several layers.
What to do with a napkin
First you need to decide in what form to use the napkin.

How to decide whether to tear the napkin or cut the elements out of it? By the size of the picture. If the fragments are large, have clearly defined boundaries, they are cut out. If the drawing is small, they will stick one next to the other, they will be torn. This will make it easier to line up the edges.
Gluing methods
Choosing how to glue decoupage napkins can only be experienced. First of all, we decide on what exactly we will glue. Can:
- Varnish.
- Special glue.
- PVA - divorced or not.
- Glue stick.
- Egg white.
To glue on varnish is no worse than on glue. But after drying, you will not be able to do anything - the napkins become almost monolithic with the product. If you don't like something, there won't be a chance to change. Therefore, beginners most often use PVA glue - it is cheaper, it is convenient to work with it.

If you decide to use PVA, you will still have to think (or try) to use it in a diluted or undiluted form. Most often it is diluted with plain water in a 1: 1 ratio. When such an adhesive is used, one must be prepared for the fact that the napkin gets wet from the water, it can stretch in different directions, and tear from careless movements. In general, you need to adapt.

A glue stick is also a good option ... if you can smooth out all the bubbles and wrinkles. This is normal on smooth, slippery surfaces. If the surface is rough, it is much more difficult. Work with egg white safe, but specific, so try it if you want.
How and where to apply the adhesive
Beginners usually choose a small size for their first object for decoupage. In principle, this is not bad. It is only desirable that the form be simpler: without a large number bends.
If the object to decorate is small, you can use a brush or fingers to apply the glue. Then use the same "tool" to level the napkin. The brush is used flat or true - which is more convenient for someone. Many people like to work with their fingers more - you can feel all the folds.

When gluing decoupage napkins, you can apply the glue to the object or to the napkin. They do this and that. When applied to a napkin again, there are two techniques:
- The glue is applied evenly over the entire piece to be glued, applied to the base with the middle. With movements from the middle to the edges, air bubbles are expelled and the folds are straightened.
- A certain amount of glue is poured into the middle of the fragment. Further, the actions are the same: we put it on the base, smooth it out.
With the second technique, it is easier to deal with bubbles and wrinkles - it is easier with more semi-liquid glue.

It doesn't matter what and how you will do it. It is important that there are no wrinkles and bubbles.
You can also do if you spread glue on the base: make a small puddle in the place where you are going to glue the fragment, lay it, and, lifting the edges, drive out the bubbles and smooth out the folds.
Smooth surface decoupage: glue + iron
When decorating a flat surface, you can do easier than driving bubbles through the entire napkin. Apply a layer of PVA glue to the primed surface or coat it with glue stick. We smear well so that no "paths" are formed. Let it dry. To speed up the process, you can take a hairdryer.

We lay and level the napkin on the dried surface, smooth it with our hands. We put a piece of baking paper on it and begin to smooth it with a hot iron from the edge.

Decoupage for beginners - maybe try something like this?
Due to the fact that the glue is heated, it saturates the napkin. Usually it turns out quite smoothly. When everything is glued, coat the top with glue and let it dry. This is perhaps the easiest way to learn decoupage for beginners.
File + water and glue
Decoupage for beginners using a document file (choose a thicker film), water and glue. This method is good if you will decorate with large drawings (cut out). Pour a little into the middle of the file pure water, into it, face down, we put the cut out fragment. We carefully straighten it, expelling the bubbles and straightening the folds. It's easy in a puddle of water.

When the fragment is straightened, lift the edges of the file and drain the water. The pattern remains adhered to the smooth film. In this state, it is convenient to "try on" and look for the best place for him.
Having found the area where you want to place the decoration, we apply the drawing on the film and begin to smooth it. This is a very difficult moment. It is necessary to ensure that at least one edge of the napkin sticks. After one of the edges of the image has been fixed, gradually smoothing and raising the edge of the film a little, we ensure that the napkin remains on the base. If you act gradually, gradually gluing the picture to the base, bubbles or folds will not appear. This method is suitable as decoupage for beginners.

When one edge is stuck, everything is already easy
The last stage - coat the adhered napkin with diluted PVA glue. After it dries, we already apply a protective layer of varnish.
A few secrets
These are not ways of gluing decoupage napkins. These are little tricks and tricks that can help you deal with creases faster or better.
- Before work, the cut fragments are moistened with water from a spray bottle. The napkin stretches, when it dries it no longer shrinks. If it has become severely warped, it is ironed. Then use it as usual. Since the paper is already flattened, it hardly stretches anymore. Everything is easier.
- Moisten the fragment with acrylic varnish in the form of an aerosol. In this case, the napkin will become rigid, it does not stretch and does not form folds. But lacquered, it no longer allows glue to pass through, therefore we coat the surface with glue and a processed napkin on it with glue.
- Soak a napkin that is already on the base (dry) and only then coat it with glue. It is difficult to explain here, watch the video.
Eliminate flaws
If the surface is decorated with small torn fragments, from which it is necessary to obtain a single whole, straighten the edges of the fragments with a brush or fingers. If somewhere there is a heterogeneity of color, we dilute the paint of the desired shade and paint over the translucent base.
When the surface has become not very wet, but has not yet dried, you can draw details with thin brushes and acrylic paints, add brightness and clarity.
The next step is to decorate the edges of the product. Here the approaches are different. Somewhere you have to evenly cut the edges, painting over the sidewalls, somewhere you can wrap the napkin on the back side and glue it there. In general, this is also a whole science.

Bringing to the finish is an equally creative process.
After that, you can already leave the product to dry. To speed up the process, you can use a hair dryer, but you need to keep it at a considerable distance, move it all the time and make sure it dries evenly. If, after drying, you see a crease in the glued napkin, you can still fix it. We take fine-grained sandpaper, sand it. We act gently so as not to damage the drawing around.
Varnishing
The dried product is covered with water-based acrylic varnish. You can use another, but this one is recognized as the best. First, one layer is applied, after it dries, the second. We can stop at this, but if active exploitation (caskets, chairs, etc.) is assumed, there may be more layers of varnish - three or four.
Photo of products using decoupage technique
Learning a technique is good, but without knowing the possibilities, it's hard to imagine what can be done and what to expect. A few photos will help you decide what you can or want to do.

Turning an old table into a new and very unusual one is within the power of decoupage


Stools are also an art object.

This technique is called reverse decoupage- napkins are glued on the glass with the front side
It is believed that modern decoupage originates from the favorite pastime of the young ladies of medieval France, who decorated furniture with colorful paper fragments, imitating painting. Paper in those days was much thicker than delicate German napkins, each motif was carefully and accurately cut out, which is why the name of the method came about (decouper - French "cut").
The invention of decoupage was not without the Chinese: it was the elegant lacquered furniture that they made to order for the nobility that served as the prototype that the craftswomen of those times tried to achieve.
A little later, at the court of the Queen of England, decoupage went even further - they began to actively use it to decorate smaller items: caskets, combs and details of ladies' toilet. Today, items created by masters of the 18th century are classified as objects of art and serve as an example of imitation for modern needlewomen.
Decoupage experienced its rebirth in the 20th century, easily settling on the canvases of famous artists - Pablo Picasso, Henri Matisse. Nowadays, the technique has become available to absolutely everyone: colossal opportunities in the search for art objects and the emergence of fundamentally new materials have raised decoupage to a new stage of development.
Searching for "canvas"
Considered at the French court "the art of the beggars," in England decoupage took on the form of luxury. Nowadays, this technique opens up enormous perspectives for an inspired gaze: almost anything that your heart desires can be used as a basis for creativity. Some restrictions can only be created by the type of base chosen.
All potential art objects can be roughly divided into two groups:
- Porous, which accept and absorb paint well, firmly hold the decor on themselves. These include blanks made of wood, plywood and MDF, fiberboard substrates, unglazed ceramics. The preparation of the surface of such objects depends entirely on their purpose: blanks for creativity are sold sanded and completely ready for work, but if you take an old box or box, then you will have to remove the paint layer from it yourself, sand it and grind it to smoothness.
- Smooth surfaces whose dense structure does not want to hold the paint - glass, porcelain, plastic, metal. The applied layer of paint from such objects can come off with any mechanical impact, as well as the object getting into water. Therefore, it is recommended to apply a primer on bottles and cans, vases and plates before decorating, which increases the adhesion of paint to the surface.

Fabric items are a very special decoupage link. They do not require complex preparation - a simple washing of the product before use is enough. Decoupage on fabric is rarely used in clothing, since gluing a napkin or card makes the texture of the fabric coarser. But this type of decoupage is actively used for decorating various accessories.
When looking for an art object, it is important to take into account the level of skill: if you are only testing your strength, then the most advantageous option will be small, flat objects - panels and plates that do not require significant painting on the motive, painting over small details. By using smooth, non-porous substrates, you can easily wash away failed work and start again, while wood and plywood are intolerant of such procedures.
Paper solo
Decoupage has much in common with applique, at the same time, it differs from it in its special artistry, picturesqueness - paper motifs in it must imitate painting and become akin to the surface. Work with the different types paper motives has a number of nuances and subtleties.

- Napkins are the most popular and favorite material. Their thin paint layer easily merges with the surface, without forming a difference in height, and in the abundance of motifs, you can choose the most interesting options and combinations. At the same time, napkins are extremely difficult to work with - every extra drop of glue can cause them to rupture, bubbles and folds often form on the surface. It takes experience and skill to create a real masterpiece with a napkin.
- Decoupage cards delight not only with an abundance of motives, but also with different paper weights. If the specified weight is over 45 g / m2, be prepared for thinning the paper, soaking the motif, and rather troublesome work. Thin cards adhere perfectly like vinyl wallpaper, but require a few extra coats of varnish to cover the elevation differences.
- Rice paper is an ideal material for decoupage. They do not tear, do not form wrinkles and easily lay down even on curved and intricate surfaces.
Decoupage as a set of techniques and methods
Modern decoupage is not just a technique or method, it is a whole trend in art, combining the classic carving of motives and a number of artistic techniques.

- Artistic decoupage combines the classics of napkin technique with artistic painting with acrylics, tempera or pastels. Not only light and shadows can be added, but also the general color background, the distant perspective of the picture and other fragments.
- Point-to-point decoupage... Traditional types of painting can perfectly complement plots and focus attention on them. The addition of motifs with contours has become especially popular - spot painting, outlining individual parts of the drawing with contour pastes add volume to the work.
- Volumetric decoupage- an extensive direction in which plastic can be used to add volume to the picture, polymer clays, foamiran and transparent structural gel.
- Silhouette decoupage- creation of a picture on a canvas, in which maps and napkins are used to form the main objects.
- Pape art - unconventional use napkins in the creation of reliefs and polychrome forms.
A variety of techniques and paper motifs, a rich history of decoupage and almost unlimited possibilities for decorating objects have given rise to a number of styles of work: shabby chic and vintage, Provence and country, modern and minimalism, baroque and glamor. Decoupage is an art in which you will never get bored, because its prospects and possibilities may be limited only by your imagination.
The video tells about the use of decoupage varnish-glue. Varnish glue is intended for gluing decoupage cards and napkins.
We also recommend
 Why doesn't the husband want a second child?
 Long bob with bangs on fine hair
 Features of the design of thematic corners in the younger group
 Selection of makeup for your type of appearance How to choose your makeup
 Dyufaston or Utrozhestan - which is better?
 Face contouring (cheekbones): How to make cheekbones with makeup How to highlight cheekbones in makeup