How to sew a mouse from fabric with your hands. Soft toy mouse
To combat rodents, a lot of drugs and devices are produced: poisons with an attractive odor, spring and electric mousetraps, ultrasonic scarers. As a rule, the acquisition of these funds costs a pretty penny. A do-it-yourself mousetrap is practically free and at the same time does an excellent job of catching rodents.
For people unable to kill an animal, such traps are the only way out: most of them lure the mouse into a trap without causing it the slightest harm. Let's figure out how to make a mousetrap at home simply and effortlessly.
Disposable traps
Disposable mousetraps will have to be reinstalled after each rodent caught. For their manufacture, they use improvised materials (ropes, bowls, plastic bottles) and the simplest tools (scissors and an awl).
Option 1
The classic mousetrap is a snap-on lid, quick and easy to make. You need a small capacity: a 0.5-1 liter can, a deep plate, a disposable plastic cup. You will also need a coin or a nut; bait is tied to them on a short string. The coin is placed on the edge and the edge of the container rests on it. The mouse tugs at the rope, climbing into the jar, and it falls, preventing the pest from escaping.

This elementary mousetrap from a can can be improved: instead of a coin, you can cut from thick cardboard or a plastic rectangle about 2 cm wide and sharpen it on one side so that it is convenient to stick the bait on it.
Option 2
If food spoiled by rodents is found on the table, a disposable mousetrap from a bottle is most convenient. To make it, you will need a bottle of 1.5 liters, a rope about a meter long, an awl and strong scissors. Cut off the neck from the bottle at a distance of about 5 cm from the cork, pierce the hole at the top with an awl and tie a rope through it to the bottle. The other end of the rope should be secured to the table, for example, tied to the handle of a saucepan.
To catch a mouse in such a bottle, they place it on the edge of the table so that the bottom with the bait hangs in the air. The mouse, climbing inside, outweighs, the whole structure falls down and hangs on the rope. It remains to drown the rodent or take it outside the house.
Option 3
The simplest mousetrap, but at the same time quite effective, is made of plastic bottle as follows: using stationery knife it is necessary to cut the bottle into 2 parts in the place where it begins to taper.
Turn the neck over and insert into the main part, the sections must be positioned at the same level and fastened with tape or glue. A bait is placed at the bottom of the bottle, the neck is lubricated with any edible oil. The mouse, once inside, slides down and cannot get out.

The only difficulty is that this plastic bottle mousetrap should be positioned so that the mouse can easily reach the neck, for example, near the shelves. Tracks can be made for mice to make it easier for them to climb. Then the bottles will have to be made heavier by pouring some stones or sand on the bottom.
Reusable traps
Making a reusable mousetrap is not much more difficult, the designs of most of them are elementary and do not require special skills. These traps can be checked every few days by discarding trapped rodents. True, they cannot be left for more than a week, otherwise the room will be saturated with the smell of decomposition.
The swing principle
The design of the first reusable mousetrap, which is easy to make yourself, is based on the principle of a swing. It will require any container with a volume of 5 liters or more with a wide mouth: a bucket, a saucepan, plastic containers. Across the edge of the bucket, using tape, fix a rigid wire, knitting needle or wooden twig.

You also need a plank a few centimeters wide and slightly less than the diameter of the bucket. Suitable, for example, a ruler or a rectangle cut from thick cardboard, plastic, metal.
We position this board so that it rests on the knitting needle, one edge lay on the edge of the bucket, and the other with the bait placed on it was in the air. In order for the mouse to climb onto the plank, a homemade mousetrap is placed on a stool at the edge of the table. You can make a ramp out of a board and attach it to the trap.
To make the trap reusable, the balancing board must be attached to the spoke and positioned so that it returns to its original state.
Spinning drum
The basis of this trap is the same as the previous one: a bucket and a bridge leading to it. In order to dump the rodent into the container, a rotating cylinder is used. To make it, you can take a small plastic bottle or tin can. A small hole is made in the bottom of the bottle, and then it is pushed onto a knitting needle. The knitting needle is placed on the bucket as an extension of the bridge and fixed.
A bucket mousetrap will work for a long time if the bait is placed around the entire circumference of the bottle. You can smear it on or attach it with a rubber band. The mouse, attracted by the smell, climbs onto the drum, it turns, and the rodent is in the bucket. If the mouse is not planned to be released outside the house, water is poured into the bottom of the bucket to choke it.
Trap trap
Mousetraps work like traps, easily letting the rodent inside and not allowing it to come out. A simple option can be made from the same plastic bottle: cut off the top, and cut the edge of the main part into narrow triangles 5-7 cm long. The resulting teeth are bent inside the bottle, and the bait is placed there. The mouse easily squeezes into the trap between the elastic plastic strips, but cannot get out back.
A more complex reusable version of this design can be made from a wooden box yourself. A round hole is cut out in one of its walls at a distance of no more than 5 cm from the bottom. Along its perimeter, at a distance of 1 cm from each other, steel wires 5-7 cm long are inserted so that they are inside the box. The mouse, having climbed into the hole, falls through the wires and remains inside the box. Rat traps are made in the same way, you just need to increase the diameter of the manhole.
Glue trap
When catching mice, you can also use special glue from rodents. It is sold in hardware stores and supermarkets in the pest control section. According to the instructions, such glue is spread on a cardboard, and a bait is placed in the center. A mouse, hitting it with even one paw, sticks tightly. This is far from a humane mousetrap, the rodent dies in it for a long time and painfully.

The disadvantage of this product is the ability of the glue to stick to curious pets and smear everything around. You can avoid this by building reusable homemade mousetraps. In a shoe box, a hole is made on the side for a rodent, a sheet of paper with glue applied under it is placed inside the box, and a delicious-smelling bait is placed in the back. After that, all that remains is to replace the paper.
Lure selection

World cinema has long inspired everyone that rodents love cheese more than anything else. In fact, catching a mouse on any dairy product is quite difficult. The most effective way to attract them to traps is to use:
- lard, especially smoked,
- smoked sausage,
- white bread croutons,
- unrefined sunflower oil,
- Sesame oil,
- fried sunflower seeds and peanuts.
Bread soaked in sesame oil is most attractive to rodents.
The baits need to be changed periodically, because the mice, having sensed the danger, stop reacting to the smell of the treat.

A mousetrap made from improvised means does not require special efforts and financial costs, and the result from its use is often better than from industrial products. And in some cases, there is nothing left at all how to make a mousetrap with your own hands. It will take much less time than looking for a working store late at night or trudging to the city from the dacha. Having decided on what materials are in the house, you can always find a suitable option from a huge selection of homemade traps.
Cats are playful creatures, in live breeds they lead an active lifestyle, satisfying their needs for hunting. However, pets also need outdoor games that allow them to develop their internal natural instincts. For this, cats need toys. You can buy them both at a pet store and do it yourself.
Top ideas
Toys can be simple to make, such as balls or pencils on strings, or complex. For example, you can create an interactive toy with your own hands that will not only allow the cat to enjoy outdoor games, but also develop it. intellectual abilities.
Attention!
A variety of soft toys, rattles and labyrinths will also delight the playful hunter by brightening up her leisure time. In addition, the pet needs to be thinned out somewhere, because he can start playing and Making them is not at all difficult at the same time, any kind of improvised materials will do.
Soft
Many pussies love soft toys for the reason that they can be easily grabbed by releasing their claws when playing. Cats especially like to hitch a toy when catching it, because this is what imitates their hunt in the wild. Let's consider several options for creating do-it-yourself soft toys. By the way, this is a great and simple solution.
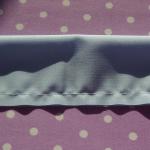
How to sew a mouse (with a pattern)?
 Option 1
  Option 2
  Option 3
 Expendable materials:
- Scissors
- Laces
- Thread
- Needles
- Pattern
- Textile
- Beads
To create a mouse, you need a special template, according to which you need to cut a pattern out of the fabric. If you choose fabric of different textures and colors, the animal will be much more interested.
Step-by-step instruction:
- Tail. Cut out a 2.5 x 10 cm pile of fabric. Or use a simple piece of lace.
- Ears. Cut out a small triangular piece of fabric, then staple the side corners together.
- Corpuscle. We sew two pieces of fabric from the templates along the edge; cotton wool or synthetic winterizer must be stuffed inside. Any soft filler will do. Sew the rest of the template.
- Completion. When all the parts are ready, it remains only to assemble the toy by sewing on the necessary parts. For the eyelet, you can use ordinary beads by gluing them in place. Tie the ponytail with a knot at the end for beauty. The toy mouse is ready!
Puppet toy
Easy to make, but interesting puppet toy is another fun option for your pet. To make it, you need an ordinary toy with a filler, a stick and glue.
Reference!
If the toy is ready, then it is enough to slightly cut the edge of the toy, insert the stick there, and securely glue the ends of the fabric with the stick. It is important that the filler does not come out of the toy. At the same time, its surplus, if any, should be removed.
Pompom for a kitten
 This entertainment option is ideal for kittens of any age. To make a pom-pom you will need: fabric, string, scissors. Take two small pieces of cloth different color.
Cut them into strips of equal size. Gather them in a bun and fold them several times. Tie tight in the middle with a string, secure with a knot. Spread the strips in different directions. Tie a long string or strip of fabric to the finished garment to play with the kitten.
Scent toy
A scented toy is another fun option for your pet. The special aroma of catnip will attract her to the product.
Expendable materials:
- Textile
- Scissors
- Needle and thread
- Cat mint
- Packet scraps
The shape of the toy can be absolutely any, for example, in the form of a cube, a mouse or a fish. Sew a pattern from the desired template. Place some rustling material such as bag scraps inside.
Place the catnip inside and sew ready product... It is important that the place of cutting is not visible, it is best to use internal stitches, otherwise the animal will tear the toy apart in search of a tasty smell.
It should be noted that cat fragrances are a separate topic. Properly used scents can help train a cat to go to the toilet where it should be - in more detail.
Rattles
 In wildlife, cats are guided in many ways by sound. That is why making a rattle toy will be good option fun for your pet.
You will need any small plastic container. Beads and other sound-making objects, tape or glue, lid. Place bells and other small parts inside a clean plastic container. If there are labels on it, they should be removed. The surface of the toy must be level and clean.
Cover with a lid or other object and glue or tape tightly. You can decorate an item in bright color so that it grabs the animal's attention. The rattle is ready!
Interactive toys: what are they?
Interactive pet toys have become especially popular lately. They represent a kind of puzzle that the cat must solve in order to obtain a treat. They look different, in the form of all possible mazes or traps, tubes or boxes with holes.
Their task is to force the cat to solve the problem in a logical way. This is presented as a fun game. Since cats are curious and curious animals, they gladly begin to comprehend a new problem. You can buy such a toy at a pet store or make it yourself, using your imagination.
Labyrinth - homemade simple option

One of the most popular types of interactive toys is a labyrinth. To create it, you will need all the tools at hand that can serve as an obstacle for the cat, as well as tape to connect them together.
It is most convenient to use pieces of plywood and planks, large cardboard boxes. A delicacy hidden in an egg container is suitable as bait, plastic cup or another small container.
From the pipes
 If you still have plumbing pipes after repair, then you do not need to throw them away, they will be the perfect solution for creating an interactive toy for your pet. To create, you need four plastic pipe bends and a drill with a special attachment.
By closing the pieces of pipes, you will receive vicious circle... Using a drill, you need to make small holes where only the cat's foot can fit. Launch a rolling ringing object and a ball into the maze. The edges of the pipe holes must be processed so that the cat does not get hurt when pushing the paw.
Simple options
Sometimes there are no materials at hand to create complex entertainment for the cat's amusement. What to do then? For creating toys, the simplest, common materials that can be found in any home are also suitable. Making the simplest toys doesn't take a lot of time or expense, but it brings a lot of joy.
Corks, balls, balls, fabric
 For playful cats, any object that rolls, attracting the attention of predators, will do. Ordinary corks, small pin-pong balls, various balls, both tinkling and soft, can come in handy.
And of course, a ball of thread is one of the most fun for a cat. In this case, the end of the ball must be tightly fastened so that it does not roll out throughout the house. Merry fun will keep your pet busy for a long time.
From paper, sachets
Plain paper can serve as a toy for your cat. It is only necessary to crumple it and tie it to a string in the middle. The cat will be happy to chase new toy... Also, a favorite place for home tails are large paper bags... If you throw some toy into them, then there will be no limit to the delight of the pussy. We recommend that you explore how you can make a paper house.
Sun Bunnies - Simple Interactive Game
One of the most fun activities is available in the summer when the weather is sunny. It is enough to take a small mirror and point it out the window. A bright glare will appear on the wall - a sunbeam.
Reference!
Direct the mirror in different directions and the cat will chase it with delight. Despite the prostate, this interactive game allows the animal to develop its hunting skills and logic.
Meter tape
If you have an ordinary measuring tape at hand, then you can safely take it in your hands. Cats love to play, chasing her throughout the apartment, arranging a whole show for their owners.
From the box

Large boxes are a great place for felines to play. They not only love to sleep in them, but they can also play great, especially if holes are made in the box and a small rolling and tinkling ball is launched there. As easy to build and as this toy.
Pencils
The usual set of pencils can be a reason for active and fun fun. One has only to break off the leads before using, so that the pussy does not get hurt accidentally while playing. Throw pencils to the cat and watch him chase after them, or tie a pencil on a string for fun.
Programs about animals, birds (with video!)
Many pet owners think that animals do not like watching TV and do not take the image on it seriously. However, it is not. Experiment and turn on your pussy a program about her closest relatives from the world of wild nature, and watch how she watches with surprise and delight what is happening on the monitor screen. Below you can find a video that you can turn on your pet.
Kitten toys - should they be different from cat toys?
Kittens are especially playful. Like all children, they love to play with a variety of toys. But it is worth remembering that the entertainment of an adult cat is not suitable for a small kitten and can be dangerous.
Reference!
Small stuffed toys are best suited for a kitten, playing with a sunny bunny and other safest ones. But interactive games or games with packages and boxes will not work for a kitten.
Security

Attention!
In the game, being carried away, you can easily forget about safety. When creating toys, it is important to remember that with active contact with the part, the cat can get hurt, so there should not be any sharp corners, objects, the stuffing from the toy should not stick out.
Also, the toy should not be coated with chemically active compounds, since the animal is likely to take it in its mouth and try to chew it. All threads and seams must be created in such a way that the cat cannot tear them.
With some toys, it is better not to leave the pet alone, using only group games with the owner from which the pussy will be delighted.
Useful video
And especially for you, a video instruction on how to make an interactive toy.
Output
It is easy and simple to create a toy for your favorite pet for fun, even with a limited budget. It is worth showing imagination and any seemingly mundane things can be adapted for playing with your beloved pet. Do not be afraid to experiment when creating new entertainment, but you should always remember about the safety of the animal.
From which we will make a pattern. Put the paper on the table and draw an even circle on it with a compass. Cut it out neatly paper circle scissors. Then we bend it in half. We have a pattern that can be used to make a mouse. Now you need to cut out such small circles in order to make the ears. We make the radius of the compass smaller and draw a circle. We also carefully cut it out with scissors. Trying on an ear for our future mouse. If it seems to you too large, you can reduce it.

You can make a mouse from soft fleece and padding polyester
Now we need to cut our mouse out of the fleece. We choose the fabric from which we will sew it. Let's take, perhaps. We lay out the fleece with the back side on the table and put our mouse body pattern on it. We take a pencil, soap or chalk and carefully trace the pattern on the fabric.

Now you need to carefully cut it (the circle). Everything, the most important detail to make a mouse, is ready for us. Now the cloth circle needs to be rolled up. This will be the little body of the mouse. And now we need to cut out the ears of the mouse. We put the fabric again inside and outline the ear. Then we cut it out. We make two identical circles.

Now we need to make the inner part of the ears of our mouse. We will make it, for example, from. To do this, we again take the ear pattern, put it on the fleece, outline it, and cut out two more circles, only this time from yellow fabric. That's it, you can remove unnecessary things from the table and start sewing our mouse.

To make the mouse right, let's start sewing it from the ears. The material for our mouse is pink and yellow color, so you need to pick up the same threads. We will choose pink threads for sewing. We measure out a small piece of thread and fold it in half. Since the ear of the mouse is not large, we can sew it with a not very long thread. Let's thread the needle. Be very careful when handling the needle.
We fold our two parts, see how much they match, fold and start stitching. Sew the details with a overlock stitch. Ask your mom what kind of seam it is. However, we are sure that your mother has been sitting with you for a long time and helps to make the mouse with good advice. But we will also try to explain how to sew with this seam.
The thread is slightly wound forward, with the needle away from us, pierce, remove and make a loop, straightening it with your fingers so that it lies flat along the edge of the product. It turns out such a seam. The stitches must be made evenly so that the seam is decorative and beautiful.


Here we have sheathed our part. Now she needs to give the shape of an ear. Bend the eyelet slightly where we left off the seam and sew two more stitches. We make the stitches small and almost invisible.

Our mouse ear is ready. We make the second ear in the same way.
Now, to make the mouse chubby, we need to cut the padding for it. We take a piece of padding polyester, put a pattern of the mouse's body on it and carefully cut it out in a circle. We fold the padding polyester circle in half and try it on to our part. We take a needle large and long enough so that it is convenient for you to work with it. Now we cut off the thread longer, and thread it into the needle, tying a knot at the end.


We correct the synthetic winterizer and begin to sew the mouse body with the same large seam. We do not finish the seam completely, because we will insert a tail into this hole.

We definitely need to make a mouse with a tail. After all, there is no mouse without a tail, right? Cut out the mouse's tail. Let's fold the fabric, roughly as follows.

Let's think about how long the tail can fit for our mouse. Well, probably as long as her. We attach the torso and mark with a pencil. The ponytail can, of course, be of any length, and if you want, you can make it very long. Cut out the detail, gradually narrowing the tail towards the end. Now this tail needs to be sewn in exactly the same way as the ears and body. We start sewing from the edge, from the very tip of the mouse's tail. Fold the knot between the fabric, then press it down. Well, now, our ponytail is ready. Now we need to secure the thread with a knot. Gently stretch the thread, thread the needle into the loop several times and tighten the knot.

Now we attach the tail to the body of the mouse. Holding the tail with your fingers, we begin to sew. We no longer make the stitches over the edge, but ordinary, straight ones. We pierce the fabric of the body along with the tail and take out the needle. Because of the padding polyester, the needle can hardly pass through the fabric. This stitch is called - forward the needle. The ponytail is attached with literally two stitches, and it will already be held.

Now let's think about where we attach the eyelet. Like the tail, we sew the ear with several stitches. When sewing on the second eyelet, make sure that it is at the same level as the first. If you want to make the mouse "a little" larger, then it can be used as a sofa cushion. Then all the details must be sewn, of course, tighter, so that it is more durable. And if it's simple, or, then the ears can not be sewn very tightly.

Now we need to choose beautiful eyes and a nose for the mouse. For this we need beads and possibly buttons. Let's choose black beady eyes for the mouse. Well, or any other color that you like. Well, the nose can be made pink. Now, carefully, put a button in the hole between the fabric and sew the nose to the mouse. For the nose and eyelet, you can use any buttons and beads that you have at home. Match them by size, color. By changing the color of the beads and buttons, you can change the character of our mouse. You can make your mouse funny or angry. We can sew the nose and eyes with one thread. To sew the eyes, we need our needle to come out in the place where you planned to place them. After we have sewn one eye to the mouse, we sew the second one. We carefully pass the needle through the entire piece and sew on the second eye.


That's all, our mouse is ready. You can present it to your mom. She can make a pincushion out of it. You can make a mouse in several copies of different colors, sizes, and put them on your sofa so that they serve as your pillows. Or you can just give them to your friends.
Have you ever wondered how things work, how they go from idea to implementation, how simple simple things are? How easy is it to make a comb? What about a computer mouse? What about a wooden computer mouse made from a solid block of mahogany with an LCD screen, with its own electronic filling and a cable made and braided especially for it? I think you will be interested in my path that I went through in 2.5 years of creating my mouse.
Design, construction, modeling
Since I was a complete zero in design, I approached the matter as a complete layman. I bought plasticine and started sculpting the mouse of my dreams.
First, I blinded a mouse, which is ideal for me to work on a desktop. She is a large dark gray in the photo. Then I dazzled a mouse that would suit me as a mobile (dark gray small). And then I took the piece of plasticine stolen from the children to work, and my colleagues sculpted a mouse that claims to be called "folk". She ideally fit into the hands of the majority of the male population of our team (multi-colored in the photo). And what? The result is banal and dull forms, which we pull day and night with our hands in every way. Apparently, among the three standard mice, any user will find a convenient one. The triumph of the ideal?

As a result, a mouse was modeled at the computer, which, from my point of view, pretended to be graceful and beautiful.

At that time, I really liked her. And without thinking twice, I divided the computer model into parts. The elements of fastening and interfacing with the electronic filling have been thought out. It sounds simple, but in fact hundreds of hours of painstaking work have been spent.

After that, the resulting parts were grown on a 3D machine to check the assembly.

Material - polyamide. It sits well in the hand, like a glove. All parts fit together, process assembly also went without problems

The next step is milling in wood. I got probably a dozen different types of redwoods, but I started with the sapele tree, the rest of the species are waiting in the wings.


I didn't like the design live. The vertical gaps between the buttons and the case looked bad and untidy. Technological "sores" are visible when working with wood - chips and tree drift. And the main thing - the keys did not bend, there was no click.

I thought about the design for a long time. Something was embarrassing, and there was no sense of satisfaction. Then I realized that the mouse lacks solidity. I decided to return to the original version of the mouse, which I sculpted at the very beginning, only at a professional level and using sculptural plasticine. There are two design options in one mouse. Convenient for comparison and decision making.

After receiving the final version, 3D scanning and transfer of surfaces to SolidWorks were done.

The second model turned out to be not much more successful than the first. The buttons were not pressed and it was not possible to fix this in the current model. The marriage of the model was laid down at the DNA level. A more comprehensive approach is needed with simultaneous control of both design and technology. Otherwise, nothing will work. There will be either technological excellence or good design, but not all at once. These characteristics sit on opposite sides of the swing. So I throw everything into the trash and start over. Sketch-design-sculpting-testing-cultivation and so on, but with technological control of critical parameters on the one hand, and design on the other. We are looking for a middle ground.

The third model was made already within the framework of the classic product design cycle. I started with a sketch.

Outlines were drawn.

And finally, the approved design.

Plasticine layout.

3D scanner, surface acquisition.

Computer model.

Then the process of finishing the hull began. On the CNC machine, the body was cut out, tested, refined, then cut out again. As a result, only the tenth version of the case turned out to be workable. The most big problem was to make the keystroke comfortable. As a result, in some places the thickness of the wood decreased to 0.7 mm! It took me a year to finalize the case.

The wheel and the connector were also made of wood.

The wheel has been laser engraved with the Clickwood brand.

The eleventh version of the corpus is on its way, where I will make minor changes. I also started developing a wireless version of the mouse. The wireless module is based on Bluetooth technology, the optosensor is laser based. Accumulators of standard size AAA, 2 pieces, with the possibility of replacement. The mouse will continue to work while charging. All elements are located very tightly, during the layout I had to pretty much break my head. A cavity specially cut in the wooden case of the mouse serves as a container for the batteries.

Wooden parts
Working with wood begins with the selection of wood. Boards must be of the correct geometry, have a minimum of knots and defects, and have the necessary moisture.
First, the boards are dried at home. At least six months.

After that, the board is sawn into small pieces, which are dried for several weeks at the site of their further processing. At all stages, humidity is controlled by a special device. If the drying process is neglected, the wood loses its geometric stability, and the manufacture and operation of the mouse becomes impossible.

The prepared blocks are processed on a CNC machine using a specially created program.

From the very beginning of part creation to final assembly mice, the parts are rigidly fixed on the metal tooling so that at none of the stages the part does not change its shape and geometric dimensions.


The processing of the upper part of the mouse has to be done with pinpoint precision, since its profile is designed for a soft click and is very thin in some places. I control the pressing force with a gramometer. In normal mice, it ranges from 50 to 75 GS. I'm trying to get 50 GS.

The tree in my project has the biggest challenges. Not only is this the most significant part of the cost, but the share of rejects is very high here. Wood is an anisotropic material. He can be led, vices can be caught, chips can occur, and a simple error in the finishing coating technology can lead to the mouse body being sent to the trash heap. I admit that I am still improving the processing technology, and I'm not completely sure that I have found the right one. For statistics: in the first batch of ten cases, only three reached the finished product. Therefore, the wood part of the process chain is critical to the cost and quality of the finished product. We are constantly working on it.
In the future, I plan to work with bone. In particular, I am already making a bone wheel.
Electronic part
I developed the first mouse circuit myself. I took the top-end optical sensor ADNS-3090 from Avago as the sensor, the controller from Atmel became the brains, and the rest of the components from branded companies such as Murata, Yageo, Geyer, Omron and Molex.

I paid special attention to high-quality mouse nutrition, here, in my opinion, with my perfectionism I reached the absolute

First working layout.

In black, final.

There have also been experiments with various buttons. I've always tried to find a quiet mouse among others. Well, since I do it myself, I decided to conduct an experiment and make such a mouse and test it in work. To do this, I replaced the clicking left and right "mikriki" with soft and quiet ones used for the central button (did you notice that the central button always clicks quieter?). A special version of the board was created, where all three identical "mikriks" were mounted.

Picked up and bought a batch of gold-plated connectors for the mouse. As usual in China. I don’t know what about "better contact", but they are in perfect harmony with the tree.

Screen, firmware
Carried away by the idea of placing a display in the mouse, he began searching for it among hundreds of suppliers. The requirements were simple: strict dimensional restrictions and the possibility of at least symbolic display of at least eight familiarity spaces. While I was picking up, I learned almost everything about displays. They differ in types: symbolic and graphic, in technology: TAB, COG, TFT, OLED, LCD, E-Paper and others. Each type or technology has many more varieties, sizes, colors, lighting, etc. In general, there was something to dig into.
Break half of the Internet, I found out that the size I need is made by only one company in the whole wide world. All other options are definitely larger in size. And even the display I found barely fit inside the mouse. As an option, a custom display was considered, which could be made for me according to my requirements, but this is a very expensive option for me (about one hundred thousand rubles). For the first model, a graphic display with a resolution of 128 by 64 pixels, which I chose, is fine.
In order to understand how the display really looks and is combined with my mouse, I had to order all varieties of this display from the manufacturers. What do these varieties mean? The model name consists of unpronounceable alphanumeric combinations such as FP12P629AU12. All of them are assembled from various blocks and clearly deciphered in the specification. For example, the given example can be assembled from blocks FP.12.P.629A.U12, where the type, size, voltage, controller, operating temperature range and other information about the model are encrypted. And the last block is the trickiest. It can have several dozen values, each of which means one or another combination of such characteristics as the presence and color of backlighting, background color, color of symbols, a range of degrees from which information is clearly read. These parameters were of interest to me.
As a result, "for trial" I ordered 18 different modifications. The manufacturer agreed, but said that the minimum order is 5 displays for each modification. There was nowhere to go, and I had to agree, knowing that 90% would go to the trash can. And then one of the cloudy days, the express delivery service brought me home a huge box in which a homeless person of average build can live. There were 18 smaller boxes in the box, each of which freely accommodated 5 display devices, securely fixed for a long trip to cold Russia. There were so many accompanying packaging that the mother-in-law was enough to cover several beds for the winter.
As a result, after thorough tests on a specially assembled stand, two displays turned out to be suitable for the series. They differ only in the background: gray and yellow-green. It is them that I will offer for completing the mouse. By default, I plan to set yellow-green, but two more options will be available: a display with a gray background and a mouse without a display at all.

But the main intrigue was what information can be shown on the screen? I was offered different ideas: ambient temperature, indication of the arrival of letters, something else not very original.
My train of thought followed a different path. Let's start with the fact that there are two significant restrictions on the display of operational information: the presence of a huge and high-quality source of any information (monitor) in front of the user and the need to turn the mouse over to obtain information. In addition, the screen is small, the resolution is small, and the LED interferes with normal reading. Therefore, I got one conclusion: information should be only entertaining in nature, the applied value of which tends to zero, but at the same time the WOW! Effect should be lethal.
What information can have such properties in a device of an ordinary complexity? There is not much of it: mileage, time of use, speed of movement, number of clicks and scrolling of the wheel. I decided to abandon the last parameter, since it seemed uninteresting to me. All the rest of the parameters are bound to the session (the last time the mouse was used from the moment it was powered up, i.e. connecting to the computer or turning on the computer itself) and to the entire lifetime of the mouse. For example, the user can at any moment of the mouse find out how many times he pressed the left mouse button or how many his mouse has run in meters for today or since its purchase. The information is absolutely useless, but it will help especially curious ones to understand how much he torments the mouse. If others appear interesting ideas, then they can be implemented with a new firmware.
Also added general information by mouse (model, mouse and firmware number, month of manufacture) and settings screen. It will be possible to select a language and system of measures (English or metric). To store all this information, a persistent flash memory had to be added to the circuit.
To accommodate such a volume of information, I had to split everything into screens. Each screen displays one type of information and shows the parameter values per session and for all time. There are six screens in total, which can be changed with the mouse wheel.
The first option was implemented in a purely textual manner, for which several variants of fonts were even developed.

I made the firmware to evaluate how the text looks using the created font on the mouse screen. Looks awful to say.

Now it became obvious that the screen needed graphics, not a set of symbolic information. Therefore, I hired a designer, and together we prepared three options for graphic design, in the end the second option was recognized as the most successful.
Of course, this design required a higher resolution, so it had to be adapted.
But this is not the end of the story. After I picked up the screen for the mouse, I ordered a trial batch for the mock-ups. As a result, the screens came, but for some reason the number of conclusions differs from what is indicated in the specification (datasheet). The manufacturer received an answer to the request that, they say, everything is fine, this is a small modification, and it will not affect the performance in any way. Meanwhile, the missing two conductors were responsible for the brightness of the displayed graphics.
It was all very suspicious. And exactly as he looked into the water. We remade the board for a modified screen, soldered it, and then it turned out that the screen was completely dim. It's like the device has run out of batteries. And it turned out after a long and painstaking work on the search and selection of screens, the purchase of a trial batch of all modifications and their tests. Time, money, and so on.
But the story ended up with a good ending. After correspondence with the Chinese, it turned out that the screen can now adjust its contrast directly from the firmware. Healed the firmware, and everything began to show just fine!
Everything is shown as planned: mileage, speed, number of clicks, etc.
In the future, the firmware also changed several times: there was a setting for changing the language. Two languages on one screen is bad - readability deteriorates, Cyrillic abracadabra will only annoy an English-speaking user, and support for other languages may be needed in the future. The difficulty started when I tried to adjust the mouse run. It seems that it is difficult there: the optical sensor transmits an increment in two coordinates, which must be reduced to the system of measures and added modulo to the current value. That's the whole run.
But, as it turned out, not everything is so simple. Two people with mice, where the same sensor is installed, can get dramatically different results! The thing is that the resolution of the sensor (sensitivity) is highly dependent on the surface on which the mouse rolls. The best results are obtained when the mouse rolls on white paper. Slightly worse for wood and fabric. Laminate and film are very bad. The declared passport sensitivity is achieved only on ideal surfaces from the point of view of the sensor.
It makes no difference to the end user. He connects the mouse and, by trial and error, sets a comfortable cursor movement speed in the operating system. The system remembers this coefficient and uses it to increase or decrease the values of the movement coordinate increment.
But it is quite another matter if you are planning to read these parameters directly from the mouse. The mouse on one surface will show the result of a run of one meter, on the other - one and a half. The speed will also "lie". And you have to do something about it.
To solve this problem, we had to introduce the “Sensitivity” parameter, which allows you to individually select the coefficient for each surface. By default, it is equal to one, which corresponds to the surface of the white paper. It can be increased or decreased in the settings. You don't have to touch it at all, everything will work fine anyway. But for true perfectionists in the leaflet attached to the mouse, a table will be given from which you can select the coefficient for the available surface and instructions on how you can independently configure the mouse to show the exact mileage.
During the development of the firmware, another one was discovered by-effect sensor operation. If you take a mouse and just wave it in the air, the mileage readings will also change. This is due to the fact that the sensor detects the surrounding space as a kind of surface and also tries to get the values of the mouse offset. Therefore, you can observe the following effect: you turn the mouse over, look at the mileage parameters and are surprised that they change upwards right in front of your eyes. Of course, you can install a tilt angle sensor in the mouse, which turns off the sensor during its flip, but it is unreasonable to do this only for the described situation. It may appear in the next version, but not now. After all, the mouse is raised only to look at the indicators, and 99.9% of the time it is on the surface and receives the correct information.
Cable
I decided to make the cable as flexible as possible so that it would not interfere with the movement of the mouse and would be "invisible" for kinematics. Well, I personally do not like the "spring" cable.
Sometimes it seems that when creating a product, the cable is the most insignificant part of the product. What is easier - buy the right amount of cable in the store and unsolder it. A damn thing. But, alas, not here in Russia. Sometimes it seems that our industry is no longer equipped to do anything more complicated than cast-iron irons. Attempts to find a cable resulted in a three-week search and shaking up the assortment of absolutely all manufacturers of Russian cable products. It turned out that our standards did not describe a cable suitable for modern electronic devices. For example, a four-core microphone cable with KMM braiding 4x0.12 mm2 has an outer diameter of 5 mm. This is a lot. Older mice and keyboards have a seemingly thick cable with an outer diameter of only 3.5mm. The closest analogue on sale was a cable by the German company Lapp Kabel, but its outer diameter was just 3.5 mm. Now imagine also the braid on such a cable. Have you presented? I'll tell you that I saw a similar cable on power cords for irons.
So, it turned out that such a cable cannot be bought in Russia. Point. Well, we are not used to retreating. I go into production and try to order, fortunately in Russia they still make a cable. And for this we will define my requirements. So what I need:
The conductors are made of braided copper wires (for flexibility).
The number of cores is 4.
Screen - yes.
Flexibility is maximum.
The outer diameter of the cable is strictly no more than 3 mm.
Color - Pantone 4625 C.
Bottom line: I tried to write, probably, with a dozen possible manufacturers of cable products, no one is interested in messing with my order. They didn't even ask how much mileage I needed. Bottom line: such a cable cannot be bought or produced in Russia. Sad. But we are not used to retreating.
Going to Alibaba.com. I find the first Chinese manufacturer I come across, write a letter and literally a few hours later I receive an answer: we will make any cable for you! I'm shocked. I throw him the specification, money for delivery, and a week later I receive a sample. Blimey! And I lost almost three months, trying to patriotically place an order in Russia. It turned out that the Chinese can easily make me a cable with an outer diameter of 2.5 mm.
The bottom line: I ordered 4 different samples from China. At first, I didn’t like the scratchiness and dullness of the outer shell, then I didn’t like the flexibility of the cable, then again I didn’t like the flexibility, and in the end I settled on the last sample sent, which I was ready to order. They cannot be more flexible. The cable has a memory. As a result, I accidentally got a cable with memory, although I wanted to be as flexible as possible like a rope
I ordered a kilometer, two weeks later I had the cable. Total Time Spent: Six months.

Braided my kilometer of cable. We got two options.

Approximately 10% of the cable was rejected. This is the beginning of the bays, where the braid is unraveling and the machine has not yet entered the operating mode. And some places where, for some reason, loops and knots of the braid threads were formed.
If the end of the cable is not sealed with heat shrinkage, then it will fluff up at the moment, the threads are synthetic! Therefore, the installation of the cable assembly is made more difficult by the preventive heat shrinkage.
The outer diameter of the braided cable is 3.2 mm, i.e. the braid added 0.7 mm to the cable diameter. It seems a little, but with a regular mouse, the cable comes mostly with a diameter of 3.5 mm, and in the era of wireless mice, it seems thick and heavy. Recently, non-budget mice began to be equipped with cables with a diameter of 3 mm, and they no longer interfere with work, they are almost imperceptible. But the keyboard cable can be with an outer diameter of 4 mm. And even more. But it doesn't matter for the keyboard.

Plastic parts
As much as I would like to make the body parts of the mouse completely out of wood, but plastic is indispensable here. You need legs, an axle for the wheel, a support for the axle and a glass for the display.

Therefore, I had to order a mold from the Chinese.

After each test casting, the Chinese sent me a dozen samples, which I tested on my mouse.

As a result, I modified the mold three times, until the quality began to satisfy me. The problems were different. For example, after assembly, I got a problem of dust that forms between the display and the protective glass. It looks untidy. Moreover, the mouse will scratch on the surface, and dust will gradually accumulate there. I had to transform the glass into a container with rims, where the display will be inserted, after which the circuit will be sealed.

The result is such a detail.

Modification of the mold is not an easy task at all, and changes can only be made in the direction of increasing the part. Therefore, any inaccuracy or mistake can ruin the whole work. For reference: each revision is a month and a half of waiting for new samples. And the change itself could be microscopic, but necessary.

I will not dwell on the plastic details, this technology is now in the lead, and I cannot tell you anything new and interesting here. I will only say about the legs, for which I have been selecting material with reduced friction for a long time, after which I conducted tests and "races" of mice in order to determine the winner with minimal friction.
Processing and coating
Initially, there is a thorough work with the removal of lint, sanding and polishing the surface.

I was faced with a difficult task. It was necessary to stabilize the tree so that the geometry of the mouse does not change depending on humidity, and to protect the tree from working in an aggressive environment (sweat and grease from the hand).

I gave up varnish from the very beginning. Varnish is a surface film that cracks, breaks down over time, and the tree is exposed. Sweat and grease penetrate the pores, the wood darkens, and an irreversible process of its degradation begins. Therefore, it was decided to use oil as an impregnation and protection, and wax to give it a commercial look.

To make it clear: the tree is soaked through with pores, which contain either air or the oil of the tree itself (if the tree is rubber). Our task is to fill the pores with our oil as much as possible, which should then polymerize and protect the wood.

In order not to stretch the story, I will say that I have tried many oils: linseed, teak, tung, vaseline, Danish. Each oil has its own character. For example, wax is very poorly applied to teak oil, and linseed oil takes a long time to polymerize. Therefore, it is necessary to introduce a catalyst - a desiccant - into it.

I ended up developing two technologies. The first is the technology of vacuum impregnation of wood. It works like this: I create a vacuum in an environment with oil and wood. Air starts to come out of the pores. After the vacuum is removed, the pores are filled with oil. As a plus, the tree stabilizes well. As a minus - it darkens a lot. Looks good, but not for everybody.

The second technology is surface oil coating. Apply the oil 1-2 or more times with a non-woven cloth.


Apply carnauba wax.

And rub it with a muslin circle.

Then, with the help of a hairdryer, I "dissolve" dry wax residues in narrow and difficult places. In the case of "insoluble" garbage, I take it in my hands toothbrush with stiff bristles, remove the debris and then repeat the waxing procedure locally again.

If we estimate the labor costs of processing, then manual labor per mouse is about four hours.
Assembly
Next comes the installation operation, but before it, you still need to remove traces of processing from the technological holes. Then, using a special 3M tape, I adjust and glue the legs (the body can lead by a fraction of a millimeter, and this will immediately be noticeable: it will stagger like a lame stool). Then I lay the cable, mount the board, support, install the wheel and also, if necessary, adjust the buttons (there should be no chatter) and the pressing force. This operation can also take up to four hours.
We also recommend
 Rules for grinding and wet-heat treatment of garments
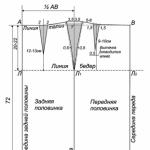
 Building a pattern for the basis of a dress: Italian technique as the easiest way to make a good pattern
 How to build a dress pattern base
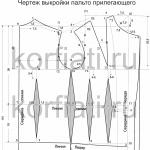 We model and sew coats!
 Skirt of the year, construction of a pattern
 Fashionable children's skirts from old jeans - patterns and description