Features of creating a costume and a mask of a crow with your own hands. How to make a magpie costume with your own hands? - Useful Information for Everyone White Dress Magpie Costume
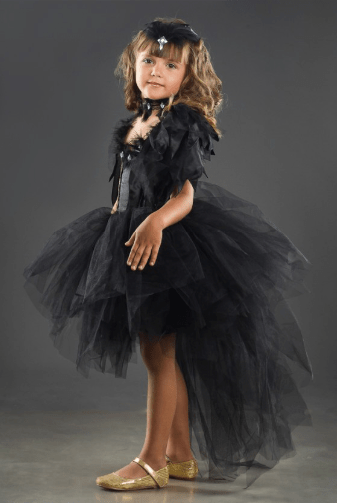
The most common images of girls on New Year's and other fancy-dress children's parties are snowflakes, squirrels, fairies, princesses. If you want to be original and experiment - choose a magpie!
DIY development will require imagination and imagination. A baby in this outfit will look stylish and bright.

How to create a magpie costume
Ah, white-sided magpie!
Wears a dress very strictly
Black top, white side
Favorite style of forty!
Long tail, nimble, talkative,
She loves shine wonderfully!

Characteristic features of a magpie: dark top, white sides, more shiny decorations.
Suitable materials for making a magpie costume with your own hands: cloth, paper, and even black plastic bags.
Two ways to sew
Let's take a look at how to create a magpie look based on casual clothes, adding details to the look: capes or curly sleeves. Let's make wings, a tail and add a hat.
Cape - cape
We need a white dress from the little fashionista's wardrobe. To him, we will cut a cape from the fabric - a cape, which will imitate the wings.
You will need black silk lining or other lightweight fabric. Cut out a circle with curly edges along the bottom and make a hole for the neckline. Additionally, you can decorate your cape with a small bib, which is made according to the principle of a baby bib. This is the white breast of a bird.

Sew triangular pieces on top of the canvas, imitation of plumage. You can trim the entire cape with feathers made of paper, textiles or plastic bags. It will take time, but the effect will be worth it.

The second way to do it yourself is to sew imitation wings and feathers on a blouse, T-shirt or turtleneck. Any tight-fitting blouse will do white... Sew on the sleeves fluffy layered flounces of black tulle or plumage-like pieces of any available fabric in black and light colors.

A skirt is required for such wings.
You can sew a fluffy gathered skirt or tiered skirt. In the first case, you will need a strip of fabric from the waist to just above the knees. The fabric is gathered along the waist line with a belt or elastic band.
For layering, use a few strips of fabric. different lengths... The shortest strip is sewn to the belt. The next length is sewn to the first part, and so on.
Complete the skirt with a small apron with a pocket like a white-sided magpie.

A bright and festive option is an organza or tulle tutu. It can be sewn from a single piece of fabric or simply put on multi-colored stripes on an elastic belt. If they are of different lengths, this will only add color to the image.
For the bird's tail, tie long, wide satin ribbons behind your back. The ponytail can also be sewn separately. It is better to do it using the same technique as the wings. It can be detachable or sewn to the belt. If you made wings completely lined with feathers, make the tail the same. It will be very beautiful.

A skirt with a train also looks like a bird's tail. The train, like the pack, can be made of black stripes.
How to create a magpie hat
The simplest headpiece for a magpie is fluffy black and white bows or a headband with a suitable image.
If you have a black baseball cap in your wardrobe, make a hat out of it. Trim the visor so that it resembles a bird's beak. Cover it with leather or paste over with cardboard. Sew eyes on the top of the cap. You can use the details for soft toys that are sold in handicraft stores. Complete the cap with a large pretty polka dot bow.

You can sew a magpie hat. First, make a base-cap from thin jersey (1). Glue paper beak and feathers on it (2).

For big fashionistas, you can make a cute miniature top hat. Cut out the margins, crown and bottom from cardboard. Glue the pieces together and cover them with satin or velvet ribbon. Add feathers, tulle, ribbons, beads as decor.

We complement the image with accessories
In children's literature, the white-sided magpie is often depicted in a colorful headscarf. At the holiday, the child will probably find it uncomfortable to move in a scarf on his head, so tie it in a gypsy style at the waist. A bright scarf will dilute the monochrome tones of the outfit and add color to the heroine.
Magpie loves everything bright, shiny. Sew a cute little purse in which she will put everything that glitters. Make a small pocket, sew loops in the upper part and thread a nice lace into them. Decorate the bag with any appliqués, beads, ribbons - as your fantasy tells you.

Well, and most importantly, without which it is difficult to imagine a magpie of fashion - jewelry, beads, bracelets, earrings. You can collect suitable ones from your mother's box or make rowan decorations if the event takes place in the fall.
As a make-up, you can draw a small funny bird on the child's cheek. Use a water-based face painting, it adheres well to the skin and is easily washed off with soap and water.

So the magpie costume is ready with your own hands. In such an outfit, you can go to the Autumn Festival, and the New Year, and to any costume events.

We will only make three details: wings, a scarf and a beak. We take all the other components of the magpie's costume for the girl ready-made. So, look in the wardrobe of your fashionista for a white blouse or T-shirt (it is imperative that she has short sleeve) and a black skirt.
We make wings for the outfit
For this part of the magpie costume, you will need to purchase:
- Lining fabric in two colors: black (80 cm) and white (60 cm).
- Threads in black and white.
- Needle.
- Scissors.
- Regular elastic band - 15 cm.
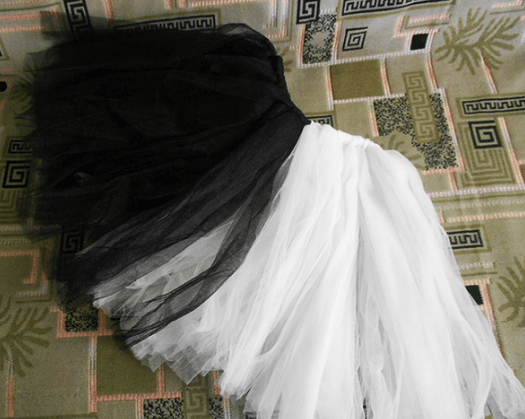
Taking a black fabric, fold it in half lengthwise - to obtain two canvases, the width of which will be approximately 40 cm. The length can reach one and a half meters. Next, you need to measure the length of the girl's arms, be sure to add 10-15 centimeters to the result. This is done so that the wings cover children's palms and hang down slightly. Having dealt with the size, without fear, cut out the black wings for the magpie costume.
It is according to the same scheme that white wings are prepared. The only difference is that they should be made narrower and shorter in length, unlike black ones, so that after stitching with each other, the latter can be seen from under the wings of white. By the way, in white the middle is then cut out. The wings are sewn with white threads.

It remains to sew an elastic band on the back side - to secure the wings to the palm of your hand and prevent them from sliding when the child moves. And the last thing: we sew the resulting detail to the outfit itself.
If you plan to perform in a magpie costume for a New Year's party, then you can use tinsel to decorate it. Other fenders are also possible.
Sewing a scarf
We stock up on the following necessary materials:
- White calico (70 cm).
- Black backing cloth (should remain from the fenders).
- With a glue gun.
- Scissors.
- White satin ribbon.
- White thread.
- With a needle.
From the purchased piece of fabric, you need to cut an isosceles triangle. If you have enough time, you can decorate the scarf with a satin ribbon sewn along the contour. If there is none, then it is sewn by hand or on a typewriter.
Remember, we also have black fabric in stock. She will go for cutting out circles. Their number is arbitrary. These circles are glued to the kerchief with hot glue. You can see that making a magpie costume with your own hands is not difficult at all. 
Making a beak for a dress
Here the main material will be black cardboard. It rolls up into a narrow cone and sticks together. Be sure to try on that the size of this part matches the child's nose. The glued cone is trimmed if necessary. In the upper part, do not forget to pierce a couple of holes on the side so that the child can breathe. 
The beak can also be made ajar. Then you need to cut out another narrow piece in the shape of a triangle (it should be shorter than the length of the beak) and glue it at the bottom. Use a thin rubber band to put on the beak.
The tail can be made by analogy with the wings. Only its size should be smaller. A small piece of fabric is required from the materials (black and white are needed). From this segment we cut out one tail (black, long), another white tail (short) and the last one should be black, it will be the smallest. They are all cut by eye, no templates are required for this.
After connecting the parts of the tail, they are sewn together. Then the tail is sewn on the back of the dress or skirt (depending on what will be taken as the basis of the outfit). For decoration, you can sheathe the hem of the dress with white tinsel. Since our heroine is crazy about everything shiny, the use of beads and other bright decorations will come in handy.
Who doesn't like this black and white outfit, you can work hard on creating a cartoon look. In this case, you need a white blouse, bright skirt and a scarf, as well as an apron.
If the outfit is intended for a boy, then the simplest solution would be to sew a fringe to a black turtleneck (jacket), and sew a beak and eyes over the hood.
We tried to consider in detail how to make a magpie costume . Perhaps you will supplement it with some of your own interesting ideas... We hope that your daughter will feel great in this wonderful look.
How to make a magpie costume
When I found out that my daughter would be on New Year magpie, once again sighed and thought, but that's why, someone snowflakes and you can dress up your daughter in a beautiful dress, make festive rubber bands for her from ribbons, and then we are pigs, then foxes, then bad weather aunties, now here are magpies) ... And all because there are a lot of words to learn, so we get such roles. My daughter is following my path, as a child I was given the longest poems and roles, where you need to memorize a lot of words.
Well, well, forty, so forty. I went to a handicraft store, where we have a New Year's costume rental, asked if there was a magpie costume, it was there, but what ... something completely different, I didn't like this option and I decided to sew a magpie costume myself ... Although I do not know how to sew, so I will immediately reassure mothers who will read this and say, we do not know how to sew, I also cannot, honestly).
I scoured the Internet in search of detailed information how can I do for my daughter new Year costume magpies, but I didn't find anything worthwhile for myself, it was only in this way that I understood certain thoughts for myself. There are many options for ready-made, beautiful costumes, but no one tells how to sew them), I will have to correct the situation, help out poor parents, whose children will get the role of a magpie at the holiday.
So, we will make a white-sided magpie costume very cheaply. At least I made every effort to this. The most important thing we will need to do is the wings, headscarf and beak. The rest will be ready-made.
Everyone has in their wardrobe a white short-sleeved blouse (you can use a T-shirt) and a black skirt. We have one piece dress, which lasted for two whole years and was not worn even once, who would have thought that it would then turn out to be an excellent suit for a magpie). And in color it perfectly matched black and white and a short sleeve, so that later you could sew on the wings.
How to make magpie wings
For the wings, I bought the cheapest lining fabric, well, judge for yourself, buying an expensive one to use it for 40 minutes, no, it's not for me.
- Black lining fabric - 80 cm
- White lining fabric 60 cm
- Threads are black and white
- Needle
- Scissors
- Regular elastic band 15 cm
Unfortunately, I did not shoot this stage, because as I wrote above, I was not going to write an article about it, because I did it all at random, and I did not know what would happen. But I made sketches on paper, and now I will tell you everything in detail.
We take a black lining fabric, we have it 80 cm, fold it in half lengthwise to get two canvases, their size will be about 40 width and length, depending on the fabric, it can be up to 1.5 m. Now we measure the length of your child's arm from the shoulder and add 10-15 cm to this size so that the wings can cover the child's palms and hang down a little.
For black wings with daughter sizes, I needed two canvases 40 cm wide and 80 cm long. I didn't have any template for cutting out the wings, I cut them right away on the fabric, as I imagined, and cut it out. If you are afraid to ruin the fabric, make a template on cardboard, only this is a very large sheet of cardboard, you need to draw a wing on it and then cut it out by attaching it to the fabric. Cut out two black wings according to your measurements.

In the same way, we cut out two white wings from a white lining fabric, but they should be narrower in size and smaller in length than the black ones, so that later when we sew them to each other, the black wings would be clearly visible from under the white ones.
I will not indicate the sizes here, you have to adjust them based on the sizes of the black wings. The only difference in the white wings is to cut out the middle afterwards. When you cut out the wings from white fabric, cut out the middle for both, in the sketch I drew the cutout area with shaded.
Now we put the white wings with the cut out middle on the black ones and sew them using white threads. I sewed everything with my hands, although we have sewing machine, but it's easier for me this way).
 I recommend carefully burning the wings, just do not burn them) so that they do not crumble, although this fabric does not crumble much, there is still a tendency to this, so in order for the wings to look neat, I burned them with matches, we will need a lot of them. You can also use a candle, but I was uncomfortable with a candle. Now we sew an elastic band on the back side so that the wings are fixed on the palm of your hand and they would not slip when moving.
 It's time to sew magpie wings to a dress, or a blouse, or a white T-shirt. I just attached wings to the dress, but so that they would not come off, of course, at the matinee itself, then after the matinee, we calmly and neatly removed the wings from our clothes and we will wear a dress, and someone a blouse.

It is possible to decorate the wings, in the event that the costume is intended for New Year's party decorate with fine tinsel. If this is another holiday, then tinsel is not needed. You can see in the photo that I sewed tinsel on the wings, where we have a cutout on the white wings, and tinsel goes along the contour.
How to sew a headscarf for a magpie
You probably noticed that in cartoons, magpies or crows are often in a headscarf, so I thought it was the best way and the simplest one, you don't need to separately buy a magpie's hat, which, by the way, costs 700 rubles, just a hat with a beak and eyes. And we have an entire ready-made magpie suit that can hardly cost 300 rubles). So look how profitable it is to do everything yourself, the savings are significant.
I was in some thoughts, what material to use for the scarf. I immediately imagined a white kerchief with large peas, but where to get such finished material? I went around all the fabric stores in our city, fortunately there are not so many of them, I found a more or less suitable material in peas, but its meter cost 250 r, no, well, this is a lot for a scarf for 40 minutes, I thought. And she got out of the situation in a different way. For the kerchief we need:
- Buy 70 cm of white coarse calico
- Black lining fabric (remnants of black wings)
- Glue gun
- Scissors
- White satin ribbon 5 cm wide - about 3 m
- White thread, needle

Don't think, dear readers, that I'm some kind of curmudgeon, I just think about the family budget, and I see the main and the secondary, what needs to be spent on, and what can be replaced with something cheaper. I hope you enjoy my budget ideas too.
With the kerchief, everything is very simple, we take the purchased piece of fabric, and cut out an isosceles triangle from it, and this is the one in which the opposite sides are equal. That's where geometry comes in handy, friends).
And now we need to sew to the headscarf satin ribbon along the contour, this is for beauty, you can do without it, if there is no time, then just trim the kerchief to look neat, or hem it with your hands if there is no typewriter. I also sewed on the ribbon by hand, for beauty I tied it up, look at the photo. Keep in mind that we only sew ribbons on both sides. From a white satin ribbon 5 cm wide, you can create a lot of beautiful things, for example, kanzashi daisies.

Now we cut out black circles from the remnants of the black lining fabric, for this I found a tiny measuring cup, it seems from under cough syrup, and I circled it, then cut it out. Cut the circles at your discretion. I didn’t count their number.

Now we need to glue the circles on the kerchief with hot glue, you can sew them on, but it’s long, and I don’t have time at all), I also save it))). The pea klondike for the magpie is ready. For beauty, I made a white bow with black peas, the technology for making such a bow is described in my article kanzashi bows.

How to make a magpie's beak
Now we need to make the most important attribute of the magpie - the beak. For this we need black cardboard. We fold it into a narrow cone and glue it, try it on to fit your child's nose. We glue the cone, cut it if necessary. Be sure to pierce two holes on the sides with a thin drill or something sharp so that your child can breathe.

My husband suggested that I make a slightly open beak for a magpie and I agreed. cut out a still narrow triangle in length slightly shorter than the beak itself and glue it from below, the daughter painted the inside of this lower beak in red. To put on the beak, you need a thin rubber band, well, you all probably saw what rubber bands and how the masks cling. We had white elastic threads at home, so we used them.
How to make a tail for a magpie costume
I made the tail in the same way as the wings, only it is much smaller in size, the principle of its creation is exactly the same as for the wings, for the tail we need quite a bit of black and white fabric. Since there is only one tail, we cut out only three parts, one black tail, which is longer, one white shorter and the third small black one, even smaller in size than white. I do not indicate the dimensions, I did everything by eye and cut it out without a template.

Now we fold the parts of the tail, as shown in the photo, sew them to each other. Then we sew the tail to the back of the dress or skirt, for beauty and accuracy, I attached a bow a little higher than the sewn tail, so the tail looked more interesting. It turned out that I made only two bows, for the headscarf and for the tail.
I also trimmed the bottom of the dress with white tinsel for beauty, but this is as anyone wants.
Well, this is how I described in detail for you today how to make a magpie costume, attached a photo, if you have any questions, write, do not hesitate, I will tell you, I will help, what I know.

It’s still a fascinating activity, making costumes of heroes, having no idea what the result will be, more precisely, imagining, but not quite, because all the thoughts came to me during the creation of this costume. In general, my friends and acquaintances said that the magpie is very similar to itself, I can’t judge for myself, see for yourself what happened in the end. Maybe you will come up with some new interesting ideas in the process of creating a magpie costume.
With respect and love, Elena Kurbatova.
What kind of costumes mothers have to make while their children are growing up. Having learned that your daughter does not need a magpie suit, you should not worry. We will tell you what materials are needed for it, and describe the manufacturing scheme itself.
Components of the outfit
We will only make three details: wings, a scarf and a beak. We take all the other components of the magpie's costume for the girl ready-made. So, look in your fashionista's wardrobe for a white blouse or a T-shirt (be sure to have a short sleeve) and a black skirt.
We make wings for the outfit
For this part of the magpie costume, you will need to purchase:
- Lining fabric in two colors: black (80 cm) and white (60 cm).
- Threads in black and white.
- Needle.
- Scissors.
- Regular elastic band - 15 cm.
Taking a black fabric, fold it in half lengthwise - to obtain two canvases, the width of which will be approximately 40 cm. The length can reach one and a half meters. Next, you need to measure the length of the girl's arms, be sure to add 10-15 centimeters to the result. This is done so that the wings cover children's palms and hang down slightly. Having dealt with the size, without fear, cut out the black wings for the magpie costume.
It is according to the same scheme that white wings are prepared. The only difference is that they should be made narrower and shorter in length, unlike black ones, so that after stitching with each other, the latter can be seen from under the wings of white. By the way, in white the middle is then cut out. The wings are sewn with white threads.

It remains to sew an elastic band on the back side - to secure the wings to the palm of your hand and prevent them from sliding when the child moves. And the last thing: we sew the resulting detail to the outfit itself.
If you plan to perform in a magpie costume for a New Year's party, then you can use tinsel to decorate it. Other fenders are also possible.
Sewing a scarf
We stock up on the following necessary materials:
- White calico (70 cm).
- Black backing cloth (should remain from the fenders).
- With a glue gun.
- Scissors.
- White satin ribbon.
- White thread.
- With a needle.
From the purchased piece of fabric, you need to cut an isosceles triangle. If you have enough time, you can decorate the scarf with a satin ribbon sewn along the contour. If there is none, then it is sewn by hand or on a typewriter.
Remember, we also have black fabric in stock. She will go for cutting out circles. Their number is arbitrary. These circles are glued to the kerchief with hot glue. You can see that making a magpie costume with your own hands is not difficult at all.

Making a beak for a dress
Here the main material will be black cardboard. It rolls up into a narrow cone and sticks together. Be sure to try on that the size of this part matches the child's nose. The glued cone is trimmed if necessary. In the upper part, do not forget to pierce a couple of holes on the side so that the child can breathe.

The beak can also be made ajar. Then you need to cut out another narrow piece in the shape of a triangle (it should be shorter than the length of the beak) and glue it at the bottom. Use a thin rubber band to put on the beak.
The tail can be made by analogy with the wings. Only its size should be smaller. A small piece of fabric is required from the materials (black and white are needed). From this segment we cut out one tail (black, long), another white tail (short) and the last one should be black, it will be the smallest. They are all cut by eye, no templates are required for this.
After connecting the parts of the tail, they are sewn together. Then the tail is sewn on the back of the dress or skirt (depending on what will be taken as the basis of the outfit). For decoration, you can sheathe the hem of the dress with white tinsel. Since our heroine is crazy about everything shiny, the use of beads and other bright decorations will come in handy.
Who doesn't like this black and white outfit, you can work hard on creating a cartoon look. In this case, you will need a white blouse, a bright skirt and scarf, as well as an apron.
If the outfit is intended for a boy, then the simplest solution would be to sew a fringe to a black turtleneck (jacket), and sew a beak and eyes over the hood.
We tried to consider in detail how to make a magpie costume . Perhaps you will supplement it with some interesting ideas of your own. We hope that your daughter will feel great in this wonderful look.
Unusual individual costumes for New Year's celebration all kids love. Matinee is approaching in kindergarten, and the child got the image of a crow, and not ordinary snowflake, snowman, bunny or squirrel? If you want your child to be unique, then it is best to make a dress yourself. Even if there are two crows in the New Year's performance, the outfits will still come out different and unique.
Crow costume for the play
The bird's decoration consists of several parts, but a mask and wings will be required. To make a dress, you can buy fabric or use handy material, which you will find on the closet or in the closet.
Cloth outfit
 An uncomplicated piece to cope with novice dressmaker, consists of two parts: a raven mask and wings. Choose an easy DIY crow costume and start with the wings. To do this, prepare the following materials:
- plain black fabric for the base;
- black satin ribbons or braid;
- flaps black cloth, lining or velvet;
- spool of black thread;
- a needle or sewing machine.
For the base of the wings, take rectangle... Its length is equal to the distance from wrist to the wrist of a small actor, and its width is about half a meter. Fold the rectangle in half and round the corners of the fabric with scissors. Divide the resulting semicircle in half into two wings, hem the cuts or overlock.
 Cut out feathers 7 cm high from individual patches.To work faster, you can fold the fabric into multiple layers, then from one strip you get several feathers. Having prepared the feathers, proceed to sewing. Lay feathers on the base of the wing starting from the bottom, and stitch row by row.
Sew on a satin ribbon by joining the top of the wings and adding ties in the middle to keep the entire model around the shoulders and waist. Additionally sew on ribbons for fixation on the wrists. Cloak for the crow is ready.
Paper raven decoration
Making a costume does not require a large investment, but please be patient and time consuming. There is also work for the baby, therefore jointly the time spent and communication will not be wasted.
 Make a costume consisting of a T-shirt with a ponytail, wings, and a headgear. To work you will need:
- black cotton fabric - 1.5 m;
- elastic jersey - 0.5 m;
- black shoe laces;
- black linen elastic band - 30 cm;
- round elastic band - 20 cm;
- pattern paper;
- ink or black gouache and brush;
- glue "Moment";
- spool of black thread and a needle;
- scissors.
Start your craftwork with the wings. Measure bent at the elbow the length of the baby's arm from wrist to shoulder. On paper, make a pattern that resembles a crow's wing. The length of the wing is equal to the measurement of the hand, choose the width as desired. Transfer the pattern to the fabric and cut out. Make the detail of the second wing in a mirror image.
 For a suit to fit well on a child, you need durable fastenings for the wings. Measure a rubber band over the shoulder and cut to the desired length. Make two identical pieces of elastic. They will keep the suit according to the principle school backpack... Attach the elastic to the base of the wings at the level of the shoulder blades and sew to the fabric blank.
From the rubber band, cut two sections for the eyelet for the child's finger. Thanks to these loops wing tips will be attached to the arm. You will have a wing base with shoulder straps and toe loops.
Go to making feathers... Make blanks out of paper different shapes and length. Bottom row - narrow and long feathers, up to 20 cm; the rest of the rows are 10 cm.
 The crow's costume is black, so paint all the feathers black ink or in gouache on both sides. Mascara is good because it shines and does not stain your hands.
When creating small feathers, cut one edge along one edge with scissors to make it look more believable. After all the feathers are ready, glue them onto the fabric part. Place them overlapping. After gluing on the bottom of the long feathers, do the rest.
T-shirt with a tail. If there is no ready-made black T-shirt or T-shirt, then take the child's usual T-shirt to make the pattern. Attach to a piece of black knitwear, circle with chalk or a bar of soap and cut in two halves.
Sew the side parts on a typewriter, sew laces on the shoulders (two laces for each shoulder). On the back of the shirt, glue the feathers in a chaotic manner, sew on the tail. To make the tail, cut out a long triangle on which you glue the finished paper feathers.
 The paper outfit is ready, it is suitable for a New Year's party and for staging a performance. Wear black leggings and black shoes under the suit. Put the wings on the child first, a T-shirt on top, it will cover the elastic bands and strings.
Trash bag dress
To start creativity, you need an idea. If the teacher supplied you with an idea and said that your daughter will be a crow at the matinee, then you just have to come up with the style of the suit and choose the material for making it. Trash bags are an unusual, inexpensive, lightweight material for creating any carnival outfit:
- green - for vesting a Christmas tree;
- blue and white - for decorating snowflakes;
- black - suitable for a crow costume.
Choose a style for your future dress. Remember that the clothes should be comfortable for the baby, therefore long dress will be uncomfortable for the child. To work you will need:
- dense black bags;
- scissors;
- black scotch tape;
- stapler;
- cardboard;
- underwear elastic band.
 Take one bag as a basis for the suit and straighten it. Attach a T-shirt and cut out the future dress along it or cut the neckline and armholes at random.
Divide the bags into strips 10 cm wide. On each piece, make a fringe of any width. Starting from the bottom of the dress, glue each strip with tape to the base of the suit to the very top. Make the frame of the wings separately from cardboard, attach elastic bands to them, which will hold the wings on your shoulders. Cover the cardboard frame with a plastic fringe using adhesive tape.
Head adornment
The raven is a strict, wise, at the same time spectacular bird, so a suit is needed. But it's hard to imagine it without a beak and feathers on its head, so make a headdress. There are many options - these are masks, hats, hoods. Having picked up the option, start creating the main accessory.
Simple Crow Beanie
A mask for a New Year's party can be made in origami style and sealed with glue for strength. To do this, you will need a sheet of paper 41 cm long and 30 wide.Use a ruler to divide the short side into three equal parts and draw parallel lines. Measure on straight lines on one side 10 and 20 cm, mark the points. Make cuts along the length of the sheet 10 cm to the first point, and across the length - from the second point to the drawn lines.
Flip the sheet over so that the lines are at the bottom. Glue the side strips to the middle strip one by one, like the edges of the box. Let the glue dry, the back of the beanie is ready.
Now bend the middle cuts and glue to the base of the cap at an angle of 45 degrees. The result is a hat with a wide visor, from which you need to make a beak. Fold the edges of the front part of the corner to the corner and make a 5 cm fold. Fold the edges of the beak inward. The crease in the middle will be the center of the crow's nose. Glue the edges of the paper underneath.
It remains to paint the mask black, make a white rim around the eyes, paint the beak yellow, draw the nostrils.
Beak hat
Take a simple baby hat and make a pattern like a T-shirt. Circle on the fabric and connect the two blanks.
Cut two 10 by 10 cm squares out of paper and cover with black paint or ink on one side. Fold the dried squares into triangles, bending two corners to the middle. Glue the resulting blanks and connect to each other. For beauty, glue red stripes in the beak. Fix the finished beak on the headdress.
Then starting with bottom row glue the feathers all over the fabric in a checkerboard pattern. For a hat, you will need small feathers with notched edges. Decorate the dress for the girl with a bow on the crown.
Simple and stylish raven
If the boy is a schoolboy, then you probably have a black school suit. You don't need to sew anything to it, just put on a black turtleneck and black shoes under the suit. But take care of the headdress separately. A top hat and a paper raven mask will suit a black formal suit. You can print the template by finding a suitable picture on the web.
The simple material you need for a top hat is paper. Take black paper or then paint the finished hat with black paint. To make a cylinder you will need:
- Whatman paper or cardboard 1 mm thick;
- compass and ruler;
- PVA glue and brushes;
- scissors, tailor's tape;
- paints.
Three parts need to be obtained from cardboard:
- circle (bottom of the cylinder);
- rectangle (for the crown);
- a circle with a hole in the center (its diameter is equal to the bottom of the hat).
Before you start making your hat, take your measurements for the pattern. Use a tailor's tape to measure the circumference of your head and calculate the radius of the circle at the base of the cylinder. The circumference of a child's head is, for example, 50 cm, then the radius will be 50 / (2 * 3.14) = 50 / 6.28 = 8 cm.
Draw a circle with a compass with a radius of 8 cm. From the same center, draw a circle equal to the width of the brim of the hat. Carefully cut out a large circle. Without cutting the margins, remove the smaller circle from it. You now have two details: the margins and the base of the cylinder.
The crown is the upper part of the hat from the bottom to the brim. To make the crown, draw a rectangle on paper with a width equal to the circumference of the child's head and a height equal to the height of the hat. On both sides of the width, leave a 2 cm allowance for fastening the cylinder and cut the allowances in 2 cm increments. You have the third part ready.
You can collect your hat. First of all, glue the crown. On the allowance, apply glue along the height and overlap, connect the edges of the rectangle: a cylinder is formed.
Bend the notched allowances of the cylinder perpendicularly: for the lower part outward, for the upper part - inward. Apply a little glue to the lower allowances, put on the margins through the pipe part and press firmly against the glued elements.
Apply glue to the upper seam allowances and glue the base of the hat gently.
The hat is almost ready, it remains to paint the product black.
Crow mask with beak
To make the image realistic, create a paper crow mask with your own hands using a ready-made papier-mâché template in the shape of the child's face. Black feathers and a massive beak are the main details of the image. To work you will need:
- preparation of a crow's head mask (you can print it on a printer);
- cardboard;
- black scotch;
- scissors;
- old newspapers;
- black paint and brushes;
- salt and flour for paste;
- glue and glitter;
- black feathers;
- acrylic lacquer.
Before making a paper crow's beak, draw and cut an equilateral triangle out of cardboard, bend it in half to make it look like a beak. Take a ready-made template, use tape to stick the beak on the mask in the nose area.
Mix two parts flour and one part salt with a glass of water. Connect the components carefully.
Tear the old newspaper into small strips. Soak the pieces of paper in the flour mixture and apply to the mask blank. Make four layers of papier-mâché. By applying more and fewer layers in different places, you can give relief to the beak: mark the hump in the middle, mark the notches at the nostrils. Let the product dry.
With a wide brush, paint the finished mask with black paint and sprinkle with glitter immediately. Once dry, remove excess glitter powder. Apply a thin strip of glue around the entire outline of the mask and glue the black feathers along the edge of the mask. You can glue on multiple layers of feathers for fluffiness.
Cover the finished beak with a shiny varnish and let dry. Decorate the eye holes with glittering rhinestones.
Magpie is the sister of the crow
The costume of the white-sided magpie differs from the decoration of the raven only in color. The crow is completely black, and the magpie has a white breast, sides and part of the feathers on the wings.
To create a magpie costume, you need two fabric colors, black and white. A lot of bright jewelry will come in handy: beads, earrings, bracelets, toys.
Take a square piece of black fabric and cut out a circle on it, the diameter of which should be equal to the distance from the child's neck to the hand. Cut the circle radially to the center. The base of the cape is almost complete. Overlock the edges. Sew on the ribbons for attaching to the neck and small elastic loops for attaching to the finger. Use white fabric to make a collar and cuffs. Cut the feathers out of a 7 cm wide ribbon and sew them to the cape.
Decorate your New Year's costume with Christmas tree tinsel. Sew a triangle-beak and eyes from yellow felt with black buttons to the finished hat.
Attention, only TODAY!
We also recommend
 Why doesn't the husband want a second child?
 Long bob with bangs on fine hair
 Features of the design of thematic corners in the younger group
 Selection of makeup for your type of appearance How to choose your makeup
 Dyufaston or Utrozhestan - which is better?
 Face contouring (cheekbones): How to make cheekbones with makeup How to highlight cheekbones in makeup