Simple rose from a ribbon. Rose brooch from ribbons Brooch rose white from ribbons
Friends, today you can get acquainted with the manufacture of a magnificent satin ribbon brooches... The author of this work is Olga Grushenkova. He is an interesting, creative person who knows how to create beauty and splendor around him. You could see her wonderful works on our website. Olga showed her master classes on making, poppies... A wide variety of flowers came out of Olga's hands.

Try to do this brooch with roses.
Take a thick satin ribbon that is five centimeters wide. Cut squares out of the tape, and then make circles. You can make the number of circles arbitrary, and it depends on how splendid you want to make the rose. Make all the petals the same diameter.

Singe the edges of the tape. You can hold the tape with your hands or with tweezers. Hold the circle of tape over the flame. To make the circle warp a little, quickly lower it low to the fire. It is mainly the edge that runs along the tape and not at the edge that is fired.

Burn on the side of the fire, almost at the base of the candle, and if you are burning over the candle, then keep the tape higher.
Take one of the circles and collect it on a string and pull it off, filling the middle.


Start sewing the petals around the core. The petals should be facing out. Pull them together on a thread, forming an assembly and giving the desired volume.


Cut off the tail formed from below and singe the edges.

Use a hot knife to vein the leaves.
Insert the wire directly into the flower. Cut a quadrangular star from the green ribbon and make a hole in the middle. Stick to by slipping over the wire.
Do the buds in the same way, only take fewer petals.
Wrap the stem with a ribbon. Cut a narrow strip from the ribbon, coat it with glue and wrap the wire with it.
Satin Ribbon Jewelry will be a great addition to your wardrobe. Such brooch will decorate your dress or costume. Well, it can also be a gift for your beloved women. And also suitable for a wedding.
You can find a lot of wedding accessories, wedding decorations, wedding dresses, etc. on the site.
Copyright © Attention !. Copying of text and photos can be used only with the permission of the site administration and indicating an active link to the site. 2019 All rights reserved.
An indispensable attribute of a woman is jewelry.
They are made of precious metals, with or without natural stones, and artificial materials. They are also factory-made and original crafts with their own hands. Today's master class is dedicated to creativity.
Modern stores present a wide range of sewing accessories and accessories. Hand made is popular in Russia.
DIY felt brooch
The technique for making such a brooch is simple. The materials used are not rare. Suitable for decorating clothes, handbags, interior decoration, gift wrapping.
Materials and tools: felt the color of baked milk, felt green, thread (it is better to use a floss), vintage copper button, decorative fastening pin, scissors, paper, pencil, needle.
The figure suggests a template. On it, petals and a leaf are cut out for a future flower brooch. It is required to make 3 petals and 1 leaf. A pattern is made from paper.
The paper pattern is laid over the felt. 4 products are cut from it. They all vary in size.
Two large petals have a round core cut out. In the smallest petal, cruciform lines are cut in the center.
Decorative veins are manually stitched with floss threads and a needle. The seam is simple. The larger the petal, the larger the line for the brooch with your own hands.
A decorative pin is sewn onto a green leaf.
On a leaf, petals are superimposed on top in turn. The last will be the smallest one. A vintage button is sewn by hand. She also holds the entire resulting product together.
Brooch - ready! Wear it with pleasure!
DIY satin ribbon brooch
This is a beautiful volumetric flower. She will not go unnoticed! The brooch can be used to decorate a dress, a hat or your desktop computer to cheer up.
Materials and tools: satin ribbons of two colors, scissors, candle, matches, tweezers, thread, needle.
A 10 cm long tape is cut off. The ends of the tape are melted by the candle fire. This will keep the fabric from shedding in the future.
The upper corner is folded down with tweezers. A bisector is drawn from the lower corner of the triangle with a needle (the triangle is divided into two equal ones) and the fabric is pulled together with a thread.
The same manipulation is performed on the left side of the tape. You will get a small graceful bud.
A new bud is made from a new piece of tape 10 cm long. The left and right corners are folded down. A simple seam is manually sewn along the bottom edge. The thread is pulled together and a new larger bud is obtained. The previous petal is inserted inside the new one.
All subsequent petals are simply bent into a charming shape that resembles the natural shape of a rose flower. In total, you need to bend 13 petals from satin ribbons for a brooch with your own hands.
At the end of the work, satin leaves are sewn to the base of the rose.
The shape of a beautiful tea rose for a brooch can be made in the second way
A 12 cm long tape is used in the amount of 14 pieces. A piece of satin ribbon is first folded at both ends towards the center.
Then - again from the edges and to the center.
The petal is secured with a thread. And turns over. No folds of fabric should be visible on the front side.
DIY beaded brooch
Brooch with an emphasis on antiquity. The uniqueness of the composition is in an unusual combination of natural malachite stone and artificial beads.
Materials and tools: cabochon malachite stone, dense fabric, beads of different colors and sizes, artificial leather, cardboard, decorative pin, instantly drying glue, threads, simple and beaded needles, scissors, pencil.
The stone is glued to the fabric with glue.
The largest beads are used for the first row of beads. First, 2 beads are taken and sewn to the fabric near the stone itself. Then - again two. So until the very end, until the beads form an oval near the natural stone.
The thread is pushed through the first row of beads again. The entire structure is tensioned for reliability.
The second row of beads is sewn not outside the first, but inside. A different color of the small item is used.
In the same way: 2 beads each. At the end, be sure to tighten the second row of beads with a new thread.
The third row of beads is located outside the very first row. Everything here is done in a familiar technique.
At this stage, the excess fabric on which the stone was glued and the beads were sewn is cut off.
Back side decoration. This requires blanks. Take the resulting brooch with your own hands and put it on the skin. With a pencil, an oval is traced over the skin. It is cut further with scissors.
The same oval is made of cardboard with an allowance of 5 mm.
A cardboard oval is glued to the brooch. There is a decorative pin on it. Next, holes are made in the leather oval for inserting the pins. And the leather oval is also glued.
After the glue has dried, it's time to decorate the brooch further. The edge is decorated with a familiar technique. This time, the needle pierces the very first row of beads and exits at the leather edge. This is how a new row of framing is made.
The resulting bead is braided with new small beads. Sew on one bead every two. And then - five beads of a different color around each, as in the picture.
It turned out to be a wonderful brooch!
Even a beginner can make a beautiful rose from a satin ribbon. I suggest you familiarize yourself with the technique of creating a rose from flat knots.
In the master class, the process of creating a flower is presented step by step. It can be used to decorate hairpins, brooches, headbands, or decorate wedding candles.
To create one flower you will need:
- satin ribbon 12 mm wide - 120 cm;
- hot glue (you can use Moment Crystal, but it takes longer to set);
- a circle of white felt of a suitable diameter.
How to make a simple rose from a ribbon:
- For work we need a satin ribbon.
 You don't need to cut it off right away - the babina will not interfere. Depending on what kind of rose you want to make (a young bud or a lush flower), you will need a different length.
- We tie a knot at the very tip, but do not tighten. We make sure that the front side is outside.

- Gently straighten the knot so that a clear pentagon is visible, and the tape on both sides of the knot is not pinched.

- We make the next knot close to the first.

- In total, 17 knots were spent on my version of the rose, although it was possible to stop at 11-15.

- Apply some glue at the base of the pentagon.

- Quickly, until the glue hardens, fold the first petal knot tightly.

- Apply glue again to the base of the next pentagon knot. We wrap the second petal around the first folded petal.

- We continue to glue the next petals, expanding the knots with the base down.

- When the desired splendor of the rose is achieved (in my case, the diameter was 5 cm), cut the tape, leaving a small tip, and glue it from the inside out.

- To make the ribbon rose look neat from the inside out, glue a circle of felt of a suitable size to it.

Shared a master class
Anastasia Kononenko
Good afternoon friends!
Today I will show you how you can make a brooch with your own hands - a rose from satin ribbons and lace.
The work itself is not very difficult, but the rose brooch turns out to be very interesting.
I will not show you how to collect the rose itself, because process, I have already described in detail. A master class on how to make a rose from ribbons can be viewed
Brooch - a rose, I was asked to make a certain outfit: the color of the dress - two shades of pink, beads and earrings - white pearls.
From this I also repelled. I decided to make the rose the same way as the dress in two shades of pink. I picked the colors as in the photo below. Judging by the table of shades of pink, I have warm pink and fuchsia.
But hereinafter, I will call it simply - light pink and dark pink.
And further. Since the customer was planning to wear pearl jewelry, I also decided to add white beads on a fishing line to the brooch.
And so, let's get started:
Brooch - rose from satin ribbons and lace
For work I needed:
Materials:
- Satin ribbon (dark pink) - 0.5 m, width. 4 cm.
- Satin ribbon (light pink) - 1 m, width. 5 cm.
- Bow (light pink) - 0.4 m, width. 9 cm.
- Lace - 0.6 m.
- Beads on a fishing line (white).
- Hot glue rhinestones (small).
Instruments:
- Hot glue gun.
- Soldering iron (can be a burner).
- Iron.
- Monofilament (thin thread-line).
- Plain pink threads.
I want to say right away that I did not use tapes of different widths on purpose. Just in the store, the ribbons of the color I needed were only that wide.
For the rose itself, I needed 9 strips of light pink ribbon, 11 cm each. And 5 strips of dark pink ribbon, 10 cm each.

First, I collected the petals from a dark pink color, as in the photo below. 4th petals and 1 rose heart.
Let me remind you that you can see how to collect a rose

Then, I collected 4 more petals from a light ribbon (no photo).
And she began to collect the rose, alternating between dark and light petals.

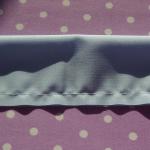
The remaining 5 light petals, I wanted to make with a border around the edge. For the border, I used an organza bow with a light wavy edging.
I put 2 satin ribbons side by side, with a gap of 1-2 mm. between them. And on top, she covered them with a bow, as in the photo below.
Attached a metal ruler to one end. I pressed it down and ran it with a well-heated soldering iron. Thus, I cut off exactly the edge and soldered the ribbons and the bow together.
I did exactly the same on the other side.

Then, I walked with a soldering iron along the bottom of both strips, soldering a bow to them.

As a result, I got these double stripes.

In the same way, I made three more strips. In total, I got 5 of them.
From double strips, I collected petals. It turned out for me, as in the photo below.

And with these petals I finished collecting the rose.
In the end, I got it, this is a rose.


Now, I took the beads on the fishing line and decided how they would be located on the rose. Cut into segments.

And with the help of a hot glue gun, I glued these beads to the rose.

Here's what happened.

I decided to place the rose on a lace rosette.
Gathered lace around the edge with monofilament and rolled into a circle. And she measured out how much lace I need.
My lace has a repeating, wavy pattern. On both sides, I cut the lace so that when the edges overlap, the pattern would be preserved.

Sewed lace, closing the circle. And I got such a socket.

Using a hot glue gun, I glued the rose to the outlet.

So that the rosette did not lie completely flat, but rose a little, I sewed it to the rose a centimeter from the base. The photo below is shown by arrows.

And since my customer, in itself is very bright and not ordinary, I decided to add small rhinestones.
To do this, I turned over the iron. To keep it tight and even, I clamped it in a vice. She covered the sole of the iron with foil and laid out the rhinestones, glue side up. She turned on the iron and waited for 5-7 minutes.

When the iron warmed up, the glue on the rhinestones also began to warm up. Then I pried each rhinestone with a toothpick, applied it to the lace and immediately pressed it.

Brooch - rose from satin ribbons
So that the brooch could be attached to the dress, I sewed a decorative base for the brooch on the back side. But, beforehand, of course, she glued a circle of double satin ribbon to the outlet.

Brooch - rose from satin ribbons
Here's a brooch - a rose made of satin ribbons, I got it.

Brooch - rose from satin ribbons

Brooch - rose from satin ribbons
And this is how the brooch looks on the customer's dress.

Brooch - rose from satin ribbons and lace
Friends, if my master class was useful to you, share it with your friends!
And again roses ... How beautiful this flower is. I come back to him again and again. It fills with inspiration, gives a huge flight of imagination. And every time it looks completely new.
Today we will make a rose brooch with our own hands.
To make a flower, we need:
1. Satin ribbon 5 cm wide.
2. Candle or lighter
3. Glue Moment Crystal or Moment Gel, hot glue can also be used.
4. Needle thread, scissors
5. Fastening the brooch
Making petals:
Cut the satin ribbon into squares. Then we round the corners of the squares, turning them into circles.
The number of circles will be completely different for everyone. In the course of work, it will be seen whether it is worth adding or removing petals.

Then we burn the circles along the edge so that they do not fall off. You need to bring the tape to the candle from the side, closer to the base of the flame. If you bring it higher, then the tape will smoke.
Then we burn the edge of the petal on one side above the candles. We bring to the fire that edge of the petal that went along the tape, and not at the edge. At a distance of 1.5 - 2 cm above the fire. The edge of the petal will begin to deform. The more kinks you make, the better the petal will look.

The petals are ready. We make the middle of the rose.
We take one of the circles and sew it in a circle.

Then we tighten the thread, fill the inner part with filler and sew it up from the bottom. You will get a small ball.
Next, we begin to sew petals around it, with the wrong side inward.

After several petals are sewn and form the middle, we begin to sew the petals with the front side inward. The petals can be pulled together a little at the base.

The more petals, the more open and lush rose you will get.

Thus, I made several roses of different sizes.

It can be supplemented with leaves from a green ribbon, as well as various accessories. We glue the brooch to the resulting composition.
The brooch is ready with your own hands.
And now, for an example of a product with a similar rose:


We also recommend
 Rules for grinding and wet-heat treatment of garments
 Building a pattern for the basis of a dress: Italian technique as the easiest way to make a good pattern
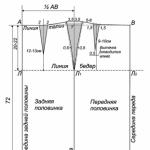
 How to build a dress pattern base
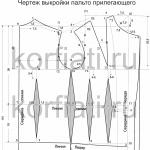 We model and sew coats!
 Skirt of the year, construction of a pattern
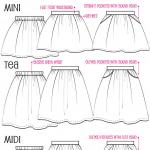 Fashionable children's skirts from old jeans - patterns and description