The simplest halloween costumes. Simple DIY Halloween Bat Costume DIY Bat Cosplay
As you can see in the photo, bat costume looks great on toddler. If you also pick up the rest of the details of the outfit, then the child will look very stylish and colorful. Black sweater, pants, gloves and a mask - what not Batman?
How to sew a bat costume: three steps
First of all, you need to decide on the size of the piece of fabric that will be required to sew a bat costume. To do this, you need to measure the baby's arm span, that is, the distance from the fingertips of one hand to the fingertips of the other. A small margin in the width of the wings can then be folded into a fold on the back, which will allow the wings to be used next year, even if the child grows up a lot: you just need to unfold the fold.
The height of the piece of fabric should be 20 cm more than the distance from the base of the child's neck to the tailbone.
It is better to choose a fairly dense fabric that drapes beautifully, does not crumble on the cut and keeps its shape well. It can be raincoat fabric, teak, nylon and other fabrics.

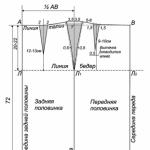
1. Fold a rectangular piece of fabric in half, and cut out a neat segment - the neck.
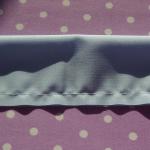
2. In the upper part of the piece of fabric, fold inward a strip, the width of which is (approximately) the width of the sleeve of the child's jacket. From the bottom edge of the fold to the middle of the piece of fabric, cut out semicircular notches that will become the edge of the wing. In photo # 5 you can see how a piece of fabric should look after this stage.
3. Figure # 6 shows where the seam is to be poured. It is better to bend the edge of the fabric before sewing so that the cut does not fall off.
That, in fact, is all. Can be worn bat costume and fly to the merry Halloween Sabbath.
| See also: |
If the holiday took you by surprise, check out our roundup of the simplest Halloween costumes that can be made from scrap materials with a minimum of time and effort. To create these outfits, you need to have black or black and white clothes in your wardrobe, to which we will add some interesting accessories and details - and the look for Halloween is ready! Of course, if time is limited, then creating a complex and unusual costume will not work, because ... to do this, you need to invent it, buy all the necessary materials for it and create it, which will take a lot of time. Therefore, if time is running out, then you can create a suit with the help of an appropriate accessory or refinement of the clothes that are in your wardrobe. From the proposed list of options, you can combine several items, then the costume will turn out to be even more interesting.
1. Printed tights or leggings in addition to black clothing. Drawing - bats, ominously grinning faces, black cats and other attributes of dark forces!
To create such a drawing, you will need one tool from this list: white adhesive paper, or acrylic paint, or a black marker, or white printer paper + PVA glue. Using a black marker or acrylic paint, it's easy to create a pattern on sheer tights. If the tights are black, opaque, use adhesive paper, or acrylic paint, or white paper + PVA glue. Choose tights that are not a pity, tk. it will be impossible to return them to their original condition. So, if you want to apply a pattern to thin transparent tights, then a marker of a contrasting color is ideal for this. The procedure is as follows. We print out bats stencils or other drawings and cut along the contour. In places where it is necessary to apply a picture, wrap the leg with paper and fix it with tape. We put on tights upstairs and apply stencils. We outline the stencils with a black marker, remove the stencil and paint over the contours of the drawings. We remove the tights and remove the paper from the legs. The paper is needed here so as not to get your feet dirty with a marker.

You can apply a pattern to thick black tights in a similar way. We only use a piece of chalk to stroke the stencils, and then paint over the drawing with acrylic paint. An alternative way is to apply the drawings onto white printer paper or adhesive paper and cut along the outline. The adhesive paper can be glued directly onto the pantyhose, and if you are using printer paper, you can glue the drawings with PVA glue. Just remember that all this must be done on tights worn on the legs, and at the same time it is better to protect the legs with a sheet of paper, as in the first option. PVA glue or paint can be quickly dried with a hair dryer. Here's what you can get.

You can use the following as stencils:

2. A jersey shirt or any other black or white garment with a cut out skull or skeleton. Of course, we take clothes that we don't mind cutting. The image can be cropped from both the front and back.

It is very easy to make such clothes. We print or make a stencil ourselves, cut the drawing along the contour and transfer it to the fabric. Next, along the contours, cut out the pattern on the T-shirt. Here are some skull stencils for making these T-shirts.


You can create other images in the same way, for example, a cat, a bat, a spider web, or other images with a more complex design.

The picture below shows a master class on cutting a spider web on a T-shirt.

3. Skull or bones painted on clothes with acrylic paint. Instead of cutting out skulls and bones on a T-shirt and other clothing, you can paint them with acrylic paint. You can sketch the ribcage of the skeleton either by hand or using a stencil.

Using this idea, you can create very interesting designs on your clothes.

4. Tights with a skull. In the next version, we suggest you to "artistically" tear the tights. You can take tights that already have puffs and holes and just finish what you started with scissors and hands.

5. Witch's shawl. In addition to the previous ideas, you can make a shawl that looks like a hundred-year-old spider web, or the robes of an evil witch. It can be created from an old shawl or scarf, or from a piece of black fabric. Using scissors on a scarf, you can cut cobweb patterns consisting of thin strips of fabric. From a piece of black fabric, you can make a cape with a hood, as in the picture below. It is only necessary to make a small seam in the upper part of the fabric on the hood, and also cut out the holes for the hands with scissors.

6. You can also make a more complex version of a Halloween costume from a piece of fabric - bat costume. If the edges of the fabric do not drip, then you do not need to overcast them. We cut out the wings from the fabric, as in the picture below, the central part can be swept to the clothes with several stitches, and small rubber bands for the fingers can be sewn on the ends of the wings so that the wings can be spread. You can also make ears: for this we sew the fabric folded in half in the form of triangles to the black rim. In order for the ears to stay on the rim, you can first glue two cardboard triangles to the rim, and only then close them with a cloth. You can simply paint over the cardboard with black paint and do without the use of fabric. Here's what the result can be.

7. Spider web on the skirt. If you are going to wear a black skirt or dress, using white tape or rope can create a cobweb effect on them. We fix a part of the rope on the belt and tie separate pieces of rope to it at an equal distance so that they fall down. You can see the scheme of creation in the picture.

8. Shoe decoration. To make your shoes for Halloween more interesting, you can cut wings from a stiff fabric, or better from leatherette, and fasten them to a shoe or shoe with lacing, as in the picture.

Here is a stencil for creating these wings.

9. Another simple option for creating an image for Halloween is bat bow tie, real vampire accessory !

Next, we offer a master class on creating a bow tie "bat". It is best to use leather or leatherette to create it. In addition, felt or satin will do. The atlas must be glued with a fleece from the inside out for elasticity, so that the butterfly does not lose its shape. Also from the materials you need glue or a needle with black thread and a black elastic band.
Download the stencil below, transfer it to the fabric and cut along the outline.


We wrap a strip of fabric in the middle of the butterfly and glue both ends at the back or sew them, but so that there is some space between the butterfly and the fabric ring, sufficient to thread the elastic. Next, we thread an elastic band into the ring and, trying on the neck, sew both ends of the elastic band. That's it, the vamp irish accessory is ready for the holiday!
10. Another option for a Halloween accessory is bezel with decoration... The headband can be decorated with the same butterfly bat that we made in the previous paragraph, or with paper bats.


To make a headband with bats, you need to print stencils or draw them by hand. Above in the article, we have already given a stencil of bats, which you can take for this project as well. Cut out bats from black paper on a stencil and fold them in half. Cut the wire into slightly different lengths. Wrap one end of the wire around the rim, and glue the bats on the other with glue. The bat headband is ready!

Mice, cut out of paper or leatherette, can be glued to the tips of hairpins or invisible pins - and another decoration with bats for Halloween is ready!

You can also glue a real twig from a tree onto the rim and "plant" bats or ravens on it. 
11. The final touch - makeup for halloween! Easy-to-use, yet eye-catching makeup will complement the look you create!

A great costume option for any occasion is the bat costume. It is quite simple to make, it will take a minimum of time and effort to make it.
Black clothes are required for the basic part of the suit... It can be trousers, leggings, leggings, a skirt, and a turtleneck or T-shirt is suitable for the top. From this list, you can choose and combine different options. But it's also important to choose accessories or make your own.
In order for everything to be at hand in the process of work, it is necessary to prepare in advance the materials that will be required.
- Black plastic short zipper.
- Bias binding in black.
- A piece of fabric for the hood.
- Gouache.
- Cardboard.
- Scissors and a stationery knife.
- Water-based paint.
- Elastic band for linen.
- Glue.
- Sewing machine and sewing accessories.
- Old black umbrella.
This list of materials may vary depending on the type of clothing planned. You can also make a simple costume that will take very little time.
How to make a Bat costume for a girl
You can make a bat costume very quickly with your own hands. The main thing is to perform all actions in stages and show your imagination in the process.

The bat is a budget option for both a boy and a girl..
The suit will require a dark T-shirt... A T-shirt with a three-quarter sleeve looks especially good.
Operating procedure 
- We take measurements: sleeve length and T-shirt length.
- From fabric carved bat wings according to the measurements. Felt works well from fabrics.
- We measure the length of the wing from corner to tip.
- Cut out several strips from thick cardboard and the same number of fabric strips.
- We apply cardboard strips to the back of the wing, and sew strips of felt on top.
- Sew the wings to the T-shirt.
The suit is ready. Now can be supplemented with a bat mask.
Advice... It is better to cut the mask out of thick black cardboard, paint it with acrylic or ordinary markers. And also rhinestones will look spectacular.
How to make a Batman costume 
Becoming Batman, like in the Marvell movies and comics, is easy enough. Plus, this outfit can be worn for any occasion such as Halloween or other fancy dress events.
The costume consists of two parts: a mask and a raincoat... Black leotards and badlon can be found in everyone's wardrobe. Consider making a suit in stages.
- It is better to make a cape with a black umbrella, which is not a pity to throw away. From it you need to remove the handle and knitting needles and cut off the upper part. The hole should be “under the neck”.
- Next, we make an incision in the neck along the length of the zipper. Baste the zipper and sew on it. Then the neck must be sewn with a bias tape.
- The hat can be sewn based on the pattern of any hood.
Advice. If there are difficulties with sewing, then you can make the task easier by purchasing a hood. The hood will be much easier to adjust according to the required parameters.
- Cut out the mask... It is made of cardboard and does not differ from other masquerade masks.
- Ears can be made from thick black cardboard or paint the cardboard. If the cardboard is not so dense, then you can make them in several layers.
- We twist the mask into a tube so that it has a curved shape. We sew or glue the ears to the side parts of the mask and attach an elastic band.
- We prime the mask with a water-based composition. We cover it with black gouache paint, and then varnish. The mask will dry instantly if you use a hairdryer... Thus, it will not lose its bend.
- We make Batman's belt, an essential element of the costume, which allows you to quickly recognize the character. The belt is made of golden fabric... A rectangle is cut and stitched. Then an elastic band is sewn to it. The belt can also be decorated with applique using sequins or black beads.
IMPORTANT! If you don't have a black T-shirt, you can quickly sew it by making a pattern for the finished product. Simply pin the t-shirt to the fabric, then trace around and cut out.
Useful Tips for Making Costumes 
Original prints
As an interesting attribute of a bat costume, you can use thick black tights.... On their own you can make prints... For example, in the form of black cats or bats themselves. To print on tights, you will need such materials.
- White duct tape.
- Acrylic paint.
- PVA glue.
- White paper for printing.
- Black marker.
Using these tools, you can quickly make any print on tights (both transparent and solid) or clothes. If you are using sheer tights, a marker in a contrasting color will do.
You need to print or make a stencil yourself and trace it around the contour. Be sure to put some paper underneath to avoid getting your feet dirty with the marker.
In the same way, you can apply a pattern to dense monophonic tights. But instead of a marker, it is better to use a piece of chalk, which is then painted over with acrylics.
Drawings 
ATTENTION! You can glue any drawings with PVA glue. The glue will dry quickly with a hair dryer.
You can add variety to a regular T-shirt in the same way.
Of course, it's best to use clothes that you can experiment with. We just grab the scissors and cut out the image on the t-shirt... For example, in the form of a skeleton, a cat or bats.
A more complex pattern for a T-shirt is a spider web. It is advisable to make a preliminary sketch on the fabric to make it easier to navigate. Acrylic paint can also help decorate a costume.
Instead of cutting out the image on the T-shirt, you can draw a drawing on it. There are drawings that are very simple, such as the chest. No stencil is required here. And there are more advanced design solutions. The flight of fantasy here can be limitless.
Hopefully the costume tips are for anyone who loves the mysterious Bat and Batman look.
Good day, friends! Dress up for Halloween? Do not deprive yourself and your children of this opportunity. I recommend starting with simple images if you've never tried anything like this before. Over time, the fantasy will play out so much that neither busyness nor the lack of themed accessories will prevent you from creating a super-outfit! One of the simpler options in my opinion is a Halloween bat costume for adults and kids. To make it with your own hands, you do not need seamstress skills, expensive materials. It is enough to find some black fabric and old dark clothes in the closet.
Let's start with the children's version, the adult version is done in a similar way.
Bat costume: how to make for a child
Dressing up as someone scary enough to scare others, but not be afraid of yourself? Yes, every child dreams of this! That is why children are crazy about carnivals. Help the baby to transform into a flying mouse. The costume is ideal for boys and girls under 12 years of age. Very crumbs look especially cute in the outfit.
Just 3 steps and some old clothes will be needed to enjoy the effect with your baby. Start by taking your measurements. Measure the span of your child's arms from the tips of your right arm to the tips of your left. Add a little for next year's headroom (just fold in the middle to remove excess fabric). The height of the wing section should be approximately 20-25 cm greater than the distance from the base of the neck to the tailbone.
For fabric, choose a dense, non-loose material. The best idea is felt, as well as nylon, raincoat fabric.
How to make wings:
- Fold the fabric in half in a rectangle and cut the neckline.
- In the upper part, fold the strip inward, the width of which is equal to the width of the sleeve of the child's outerwear. From the bottom of the fold to the middle, cut out the notches in the shape of a semicircle. These will be the edges of the wings.
- Place a seam as shown. If the fabric is frayed, fold the edges.
It's all. 3 steps and a bat costume for a child is ready. Complement it with dark trousers and a turtleneck or a dark skirt and leggings.

Costumes for adult bats are made according to the same principle. Special hats with ears are sewn on the head or hoops with ears are used. Girls look great in tight black jumpsuits and high boots with homemade wings on the back.

See how simple it is! Dress up as a bat with your baby and head to a fun Halloween party! Share the instruction for a simple suit with your friends. And do not forget to drop in often. Until next time!
Best regards, Anastasia Skoreeva
Is one of the happiest holidays of the year. And, of course, in order to look spectacular and bright at the holiday, you will need an appropriate carnival costume. In this master class, you will learn how to sew a bat costume for a child with your own hands.
Master class "Bat costume for a girl"
- Draw a single bat wing pattern on a piece of large paper. Then fold the fabric of your choice (such as felt) in half. Naturally, we take the fabric in black.
- Cut out the fabric according to the template and unfold it - this is the main part of the suit and you are ready! Felt is good because its edges do not need to be processed, so there is very little sewing work when making a carnival costume "bat".
- The wings will be secured to the child's shoulders with elastic bands. Make loops of the desired size from two elastic bands (preliminary fitting is required!) And symmetrically pin them with pins in the very middle of the upper part of the pattern.
- Cut a small rectangle out of the remaining felt. Sew it at this point with elastic bands.
- The wingtips of the mouse are attached to the child's thumbs for easy putting on and off. To do this, we sew a small elastic ring on both wings. Thus, the girl will be able to put on or take off the suit herself.
- Actually, this is the end of sewing. If you have an urgent need to make a Halloween bat costume, it can be done in just half an hour.
- The resulting masquerade outfit looks a little dark, so let's decorate it. To do this, glue the places of each fold of the fabric with two strips of masking tape, and in the gap between them we glue sequins, rhinestones or sequins. When the glue is dry, remove the tape.
- This decor looks charming!
- Finally, add the bat ears to the costume. Cut two small triangles out of the same felt fabric. The white lines show where the cuts need to be made.
- Bend them as shown in the picture.
- And we sew (or glue), forming a neat eyelet out of felt.
- The resulting ears should be glued to the usual black


We also recommend
 Rules for grinding and wet-heat treatment of garments
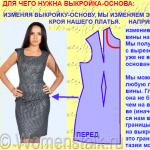 Building a pattern for the basis of a dress: Italian technique as the easiest way to make a good pattern
 How to build a dress pattern base
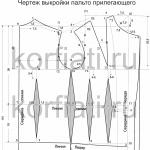 We model and sew coats!
 Skirt of the year, construction of a pattern
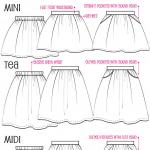 Fashionable children's skirts from old jeans - patterns and description