Spider made of yarn. Autumn crafts
Spiders and cobwebs are classics of Halloween decor. If you need to decorate the space for the scariest day of the year, I will show you how to weave a web and make a spider with your own hands in just half an hour.
It seems to me that this is one of the most budgetary and fastest projects that have appeared on this blog. The web can be mounted on a wall, on a small or large frame, or used as a base with wooden sticks. This simple yet stylish decor will perfectly complement the creepy décor on the street, in the house, in the office or in a space where a Halloween party is being planned.
DIY web - materials and tools
Elapsed time: 20 minutes. We will need:
- black thread for knitting
- scissors
- strong double-sided tape.
How to weave a web with your own hands
I worked with ordinary lint-free knitting threads. If you use mohair, the web will be fluffier.
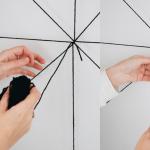
1. Let's start with the basics. Cut off 3 threads of the same size. The longer they are, the larger the web will be.
2. We fix the base to the surface. Depending on the wall finish, the threads can be secured with tailor's pins or double-sided tape. The main thing is not to spoil the coating.
3. Unwind a small ball with a working thread. We tie the tip to the middle where the main threads intersect.

4. We retreat a couple of centimeters from the middle and wrap the main thread of the working one. We transfer the working thread to the adjacent main thread and wrap it again. We continue this way until the web is ready. If the thread runs out, you can tie an additional one to it.


The web is ready. It remains to make a resident for her.
DIY spider - materials and tools
Elapsed time: 10 minutes. We will need:
- aluminum wire - about 50 cm
- wire cutters
- pliers
- Knitting
- PVA or hot melt glue.
How to make a spider with your own hands
1. Straighten the aluminum wire with pliers and cut it into 3 parts with pliers.

2. Tie all three pieces of wire with threads in the middle.

3. We wind the pieces of wire together in the middle in a criss-cross pattern.

4. Start wrapping the spider's foot. First from top to bottom, and then from bottom to top. To prevent the thread from slipping, you can attach it to the end with glue. Repeat the step with each foot.

5. Now we form the abdomen. To save thread, you can first wrap the middle with masking tape, and on top with knitting threads.


A simple and quick Halloween decor is ready. Have fun and fear nothing :).
Best,
According to legend, spiders cannot be driven out of the house, they protect the home from negativity and uninvited energy guests.
Make this cute amulet with your own hands - a chestnut spider in the company with a dragonfly made of natural material will perfectly cope with the tasks! A decorative spider web made of threads will never become a reason to think of you as a poor hostess, rather the opposite - all guests will admire the original decor! Every novice needlewoman will cope with the task.
Preparation of materials and tools
To create the craft "Chestnut spider on a web", as in the photo, you will need the following materials and tools:
- two chestnuts (large and small);
- viburnum fruits;
- two acorn caps;
- three cones with thuja twigs;
- five petals - "helicopter";
- the fruits of the Safora tree;
- eight wooden skewers;
- thread with sequins (or any other thread);
- wine cork;
- two fuzzy sticks on a wire base, dark brown and light brown;
- a piece of black plasticine;
- scissors;
- glue gun.

If you don't have some materials for decorating, it's okay, use something else or reduce the amount of decorations.
Step-by-step master class on creating decor
First, you need to prepare wooden skewers to create the basis of the craft - a spider web. Leave the length of the skewers 10 cm each (more or less, depending on the desired size of the finished product), sharpen the blunt edges of the skewers with a knife.

On the finished "skeleton" for the web, closer to the center, tie a thread to one of the skewers. Secure the knot with a glue gun. Then, at the same level, wrap all the skewers one by one, fixing the intersection of the thread on the stick with glue so that the thread keeps its shape better and does not slip. 
After the first level of the web, you need to wrap the thread near the initial knot, fix and make two turns along the same skewer, lifting the thread up to continue the next row of the cobweb. Thus, go around in a circle all the drops to the edges of the skewers, do not forget to fix the intersections with glue, especially the last knot. 
A spider web of threads is ready for. 
Then start making the hospitable host of the spider web - a spider made of chestnut and fleecy sticks. For an insect cap you will need: a helicopter petal and an acorn cap. 
On the edge of the larger chestnut, closer to the top, glue the small chestnut. This will be the torso with the spider's head. Then cut 6 legs of 3-4 cm with scissors from a fleecy stick and bend them slightly in the middle. Glue three spider legs on each side of the body (large chestnut).
Cut off the edge of the "skewer" - this will be the visor of the cap and glue it to the acorn cap, and then to the spider's head. Roll out of plasticine and stick two black eyes. Cut off a piece of a light brown stick and attach it around the spider's neck. The spider is ready.

Now it's time to make a dragonfly from a natural material with your own hands: a body made of a piece of a fleecy stick, wings made of "spitters", a head made of an acorn cap, eyes made of plasticine. 
Start making a dragonfly from the body. To do this, bend the wire almost in half (make one edge a little longer) and twist it slightly (not tightly), leaving a small loop at the base, and the end thinner. Glue the head - an acorn cap to the loop and glue two round, flat eyes made of black plasticine. Along the edges of the eyelet, glue two "helicopters" on both sides - these will be the wings of a dragonfly.

The caterpillar will be the last guest on the web. To make it, you will need the fruits of the Safora tree (so that the caterpillar is longer, they can be glued) Make eyes and glue them from plasticine. 
Place the chestnut spider and the rest of the inhabitants and glue to a decorative web of threads.
To decorate the composition in the center, glue the composition of thuja twigs and three cones. 
Add a few viburnum or mountain ash brushes along the edges "for a sparkle". The craft is ready.

For the craft "Chestnut spider on a web" you can make a loop and hang it as a talisman. Let the spider protect your home, which will always be full of goodness and long-awaited guests.
Other ideas of what await you in our other publication. Such creativity can be safely attributed to, because it does not require practically any costs.
Visit us more often and subscribe to the groups of the site "Women's Hobbies" in social networks to be the first to know about the release of new master classes.
Such an unusual and not all pleasant species of insects, like a spider, is a rather unusual decoration and decorative element. Such an accessory can be made using a wide variety of interesting techniques and materials. In our article we will talk about the most popular of the techniques for creating a decorative spider quickly and step by step with our own hands.
We make a shaggy spider with our own hands from cardboard and thread
To create such an unusual decorative arthropod insect, you will need very few materials and tools. The shaggy spider will be made from cardboard and skeins of yarn.

So, prepare the following tools and materials:
- A ball of yarn of any color. Most of all, black or gray threads are suitable for creating a shaggy spider.
- Sheets of thick cardboard;
- Copper wire;
- Sharp scissors;
- Glue;
- Markers of different colors.
After preparing all the tools and materials for the master class, start making a shaggy spider.
First, you should cut a piece of cardboard to the size you want. The wider the width of the cardboard strip will be. The bigger and bigger your spider will be. Now start winding threads from the middle of the cardboard strip. After that, start inserting pieces of copper wire into the core of the wound circle of thread. Cut off excess cardboard.
Cardboard is best taken in the same tone as the color of the spider yarn. If you cannot find such a color, then you can paint the spider's legs with felt-tip pens or paints.
Now, spider eyes should be cut out of sheets of thick cardboard and glued to the glue. A more economical option for those who do not want to use and spoil good threads: insert bendable tubes into the ball. Make the tubes themselves into spider legs. Use decorative pins or foil balls instead of eyes.

Such a spider can be made sitting on a web of threads or other similar material.
We are exploring a realistic way to make a hairy spider with your own hands for a holiday
In order to decorate your room for the holiday, you can make a spider from special black hairy tubes. For work you need seven sticks of black chenille. Such material is very easy to work with and use. It can be easily twisted and fastened together.

Twist the ends of two chenille sticks together and wind the resulting long wire around the index finger. Leave a small piece of material. Secure the resulting bundle of six shaggy wires with the prepared end of the wire. Straighten the legs of the spider and form a small loop at the end of each of the legs. This will make your match spider more stable.
You can make many interesting and unusual crafts from bright balloons. We suggest you try to make an unusual spider out of balloons for the Halloween holiday.

To work you will need the following materials and tools:
- Two black balloons;
- Sheets of black and white cardboard;
- Sharp scissors;
- PVA glue;
- Rope.
After preparing all the necessary material, start making an unusual spider from balls. Inflate two different sized balloons. One larger ball for the body of the insect, another smaller ball for the head of the spider. Crochet them together with a string.
From black cardboard, cut eight strips of the same length and thickness for the spider's legs. Fold the strips of black cardboard in the form of spider paws and fix with PVA glue on the sides of the larger ball.
Then cut out the eyes and nose for the insect from cardboard and glue to a smaller ball. Your balloon spider is ready. You can use it to decorate your room for Halloween or even for a birthday.
You can make a spider using balloons in a wide variety of colors and shades. Check out some ideas for making this type of spider in the photo below.

Here is another way to create a balloon spider.
A selection of thematic videos for the article
At the end of the article, we suggest you watch a few videos on the topic described above. We hope that after watching the proposed video materials, you will not have any questions on this topic. The demonstrated material will help you learn how to create unusual accessories in the form of a spider. Enjoy viewing and exploring!
Celebrating Halloween has become a tradition in recent years. A spooky, but very funny holiday gives you the opportunity to play pranks to your heart's content not only for children, but also for adults. You can show your imagination and amaze guests with ominous makeup, intricate dishes and table setting with gloomy decor. So we will try to decorate the house in an original way - we will create with our own hands a decorative wreath in the form of a huge shaggy spider that sits in a web.
To make a decorative wreath with cobwebs, we need:
- willow branches
- black spray paint
- white cotton thread
- white fluffy weed yarn
- rose hips and dry herbs

To create a furry spider, we need:
- wool for felting black and gray
- wire
- black woolen thread
- felting needle
- foam sponge
- side cutters
- narrow-nose pliers

Let's make a frame for the web out of willow branches. To do this, we will roll one willow branch into a ring, then we braid the required number of branches around it, creating volume. The ends of the branches do not need to be cut off, the sticks sticking out in different directions will give our web a natural and ominous look.

If desired, you can also stick a few twigs of dry herbs or flowers into the base.

The finished base must be painted black; for this, acrylic paint in an aerosol is best suited. The paint has a pungent smell, so you need to use it outdoors, for example, on a balcony. Before painting, the willow base should be placed on newspapers or another surface that is not afraid to get dirty. Leave to dry completely for several hours.

We tie a white cotton thread with one end to the willow base, pull it to the opposite side of the base, as if marking the diameter of the circle, tie the end with a strong knot and cut it off.

In the same way, we stretch a few more threads, trying to make equal gaps between them. I have only 8 strands or 16 rays extending from the center.


Further, we will weave a web from the yarn, the idea is borrowed from the amulets of Siberian shamans, this is how their dream catcher, kytgyem, is woven. The end of the yarn is fixed with a knot at the base of one of the beams, the yarn is pulled to the next beam and again fixed with a knot, thus tied in a knot on each beam.

After passing the first circle, weave in a spiral, gradually narrowing the circles, reaching the center, cut the thread.

The yarn looks great, giving the web a real look.

Do-it-yourself hairy spider
We will start making a spider with its legs. Using side cutters, cut off the required amount of wire. Three blanks will be the same length, one slightly shorter for the front legs and one very small for the jaws.

We bend the wire in the shape of the letter "M", bend the ends with the help of narrow-nose pliers.


We braid each wire with a black woolen thread, starting from the center, then spiral one leg, pass the end of the thread into the fold of the wire for better fixation, go up in a spiral and braid the second leg in the same way.


When all the workpieces of the legs are ready, we start making the abdomen, which we will make of wool. Put some wool on a foam sponge and use a felting needle to shape it into an egg-like shape.

We insert all pairs of legs inside the abdomen and fix it, continuing to roll the base of the spider.


In the same way, we make a spider's head by inserting a wire with a jaw blank inside it.


We connect the head and abdomen, cover the top with black wool, if desired, you can also paint the spider with spray paint.


We draw a drawing on the body of the spider, wrap each leg with gray wool and knock out the outline of the cross on the back. We beautifully bend the legs of our spider and put it on the cobweb, it does not need any additional fastening.

We decorate the cobweb to our liking by inserting rosehip twigs, bird feathers and so on into the willow base.


The spider web turned out to be excellent, it remains to hang it on the tree at the entrance to the house or in the room on the wall.

Experiment and surprise guests, happy holidays!
You will need: yarn, scissors, glue stick, felt-tip pens, white paper, a small piece of cardboard, wire.
First you need to make the body of the spider: for this, take a small rectangular piece of cardboard (you can fold the paper sheet several times) and make cuts on the sides, stick a woolen thread into the cuts, wind yarn over it. Then remove the thread from the cardboard and tie the skein tightly.


Now you can carefully pull out the cardboard. Turn the skein over and tie the thread around it on the other side.

Now gradually cut the threads, from the sides indicated in photo 4, just be careful not to cut the fastening thread.

Here's what you should get.

The next step is to create spider legs. To do this, cut 4 pieces of wire, they can be the same length or different. It is better to round the ends, so it will not only be safer, but the wound thread will also be easier to fasten.


In order for the yarn to hold better on the wire, the thread must be greased with glue stick and wound in a circular motion. The middle of the foot does not need to be wrapped tightly: this will save you time and yarn.
After the legs are ready, we proceed to the penultimate stage. I decided that my spider will have big eyes and teeth, you can do as you like - squint, protrude tongue, smile or something else. So, on white paper, draw two eyes and two fangs, then cut out.

The final stage will be the assembly of a funny spider. We stick in the paws, bend them so that they look like real ones, then glue the eyes and teeth. Here the spider is ready, you can attach a rope to it and hang it in the corner.

This craft can be done with children, they will love to participate in the process, coming up with new colors or funny spider faces.
