How to name a pumpkin craft. Simple autumn pumpkin crafts: for kindergarten, school and home
Autumn is coming, which means that our way of life is changing a little. Children go to school and kindergarten, returning from vacation, and again autumn assignments will fly to us to make crafts from vegetables and fruits. Therefore, today I will tell and show you how many ideas there are in pumpkin crafts. This vegetable comes in all sorts of fancy shapes and colors. Sometimes you look at a pumpkin and immediately there is an image of what it looks like. They are especially fond of using it on the Halloween holiday, giving it a special atmosphere and mystery.
Creativity knows no boundaries and in this golden-orange vegetable you can see the carriage for Cinderella, and even Kopatych from the famous cartoon about Smesharikov. While preparing this material, I was surprised at how vast the imagination is and it's just great that with your own hands, as if by magic, you can create fairy-tale characters, beautiful baskets, real flashlights and even vehicles.
It's nice to just look at these pictures, and it's also very useful to spend time creating with your child. My daughter and I also ran to the store, chose a small pumpkin and will make a carriage, like in a fairy tale. And you choose any idea. Something will be easy to do, something more difficult. But we will definitely cope together. I invite you to study the material in a good orange mood. And let this article help you wake up your imagination and come up with your own original and unique pumpkin craft.
Children who already go to school are not so easy to surprise or captivate with something. But since contests or exhibitions are held in classes, it is necessary to come up with an idea so that the child proudly carries the pumpkin craft and is sure that everyone will say: "Wow !!!". After all, there is a kind of big responsibility to speak on your behalf in front of the school. The surname and class are written under the product, so everyone will know whose cool masterpiece it is.

Some options are quite complex and require skills, and besides, working with a knife is unsafe. But we can help the child. In addition, suddenly your child will discover talent and you will see how new ideas are born. Take a closer look at these amazing pumpkin creatures and get creative with your kids.
You look at this Cheshire cat from afar and think: What kind of talent does it take to create such a pumpkin. But if you look closely, there is nothing difficult about it. Remove a thin layer with a chisel, correct the muzzle with a knife. Well, really, because you are just as talented. Take for an idea with a child. This one is well worth the time!

Who Loves Angry Birds? Feel free to take any round pumpkin and paint. A few touches and you will be faced with the difficult task of making friends with formidable birds

Maybe your dad is a joiner or carpenter. And he knows how to carve such things out of wood. Ask him to help make such a miracle using soft pumpkin material!

The stem of a pumpkin is just perfect like a nose. Start from this point. The image may surprise you

Tough guys and girls, I think, will not want to bring crafts in the form of mushrooms or a toy car to school. Why not use this idea?

Lovely fairy-tale houses can be created by making a door and windows out of twigs. Someone is already waiting for a visit.

Only recently have the whole family watched Monsters University and Monsters, Inc. This idea is just great when Mike Wazowski can be quickly and easily made from a pumpkin.

And Aunt Bra is just lovely.

The orange color just begs for the pumpkin to turn into a formidable, no, into a cute tiger cub.

Earlier, in childhood, for the new year, they bought a false mask with glasses and a nose. See how you can play this with a pumpkin.

Pumpkin like a head of cheese! Original. If the vegetable is bright orange, you can paint it beige, drill holes, removing the insides. And the mice are right there.

Did you know that pumpkin is also afraid of mice and spiders).

We will decorate the muzzle from napkins or you may wish to crochet the elements.

All parts of this wacky dog are also made from pumpkin. Ornamental Lagenaria pumpkin is great for ears and tail.

If a child is fond of the String Art technique for creating paintings from carnations and threads, it can even be applied to a pumpkin.

Any face can be transferred to a pumpkin by first drawing a template on paper, and then using an awl to often pierce along the contour. Then cut with a thin scalpel. And such a technique will help to complete the upper class crafts.

Beautiful crafts from pumpkin on the theme of Autumn in kindergarten
Dear mummies and daddies of babies. The time has come for creativity and you are faced with the task of bringing crafts to kindergarten. Pumpkin is a material that is not difficult to use at all. You can simply paint and draw the face, or you can add a few details and turn the vegetable into a fairytale hero or animal. Choose any of the suggested ideas. Create with children using any wildest imaginations. Look at all the pictures with the child and he will definitely come up with his own unique craft. You will only provide him with the necessary material and help in difficult moments.


The creative store sells fluffy wires and eyes. There are very few details, but you get a wonderful bat or a candlestick spider.


On a walk, you can collect moss, wild berries or mountain ash and make houses for gnomes

Here's another design of the huts.


There is not one identical face in the whole world. One is more original than the other.


Get the idea of making a flying saucer with cute and friendly aliens.

How do you Losyash? The main thing is that everyone will recognize him. And whoever is familiar and loved attracts attention the most.


Use cardboard and colored paper for creativity to diversify ideas.

DIY pumpkin and zucchini crafts for kindergarten and school
Vegetables and fruits in their ensemble can offer whole plots. How do you like the idea of crafts, for example from pumpkins and zucchini? Everything here is only limited by our imagination. Nature is so rich in its diversity that one is simply amazed. Creativity always has childhood roots. Therefore, so much time is devoted to various exhibitions in schools and kindergartens, where a child can reveal his talents and develop imaginative thinking. See also in this section what crafts were invented by children and their parents.

Looking at the details of this complex composition, you are amazed at how quickly and easily you can make it from pumpkin and zucchini.

Carrots and potatoes can also serve as elements, transforming into cute little animals.

And even on the train

Decorative pumpkins can easily disguise themselves as porcini mushrooms. They are also very similar to acorns.

Vegetable figurines have their own mood and facial expression.


These are the piglets for every taste and fat content


This masterpiece was born in the mind of the master only because he saw the bend of a fish in the natural form of a vegetable. How beautiful it is. Let's try to do something like this? The eyes are afraid, but the hands do.


Autumn crafts from decorative pumpkin
The decorative pumpkin is striking in its beauty. Figures and images that exist in the world have already been created in it. The main thing here is not to rush. Take a closer look, turn it over in your hands and ideas for crafts from this vegetable variety will be born in your head. Until then, also check out the ideas I found for you.
Basically, houses from such pumpkins are very good. The orange roof and white walls are just perfect for real fairy-tale structures.


You can also get serious about creating a pumpkin decor. For example, for a photo shoot, or maybe you will take with your child the decoration of a class or scene for a holiday.


Below are ideas for creating cute faces and chubby cats.


Crafts from pumpkin Lagenaria do it yourself for the exhibition
In our region, where we live, such a pumpkin of the Lagenaria variety has never been seen. Once I saw a picture of my grandmother hugging vegetables very similar to geese with long necks. Since there are a lot of fakes on the Internet now, I did not believe such an image. But while preparing this material, I became closely acquainted with such an amazing pumpkin. It is also called bottle or dishware. It is just made for a variety of interesting crafts. That's just the way it is. Experienced craftsmen even make entire works of art. If such a wonderful pumpkin is available to you, then the ideas presented below are for you.
See how original and unique each chicken is, thanks to the different shape of the pumpkin.


Even though the shape may be the same, here the fantasy is simply limitless.


If you are fond of decoupage technique, show your child how you can use it on a pumpkin and together transfer a cute drawing to a vegetable

With this type of pumpkin, birds with long necks are just great.

Just amazing creatures. And how does nature know that there are such birds in fact


And this is top class craftsmanship. Perhaps the child wants to get carried away with this direction or draws well. Since the pumpkin has a very smooth surface, it is convenient to work with it for small cuttings and painting.


Making a tree from pumpkin seeds
Also, feel free to use pumpkin seeds in original crafts and appliques. Painted in different autumn colors, they turn into leaves. I offer you separate options for how to make a tree from pumpkin seeds. It is very useful for a child to develop fine motor skills and this is just the case when you can spend a wholesome time with benefit.


The trunk of a tree can not only be drawn, but also made from pumpkin seeds, having previously painted brown.

Oaks also grow well from colored paper.

Draw branches on paper if the children are still very small and let them glue the seeds on PVA glue

How to make a pumpkin basket (vase)
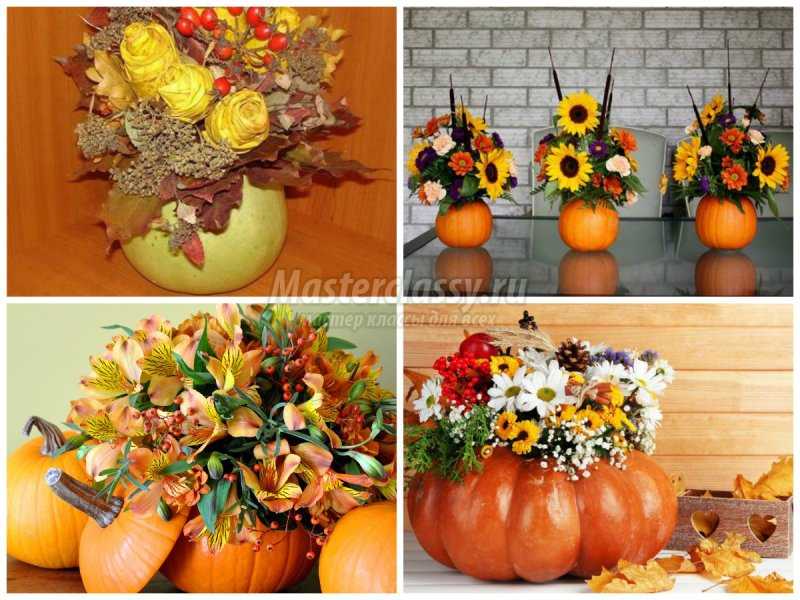
Previously, pumpkin was often used for decoration and various flower vases. If you want to make a pumpkin basket so that at least for a short but wonderful autumn period it will delight you, then take a closer look at these works. Perhaps you will make a basket with your child and present it to the teacher or teacher for the holiday.


In order for the flowers to retain their freshness for a long time, you can put a jar of water or a damp sponge for flower arrangements in the pumpkin niche.


Flowers from pumpkin seeds for the fall holiday
Flowers from pumpkin seeds are very lush and incredibly beautiful. The seeds are so unique that the flowers from them can look like chrysanthemums and chamomile and even sunflowers. You can give them a different color shade thanks to the white base. Using additional handy materials, whole bouquets begin to bloom. Create them with your kids for a gift or for an exhibition. Unlike the pumpkin itself, such crafts last for a very long time.

Thanks to painstaking work, you can make such a voluminous composition. The basis is plasticine

These are such a variety of flowers from the same seeds


Master class on how to make a pumpkin owl
If you need to build a large craft, and there is very little time, you can take into account this master class in the video on creating an owl from a pumpkin. Everything is done quickly. The vegetable does not need to be prepared or peeled. Therefore, feel free to take a pumpkin and in a few minutes you will have an owl who is looking forward to her journey with her child to a kindergarten or school.
Craft from pumpkin "Carriage for Cinderella"
With my daughter, as I said above, we chose the idea to create a carriage from a pumpkin for Cinderella. After all, it was from this vegetable that the godmother conjured up a beautiful fabulous transport for a trip to the ball. It's just that their eyes run up and it's even a little jealous of these princesses that they have such a beautiful carriage. I think every girl has horses, mice in her toys and, most importantly, her favorite little dolls who dream of going to the ball.

We have found a myriad of carriages for you, but I am sure that your child will be able to come up with something even better and more original.


And how do you like such a modern version of the mega-carriage. Winx or Monsters High also love balls.


How to make a pumpkin lantern for Halloween
A pumpkin flashlight with its mystery and mystery is simply mesmerizing. Of course, it cannot be used for a long period of time due to the fact that fresh pumpkin withers over time. But you can create an atmosphere in the evening and light up the room in an original way, or make a cute decor for a holiday. And for the light we will use candles in cups or garlands.


The stars can be cut not only with a knife, but also using iron cookie cutters. Place it on the barrel of the pumpkin and tap with a hammer.


Here is such a wonderful lamp with windows. As if someone is living inside. In my childhood, it was so mysterious for me that I always tried to look into houses with luminous windows, be it a New Year's house or a paper lantern.


You can cut out any picture for a flashlight, first attaching the template to the pumpkin. Then prick the outline with an awl and cut out.

Here are some more ideas.


For safe lighting, use either a garland or candles in cups


How to cut a pumpkin snail
Making such a pumpkin snail is as easy as shelling pears. Several years ago, real Akhatinka appeared in our house, just before the fall, and when the children suggested making a pumpkin craft in the shape of a snail, I first abandoned this idea. I thought it was all very difficult. But, my good ones, if you are also looking for a similar idea, then I will say in advance that carving a snail from a pumpkin is not difficult at all. Here even the pumpkin itself remains intact, we just cut off the side for stability and a strip in a spiral, repeating the pattern of the snail shell.


Craft from pumpkin "Kopatych"
That's how many children did not watch a cartoon about Smesharikov, namely Kopatych, with his innocence and village diligence, was somehow associated with a pumpkin for me. Well similar, isn't it? From this section we will take ideas with you and make from Kopatych's pumpkin. Eyes, nose, mouth, glued to the pumpkin and the image is ready.

Nose and ears can be made from plasticine


Or potato slices.

And also make a tomato if you need a red nose.


Or print Kopatych's face on a color printer and stick it on the pumpkin

My friends. I hope after viewing the materials you have already made your choice. And the child had an idea and an image of what to make of such a wonderful and healthy vegetable like a pumpkin. I would also like to suggest that you take a look at the article where I posted. Indeed, in order to have strength for creativity, you need to refresh yourself.
What do you need
- Small pumpkin;
- white acrylic paint;
- wide brush;
- cardboard;
- scissors;
- Scotch;
- golden adhesive tape;
- simple pencil;
- white felt;
- lilac felt;
- black felt-tip pen;
- black self-adhesive paper;
- pink self-adhesive paper;
- glue gun;
- pink yarn;
- small artificial flowers;
- PVA glue;
- rhinestones.
How to do
1. The authors of the master class use a decorative pumpkin. But, of course, a real one will do. Just paint it white and let it dry. And if the natural color of the vegetable is visible, apply several coats of paint.
2. Cut a triangular shape out of cardboard with one rounded side. Roll it up so that you get a cone, and fix it with tape. Use scissors to trim the bottom of the shape - this will be the horn of the animal.
 YouTube channel Karen Kavett DIY
3. Cover the horn with gold tape.
 YouTube channel Karen Kavett DIY
4. Draw two teardrop-shaped ears on the white felt. They should be pointed at the top and slightly widened at the bottom. Cut them out.
 YouTube channel Karen Kavett DIY
5. Circle one ear on the lilac felt and cut out the same shape, only smaller. Circle it and cut out the second part.
 YouTube channel Karen Kavett DIY
6. Draw a closed eye with long eyelashes on the cardboard with a felt-tip pen. Then cut it along the outline. Trace around the back of the black self-adhesive paper, flip the shape over, and trace again. See the video for details. Cut out the details you have drawn.
 YouTube channel Karen Kavett DIY
7. On pink paper, draw and cut out two circles for the cheeks of a unicorn.
 YouTube channel Karen Kavett DIY
8.Using a glue gun, attach the horn to cover the stem of the pumpkin. Glue the white and lilac ear pieces, run glue along the bottom edges and attach them to the left and right of the horn.
 YouTube channel Karen Kavett DIY
9. Make the mane. To do this, wrap the yarn several times around a pad, thin book, or something similar. Remove the threads, cut them along one edge and tie them at the top. Glue the mane by the horn so that it falls to one side.
 YouTube channel Karen Kavett DIY
10. Glue flowers around the horn and ears in front. Attach the eyes below, and even lower, to the right and left of them, the cheeks.
 YouTube channel Karen Kavett DIY
11.Using PVA glue, glue the rhinestones to the centers of the flowers. Add another row of rhinestones under them.
 YouTube channel Karen Kavett DIY
What other options are there
Here's a similar but slightly different pumpkin design:
And here are the cutest multi-colored unicorns with fluffy bangs:
How to make a bouquet in a pumpkin
What do you need
- Pumpkin;
- floristic sponge;
- felt-tip pen;
- fresh flowers and greens;
- secateurs.
How to do
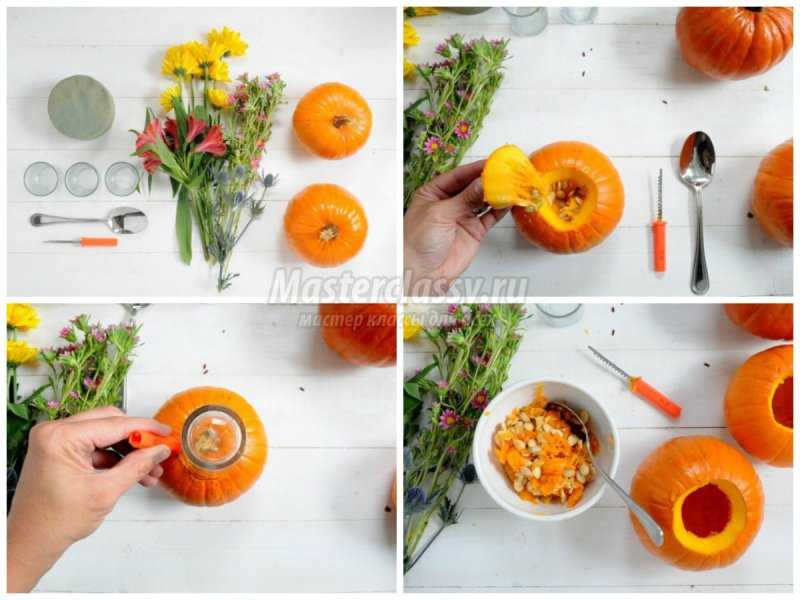
1. Apply a floral sponge to the top of the pumpkin and outline the outline with a felt-tip pen.

2. Soak the sponge. Cut the pumpkin along the outline and remove the top and excess flesh.
 Southern Living YouTube Channel
3. Place a damp sponge inside. Trim the ends of flowers and greenery with pruning shears so that they are not too long. Start sticking the stems into the sponge.
 Southern Living YouTube Channel
4. Assemble the arrangement by sticking in all the flowers and greenery.
 Southern Living YouTube Channel
What other options are there
Tall bouquet of other flowers:
See how cute a bouquet looks in a small pumpkin. Flowers will have to be cut very short:
And here is a composition with fruits, berries and autumn leaves:
How to make a candlestick or pumpkin lamp
What do you need
- Pumpkin;
- measuring tape;
- felt-tip pen;
- drill;
- candles.
How to do
1. Cut off the top of the pumpkin, but do not discard it. Remove seeds and excess pulp from the vegetable. Place the tape vertically on the pumpkin and mark a little more than 1 cm apart.

2. Use a thin drill to make holes at every other mark.
 Brooklyn and Bailey YouTube Channel
3. Use a thicker drill bit to go over the remaining marks. You will get a drawing like this:
 Brooklyn and Bailey YouTube Channel
4. Repeat the pattern all over the pumpkin so that small and large holes alternate in the horizontal rows. Place the candles inside and cover with the top.
 Brooklyn and Bailey YouTube Channel
What other options are there
Here's how to make a floral pattern on a pumpkin:
A garland is inserted inside this lamp:
Children will appreciate the fairytale candlestick with the outline of the Tinker Bell fairy from the Peter Pan cartoon:
How to make a pumpkin house
What do you need
- Several thick twigs;
- pruning shears, knife or other cutting device;
- pumpkin;
- glue gun;
- white acrylic paint;
- thin brush;
- gray acrylic paint;
- self-hardening polymer clay;
- rolling pin;
- 2 wooden sticks;
- awl;
- red acrylic paint;
- decorative moss;
- stand;
- various decor.
How to do
1. Cut the branches: you will need many of the same lengths and a few larger pieces.

2. Glue four branches to the pumpkin so that you get a window. The top and bottom should be slightly longer than the side ones.
 YouTube channel Deko Kitchen - Schöne Deko selber machen | Esther straub
3. Make a door from long sticks. Add exactly the same window to the side as in the previous step.
 YouTube channel Deko Kitchen - Schöne Deko selber machen | Esther straub
4. Paint the inside of the windows with white paint. When it's dry, go over the top with a gray tint. Darken the top with additional strokes.
 YouTube channel Deko Kitchen - Schöne Deko selber machen | Esther straub
5. Roll out the clay into a thick rectangle to fit the door. Stick it inside, remove the excess and make a vertical pattern with a special tool, an ordinary stick or something else.
 YouTube channel Deko Kitchen - Schöne Deko selber machen | Esther straub
6. Fold several identical short twigs. To hold them together, glue wooden sticks to them. On one side, they should have pointed ends so that they can be inserted into the pumpkin. This will be the staircase.
 YouTube channel Deko Kitchen - Schöne Deko selber machen | Esther straub
7. On the back of the ladder, glue two short twigs vertically on the sides. Attach a long stick horizontally on top.
 YouTube channel Deko Kitchen - Schöne Deko selber machen | Esther straub
8. Add a railing on the other side. Make two holes under the door and insert the ladder into them. For reliability, you can grease with glue.
 YouTube channel Deko Kitchen - Schöne Deko selber machen | Esther straub
9. In the windows, draw white curtains with red polka dots. Decorate them with moss.
 YouTube channel Deko Kitchen - Schöne Deko selber machen | Esther straub
10. Make a small wooden handle on the door. From the twigs, make two simple fences. Glue the pumpkin to a stand, cover it with moss, attach a fence and other decorative elements.
 YouTube channel Deko Kitchen - Schöne Deko selber machen | Esther straub
What other options are there
The door and windows can be cut and the pulp removed from the pumpkin. Then you can put something inside.
Here are some more cool ideas for inspiration:


How to make an autumn pumpkin fairy
What do you need
- 2 white chenille wires;
- small pumpkin;
- glue gun;
- artificial autumn leaves;
- felt-tip pens;
- cotton or foam ball;
- thin twigs;
- acorns - optional.
How to do
1. Twist the ends of the wire to form one long wire.

2. Wrap it around the pumpkin stem, twist it in front and bend the ends in different directions.
 YouTube channel Smile Mercantile
3. Glue a couple of artificial leaves onto the top of the stem.
 YouTube channel Smile Mercantile
4. Draw a face on the ball and glue it onto the leaves.
 YouTube channel Smile Mercantile
5. Cover the head with a piece of paper.
 YouTube channel Smile Mercantile
6. Glue twigs to two leaves. Twist the ends of the wire around the twigs. Instead of leaves, you can glue acorns to them.
 YouTube channel Smile Mercantile
How to make a pumpkin penguin
What do you need
- Small pumpkin;
- white acrylic paint;
- wide brush;
- black spray paint;
- very small pumpkin;
- gold spray paint;
- glue gun or other durable glue;
- black openwork fabric;
- several silver buttons;
- 2 cotton pads;
- scissors;
- shiny gold fabric;
- black fabric;
- orange fabric.
- 6 black chenille wires.
How to do
1. Paint a small part of the pumpkin white and dry.
 Ann Le YouTube Channel
2. Cover the white area with paper and paint the rest of the surface with black paint.
 Ann Le YouTube Channel
3. Color a small pumpkin golden. When both pumpkins are dry, glue the small one to the top of the large one. Make a butterfly out of openwork fabric and glue it between them, on the white part. Attach a row of buttons at the bottom.
 Ann Le YouTube Channel
4. Glue one smaller gold circle to each cotton pad. Attach an even smaller circle of black cloth on top. Glue the resulting eyes on the head, and between them add a triangular orange beak.
 Ann Le YouTube Channel
5. Twist one wire into a loop. Screw two more wire loops to it so that you get the figure shown in the photo. The video above shows the whole process. Make another detail like this and glue both sides to the large pumpkin.
 Ann Le YouTube Channel
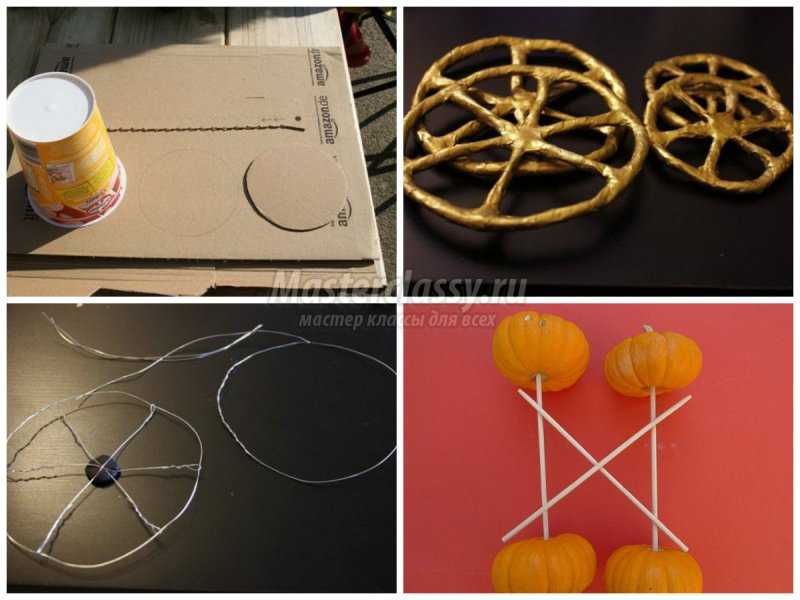
How to do
1. Form four wheels from the wire. Two of them should be slightly smaller than the others. Fix the wire in the middle with clay.
 totallyeileen.blogspot.com
 totallyeileen.blogspot.com
3. Dilute the glue and water in approximately equal proportions. Cover the wheels with paper or newspaper, dipping the sheets in the glue mixture.
 totallyeileen.blogspot.com
4. When the wheels are completely dry, paint them and the sticks gold. Glue the sticks to the wheels.
 totallyeileen.blogspot.com
 totallyeileen.blogspot.com
6. Decorate the pumpkin with ribbons and 3D paint patterns. Glue on the sides of the wheel.
 totallyeileen.blogspot.com

Today I will show you how to make the funniest, most beautiful and brightest autumn crafts! We have already made miracles from vegetables and fruits. But the pumpkin is worth highlighting as a separate topic. She deserves it! And the color, and the shape, and the density of the fruits allow you to prepare many interesting things from the vegetable. By the way, maybe you would like to share your work? Send photos and tell us how you made them. So, by joint efforts, we will put together a separate collection of handicrafts. Feel free to share the link to this assembly with your friends and subscribers on social networks!
There is another plus for the pumpkin! This material can be used to make works all year round, both for autumn holidays, such as Halloween, and for winter holidays, such as New Years. We can decorate everyday life with bright colors if we make an original vase or lamp.
Crafts on the theme "Autumn" can be completely different, as simple, with a mono-pattern (cut out on the skin of a vegetable or by making an applique). And there are also complex, but insanely beautiful compositions.
Applique Autumn.

- We collect different autumn leaves or cut them out of paper.
- We paint the pumpkin in the base color. It is advisable to make it darker than the pattern will be.
- We paint each leaf in autumn red-orange-yellow tones.
- We glue the leaves, creating an autumn pattern.
- From the leaves, you can cut out figures in the form of cones or acorns and stick them between the leaves.
Decoupage.
Another great way to decorate a vegetable is to glue it over with paper napkins - this will be decoupage.

For example, we glue the cut motifs.

Another option for those who like shiny decor: paint part of the vegetable, and spread the other part with glue and sprinkle with glitters.

The pumpkin can be spray painted. Completely, or covering part of the vegetable with adhesive tape, in order to obtain a geometric pattern. Can be painted with a brush, acrylic paints.


And what delicious donuts are obtained.

You can use stencils with different ornaments and use a sponge to apply paint or use aerosols.

The easiest option is to decorate the pumpkin with multi-colored tape. You just need to stock up on colorful scotch tapes. They are sold in craft stores, stationery stores, and gift wrapping shops.

Turkey chick.

- Cut out the head, eyes, beak, beard and paws from cardboard or felt.
- We glue the variegated autumn leaves of a maple (or other tree) like a tail, behind the pumpkin.
- Glue the paws from the front at the bottom.
- Above (towards the pumpkin's tail) we place the head with beak and eyes. And under the head - a beard.

Such a craft, using leaves, is simple, but it looks original.
Forest animals.
We paint in the main color, add eyes, ears, tail from felt, foamiran or cardboard. And we get an owl, a raccoon or a chanterelle.

Seals.
The shape of the fruit, which is so different in pumpkins, can tell you what to depict. For example, funny cats.

Or such wonderful cats. You can fasten the head to the body using sharp skewers or stiff wire.


Autumn crafts from pumpkin on the theme of gifts of autumn in the garden
Making a craft out of a material such as a pumpkin is very interesting! You can think of such stories !!! Even from a fairy tale. For example, this job!

"Turnip".

- We make the head separately. I understand that this is the grandfather who pulls the turnip. We make hair, eyebrows and mustaches from paper or straw. Draw the mouth and eyes. But the nose is half a potato. We put a hat on our head.
- Cut the turnip in half. We need half with tops. We put half a turnip on a brown cloth or paper so that it looks like the turnip is half taken out of the ground.
- A mouse is running nearby. It can be made from beetroot, carrot or potato.
- Next to the grandfather is a basket. Peel half of a large cucumber or zucchini. We take out the insides of the vegetable. Cut off the bottom for stability. We put on a zucchini a circle of Bulgarian pepper. Fill the basket with cherry tomatoes and a bunch of green onions.
- You can build a fence if you want.
Hard? Nothing like this. Just a lot of details. And they are all made from different vegetables and fruits.
Beasts.


And you can make a house for animals or dolls.

Master - class on how to make a vase and Ekibana with pumpkin and flowers
It is very difficult to choose what to show you. There are always more works than can be described. Therefore, I decided to very briefly talk about a few crafts. Briefly, but in a way that is clear and easy for you to repeat.
Ekibana.

- In a large flower pot (or in a small bucket) we place different autumn flowers (preferably, if possible, natural, not artificial).
- We cover a small pumpkin with varnish. Place it on a bamboo skewer and place it between the flowers.
Vase or flowerpot.

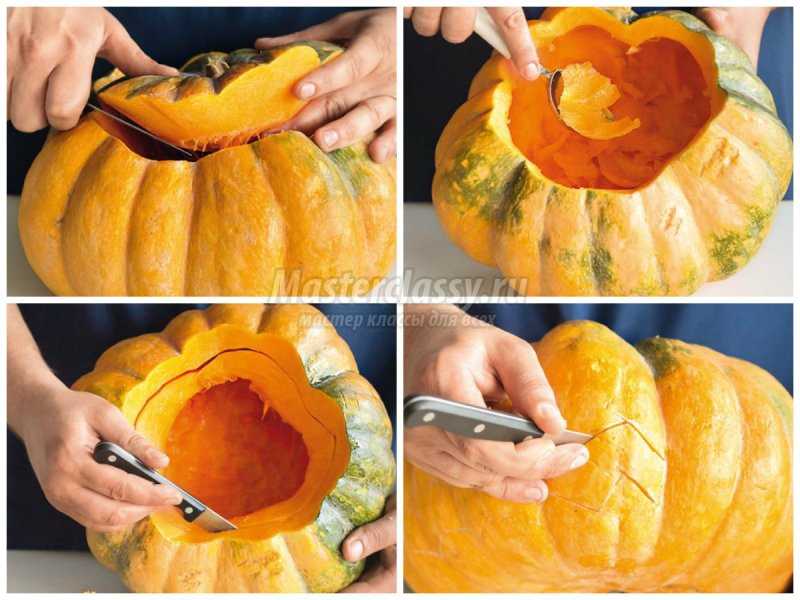
- Where the vegetable has a tail, cut a hole. We clean it from the insides literally to the walls.
- We put a vase of water in the middle and fill it with flowers. But you can put a whole pot of flowers in a pumpkin.

Ekibana "Face".

- We have already covered how to make a vase. Cut out the circle, take out the insides and insert the jar of water.
- By the way, instead of a can, you can put a sponge moistened with water on the bottom.
- For a real Ekibanu, the bouquet is not important, but the plot is important. Therefore, we choose sprigs of barberry and rose hips, painted in bright colors in autumn.
- We use two empty "houses" of the snail as eyes.
- We draw "pupils" on the snails. Making the mouth.
It turns out to be a real Ekibana, or, a bouquet with meaning and plot!
And here is also an interesting option from a small pumpkin.

If you are using fresh flowers, then use a floral sponge to prevent withering.

How to make a carriage out of a pumpkin with your own hands
It turns out that not only Cinderella's godmother can do such a miracle as turning a vegetable into a carriage, but you and I too! And again, there are a huge number of options waiting for you!

With dolls.

- If you have dolls, you can use them to create crafts. Just dress up the Barbie, because she is almost a Princess!
- We make 3 holes. One large, two smaller, they are located on the sides of the large hole.
- We glue the small holes-windows along the edging with tapes.
- We decorate the carriage doors with curtains and rhinestones.
- Glue the crown on top of the carriage.
White carriage.

- For this and similar carriages, a template is needed. Therefore, we immediately draw on paper which doors and windows (taking into account the size and shape) you want.
- Using a template, cut holes on both sides.
- We make wheels out of wire and fix them to the pumpkin. You can wrap them with foil or rope, paint them.
- We apply a pattern.
It would be nice to find small horses, and then you can hope that the carriage will go.
Wheels can be made of cardboard or wire or small vegetables.

Here are some more options and ideas.


What kind of craft can be made from pumpkin for the fall holiday
I myself know how unexpected it is to always hear from a teacher or teacher that you need to bring an autumn craft made from vegetables or fruits. Because you need to take part in an exhibition on the theme "Autumn". And care begins for moms and dads: they think what to do in order to quickly, beautifully and simply.
 Author https://www.instagram.com/p/BMBmuOhgXat/?utm_source=ig_web_copy_link
 Vegetables and fruits are taken from the cabinets. Each fruit is carefully selected, and the head of the family walks through the neighbors or just looks for a suitable idea on the Internet.

In general, there is clearly no need to get bored. Save the ideas I found in a selection box, they might come in handy. Handles of an unknown animal made of felt - you can circle the handles for children. And the eyes are purchased, but they can be made of felt and glued to sticks, which will have to be installed so that the lid is ajar.

To cheer up a gloomy autumn, you can make such cute little people - snowmen.

Or cute cats.

Kindergarten is a space for creativity. Such a baby can be made from a pumpkin, a nipple and a hat.


How do you like that kopatych? His face, as you can see, is made of paper, but you can paint directly on the vegetable with paints. Don't forget to decorate your hat.

A pumpkin house for gnomes is also quick and easy to make, and it looks beautiful, especially if you arrange the adjacent lawn.

And here is a pumpkin house for Mole. You will need a small pumpkin, on which you need to draw a window and an entrance with a pen, then cut out the holes with a knife. We take out all the insides with a spoon.

We make shingles from dried birch leaves (fasten with hot glue). The door and window are made of twigs, also held together with hot glue. 
You can dress up the Christmas tree-cone with pom-poms or plasticine balls.

I also liked the house and the palm tree.

And this option is just like from a fairy tale about a teremok, right?

And you can make a painting. YOU WILL NEED:
- Pumpkin
- PVA glue
- Sequins
- Acrylic paints
- Brushes
We paint the vegetable white or whatever it is. We apply the pattern with PVA glue with a brush and generously grind it with sparkles. When the glue dries, you can fix additional glitter with PVA glue.

But how beautifully you can decorate a vegetable with leaves. It is best to glue on PVA.

You can also make a beautiful decorative pumpkin using decoupage technique. To do this, glue the napkins you like (only one top layer) on PVA. You can press down on the napkins with a damp kitchen sponge. So the drawing will stick well and will look as if drawn.

If you don't want monsters and monsters, you can do something cute and positive. For example a fox, how do you like the idea? Cut out the details from colored cardboard and paper and glue them with a hot gun. True, hot glue does not adhere well to a vegetable. So, if you decide to repeat it is better to use scotch tape, well, or more hot glue.

And here are the cool cartoons. This is how you can make all rounded characters, for example smeshariki or angry birds.

And here is a real pirate!

It seems to me that no vegetable / fruit conveys the atmosphere of autumn as well as pumpkin. Little owls' eyes can be entrusted to children, because the purpose of this task is not to strain parents at night, but to bring them closer to children by joint creativity.
 Author https://www.instagram.com/p/BovkHAsBmxY/?utm_source=ig_web_copy_link
Basket.
The vase that we made a little earlier and the basket differ in that the hole is on top of one, and on the other handicrafts they are made on the side.
Of course, you can make the side cuts even on both sides of the pumpkin. That is, I will explain this moment a little more spaciously: we cut out semicircles on the sides. At the same time, the lower side of the semicircle is even, and the top is an arc. If this is done on both sides, then a thin strip will remain on top, resembling the handle of a basket.

If you want to make the cuts uneven, like in the picture, it is better to make a template on paper and transfer it to the vegetable from both sides.

We made a hole, and now we take out everything from the inside of the pumpkin.

We cleaned the insides, and put a sponge moistened with water inside it. We stick autumn flowers and leaves into the sponge.
But you can put fruits and vegetables in the basket.

And how do you like the idea to make a summer cottage with a house inside or a forest and a wolf howling at the moon.

Or you can make a puppet theater.


DIY pumpkin lamp (Jack lamp in Minecraft)
According to legend, the Irishman Jack, who led a very riotous and idle lifestyle after death, could not go to heaven or hell and wandered between worlds with a lamp in the form of a pumpkin with a candle.
In minecraft, the authors of the game drew such a lamp. Moreover, unlike a torch in the game, it can be placed under water and it will not go out. This makes it one of the best sources of underwater lighting.Unfortunately, we will not be able to get a cube-shaped vegetable, unfortunately. Therefore, we will have to go the other way. We will make the pattern almost the same as in Minecraft, i.e. pixelated.

- Cut out the eyes square.
- Cut out the mouth from a row of squares: the outermost squares look down, the square in the middle at the top.
The scarecrow turned out to be something else! Do not forget to put a candle in the middle of this head.
By the way, if you have a thin skin, you can cut out both the eyes and the mouth from more pixels !!!

How to cut the lamp correctly:
- Choose a vegetable, wash it well and dry it. Cut off the "lid" and carefully remove seeds and fibers through the hole. Try to get rid of the pulp as much as possible, so your craft will last longer.
- Degrease one side of the appliqué cut. Draw a face with a marker. It will be easier and more accurate to print the desired drawing on a sheet of paper and fix it on a vegetable using English needles, cut out everything you need from a ready-made template. If you did not use a template, but drew the outline of the drawing on the pumpkin with a marker, then wipe the marks from the marker with alcohol, giving the craft a neat look.
- After you cut the face, leave the vegetable to dry overnight. Then finish the composition by inserting a candle or other light source inside.
I like patterned lamps. Holes are easy to make with a drill.

How to make a pumpkin head for Halloween
To get the head, you need to take a very ripe fruit. Then it will be easier to cut, and the craft will dry out quickly, which means it will stand longer and "please")

- First, we prepare a paper template, the drawing of which is transferred to the pumpkin.
- When, according to the template, we have outlined where and what the holes will be, boldly cut them out.
Remember, facial expressions can range from sinister to cute smiling! I am not an adherent of this "holiday" and I do not want it to enter Russian culture. Since this is not a holiday at all and many children disappear on this day every year. Although the media and educational institutions for some reason diligently promote this tradition. And there is a demand for carving, even in kindergartens they give such a task. Therefore, I will show you some interesting and not creepy options.

I will show you the simplest option, which can be cut even without a template.
The head of a cat.

- Cut out round or triangular (as it turns out) eyes.
- Cut out a nose under the eyes, a strip down from it and two more to the sides, the edges of which are slightly raised.
- We make small cuts - a mustache.
- We attach the ears to wood skewers or toothpicks.
I don't even know if such a pumpkin head will scare or amuse. What do you think?

You can also create such a Winnie the Pooh with a keg of honey. Well, this is if you already have absolutely nowhere to put the fruits).

Probably the easiest thing in making autumn souvenirs from such a sunny vegetable is drawing faces on it and decorating with additional attributes. See how cool the boy and the girl turned out.

Another option is to decorate your head with gouache or acrylic. You can even eat such a pumpkin after the holiday. What will come of this? Look!

So, the collection is over and is waiting for your additions.

Until then, you can subscribe to know about every new article!
This vegetable, the very appearance and color of which suggests autumn, is not only tasty and healthy, but also an excellent material for making anything from houses and carriages to lanterns and various figurines, so today we will discuss and make pumpkin crafts... Pumpkin has become especially in demand with the Halloween fashion that has come to us from the West. Candle-lit horror stories from it are an integral part of the entourage of this holiday. But even if you do not take it into account, it is simply a sin not to cut out something for a kindergarten or school from such ornamental material, even the color of which is bright and joyful adds positive to the gray autumn days.
Crafts from pumpkin on the theme of autumn
The pumpkin comes in a wide variety of shapes and sizes. It is great if you have decorative representatives of this species available, but even if they are absent, many different interesting things can be made from what is grown independently for food or bought on the market. Let's start with the simplest: if you find it difficult to make a lot of curly cuts, then the simplest option handicrafts of autumn from pumpkin-, in which you can put a bouquet of flowers, leaves, branches. For the most common round flattened vegetable, it is enough to cut off the top with a stalk and a spoon to remove the seeds and pulp. You can guess the diameter of the cut so that you can tightly insert inside, say, a cut plastic bottle or can of canned food, preferably one with the inner surface covered with plastic. This is convenient if you are going to put a bouquet of fresh flowers inside, since you can pour water without fear.
A beautiful vase with a neck can be obtained from a gourd-gourd or simply from a fruit that has an elongated pear-shaped shape. Such a vase can be decorated with peel carvings. The pattern can be simple geometric, such as zigzags, and if someone in the family has an artistic talent, then it can be more complicated. Painting with paint is also an option. Moreover, you can use stencils. It doesn't matter at all if you got the fruit of an asymmetric, irregular shape. Take a closer look at it, turn it in different ways. After all, a vase does not have to be symmetrical at all, a curved shape will allow you to create a more interesting product.

Crafts from pumpkin in kindergarten
If you decorate the cut with teeth or make a curly edge for a round vegetable, then the resulting bowl can be filled with vegetables and fruits, and also placed there. Just for vegetables, cut off the edge approximately in the middle of the fruit, and for flowers closer to the top. It is a little more difficult to depict a basket with a handle, but this is not such a big problem either. In this case, it is better to make the bottom from the side of the stalk, cutting it off so that the basket is stable, or choose a slightly asymmetrical fruit. How to decorate handicrafts from pumpkin, photo will show you various decor options. If desired, the product can be decorated with cut or drilled patterns. It is not difficult to make holes with a drill, of course, after removing the pulp first. To make the pattern more interesting, we use drills of different diameters. Plain electrical tape will allow you to evenly place it. We glue it horizontally at intervals of the required size, or even make a grid out of it and place the drawing in the cells. When you're done, just peel off the tape.
In the same way, you can do autumn pumpkin crafts in the form of lanterns. Often a grinning face is cut out on a vegetable for a lantern. To do this, a drawing is first applied to the prepared (peeled from pulp and grains) fruit with a felt-tip pen, and then the necessary areas are cut out with a knife and chisels.
If it's difficult for you to draw on the surface right away, draw the drawing on tracing paper, attach the tracing paper to the fruit and find the optimal place for placement, and then pin the drawing along the contour with an awl or even an ordinary nail and cut holes along the tattoo.
Often the skin of a pumpkin is very dense. This is where a drill can come in handy again. After all, drilling holes with it is much easier than cutting a drawing with a knife. Using drills of different diameters and insulating tape to demarcate, so that the pattern does not move, you can create very interesting and cute lanterns.
It is best to put an LED lamp inside. By the way, it is not at all necessary to make all the holes through. If you leave a layer of pulp under the skin about a centimeter thick, then only the densest layer can be removed for the pattern. The lamp will illuminate the pattern from the inside, and it will look very decorative.

DIY pumpkin crafts
Let us recall the tale of Cinderella and that of the kind godmother. We, of course, are not magicians, but only learn, but together with the kids, we make such a non-trivial vehicle as DIY pumpkin crafts we are quite capable, especially since the manufacturing principle is still the same: we cut off the top so that the hole is small, if only we can scrape out the pulp with a spoon. Our carriage can only have windows, or you can make windows and a door.
By the way, if the fruit is large and, accordingly, the openings of windows and doors are large enough, then the pulp can be removed through them, leaving the top intact. We apply a drawing with a felt-tip pen or make a preliminary stencil and circle or prick it with something sharp, then cut the necessary holes along the contour.
If the edges of the holes turned out to be even and correct, then you can apply a decorative pattern around them with a chisel or a carving knife, and even decorate the entire carriage body with drawings made using carving. In the event that it was not possible to cut through the peel carefully, colored paper or colored cardboard and glue will come to the rescue.
Cut out decorative strips for doors and windows and glue them to the carriage body over the holes. You can also think of a decoration for the stalk. Squash, which we fix with bamboo sticks, are perfect as wheels. If there are no squash, use zucchini mugs, or cut the wheels out of cardboard.

You can do exactly the same thing crafts in the pumpkin garden in the form of fairy houses. That is, we cut windows and a door of the desired shape on the vegetable, moreover, you can not cut off the top of the fruit, but remove the pulp through the door opening.
But then we turn on the imagination and decorate the resulting house to our liking. For example, as a tile on the roof, you can glue autumn leaves, scales from cones, or use a bundle of dry grass or spikelets.
Toothpicks or twigs tied in a cross will add credibility to the window. The staircase, door, chimney and other details will make the house unique and individual. A plot scene will turn out quite well, if you come up with a stand, decorate it with moss and a fence. Figurines of little mice or little men made of cones, acorns or other natural materials will add additional flavor. Fruits of various shapes are suitable, not only round ones.
Only in this case, if you want to put the pear-shaped pumpkin upright, take care to fix it on a stand, for example, with the help of glue, so that it does not fall at the most inopportune moment. But the house will come out more interesting.

Crafts in the pumpkin garden
You don't have to cut and peel the vegetable to make pumpkin crafts on the topic Halloween. It is enough to cut out silhouettes of bats from black paper and decorate a vegetable with them. Or just paint them with black acrylic paint or marker. Likewise, a black outline of the lock, drawn or pasted on the side, will be appropriate. By the way, it is not necessary to use natural pumpkin, but you can make it yourself from a variety of materials.
Ideas and methods of making artificial ones are very, very diverse. Paper, fabric, and knitwear will do. Finding a disused sweater on the farm is not so difficult. It is better if it is orange, brown or green, but, in principle, it can be any color.
We cut out the cylinder, tighten the bottom in a circle and fill the resulting bag with filler: padding polyester or holofiber, tighten the upper neck with an elastic band or jute twine. With his help, we depict the ribs of the pumpkin, after which we wrap the rest of the knitwear on top tightly with twine, we get a stalk.
It is easy to sew a pumpkin from the fabric using the given pattern, increasing it to the required size. The fabric can be any, even viscose household napkins are suitable, only they should be duplicated with glue so that they do not creep when stuffing.
They are yellow, orange, and green, so they are suitable for leaves. The leaves will be good and made of felt. Tint the seam with any paint, even watercolor or gouache will do.
From paper pumpkins, simple in shape, you will get an interesting garland for decorating a room, which can be placed in window openings or under the ceiling. It is better to take paper colored on both sides, such as colored paper for a printer.

Autumn pumpkin crafts
Colored paper may be needed when making pumpkin crafts on the theme of autumn, if we want to portray a funny or frightening face: we cut out paper eyes, mouth and nose and glue it all on a whole pumpkin. The drawing can be applied with acrylic paints, and for greater authenticity, add hair from a washcloth or an original hat.
Felt or foamiran is also suitable for the manufacture of overhead parts. For example, to make a funny owl, it is enough to cut out shaggy eyebrows, eyes and a beak from felt and stick all these details, having previously tried on how to place them best. Natural materials will also come in handy in this case: pumpkin seeds, cone scales, leaves, and the like.
Autumn is a wonderful time, it seems as if nature is ready to give it all its colors before the cold winter. And a great gift from this time of year we get all kinds of vegetables, which are not only useful to eat, but also make all kinds of crafts from them - decorations for the interior.
Today on the website "Dream House" we will talk about the pumpkin. It is not only useful, but also has a beautiful color, from green with splashes of yellow to juicy yellow and orange. Thanks to the color and thick skin, pumpkin crafts are durable and beautiful. They can please the eye for a very short time or, conversely, for a very long time. What can be made from pumpkin, how to extend the life of crafts? Let's talk about this.
What crafts can be made from pumpkin with your own hands
The first thing that comes to mind is a Halloween pumpkin. On this holiday, the pumpkin head is found everywhere, and in our country the idea was picked up fairly quickly. The second is pumpkin vases. But we have a separate publication about them. What else?
The easiest crafts to perform are all kinds of boxes, candlesticks, lanterns, salt shakers. More difficult items to make are made of dried pumpkin - kitchen utensils, handbags.


You can fill a nursery with a large number of pumpkin crafts: a mobile for a crib, maracas, a lamp, and so on. Together with the children it will be interesting to make a carriage, houses, various animals, pumpkin boats, all kinds of little people.

Cool faces - crafts from pumpkin

Cool faces - pumpkin crafts for the garden


DIY pumpkin crafts for children
A fireplace or a shelf in the living room can be decorated with such an original craft as a clock from a round pumpkin.

Crafts from a large pumpkin - clock
If you are a happy owner of a garden, then fill it with street lamps and lanterns, a birdhouse, an intricate pumpkin washstand.


Pumpkins decorated with fresh flowers, sparkles, autumn leaves look luxurious. This is perhaps one of the best decorations for an autumn interior.


And with the help of paints, you can make beautiful patterns.

How to make pumpkin crafts: highlights
Getting acquainted with the pumpkin as a material for crafts, it is best to get your hand on objects that are easy to perform, and only after that move on to more complex crafts.
We select the tool
For the manufacture of a particular craft, it is necessary to properly prepare the tools at hand. Most often you will need:
- long knife;
- a scraper or spoon to remove the pulp from the pumpkin;
- paper for faster drying of the pumpkin;
- thin paper, coal;
- an awl to make small holes;
- Scotch;
- paint, cutter and so on.
We select and dry the pumpkin
Most often, crafts are made from decorative pumpkins, but ordinary small specimens can also be used. Having chosen a suitable vegetable, inspect it for rotten spots, wash thoroughly and wipe it off, preferably with an alcohol solution. Your next step depends on the purpose of the future craft.
If you do not plan to store it for a long time, then simple drying of the pumpkin is necessary, which will not take very long. You should cut off the neck, spoon out the pulp and seeds with a spoon, then stuff it with a lot of paper so that it absorbs moisture. Change the paper until it is no longer damp. The pumpkin is now ready to use.
If you want to do something a little more serious, like dishes, then you need to know how to dry a handicraft pumpkin so that it lasts much longer. You will have to be patient because this process will take six months. To avoid disappointment by the end of the term, instead of well-dried pumpkin, choose a few pieces to dry. In the process, some of them may start to rot. So, pumpkins washed and wiped with a weak alcohol solution must be removed to a well-ventilated room not exposed to sunlight. Vegetables should not touch each other. Turn pumpkins every day for 6 months and check to see if they have rotted so that the infected vegetable can be removed in time.

How to dry a pumpkin for crafts

Crafts from dried pumpkin
We start to create
To make making pumpkin crafts with your own hands give you a lot of pleasure, use our tips:
- if the pumpkin was dried whole, then before removing the seeds from it, pour water inside, then rinse the pumpkin;
- To apply a pattern to a vegetable, you must first apply it to thin paper, then use adhesive tape to glue it to the pumpkin and use an awl to "pierce" the pattern along the contour. After you remove the paper, wipe the craft with charcoal, it will help fix the drawing. The second option is to use ordinary carbon paper to apply the pattern;
- the drawing is finally applied on a well-dried pumpkin using a jigsaw or a wood-burning device;
- on a fresh pumpkin, you can apply a drawing with an ordinary vegetable cutter;
- if you decide to use paints, then give preference to acrylic;
- do not varnish the craft, the pumpkin should breathe;
- if the fresh pumpkin craft begins to dry out, dip it in water for several hours;
- cut the drawing from the center;
- if you unsuccessfully cut out a part of the pattern in a fresh pumpkin, you can return the cut piece with the help of a wire.


Pumpkin Crafts for Beginners
Having fired up with the idea to create something, I don't want to wait 6 months. Therefore, we bring to your attention the simplest crafts made from natural material - from pumpkin.
Pumpkin candle
Prepare a small pumpkin as described above. After quick drying, gently fix the wick at the bottom of the pumpkin, pour the wax inside. You can use scented candle wax.

Small candles - round pumpkin crafts


Candlestick
Follow the steps described for making a pumpkin candle, only at the end, instead of wax and a wick, put a small candle inside the vegetable. If you wish, you can first apply a drawing and make the candlestick more delicate. You can also make a lamp.


Pumpkin basket
Perfectly decorate the autumn table. Open the pumpkin under the basket, cutting out the excess. Remove seeds and dry quickly. The handle of the basket can be carved, and a simple pattern can also be applied to the sides of the pumpkin.

This pumpkin craft will be interesting to do with children. Use the suggested sketches on the Internet, and feel free to get to work.


Finally, I would like to note that you can make pumpkin crafts all winter, brightening up cold evenings. And the received products will be pleasant to present to your friends and family. Believe me, such a reminder of warm days will bring them a lot of pleasure!
We also recommend
 How to make a dragon from papier-mache Making dragons from papier-mache
 DIY leather wallet
 Crafts from pumpkin - original ideas and a master class on creating home decorations (85 photos)
 Simple autumn pumpkin crafts: for kindergarten, school and home
 Spider made of yarn. Autumn crafts. Spider on a web DIY spider from scrap materials
 Weave a dragon from beads with our own hands