Incredible useful crafts. Interesting DIY homework: TOP of the most original needlework ideas from scrap materials with photos and instructions for homemade hand made
Ordinary toys from the store are no longer interesting for your child? Then, maybe it's time to do something with your own hands, especially since this can be done with the help of scrap materials. We will give some simple examples with step by step photos of how to make interesting crafts at home. Involve the child in work, for sure it will be interesting for him to assemble a toy on his own, and then he can also play with it.
Making crafts with your own hands from improvised tools at home is a very exciting and interesting activity. Both children and adults are fond of this, who enjoy this process and take a break from the gray routine. For crafts, you can use any artificial and natural materials. The products fit organically into the interior, thereby adding innovations and originality to it.
- The best cardboard crafts.
- Cup holder.
- From napkins.
- Made of wood.
- Salted dough.
- Shells frame.
- From socks.
- From plastic bottles.
- From plastic bags.
- From disks.
- From paper.
- Puzzle.
- Original crafts from fruits and vegetables.
- Cool cones products.
- Lamp.
- Key holder.
- An unusual cup.
- Unusual keyboard.
- Candlestick.
- Decor.
- From tubules.
- From pasta.
- Master Class.
- Garden crafts.
- DIY crafts for kindergarten.
- Finally.
The most important “consumers” of creative products at home are, of course, children. Try to get the child interested in a joint activity, for example, during a vacation at the dacha, especially since the result will not be long in coming. Gather together simple natural material, which is abundant in the area - flowers, stems, branches, cones, leaves, and more. Add a little of your imagination to this ensemble - and you can make an original masterpiece.
The best cardboard crafts
You can easily make various do-it-yourself cardboard paper products with diagrams and instructions for all family members. This is an interesting and exciting process that will not leave anyone without a lesson.
Cup holderWith the help of small white decorative stones, you can make an original cup holder. For this, the stones must be glued together. This is quite a long and painstaking work, but the result is worth it. This stand can be used under hot dishes.
Unusual products from napkins
You can diversify your leisure time with your child using simple napkins. Children love to craft something on their own, and it also develops motor skills.
Made of wood
Wood crafts are more suitable for young men, since it will be difficult for girls to do this. Excellent leisure time not only for boys, but also for their dads.
Salted dough
Dough products with step-by-step video instructions for mothers and their children will bring a lot of great mood and emotions.
Seashell frame
Seashells will help to make a decorative item from an ordinary wooden frame. It is enough to glue the frame around the entire perimeter with them. Also, some seashells can be coated with a clear glitter varnish for more attractiveness.
From socks
Every house has socks, so we would like to suggest some great ideas from ordinary socks, or more precisely, a toy. There are many different options for products, for example, a bunny, a snowman, a bear, a cat, an owl, and so on. You can fill such a toy with cereals, padding polyester, cotton wool. Groats are an excellent filler, because their use develops hand motor skills in children. Crafting something with children is interesting not only for them, but also for their parents.
So, for example, you can make a bright striped caterpillar. To do this, you will need: a ribbon for decoration, a sock, a marker for the face, thread, synthetic winterizer or cotton wool. Fill the product tightly with filler, sew one end or tie it with a thread. We visually divide the sock into five sections and tie a thread between each division to make small rollers.
The part in which the head will be located is also tied with a thread, and then a bow can be made from the ribbon and tied to the head of the caterpillar. The muzzle is outlined with a marker, and the surface of the pattern is embroidered with threads, this will add volume to the caterpillar. So you get a bright and cheerful caterpillar with a "tuft".From plastic bottles
Such surprises are suitable for older children, and although it is a troublesome activity, it is quite exciting.
From plastic bags
Such wonderful crafts for dad or mom from children will go for the New Year, Birthday and any other holiday. You can view exclusive and unusual gifts made of polyethylene with step-by-step instructions below and choose something original for yourself.
From disks
Birthday gifts for their mom and grandmother. This will take you a little time. They will definitely be delighted with such a wonderful presentation.
From paper
If you want to make something unusual out of paper, then we offer several original and simple ideas. You can also make origami, there are many different options.
Puzzle
You can even create an educational puzzle from improvised means. To do this, you need to take ice cream sticks of the same size and spread them exactly along. Apply glue to any paper picture of the same size and lean against sticks. After the glue dries, cut it into separate pieces with a clerical knife.
Original crafts from fruits and vegetables
Here are the best ideas from fruits and vegetables, and everyone can make such a masterpiece. This will be a great leisure time for children and their parents. So choose and enjoy a wonderful pastime.
Cool crafts from cones
If you want to make a toy out of cones, look at the photos that show a lot of original and cool ideas.
Lamp
From autumn leaves and a simple half-liter jar, you can create an unusual and at the same time beautiful lamp. To do this, you need to select the "golden" leaves and glue them on the outside of the can so as not to leave empty gaps. We tie the top of the can with twine, in the middle you can put a small candle. If necessary, set it on fire, the bank will give off a little golden twilight, thanks to which an atmosphere of comfort will be created in the room. A great way to pass the time with your child.
Key holder
A regular tennis ball can be used to make a funny and very funny key holder. You will need to mark the eyes on the ball with a marker and pierce it with a knife, imitating a mouth. A metal bolt is inserted into the cut-out hole. Then the ball is glued in the desired place.
Fancy cup
With a marker and cardboard, you can turn an ordinary white cup into a piece of art. To do this, you need to cut out the desired image from the cardboard and lean it against the cup. Place a marker around the stencil with a marker, then remove it. A wonderful gift with your own hands for your beloved for her birthday or March 8.
Fancy keyboard
An old computer keyboard will help you to congratulate you on the holiday in an original way. All letters need to be taken out and glued to the board, we choose the color to taste. Then we insert the board into a wooden frame, and the original gift with instructions is ready.
Candlestick
You can decorate the room with a candlestick made by yourself. To create it, you need two transparent glasses of the same height, but different diameters. The smaller glass is inserted into the larger one and secured with glue. The space between the glasses is filled with food coloring water (you can choose any color). Insert a sleeve candle into the middle of the candlestick.
Decor
Crafts can be created from any materials at hand, even from wine corks. You can make a heart that will serve as a decorative element in the room. To make it, you need to draw a heart on a sheet of paper and lay out the corks, gluing each one together.
From tubules
Another great idea is the use of straws. Such small surprises will be pleasant as a gift for your grandmother, mother or sister.
From pasta
What an inventive Russian people, crafts from pasta, it must be the same. Do you want to make something unusual? Then take pasta. Children of any age can be involved in this activity.
Bottle butterflies
The topic of plastic bottles, as they say, is not fully disclosed. We offer you to create original crafts with your own hands from improvised means at home. Beautiful butterflies will "flutter" around the house, and this requires affordable and simple things:
- tweezers;
- the middle of plastic bottles;
- toothpicks;
- butterfly patterns;
- shiny rhinestones, beads, sequins;
- marker;
- nail polish;
- scissors.
Getting started:
- On the Internet, you can download butterfly patterns or cut them out of children's coloring.
- Then cut out rectangles of the same size from the bottles, after removing the remnants of the glue and the label.
- Place the plastic rectangle over the butterfly image. Use a marker to outline the contours on the other side.
- Carefully start carving the butterfly, don't forget about the delicate legs and antennae.
- Add decorations to your taste. Use sequins, sequins and varnishes. Small lines can be drawn with a toothpick.
- Paint over the original side with black marker and then cover it with clear varnish.
- Now a beautiful butterfly has appeared in your house, which you can present to friends or decorate walls and curtains with it.
Helicopter
Necessary materials:
- hairpin;
- small plastic bottle;
- three plastic tubes;
- scissors;
- ball.
Getting started:
- Use scissors to make a hole in the lid. Cut off the bottom of the bottle, cut out a strip.
- We cut the tubes into small pieces (see the picture) and connect them together.
- Now the individual parts of the helicopter need to be assembled and fastened with a stippler.
Pirates' ship
We will need:
- cardboard box;
- black fabric for the sails;
- superglue or hot glue gun;
- wooden skewers;
- ruler;
- sticks of various sizes;
- pencil;
- rope;
- stationery knife;
- black marker.
We start tinkering:
- Cut the cardboard into pieces. On the long pieces, draw a template for the side of the ship. Remember that the nose should be slightly raised (look at the photos).
- You need two identical sides of the fuselage, two square pieces are attached to the back, a rectangular strip of cardboard to the bottom - front and stern - to the bow. It is necessary to cut out the shapes exactly with the samples shown in the photo.
- Using super glue or a hot glue gun, glue the sides of the boat. We are waiting for the body to dry.
- Then we glue the bottom, not forgetting that the bow of the vessel should rise slightly upward. Hold the cardboard in this position until the glue dries.
- Now we are preparing a cardboard bent in the shape of the letter L, a foam piece in the shape of a letter C (equal in size to the diameter of the stick) and a stick for the mast. The cardboard should be ship-sized (measured internally).
- Then we put glue on the stick and attach it at right angles to the deck of the ship. For greater stability, we fix the mast with a piece of foam.
- To make the effect as realistic as possible, attach a piece of a stick to the bow and connect it to the mast with a string.
- Now we make two wooden skewers of the same size and fasten them perpendicular to the mast, using the same string. We will tie a sail to them. Cut out a rectangle with black fabric, which should be slightly longer than the distance between the skewers. You can decorate it as you like. Tie the sail to the mast.
- It remains only to make a hole along the fabric and stretch a string through it, tie it to the skewers (each hole separately).
- We fix the board (with the help of which the pirates will force the enemies to throw themselves into the sea).
That's all, the pirate ship is for annual use, you can even roll dolls on the sea in it!
DIY garden crafts from improvised tools at home
Time spent in the country can be brightened up with the help of unusual garden crafts from scrap materials. Surround your summer cottage and yourself with beauty and comfort, boldly using our advice. Let not only berries and fruits ripen at your dacha, but also creative ideas.
Some of the most affordable and safe materials - of course, are plastic bottles. Who would have imagined that unusual palms can be made from recycled containers. A couple of dozen bottles, and a real tropical paradise for adults and children will "grow" in your yard.
Brilliant and simple ideas are literally scattered underfoot. Such a simple candlestick can be made from the remains of cement, concrete or plaster.
Bottle caps will be an excellent material for an original garden decoration.
Ordinary garden boxes with a simple movement of the hand will turn into stylish and cool boxes for all sorts of little things, usefulness and amenities. For example, if you want to make a present for your grandfather or dad by February 23rd, you can decorate their toolboxes. In addition, from the boxes you can make a portable stool, something that is indispensable in the garden and on fishing - dad should like.
"Bald" and old tires - a real treasure for the implementation of country ideas. Don't believe me? Watch the YouTube video on this topic - you will be delighted!
Simple crafts for kindergarten
As you know, kindergarten is a key step in the social development of a child. A visit to it is necessary for a comfortable perception of the world around us. In kindergarten, they work with children, teach them the basics of writing and arithmetic, and also develop creative abilities. Today, many children make various handicrafts from improvised means, ranging from salt dough to paper. After all, this contributes to the development of hand motor skills, the child's imagination. We present you the best crafts for children on various topics.
Hedgehog
You can saddle a hedgehog with a regular bump. This Christmas toy will decorate the Christmas tree in kindergarten and will bring a lot of pleasure to children in the process of working on it. Below you can see detailed instructions on how to make a cute hedgehog.
You will need:
- plasticine;
- cone.
Progress:
- A muzzle is glued to the sharp part of the plasticine cone; you still need to make the tip of the nose and eyes to it.
- Now we make legs, also from plasticine. Thus, we get a prickly and very cute hedgehog.
- Additionally, you can make a clearing by molding a mushroom and forming leaves from plasticine.
Paper bookmark
The most common paper crafts are bookmarks. They can be done even with small children (from 4 to 6 years old). The bizarre face of some animal looks very organic. Below you can watch a master class with step-by-step instructions.
You need:
- glue;
- colored paper;
- pencil;
- scissors.
Progress:
- Draw a square (20x20 centimeters) on the sheet. Divide it into four even parts with a pencil. Now you have four 5x5 cm squares.
- Divide the lower left and upper right squares with lines to make triangles. The line must be drawn from the lower right corner to the upper left so that they turn out to be parallel. The outer triangles are crossed out and will not be required.
- Cut out the figure from the paper, leave the crossed out areas. Cut off the top triangle. If you lay the paper flat, it will resemble rhombuses with two glued triangles.
- Fold each triangle in half and put it in turn on the rhombus. The resulting pocket is the bookmark. It must be worn at the corner of the page, fixing it.
- You can cut out an applique from colored paper and glue it on the pocket.
Various bugs can be made from small flat stones. For this, it is advisable to be able to draw a little. Such a bug, made together with a child, will look great in a pot of flowers or on a shelf. To complete such a craft, below you can view the full description with step-by-step instructions.
You need:
- scissors;
- a pebble shaped like a bug;
- colored paper;
- paints;
- glue.
Getting started:
- Cut out the base for the legs and antennae and glue it under the bottom of the pebble.
- Use paints to paint the stone in the form of a bug.
Christmas ball of pasta
A great option for children in kindergarten is a pasta craft. There are many different varieties of pasta as they are readily available and available in every home. So, for example, you can make a decoration on a Christmas tree - a ball. In the description below you can find detailed instructions on how to make it.
You will need:
- dye;
- balloon;
- pasta;
- glue.
Progress:
- Inflate the balloon to the desired size and tie it.
- Then we put glue on each pasta, glue them together.
- After a small blank of several pasta has been made, attach it to the ball (for convenience, you can fix the blank with PVA glue by gluing it to the ball). We glue the whole ball in the same way, with Moment glue the process will be somewhat faster, but if the craft is done with the child, it is recommended to use PVA.
- After everything is dry, pierce the ball with a needle and pull it out through the hole, now you can glue the remaining pasta.
- Attach a ribbon or string so that the Christmas tree toy can be attached to the tree. You can also paint the ball, or you can leave it in its original form. This craft can be done with a child from 5 to 7 years old.
Butterfly
One of the simplest paper napkin products is the butterfly. Even three-year-old children can easily cope with such work. In this article, we will tell you what you need to easily cope with it. A handmade butterfly will delight the child, and most importantly, it can be fixed anywhere.
Necessary materials:
- scissors;
- napkins;
- felt-tip pen;
- colored paper;
- hitch.
Progress:
- Requires napkins in two different colors and sizes. Place them on top of each other, with a large napkin underneath. Punch a hole in the middle.
- Place the napkins on a clothespin that will serve as the body.
- Draw the face of our beauty on the clothespin, and use colored paper to make the antennae, and then attach them to the clothespin. Our beauty butterfly is ready!
Plasticine cow
Babies of younger groups can be invited to create a ladybug. Plasticine crafts can develop imagination, as well as hand motor skills. The cool ladybug is designed for children 7-10 years old, which you can mold with your own hands. To complete such a craft, we advise you to view our master class with detailed instructions.
We will need:
- white sheet of paper;
- plasticine (white, black, red);
- pen;
- plastic cover 10-12 cm in diameter.
Getting started:
- Blind the body from red plasticine, from black - specks. Also black plasticine is needed for the head and legs.
- Take a clear plastic lid and draw a daisy-shaped flower on it.
- Place a white sheet under the bottom of the lid so that you can see the outline of the drawing. Then, along the contour of the drawing, glue the flower with different colors of plasticine.
Octopus
You can use woolen threads as a material. They will make an octopus, which the baby will really like. Such a craft is very easy to make, and it will not take much of your time. You can watch the master class to do everything yourself.
We need:
- scissors;
- woolen threads (sixty threads 35 centimeters each and a little more for tying);
- colored paper (for the eyes), or you can buy ready-made in the store;
- a small plastic ball from which we will make a head;
- ribbon.
Procedure:
- Take the cut threads and fold them together, tie the thread in the middle, then place a ball on it. Wrap the threads around it, tying them under the ball. This will be the head of our octopus.
- From the remaining threads, weave pigtails in the form of tentacles.
- Use purchased eyes or draw on paper yourself, cut and glue to your head.
- Tie a ribbon around your head, it will serve as a great decoration. That's all, our octopus is ready!
Cipollino
Use vegetables and fruits for kids' creativity. Sprouted onions can be used to make Cipollino. Such a craft is easily performed by children 3-5 years old. Below is a detailed description.
We will need:
- plasticine;
- a small head of onion;
- felt-tip pens;
- a jar (the diameter of the neck should be less than the onion);
- glue;
- scissors;
- colored paper.
Progress:
- Draw the cheeks, mouth, eyebrows with a felt-tip pen on the bulb, and make the nose and eyes out of plasticine.
- Cover the jar with paper and draw the body of the cartoon character on it.
- Insert your head into the jar. So we got a very cute Cipollino.
Vase
Another great way to use unnecessary plastic bottles is to make a vase. A regular bottle can be transformed into a decorative visa with a cute face of a cat or any other animal. The best DIY craft for a child with a detailed description and step-by-step instructions is presented in this article.
You need the following:
- scissors;
- plastic bottle;
- marker;
- sponge (for painting);
- paints.
Progress:
- Cut the bottle in half, we only need the bottom for the craft.
- Cut so that the edges are even, leaving two triangles that will serve as the ears of the animal.
- Use a sponge and white paint to paint over our blank.
- Paint the nose and triangles on the ears with a brush in pink.
- Draw the cat's face with a marker.
- Our vase is ready.
A small plastic bottle (0.5 liters) can serve as a material for such a craft. The toy will delight not only children, but also their parents. To figure out how to do it, let's see the instructions.
You will need:
- scissors;
- plastic bottle 1.5 l and 0.5 l;
- paints;
- colored paper.
Getting started:
- A small bottle should be painted with paints or yellow paper pasted on its surface.
- Draw bold black lines on the bottle in the same way.
- Cut out the eyes, antennae, mouth of the future bee on a paper cover.
- We cut out the wings from a large bottle and glue them with glue on a small one. As a result, you get a pretty bee. A great idea for spending time with your child.
Finally
Increasingly, in many homes you can find handicrafts made with your own hands from improvised means at home. Many of them serve only as decorative elements, but there are also those that have a very useful, practical purpose. Children's crafts allow the child to develop, learning about the world around him. They can be made from different materials, for example: leaves, plastic, plasticine, paper, wood, and even eggs.
So that in any weather you have a great mood, make new things from available tools. Quick crafts that will take less than an hour to make.
The content of the article:
Sometimes you want to pamper your child with a new toy, but there is no financial opportunity and time to make it. Therefore, we decided to choose the fastest simple crafts for you, on which you will spend no more than an hour. The family budget will not be affected, as they make their craft for the most part from junk material and all sorts of leftovers.
How to make a doll from threads and a dandelion with your own hands?

You will create it while relaxing in a comfortable armchair. The main thing is to arrange everything you need nearby so that you don't have to get up again. This:
- threads;
- half a sheet of cardboard;
- scissors;
- a strip of flesh-colored fabric;
- markers.
- Wrap the thread around the card with an impressive layer.
- Tie up the finished winding with a thread. Determine where the doll's head will be. Mark it by rewinding it with thread as well.
- Arrange the right and left arms in the same way. To make the doll's hands from threads, rewind your hands at wrist level, cut the yarn around the toy's fingers.
- Also separate the torso from the legs with threads, and they perform in the same technique as the arms, just make them longer.
- Measure a strip of flesh-colored fabric along the volume of the head, glue its sides.
- Wind the thread around your hand and cut through the resulting roll from one side. Glue to head, trim bangs if desired.
- Use markers of different colors to draw the features of the face.
- Sew a jacket for the toy or tie it with a piece of cloth to make an apron. You can tie a handkerchief to make it a raincoat. Children make such clothes with pleasure, who will surely appreciate the new doll made of threads.
If you are making a girl doll, then you do not need to designate her legs. Let the threads cut exactly at the bottom become a skirt.
Such simple crafts will surely delight children. You can also create a fluffy dandelion from the leftover threads.

For this charm you will need:
- yellow and green yarn;
- wire;
- PVA glue;
- knitting fork or metal staple;
- scissors;
- gypsy and thin needle.
- Wind the yellow yarn around the knitting fork. Thread the gypsy needle with a thread of the same color. Sew in the middle with it.
- Lubricate the resulting line well with glue. Remove the created fabric of yarn from the fork, roll it with a roller.
- A thread is wound in the middle to give the workpiece the shape of a dumbbell. On top, coat the middle of this part with glue, wait until it dries.
- Such simple crafts are interesting for both adults and children. They are made quickly, but some of the time is spent waiting for the glue to dry. Therefore, it is better to tinker in the evening, and the next day to continue entertaining needlework. What are we going to do now.
- Cut the resulting dumbbell in the middle. On the first and second flower, you need to cut the loops with scissors, comb carefully to get fluffy hats of two dandelions.
- The green yarn, from which we will make sepals, must be cut into 4 cm long pieces.We insert the same thread into the gypsy needle, sew the pieces across, but not in the middle, but stepping back from the edge 2/3.
- Trim the top with scissors, trimming it, make another stitch parallel to the first.
- Lubricate the back of the flower with glue, attach the sepal here. Wrap it with the same thread that was stitched. Glue both ends together and leave to dry.
- In the meantime, you will wind the green thread around the greased wire. The stem will turn out.
- Stick a thick needle into the sepal from below, twist to make a hole for the stem. Install it there, having previously greased this part with glue.
- The leaves can be crocheted, but since we are making simple crafts, cut them out of green paper or cardboard, glue them to the stem.
How to quickly make crafts from animal tissue?
If you want to spend less than 30 minutes making a new toy, then make these funny mice. They don't even need to be sewn. By making the slits in a certain way, you will craft these rodents.

See if you have:
- pieces of felt;
- juice straws;
- beads or small buttons.
- For each mouse, you need to cut two pieces from the same fabric. The first will become a body, pointed from the muzzle, rounded on the other side. Cut the ears in a figure eight.
- From fabric of a different color, you need to cut out a small circle for the nose and two larger ones for the ears, glue them into place.
- Use scissors or a clerical knife to make 4 cuts on the body of the mouse. Two will be vertical, at the back of the head, and the other two you will make in the rump area to put a straw here. Place the ears on the head by passing them through the incisions.
- All that remains is to glue beads or buttons instead of eyes and marvel at how quickly crafts are made from simple materials.

If the child is bored, you can make a fabric applique with him. Such funny bunnies are sewn onto the worn knees of children's trousers to update this thing.

Transfer the applique to the fabric, cut it out. Decorate the bunny by sewing a bow to its ears, and a carrot on its body. Attach the eyes and other facial features. If this is an applique, then you need to glue the hare to the cardboard.
And here are some more simple crafts - in the form of birds. You can cut these out of the remnants of felt, glue the nose, eyes, wings and play a home show.

Crafts from cones with their own hands for children

They are also made simply and quickly.
To make gnomes, take:
- Pine cones;
- light plasticine;
- pieces of felt or fleece;
- glue;
- brush.
- Let the child roll a ball out of plasticine, make recesses in it for the eyes, mouth, nose with the back of the brush. They will be filled with pieces of plasticine of the corresponding color. So, the eyes can be brown or blue, the mouth is red.
- Attach the head to the top of the bump. Cut a triangle out of felt, glue its sides to make a cone. Put this hat on your character's head.
- Cut out mittens from the remnants of the fabric, attach them to the bump with plasticine.

For such a craft made of cones, like an owl, we also need:
- 2 acorn caps;
- yellow paint with a brush;
- plasticine;
- accessories in the form of feathers, ribbons.
- First, the bump and cap from the acorns need to be painted, continue the subsequent work when they are dry.
- Let the child roll small balls out of black plasticine, stick them to the inverted acorn caps - these are the pupils.
- Make a nose out of orange plasticine, attach it in place.
- Such an owl made of cones is decorated with feathers or a ribbon.
- pine cone;
- pieces of dense fabric;
- two toothpicks;
- cotton wool;
- 2 ice cream sticks;
- white paint.
- Let the child paint the bump, remove it until it dries completely.
- Mom will cut a scarf out of checkered fabric and tie it around the snowman's neck. She will make headphones from felt and stick them to the character's head.
- The child will make a snowman's nose and mouth out of plasticine, attach it to his face.
- Make your arms out of wire wrapped in a strip of fabric or ribbon. You need to wrap a bump with a wire.
- Put toothpicks in the hands of the snowman, with pieces of cotton glued to the bottom of these sticks.
- Color the ice cream sticks, when dry, place a snowman on these skis.
Piglets like this are made quickly and easily. Glue the ear-shaped cone scales to the spruce cones. Attach also the patches, which will become acorn caps. You can use not glue for this, but plasticine.

Paint the piglets pink, you can use spray paint for this. When it is dry, only then will you attach the small black beads that will become the eyes.
For this craft, you need an unopened bump. But over time, the scales open up. To avoid this, immerse the buds in wood glue diluted with water for half an hour.
Remove them from the solution, shake them off. After 3 days, the bump is completely dry, fixing the scales, which now will not open. After that, you can paint this natural material and craft new items.
The next simple craft is a forest corner. For her, take:
- CD disk;
- plasticine;
- spruce and pine cone;
- an acorn cap;
- glue;
- paints;
- eyes for toys.
- Paint the disc green, draw flowers on its surface.
- Let the child roll up the caps and legs of the mushrooms, connect them.
- The base for the hedgehog can be molded from plasticine or polymer clay. Then cover it with brown paint.
- When it's dry, stick the spruce cone scales into the back of the hedgehog. Place a hat on his head.
- Glue the eyes, nose, mouth, put a cane in your hand. The other will contain a basket with mushrooms, which are molded from plasticine.
- Attach the hedgehog to the stand, after which another wonderful craft is ready.
Tie a floral wire to the cones, put the picturesque flowers in a jar previously wrapped with twine.

You can make another craft out of cones for the garden, such a wonderful decorative basket.

If you need to quickly make a hedgehog to bring to kindergarten, mold his body and head from beige plasticine, and roll his eyes and nose from black. Stick in the seeds, which will become thorns.

Simple crafts for a great mood
Now the sun rarely peeps out, the weather is increasingly cloudy. In order not to succumb to despondency at this time of year, make mischievous tricks that will certainly improve your mood.

Set these cheerful flowers in a vase at home, which are made from almost nothing. For them, you just need to take:
- colored paper;
- cardboard from a white box;
- marker;
- stationery knife;
- tape;
- scissors.

Paint the eyes with a black marker, bend the petals forward.

Cut the stem out of the cardboard. At the top, on one side, glue the finished part, on the other - a pre-cut flower with petals.

Fold a green sheet of paper in half, draw an oval line on it, cut along it. If available, use zigzag scissors. Make the notches simple.

Tie the paper flowers with a ribbon, and if there is taffeta, then use this fabric for decoration. You have got a bouquet that will never fade, will amuse you.

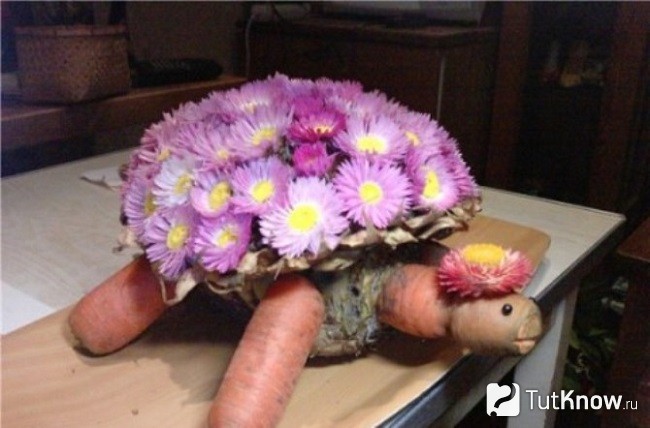
You can attach the flowers with a toothpick to washed beets or pineapple. You will get a beautiful shell for a turtle. You will make her arms, legs and head with a neck from carrots. Attach these parts to the body with toothpicks too.
If you want the New Year to come as soon as possible, decorate the white objects in the apartment by turning them into snowmen.

Attach black magnets to the refrigerator, and now the character of the holiday has settled in your kitchen. If you paint on a white vase or glue round eyes and an orange nose in the form of a carrot, then another snowman will amuse everyone at the table.
See what other quick and easy crafts you can make.
Each woman has her own hobby that helps to relax and enjoy the process of creating a new thing, which will later turn out to be an original addition to the interior in her home. Our magazine has collected the most creative hand-made ideas that will help fill your home with special warmth and comfort.
The main thing in the article
DIY homework: useful hand made

Hand made has a literal translation - handmade. It unites all previously known types of needlework. In other words, the term hand made can be a self-knitted sweater, a beautiful homemade postcard, a vase or a blanket made with your own hands.
This direction, in addition to moral satisfaction from the work process, is beneficial, and items made using the hand-made technique become excellent "helpers" in everyday life. After all, they can be put on, put as decor, used in the kitchen in the process of preparing dishes, etc.
The most interesting ideas for home crafts
If you wish, you can do a lot of useful things for your home with your own hands. We suggest considering the most interesting ideas.
When a cat lives in a house, it can be settled “separately” by constructing its own dwelling for it. 
To do this, you need such a blank. 
Collect it, decorate it on top, and place a soft rug inside. 
Pitomits will certainly appreciate such a "residence permit". 
Other photos- ideas for home crafts.


Needlework for comfort in the house: TOP of the best ideas with instructions
Making your home more comfortable is not difficult if you like handicraft. Below we present the instructions, using which, not only an experienced housewife, but also a person who is just starting to create, can do interesting things in the style of hand made. Prepare the necessary tools and materials, let's get to work.
Newspaper baskets
 It is quite simple to make such an accessory, but you can use it in everyday life as you like. The basket is perfect for storing linen, newspapers, small items. To create it you will need:
- the basis on which the weaving process will take place - it can be an ordinary square cardboard box, like ours, or a three-liter can, a small bucket, large jars of bulk products, etc.;
- many newspapers;
- thick cardboard;
- flat knitting needle;
- scissors;
- glue.
The basket is made like this:
- Divide the newspaper sheet in half lengthwise. On the knitting needle, start to twist the newspaper obliquely.

- Twist tightly to the very end.

- Smear the tip of the newspaper with glue and stick it on.

- Cut the bottom of the basket out of thick cardboard. We have a rectangle, but you can make a square or round basket. Glue newspaper tubes to the base.

- For the bottom strength, glue another piece of cardboard over it.

- In the first row, the glued tubes are wrapped one by one.

- Wrap the last tube as shown in the photo.

- Glue a new tube and start braiding.

- Attach the tubes by inserting one into the other.

- After reaching the desired height, finish the job.

- Wrap the vertical tubes one by one according to the principle of the first row.

- Place the wrapped tubes inward.

- Wrap up.

- Trim and scorch.

- Paint it in the desired color and the basket is ready.

Knitted rug from bulky yarn, from twisted yarn
Cork mat

You will need the following tools and materials for the rug:
- base, a substrate for linoleum or laminate is perfect;
- glue, it is desirable to have a glue gun;
- cork corks from wine of the same size;
- scissors.
The work is done as follows: 
- Cut a piece of suitable size from the base.
- Cut the plugs in half lengthwise.
- Glue the plugs onto the base using a glue gun.
- This rug is perfect for a bathroom or hallway.
A rug made of unnecessary things
To make an original rug, it is not at all necessary to buy any materials, it is enough to show a little imagination and everything will work out. 
A rug made of unnecessary things is done like this: 
- Remove unwanted items from the closet and cut them into small strips.
- Tie pieces of fabric tightly to the net.
- Secure everything with tape from the bottom and the rug is ready.
Pieces blanket
A piece blanket can be made in different ways, for example:

Bead painting
Decoupage furniture
Decoupage is a great way to update your furniture. The method of such decoration helps to make exclusive pieces of furniture at a minimum cost. To perform decoupage on interior items, you can use fabrics, photographs, old books, newspapers or magazines that are in every home. They are glued to pieces of furniture, varnished, mechanically aged. The technique of coloring, drawing, decorating with all kinds of elements is also actively used.
Table decoration.


Decorating the chest of drawers. 

Graceful garlands for home and garden
You can bring freshness and lightness to your home with the help of graceful garlands, which you can make with your own hands, showing a little imagination. They will unobtrusively complement any interior. 


You can also decorate the garden with garlands. A garland equipped with bulbs that can be turned on in the evening, delighting those around with its appearance, will look especially good in the garden. 

DIY fabric handcraft for home
If you have basic sewing skills, then you can make the necessary things using the hand-made technique from fabric. For ideas of useful fabric items, see the photo below. 


We also recommend that you look at the article: "", where you will find detailed master classes on how to make funny toys from fabric for your child or for a gift to friends.
DIY handicrafts for home: useful crafts
A distinctive feature of hand made is the manufacture of handicrafts not only for satisfying creative fantasies, but also for using them in everyday life. There are many variations of crafts, but all objects have one thing in common - they are useful in everyday affairs. You can find photo examples of useful crafts below. 


Interesting handicrafts for a summer residence with a photo
Hand made involves the manufacture of useful things not only for use in everyday life or for interior decoration. Using this technique, you can make interesting and useful things for summer cottages from unnecessary things.
Crafts from the vine
If grapes grow in your country house, then you are provided with the material for work. From these thin branches, you can create baskets, flowerpots, benches, and decorative figures that will decorate the courtyard of your summer cottage. 

Well, if you have not yet acquired this wonderful culture, look at the article: "" and choose the most suitable variety for your soil and climatic conditions.
Painting on stones
A little drawing skills, and in the country you can create a real masterpiece. Painting stones is fun and amazingly beautiful. 


Rope planter and rug
Mat made of plastic bottle caps
An original idea to build a rug from plastic bottle caps, because surely they are regularly sent to the trash at every house. 
Making an exclusive rug is quite simple. It is necessary to collect many caps of different colors.
The lids are connected with a fishing line, and the holes are made using a conventional awl. To make it easier to make holes, the awl can be warmed up. The color and shape of the rug depends only on your imagination. 
Also, in the decor of your summer cottage, you can actively use plastic bottles. Photos of ideas for crafts can be found in the article: "".
Hot coasters
A hot stand is quite a necessary thing that will find application in every home. You can make it out of anything, and we offer a few ideas to keep in mind:

Country paintings
Pouffe in patchwork technique
Western technique that our needlewomen successfully use. These poufs can be made in different sizes and can be used both for seating and for decorating larger furniture.  Puffs are made using the patchwork technique as follows:

Do-it-yourself hammock chair with step-by-step instructions
In summer, at the dacha, do without a hammock. It's so nice to lie down in the fresh air in the shade of green trees. We suggest making a hammock chair with your own hands. 
For work, you should prepare:
- rope;
- dense fabric.

Useful ideas for home crafts with photos
Interior design or garden design in the courtyard of a summer residence is a place for creativity using the hand-made technique. And here are some helpful home craft ideas.

Needlework for the home: the most interesting
Hand made is multifaceted and this is once again proved by the photos below. 


Interesting handicrafts for the home: video master classes
Many people choose not to work for their uncle. Such citizens need to earn money somehow. For example, by organizing your own business. This is the most reliable solution for those who want to receive money without hiring. But in this case, each businessman is faced with the question of the definition of activities. Quite often people give preference to handmade things. They are very much appreciated in the modern world. Today we have to find out what we can do with our own hands and sell. What tips and tricks will help you get a good profit from your business? Where and how best to distribute DIY items? If you thoroughly study the answers to these questions, you can become a famous businessman with a good income.
About popularity
With the advent of man, handicrafts were born on Earth. Previously, people made items out of necessity. With the development of society, handicrafts have become appreciated not only for their importance, but also for their beauty.
The so-called hand-made is usually genuine, original and unforgettable. It carries the love and positive energy of a person. Many say that the philosophy of the art of conserving the planet's resources is promoted by creating handcrafted items. After all, craftsmen usually use only natural materials in their work.
Having and wearing handmade items means always being at the height of fashion. People also think about what they can do with their own hands and sell due to the fact that such things are distinguished by their originality and uniqueness. They emphasize a person's individuality. In addition, not everyone can do something with their own hands. Someone is not able to do anything, someone is good at embroidering or sewing, someone has a talent for drawing or forging. In any case, in the modern world, hand-made is in great demand.
Problem of choice
Can I sell DIY products? Yes. A similar prospect opened up in ancient times. As already mentioned, people used to make something for themselves. Then they began to exchange items. With the development of the economy on Earth, handmade goods began to be sold. This is normal.
But every businessman who wants to create handmade things faces a number of problems. The first is the question of what you can do with your own hands and sell. Below will be presented the most common, relevant and useful ideas for those who plan to try themselves in the field of hand-made. 
Jewelry and jewelry
The first thing that can be advised is to make jewelry and accessories. They are usually worn by women. Such handmade things are always in the price. They don't go out of style. Such items are unique, they attract the eyes.
What can you do with your own hands and sell? Any jewelry and accessories. They can be both male and female.
You can make beads, bracelets, pendants, brooches, key rings and so on. In this case, the use of absolutely any materials is allowed - beads, clay, wood, wire. This is not an exhaustive list.
What can you do with your own hands and sell? Bracelets made of beads and polymer clay beads are now popular. Even a schoolboy can make such decorations.
Many people say that kanzashi-style jewelry is very popular - this is a kind of hair jewelry. In the manufacture of such a hand-made, the technique of folding fabrics is used in a variety of ways.
It should be noted that many jewelry made of semi-precious stones without clear cut cannot be found in stores. Such items can only be bought by hand. They look original, which attracts buyers.
Paper filigree
What can you do with your own hands and sell profitably? The following idea will suit exceptionally diligent and neat people. It's about paper filigree. It is called quilling.
What it is? The art of creating a variety of paper crafts (ornaments). Craftsmen usually use paper ribbons for their hand-made products. They create a variety of decorations that can be used in postcards, letters, frames and gift wrapping.
In addition, with the help of quilling, you can make a variety of decorations. What exactly should you do? It's hard to predict. Any figures made of paper ribbons will be bought up by modern fashionistas. 
A few ideas for paper filigree:
- creating flowers;
- crafts in the form of zodiac signs;
- paintings;
- toys.
Pictures are especially popular today. With a certain skill, it will not be difficult to make them. And such a hand-made is sold expensively.
Quilting
What can you do with your own hands and sell? At home, modern people can create a variety of objects. The range of materials at hand is practically unlimited. Therefore, there are a lot of ideas for business.
The next interesting direction for work is quilting. It is the process of creating items from scraps of fabric. Usually such things turn out to be bright, original and distinctive.
The art of quilting has come to the modern world from past centuries. Ancestors often sewed from scraps of fabric. Modern craftswomen use expensive fabrics of different colors in their works.
What can be done this way? Here are some ideas:
- blankets;
- pillows;
- towels;
- paintings;
- rugs;
- toys;
- bags.
This is not a complete list of what you can do with quilting. But these ideas will help you test the activity and assess its profitability.
Decoupage
Not everyone can do just tinkering. Some people have certain talents for the arts. What can you do with your own hands and sell in this case?
When decoupage, it is allowed to use any materials - from napkins to fabric. Such a business does not require special expenses. The main thing is to have a talent for decoration.
You can paint anything you want - plates, saucers, cups, vases, coasters and even furniture. It all depends on what exactly the person wants to do. At first, it is recommended to work with available items - dishes and vases.
Useful Tips
It is not necessary to have a special gift to create something beautiful and unusual. If you know some tricks, then it is quite possible to make a beautiful decoration for a home or a gift with a minimum of effort and very few materials.
On our website you will also find:
Here are just a few of the simple crafts that absolutely anyone can do:
Simple DIY crafts
1. Autumn candles

You will need:
Leaves (real or artificial)
PVA glue (decoupage glue)
Brush or sponge

* Rub the jar with alcohol to get rid of fat.
* Apply glue to the jar.
* Use straight leaves to decorate the jar.

* You can grease the glued leaves with decoupage glue.
* Add a thread and a candle for beauty.

2. Painted cup

You will need:
Butter markers
Scissors

* Cut out a stencil of any pattern or letter from cardboard.
* Place the stencil on the cup and start marking dots around it with different colored markers.


Just do it yourself
3. Painted jars

You will need:
Alcohol (for cleaning the jar)
Acrylic paints
Decorations (flowers)

* Clean the jar with rubbing alcohol.
* Paint the jar any color and leave to dry.
* You can add a watermark with a marker (in this case, a relief is applied to the can, which is erased).
* Insert flowers into a vase.

4. Colored sneakers

You will need:
Tissue markers
White (light) sneakers
Pencil

* With a pencil, draw the desired pattern on the sneakers.

* Circle the drawing with a marker and start coloring as you like.

The most simple crafts
5. Craft from wine corks

You will need:
Wine corks
Pencil
Super glue
* Draw any simple shape on paper - in this example, it is a heart shape.

* Start gluing the corks to each other (apply glue only to the sides, do not apply to the ends so as not to glue them to the paper), placing them on the drawing to end up with a heart.

6. Scarf of infinity from an old shirt


You will need:
Old / unnecessary jersey
Scissors
Thread and needle (sewing machine)
* Cut off the left and right edges of the T-shirt (see image). The width of the shirt will then become 35 cm.

* Cut off a small piece at the bottom and top (where the neck is).

* Sew both halves from the inside for a scarf.

Easy and simple with your own hands
7. Bright vases from glass bottles

You will need:
Watercolor paints
Bottle
Bowl and brush (if needed)
Syringe (if necessary)
* Pour some paint into a bowl. You can mix several colors to get a different color.

* Pour the paint into the bottle. It is more convenient to do this with a syringe - you draw paint into the syringe, and then inject it into the bottle.

* Rotate the bottle so the paint covers all the glass inside.

* Turn the bottle over and leave it in this position in the sink - excess paint will run out.

* When the paint is dry, you can add water to the vase and insert flowers into it.


8. Towel dryer
If you have an old ladder, you can clean it, if necessary, sand it and even paint it. After that, you can put it in the bathroom to hang towels.

Simple paper crafts
9. A garland of paper cups

You will need:
Paper cups
Ordinary garland
Knife or scissors.

* Make a cruciform incision in each cup.
* Insert a light bulb from a garland into each hole.
* Decorate the room with a garland.
10. Golden canvas
Even if you do not know how to draw at all, you can make a very beautiful project and decorate the interior with it.

You will need:
2 white canvases
Gold, blue and orange acrylic paint
Sponge brush
* Paint each canvas with 2-3 coats of gold paint - let the paint dry after each coat.
* With a sponge brush, start painting on the canvases. One will be blue and the other orange. Make some lines shorter and others longer.
11. Multi-colored keys
If you have several of the same keys for different locks, use nail polish to paint them. Thus, you will know which key from which lock.

Crafts from simple materials
12. Colored candlesticks

You will need:
Wide glass and narrow glass (or vases of different sizes)
Super glue
Food coloring
* Place the small glass in the large one, and secure both with glue - apply glue to the bottom of the small glass.
* Pour water between glasses and add food coloring.
* Place a candle inside a small glass.
13. Vase from a light bulb

You will need:
Bulb
Pliers
Screwdriver
Wire (if required)
Cover for vase base (if required)
Super glue
Gloves and specials glasses (to protect hands and eyes)

* Use pliers to remove the tip of the bulb.
* Use a screwdriver or pliers to remove excess glass at the base. You may need to get rid of multiple layers of glass - be careful and careful.
* Glue the light bulb to the base (plastic cover).
* You can also hang the light bulb by using a wire.
* You can complicate the task and add an LED light bulb. For this, in addition to the light bulb, you will need small batteries. All instructions can be seen in the video:
Simple crafts for children
14. Drawing of a ghost on a T-shirt

You will need:
Wide adhesive tape
Light T-shirt
Scissors
* Cut out the details of your ghost from the duct tape (eyes and mouth, for example)

* Glue all the details neatly to the T-shirt.

15. Congratulations from the keyboard
Such a congratulation is very easy to make.

We also recommend
 How to make a dragon from papier-mache Making dragons from papier-mache
 DIY leather wallet
 Crafts from pumpkin - original ideas and a master class on creating home decorations (85 photos)
 Simple autumn pumpkin crafts: for kindergarten, school and home
 Spider made of yarn. Autumn crafts. Spider on a web DIY spider from scrap materials
 Weave a dragon from beads with our own hands