Crafts from a dishwashing sponge: samples with explanations. Foam sponge cakes Volumetric picture of dishwashing sponge
Master class: Sponge mosaic "A drop of summer on a thin leg"
The master class is designed for teachers of additional education and parents.
The purpose of the master class: making crafts, like a memory of summer.
To create crafts you will need:
Colored yellow paper for the background (you can take any one you want);
Sponges of red and white, yellow and two green in different tones;
PVA glue;
Toothpick;
Wooden or plastic stick;
Light press.
Target: creating a mosaic pattern from a washing sponge.
Tasks:
1) to form the ability to use various materials to create a mosaic;
2) foster a respect for nature and love for the native land;
3) develop creativity and interest in creativity.
Course of the lesson
I. Motivational moment.
One day in July, waiting for a river crossing, I found myself in a forest clearing. I decided to walk along it. On the heat, the stumps had thin stalks, and on them - strawberries. I could not resist taking a picture of her. The mischievous woman started a cunning game with me. Bending over, carefully unbending the stems, I looked for ripe berries. What a fragrant berry the wild strawberry turned out to be!
For a long time these crimson lights haunted me. And I decided to make a craft in memory of the strawberry meadow.
II. Formulation of the problem.
The question arose: “What material? From paper? Plasticine? I remembered that I had recently bought dishwashing sponges of different colors. I was delighted and set to work.
III. Communication of the topic and purpose of the master class.
So, the topic of the master class is "A sponge mosaic" A drop of summer on a thin leg ".
.jpg)
IV. Discovery of new knowledge
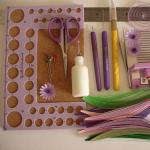
1. First, prepare the necessary materials and tools.
.jpg)
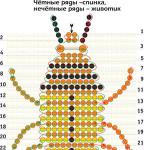
2. Using a computer, make an image of a strawberry and copy it (you can draw it yourself) onto a yellow sheet of paper (if you wish, you can take a different color of paper).
.jpg)
3. Let's start doing the work with berries. Take red and yellow sponges. The craft will turn out more tender if we tear off the pieces from the sponge, and not cut off with scissors. First, apply glue to the drawing of one berry and use a toothpick and a plastic stick to place the torn off pieces of red, and between them of yellow.
.jpg)
Then put it under a press, as the sponge swells from the glue. Then, one by one, continue to fill in the drawing of all the strawberries.
.jpg)
4. Using the specified technology, fill in the pattern of strawberry leaves with pieces of green sponge in different tones, and then the stems.
.jpg)
5. For the core of the strawberry flower, take a piece of yellow sponge, and the flower itself is white.
6. Place the finished product under a light press to dry.
.jpg)
V. Summary.
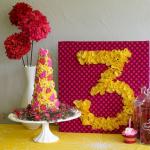
Now insert the craft into the frame
.jpg)
Hang on the wall.
.jpg)
It turned out to be a wonderful picture. For me it will be a memory of a strawberry meadow, and for you, your children and guests - a drop of summer.
Vi. Reflection
In the summer, you will probably go with your children, relatives, friends to the forest, to the meadow where berries or flowers grow. Remember, although they grow in the forest, they also need to be protected, otherwise they may disappear. The forest reveals its secrets to those who come to him as a friend. Become friends too. And do not offend the one you love yourself, and do not let others offend.
The leading activity is play. In preschool childhood, much attention is paid to the development of play activities in role-playing games. The children of the older group and I decided to make a pastry shop and began to make attributes for it. I stumbled upon the Sponge Cakes master class in a magazine and decided to make them by all means.
In order to make cakes for the "Confectionery" game, you can use a regular dishwashing sponge. I found large sponges, or you can take a regular dishwashing set and not cut anything, but leave the cakes rectangular. If you take such a package, then the top of the cakes (icing) will be green and you will only have to decorate as you want.
How to make sponge cakes
Materials for work
- sponge,
- braid of a suitable color,
- felt,
- buttons or beads for decoration.
Manufacturing sequence
Step 1.
Make blanks, cut out triangles and rectangles from a large sponge.

Step 2.
Cut out the corresponding details from felt and decorate as you like with braid and beads (cloths for washing dishes of any color are also suitable).

Step 3.
Sew the wavy braid to the sponge so that you get two cakes and a cream.
Step 4.
Put all the pieces together.
Delicious cakes are ready! The cakes are light, safe and very beautiful. My kids liked it so much that we decided to make more cakes, but this time from a fitness mat. Interesting? Then read my article "Attributes to the role-playing game" Confectionery ".
Yeah, that's such an unromantic thing - washcloth... And, by the way, there is a quite reasonable justification why it was necessary to suddenly make her handicraft and beautiful. It's simple: to turn an unpleasant kitchen cleaning activity into an enjoyable and even aesthetic process. Agree, it's one thing to pick up an old piece of fabric of an indistinct color, which was once a children's T-shirt or men's pajamas, and quite another thing to touch something that was created with love and care for oneself. Washing sponges Few consider dishes as a handicraft object, and this, in general, is understandable: when there are so many wonderful ideas in the world, and there is such a mountain of creative projects in the head, it is strange to waste time knitting some kind of dishcloth... However, sometimes, when it is raining outside the window, and there is sadness in the heart, it stands between the times, just like that, not really thinking about the result, to do something completely new. And maybe even meaningless. Irrational. And who knows, maybe then a quiet joy will settle in the soul, and the dullness outside the window will be replaced by a rainbow.
Dishwashing rags - 5 homemade options:
1. Dishwashing scrubber - volumetric flower
It is strange, of course, to argue that in the process of washing dishes you can imagine a blooming meadow with many cornflowers, daisies and bells, but believe me, you can still! And you know, if you think about beauty, then there will be beauty around. Even dirty dishes and pans will be a little nicer and nicer. Are you skeptical about the idea? Try it!
2. Loofah from a bag for vegetables
Do you like everything unnecessary and half-needed to go into business? Then, having once again bought a net with lemons or potatoes, do not throw away the packaging: with a little diligence, you can knit a wonderful rag for washing dishes. Non-standard, unusual, but very comfortable and, no doubt, very budget. A great idea for housewives!
In general, let's say that everything in the house should be aesthetically pleasing. Even if we are talking about ordinary household things and household items, they should still bring, if not delight and joy, then at least satisfaction. A homemade dishcloth is just an aria from this opera. Simple, but very nice.
4. Watermelon sponge
Do you smell how summer smells? What scent of freshness and happiness spreads through the kitchen when you pick up a watermelon-shaped dishcloth? Well, turn on your imagination, you will definitely catch this smell - it gives you smiles, it is filled with light, with it you feel joyful and summer-like warmth. More, more imagination!
Therefore, crafts from sponges for dishes can be done with children in kindergarten and at home.
Upholstered furniture for a doll
For a doll, you can make a sofa and two chairs. For this craft, you will need glue and 14 sponges.
Making a chair:
1. Take 4 sponges for four parts of the chair: seat, back and side parts.
2. We glue all the parts together. We glue the back to the seat, and then the side parts.
3. Now we make the second chair in the same way.
Now we make a sofa:
1. For the sofa, you need to take six sponges: one for the side parts, two for the back and two for the seat.
2. First, glue two sponges together with smaller sides. It turned out to be a seat.
3. Now we also glue two sponges for the back of the sofa.
4. Then glue the back to the seat.
5. In conclusion, we glue the side parts - armrests to the received workpiece.
6. A cute and very soft sofa for your favorite doll is ready!
Gift pin cushion "Ladybug".
This craft can be presented to your mother or grandmother.
In order to make such a needle bar, you need to prepare: glue, a red and green sponge, cardboard, scissors, a black marker, lace for the loop.
The order of the needle bar:
1. Cut a square out of cardboard.
2. Fold a piece of tape in half and glue it on the back of the cardboard. You will get a loop for which it will be convenient to hang the needle bar.
3. We start making a leaf on which our ladybug will sit. Take a green sponge and draw a leaf on it. We take scissors and carefully cut out.
4. Spread the resulting leaf with glue and press it against the cardboard. Let it dry well.
5. Now we start cutting the ladybug. To do this, draw a circle on a red sponge. We take scissors and carefully cut out a circle.
6. Glue the resulting ladybug to the leaf.
7. On our little insect, draw specks and a black head with a marker.
8. Cut out two small circles (eyes) from white paper. And we glue them to the head of our insect.
9. The cute pincushion is ready!
Dishwashing sponge applications.
Such crafts are perfect for kindergarten classes.
The teacher can prepare the details by cutting small squares, rectangles, circles and triangles from multi-colored sponges.
In the process of performing such applications, children will learn shape, color and develop imaginative thinking.
1. Invite the children to lay out a house out of foam blocks on a sheet of paper. In this case, apply glue to each cube.
2. Lay out the roof from two triangles and glue it to the house.
3. Then glue the pipe to the house.
4. From the green pieces lay out the lawn near the house and glue.
5. Children can make clouds from a blue sponge, and a sun from a yellow circle.
Craft for March 8 from a sponge for dishes "Vase of flowers."
1. Let's take for crafts: glue, colored cardboard, sponges of different colors, felt-tip pens.
2. Cut out a vase from the sponge. To do this, cut off two corners from a whole sponge. Glue the vase to the cardboard.
3. With a felt-tip pen, you can draw an ornament of dots and dashes on a vase.
4. Cut diamonds and stripes from a green sponge. These will be leaves and stems for flowers.
5. From a yellow sponge, cut into circles for the centers of the flowers.
6. Cut out the petals from the pink sponge.
7. Glue the stems and leaves over the vase.
8. Glue the centers and petals around the stems.
Dishwashing sponge rose ring
.
You will need a wire and a bright sponge.
1. Cut the sponge into strips. Twist the stripes into a flower and twist them with a wire.
2. Roll a ring out of a piece of wire and fix a rose on it.
Victoria Bezruchko
On the Internet, I met pictures of fake pastries(just what you need for the role-playing game "Shop", "Cafe"). Cakes can be sewn, made from cardboard or made from ordinary foam rubber sponges for dishes... And the most interesting thing is You can decorate cakes like this that no two will be alike.
All ingenious is simple!
For work we need:
- sponges;
Scissors;
Glue gun;
Gun glue (black and white).
1) Cut sponge in half

2) From sponges cut out the shape of the future cake... Preparing different layers for our pastries


3) Now the most important part is to carefully glue the parts together (as always, I couldn't do without injuries - I burned my finger with glue = ()


5) The last part of our work is no less important than the previous ones. It remains only to decorate our pastries! This is where your imagination and fantasy can roam. Since I needed black glue, and I had white in my gun, I urgently needed to put the white glue somewhere, and I drew snowflakes on top, and some pastries"missed white cream" in the middle. And she decorated the top and edges of our treat with black "cream".

Tomorrow I will take the products to the group to the children, I hope they will appreciate my efforts and will play with interest with pies.

Related publications:
“We invite EVERYONE to the cafe, stocked up with cocoa and tea. And we also have a special order for YOU! It is on a painted dish with a decorated one.
 Dear colleagues! In our kindergarten №43 in Ivanishchi, we invite parents to participate in various events and competitions.
Purpose: creating a pattern using a foam sponge. Objectives: to develop the creative abilities of children; expansion of the active vocabulary of children.
 I am glad to welcome you to my page. Today I want to show you a master class "Flower basket" in the drawing technique using.