How to draw a large number 1. How to make volumetric numbers for a birthday
For the birthday of the child, I want to decorate the nursery in a special way. We have collected ideas on how to make a figure corresponding to the age of the birthday person.
savepic.ru
It is not necessary to order expensive decor from professional decorators; you can also make beautiful "things" for interior decoration with your own hands. If decorating with balloons is tired or does not suit you for other reasons, hold the scissors in hand and go! We make a figure for the birthday man with our own hands. It is enough to cut a large template out of thick cardboard and decorate it with corrugated paper, threads, photographs of a child or something else that your fantasy tells you. Try it!

www.babyroomblog.ru
Birthday figure in the form of a panel. Find a suitable size fiberboard or a piece of thick cardboard and cover it with a beautiful fabric, paste over with paper, etc. The background should not blend in with the number itself. It can be of a contrasting color or in the same range, but lighter / darker than the main number.

Glue the blank with flowers and the number is ready! Yes, it will take a lot of flowers, yes, you need to sweat to cut the blanks and glue them to the base. But! Hot melt glue to help you. Beauty requires ... no, not sacrifices, but wasted time!

Such a figure will be an excellent backdrop for a festive photo shoot. After a birthday, she can just hang on the wall as a decoration until the birthday boy is another year old. Flowers can be made in any way (from paper, from fabric) or used ready-made. They can be of the same color or matched in the same range, but with a slight difference in tone. Contrasting compositions look good. Experiment, take into account the general style of the holiday or the room where the decor will be located. If the number is to be mounted on a wall, then only one side needs to be decorated.

www.babyroomblog.ru

If you cut paper blanks for flowers in a spiral, you get pretty roses. Make them different sizes and colors for a pretty birthday number.

static.baza.farpost.ru
The volumetric blank of the figure can be cut out of polystyrene foam. Such a figure will stand independently on a flat surface of the table, chest of drawers. But you will need a lot more flowers!

To make flowers, you can use paper napkins, crepe paper, pastel paper, felt, tulle, tulle, etc.


www.babyroomblog.ru
If you use corrugated "plates" from sweets or cupcakes, you get an elegant figure with frills. Girls love ruffles, so you can decorate the blank with simple fringed stripes.


Cut out circles from the fabric, melt over the fire and collect the "plate in a plate". Decorate the middle of the resulting flower with a bead. Decorate a large blank-number with such flowers and the festive decoration is ready! This option is more suitable for girls. The fabric can be matched to the color of the birthday girl's dress.
If you have patience and a lot of paper napkins, you can make a figure using the facing technique. In this case, the workpiece should be made of polystyrene so that the folded napkins are stuffed there and do not fall out. It turns out magnificently and beautifully.


www.babyroomblog.ru
You can't stop your mother-needlewoman! Sewing numbers from fabric is not difficult. You can decorate with ribbons, fabric flowers, beads. These numbers can be used as decorative pillows.
 livemaster.ru
Do you want to please the birthday boy and surprise the guests? Make a figure in the "bow" of the hero of the occasion.

evgakids.com
Figures can also be made from living floristic materials (flowers, moss). In this case, the base should be made of piaflore - a special floristic sponge, which for a long time is able to retain moisture and nourish plants.

boom-party.ru
You can also decorate a birthday number with ready-made artificial flowers. It is convenient to glue flowers to the base with a heat gun.
If you are expecting to visit a horde of sweet tooth or a crowd of relatives "for tea", you should stock up on edible numbers corresponding to the age of the birthday person. Cookies and cake will go with a bang!
 snova-prazdnik.ru

77tortov.ru

parties-and-picnics.org

parties-and-picnics.org
There are also useful vitamin numbers for your birthday, you can eat them right during the holiday with your guests. Read how to make a number out of fruits and other sweets.
How to make a number for your birthday with your own hands?
Children's birthday should take place in a special festive atmosphere. I would like to decorate the birthday person's room and hang a large sign in the hallway so that little guests are charged with positive and fun right from the doorway.
You can call for help from professional decorators. They will quickly hang expensive decor. But it is much more interesting to do interior decoration with beautiful home-made "things" for both parents and children. Joint creativity will allow you to spend time exciting.
This article contains a variety of ideas for making a figure for a birthday boy. You can make it out of balloons.
But if this design is tired, then arm yourself with scissors, cardboard, corrugated and colored paper, decorative elements, threads and get to work. The main thing in such an important matter is a good mood and a positive attitude.
What to make a birthday number out of?
Figures corresponding to the age of the birthday boy, made from small balls - this is the most familiar way of decorating a room for us. What could be easier than placing an order for the required number at the nearest event agency? But if you make a figure with your own hands from any other material, then it will look unusual.


You should not give up the idea of making your own number for the birthday of the birthday person if you have little time. A digit from cardboard is cut quickly, and the needlewoman is always at hand with fabric and threads.
If the figure is not urgently needed, then you can print bright photos in advance or come up with something completely original. An interesting photo session for the birthday person in such a room with large numbers is guaranteed.


What are the methods of making numbers?
- A large number can be cut out of cardboard and decorated with whatever your imagination and resources are capable of.
- For the base, we will take a regular cardboard box of the preferred size. The contours of the desired number are outlined on the cardboard. The figure is cut out with a clerical knife and decorated. This figure will be flat. It can be hung on the wall.
- If you need a voluminous figure or you have the time and desire, then it is better to make such a figure with which the birthday person can play and rearrange from place to place if desired.
- To make the figure three-dimensional, you need two identical cardboard blanks. But besides them, you will also need to cut out long cardboard strips with smooth edges (of the same width) in order to glue the sides.
- The frame is easily assembled with a heat gun or masking tape.


The decor of the figure must be selected in accordance with the general design style. The most commonly used materials are:
- leg-split
- colored yarn
- bright fabric (organza, chiffon, satin, velvet)
- floristic film used for packaging
- colored paper
- corrugated paper
- flowers from napkins
All of these materials are used for wrapping the base. But you can use them to give additional volume to the numbers. To do this, you need to make flowers with sticking out petals out of paper or fabric, or make fluffy pompons from woolen threads, add different "funnies" and bows.


Eco-style digit
- To make an eco-style figure, you need a cardboard base and twine. The base is gradually greased with glue and neatly wrapped with twine over the glued area.
- The finished figure can be painted with acrylic paint, or you can leave the twine unpainted. Such a figure will adorn any interior, and it will take very little time and effort to make it.


Flower number
- To make a figure with a floral pattern, we need a lot of roses, cut and glued from paper.
- Flowers fit tightly to each other, filling the entire base
- Such a figure, even in the absence of other decor, will look great.

The time spent cutting paper flowers is compensated by the smiles of the children and the joy of the birthday boy. After the holiday, the number can be hung in the children's room until the child is a whole year older.
Pom-pom figure
- To make a figure from pom-poms, you will need a large number of wool pom-poms
- The process of filling the base with pom-poms is the same as with paper flowers.
- In the following sections, we will take a closer look at how to make beautiful numbers for a birthday person.
Birthday number made of napkins
You can decorate a frame cut out of cardboard with flowers from napkins. If you have patience and cut out flowers of the same size from ordinary napkins, you can please the birthday boy with the fluffiest number in the world!

Manufacturing process:
- We cut out napkin flowers in unlimited quantities: divide a four-fold single-layer napkin into 4 squares
- We lay the squares in an even pile and fix in the center with a stapler or a piece of thin wire
- The square stack is trimmed to make a circle.
- It remains only to cut through the edges of the resulting circle, without reaching the center
- Lift the napkin petals and straighten them.
- So we will create fluffy flowers, which then only need to be glued with PVA glue to the base.


 This is the figure obtained after pasting with flowers
 Deuce and scenery
 Corrugated paper birthday number
Corrugated paper flowers look just gorgeous. They can be done in two ways. All you need is a large amount of corrugated paper of the desired color. The number will turn out more beautiful if you glue flowers of 2 or 3 different colors on it.
Method 1:
- We cut the paper into strips. Approximate dimensions in centimeters: 50 / 3.5. We monitor the correct location of the "veins" of future flowers: they should stretch along, and not across the flower.
- Next, you need to stretch the flower on one side to get waves. Such stretching is possible due to the "veins".
- We hold the stretched flower blanks firmly on one side in waves upward, and grab the base-cup.
- We fix the lower part of the flower with an elastic band or thread to match the paper.
- The softer the corrugated paper, the more voluminous and fluffy the flowers are.
- The walls of the cardboard base are pasted over with corrugated paper to hide possible gaps between the flowers.
- The base is pasted over with flowers. For this, it is convenient to use a hot glue gun. You can "plant" flowers on regular PVA glue.


Video: corrugated paper flowers
Method 2:
- Cut corrugated paper into equal squares
- Apply glue to the cardboard base of the figure
- We wrap the pencil with corrugated paper, laying it with its central part to the rod
- We lower the lower part of the future flower into glue and apply it to the cardboard base
- So gradually fill the entire surface of the cardboard base with squares.


Fill the cardboard base with squares
Birthday inflatable numbers
Children's holiday is not complete without balloons. Birthday can be done excellent wall decoration:
- you will need a base of expanded polystyrene (this is a rectangular piece or a square piece)
- small balloons
draw the desired number - inflate the balls and fasten them with double-sided tape to the base in a pre-drawn shape


Birthday Cardboard Numbers
- The easiest way to make a number from cardboard is to draw it on a piece of cardboard or cardboard box and cut it out without bothering to create a voluminous product.
- The number can be pasted over with colored paper or spread with glue and sprinkled with tinsel. You can cut a stencil of the desired pattern or pattern, attach it to the painted over cardboard number and paint over the areas inside the stencil with contrasting paint.
- A volumetric cardboard base consists of two identical parts of the number (the second can be simply circled) and long strips of cardboard of the required thickness for the sides.
- The parts are connected with a glue gun, and for structural reliability and better fixation, stiffening ribs are glued from the inside.
- The volumetric figure can be placed vertically right on the festive table. If you make a horizontal platform out of cardboard, then the figure can also be put on the floor. Then she will become a gorgeous attribute for photographing as a keepsake.

 Flat shiny number
 How to make a volumetric figure:


 We glue the parts with tape


Decorative numbers for birthday
Decorative numbers can be made using the quilling technique.
You can glue many paper umbrellas of different sizes and fix them on a cardboard base.

The details of the figure can be cut out of fabric and sewn into a large volume pillow. Ribbons, fabric flowers, lace and beads are suitable as decorative elements.


If you make a base from a special floristic sponge Piaflora, then fresh flowers can be used as a decor: the sponge keeps moisture for a long time and feeds the plants. But a significant drawback of such a decor item is its fragility.
Birthday numbers from photos
The numbers that will be truly unique are those made from photographs. They can be glued onto a cardboard flat figure or you can choose photos for a collage in Photoshop and arrange them according to the intended form. The finished collage only needs to be printed and glued to the base or wall.


Felt numbers for birthday
Felt figure, if decorated with small toys cut out of felt, the child will be able to use after the birthday in his games.

To make a figure, you will need one piece of bright felt (for a flat figure) or two (for a voluminous one). The figure is sewn like a soft toy and stuffed with filler - cotton wool or padding polyester.
Birthday balloons
It is impossible to imagine a children's party without balloons. Balloon numbers, although they are a constant attribute in the photo of birthday people, can also be made in an original way.


The video shows one of the ways to make a figure from balloons.
Video: balloon figure
How to decorate a birthday number?
Anything is suitable as a decoration for a number. If only it looked beautiful and festive. You can make paper flowers, you can paste over the number with buttons, or sew small animals out of felt and attach them to the number.
Ribbons, lace, pieces of fur, crowns and hats, beautiful bouquets of artificial flowers and large beads will go well for decorating a figure
Methods for decorating a figure:
- quilling decor
- using interior lighting
- gluing squares of corrugated paper or pre-prepared flowers
- metallized, pearlescent or embossed paper
- the cloth
- satin ribbons
- sequins
- colored cones


Number 1 for birthday for boy and girl
- To make the number 1 for your birthday, you will need a large piece of cardboard or cardboard box, tape or masking tape, and a utility knife.
- We draw the letter of the desired shape. Cut out. We outline the second part along the cut out one and also cut it out.
- We fix the sides with tape. And let's start decorating.
- We cut out roses from napkins and glue them on a cardboard base, gradually filling the entire figure. You can pre-paste the number with colored paper to match the napkins used for roses.


Video: how to make a 3D volumetric number 1 for your birthday?
Video: do-it-yourself napkin figure
Birthday number two for boy and girl
Number 2 can also be made voluminous and decorated with "napkin" roses. The manufacturing process for figure 2 is shown in the video.
Video: volumetric number "2" from flowers (napkins) for birthday
For a girl, the figure can be decorated with a crown, a chic bow, or dressed up in a skirt.


We propose to make number from ribbons... You will need a large piece of corrugated cardboard, double-sided tape, scissors and a bright ribbon about 7-8 m long and 5 cm wide. We will decorate the number with beads.
- Cut out 2 cardboard base blanks. If the cardboard is thin, then it is better to cut out two identical sides for strength and glue them together.
- Next, we proceed to wrapping the numbers with a ribbon. We fix it with a stapler or tape. You can fasten the ends of the tape with threads or hide them behind the tape and secure with tape.
- We glue the beads with a heat gun.


The figure for a boy can be made in a nautical style: from blue and white stripes. A number made in the same color as a bow tie or tie is also suitable.
Video: how to make number 2 for birthday
Birthday number three for boy and girl
The number 3 can be "grown" in a flower pot for variety.
You will need:
- flower pot
- cardboard box from which we will cut the number
wooden sticks - different decorations
- ribbon
- thermal gun
How to make a figure?
- We cut out two identical triplets and put wooden sticks between them (they are necessary to fix the number in the flower pot)
- Glue the halves of the number with glue and connect them
- We start wrapping the three with tape
- We fix the tape with a thermal gun, and where necessary, we sew it
- Glue the pallet to the flower pot
- We fix wooden sticks to the pot with a thermal gun and put pebbles inside the pot for structural reliability
- Top can be decorated with decorative stones
- Decorate the number with ribbon roses. It's not difficult to make them
- Fold the ribbon in half and begin to wrap, gradually sewing on the lower part of the future rose

 Cut out a three How to make a rose How to cut a chamomile
Video: corrugated paper and cardboard figure
How to make number 5 for birthday for boy and girl?
The five can be made from a cardboard base, decorated with ribbons or "napkin" flowers, or you can cut out circles of different sizes and cut spirals out of them. Then, collecting the resulting ribbons in the center, you get another original type of floral decoration. a bead can be inserted into the middle of the flower.

Video: how to make number 5 for birthday?
When the birthday of their beloved baby is approaching, all parents try to prepare all kinds of treats for their crumbs. To make the holiday in a festive atmosphere, moms and dads decorate the apartment with balloons, photographs and other attributes of the celebration.
Volumetric figures for a child's birthday are becoming more and more popular with parents who want to decorate an apartment for the holiday, prepare for a photo session and simply please the baby. However, not every parent knows how to make such a figure on their own.
The work on the creation of a two can be roughly divided into two stages: creating a frame and decorating a figure.
How to make a frame-base of a two?
In order to make a frame, you will need:- large cardboard box,
- wide tape,
- masking tape on a paper basis,
- ruler, marker,
- stationery knife, scissors.
First you need to draw the number two on the box. Try to draw all the corners carefully. When the drawing is ready, you need to cut it out. Since it is very difficult to cut thick cardboard with scissors, it will be better and more convenient to use a clerical knife. Then you should make a copy of the deuce, placing the base on cardboard. As a result, you should end up with two cardboard numbers.
To make the two look voluminous, you should cut out a few more cardboard elements and use adhesive tape to connect them with two numbers.


The frame is ready.
It is known that flowers from napkins will not be attached to ordinary tape. In order to make the decorating process easier, you should glue all the joints with paper-based tape. Glue the frame of the deuce with napkins of the color you like using PVA glue.
How to decorate a volumetric figure?
There are many ways to decorate a 3D figure. Some people prefer to use corrugated paper for decoration, others choose felt. There are also those who like napkin flowers.


In order to decorate a voluminous two with roses from napkins, you will need:
- several packs of napkins of any color,
- PVA glue,
- stapler,
- scissors,
- cardboard circle.
The easiest way to make a flower from napkins.
1. Take three napkins folded in four. Place a medium-sized circle cut out of cardboard on top of them. Cut along the contour.2. Fasten all the resulting circles from the napkins with a stapler in the center.
3. Now you need to detach the top layer of the paper napkin and crush it, then the second and so on. Crumple each layer separately, trying to maximize the pressure from the bottom. As a result, you should have a rose. You will need a lot of such flowers.
Consider the design of the two beforehand. It can be made both in one color and in a combination of several colors, you can come up with some unusual pattern, or you can simply alternate roses of different colors.
It is necessary to decorate the number with flowers not only in front, but also on the sides. This will visually increase the size of the deuce and give it additional volume.
Volumetric figure 2 is ready.
A universal selection of gift ideas for any occasion and occasion. Surprise your friends and loved ones! ;)
Hello dear readers! As you know, the holiday should be primarily in the soul. But if good sincere wishes and gifts are added to this, then this is even better. And the decor of the premises in honor of the celebration is completely capable of turning a traditional celebration into something special. One of the simple and uncomplicated ways to decorate your home is napkin numbers.
Such figures bring not only the feeling of a holiday, but also make you feel like a professional decorator. Although in fact, even a beginner can cope with such a number with due diligence. Let's get started!
Necessary materials
I decided to present the necessary materials in the form of a list:
- The foundation... Pay special attention to it. The most common types for its creation are cardboard boxes and polystyrene. Boxes can be used both for large household appliances and small ones for juice, etc. The larger the desired digit size, the larger the box.
- Napkins... Several packs will come in handy. You can use other types of paper, for example, corrugated paper.
- Glue or skewers for attaching flowers and other decorations to the base.
- Scissors or utility knife... The latter is especially relevant for cutting foam.
- Double-sided and paper tape... For the Styrofoam you will need the first one, and for the cardboard you will need the second.

Napkin flowers: 5 options for decorating numbers
Before you start creating numbers directly from cardboard, foam and napkins, you need to understand how we will decorate these numbers. There are many options for creating the main decorative element - flowers.
The first and most common are fluffy roses that can be easily made from napkins. To do this, you will need a napkin folded several times, a stapler, a circle template, and scissors.
Progress:
- Fold a few napkins together to form a square. The more layers, the more magnificent the flower will be.
- Attach a circle to the resulting stack and cut out circles from all layers at once.
- Staple the flower in the center with a stapler.
- Raise each layer so that you get a lush petal.

Larger designs can be made. To do this, take napkins and fold them like an accordion in several layers. Cut the edges in a semicircle, tie the center with a thread. Fluff the edges - the flower is ready.

The flower below can be made in a similar way. The only difference is that you do not need to cut the edges in a semicircle. Such additions for numbers can be made not only from paper napkins, but also from different types of paper - for example, crepe paper.

For the next flower, the napkin will need to be folded 4 times. Draw on this base a semicircle as shown below and trim off the edges. It will take several layers.

You can create such roses from corrugated paper. The option is not as budgetary as with napkins, but the effect is quite unusual.

If you want to know about other possible flower decorations for numbers, I recommend visiting. There is a flower for any idea
How many napkins and flowers do you need?
It all depends on the size of the finished product. But it costs from 3 to 5 packs of napkins to cook. Flowers you will most likely leave from 200 to 500 per piece.
What determines the number of colors:
- from the size of the flower and the finished figure,
- from the splendor of the decorative element,
- on the density of the rows.
Other ways to decorate numbers
Besides the most obvious way discussed above, there are other methods. For example, creating fringes is much faster than creating many colors and gluing them on. You can read how to make a fringe in the article on creating a piñata. There, the paper is folded in half, which gives the impression of volume. But you can use a single layer of fringe - this will take less paper or napkins.
The general principle of operation is as follows: Cut out a strip of paper and cut the edge. Glue the uncut part to the number. Glue each layer so that the previous one overlaps the uncut top.
In addition, you can resort to other methods. For example, facing, when decorative square pieces of paper are attached in the center to the base (mainly foam). Or maybe you decide to create something unusual - say, a lot of quilling curls on the surface of the number.
How to make numbers from napkins with your own hands for a birthday and not only
The most important date on which the production and decoration of holiday numbers usually falls is Birthday and Anniversary. Although in honor of the New Year and other memorable celebrations. However, how do you cope with creating such a festive decor?
For all products will be relevant:
- Saving time will be given by pasting the sides and bottom with paper or the same napkins. Then it will take much less time to decorate the figure.
- Take the most voluminous, lush flowers, so that you can easily decorate a large surface with several pieces at once.
- Give preference to glue that sets quickly and is easily squeezed out of the container. Double-sided tape can also be used for light wipes (although this is a more expensive option).
Number 1
The most popular number is 1. This is not surprising - it is usually used to decorate the first month and first year of a baby's life. You can make the basis for such a decoration from cardboard boxes or from foam.
For a bulky cardboard version, you need to cut out the front and back parts as in the photo. That is, just 2 flat units. The side parts consist of rectangles of the same width, and their height should correspond to the height of each segment of the unit (again, look at the photo).

The flower decoration can be completely different. Only you choose the type of decoration that is most attractive to you.

The Mickey Mouse style unit is a designer piece for a costume party.

A flat napkin number that is useful for decorating walls or windows.

The video shows another option for creating a base - from foam. It is easier than making a number from cardboard: you only need foam and double-sided tape.
Step-by-step instructions for making:
- To make the number stable, cut out the two numbers "1" and glue them with tape. It is most convenient to cut parts with a clerical knife. The dimensions of the base are shown in the video. But you can make the number larger or smaller.
- After that, you will need a large number of paper flowers, the process of creating which is also in the master class. A few packs of paper napkins of the desired shade will come in handy.
- Take the glue. Instant or ordinary PVA will do. Apply glue in lines as you paste the flowers.
- Flowers should be glued starting from the edge and moving towards the center. Choose the direction of movement yourself - from above or below.
If you want to make a one or another number more interesting, then choose several shades that are combined with each other at once. A smooth transition of colors can be achieved by creating elements from all shades of napkins. For example, if you chose red and yellow flowers, then about a third should be created from yellow napkins, a third from red, and a third - simultaneously from red and yellow with different contents of both colors.
This entire process is detailed in the video below.
Here is another example of a digit with a smooth color transition:

Number 2
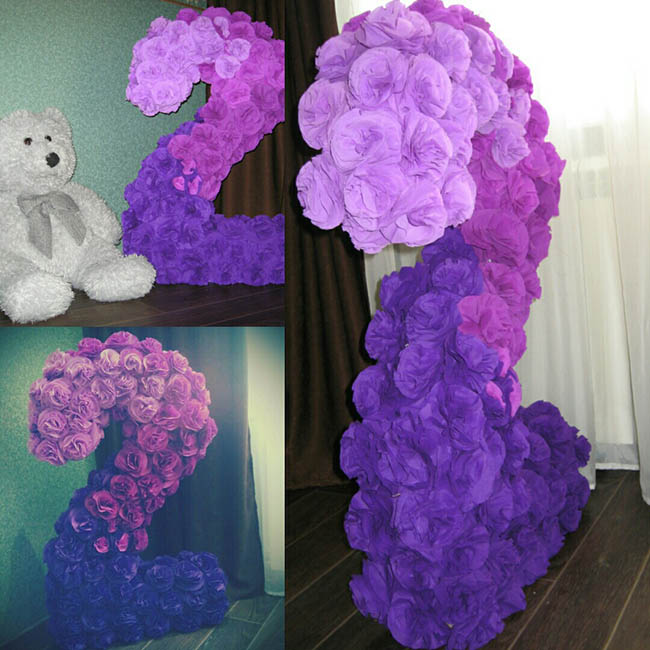
There is a complexity here. Unlike the angular unit, the two has smoother curves, due to which it will be much more difficult to make the cardboard base for the number. Therefore, for this case, the choice is clearly in favor of the foam base. Below are several options for the volumetric figure 2.
If you want to make a flat version, then use the master class below. To do this, take cardboard and make a large number of roses for it, simply twisting strips of napkins or corrugated paper.

If you just crumple the napkins and glue them to the base, you get the option as below. It is simpler, but it is better to wrinkle the napkins near the center.

In the video mk, a foam base is just used. It looks very impressive, contrasting roses are used to create the number.
Number 3
Is your baby 3 years old? Or is a jubilee being prepared for 30 or 35 years? Then you can not do without the number 3. It is difficult to make a base from cardboard, but from foam it is the very thing. See below for different triplets.


A master class in video format will show you how you can make the number 3 with your own hands. And a little girl will do it together with her mother.
Number 4
Fours can be made in the same way as one, they are similar in appearance. Choose a delicate pink color if you are preparing a surprise for a girl.


Is the boy's birthday? Then he will like the four, made in the style of Spider-Man. There are no more flowers and roses here, but there are many crumpled red and blue napkins and a white lace that resembles a spider web.

Another universal option is presented in the instructions below.
Number 5
It is best to choose a more straight shape for this figure, so that it is easier to cut out the elements. But, if we are talking about the 55th anniversary, then take the version of the more curved five - this will draw attention to the birthday person or the birthday girl.

Delicate girly number with a very light color transition.

For a boy, the option below is more suitable, you can even completely make such a figure out of blue and blue napkins.

Double instruction (in two videos) for creating such fives tells in detail about creating a five for Birthday and similar dates.
Digits 6 and 9
Having made a six, you immediately get another 9, because you just need to turn the number upside down to get the desired option.


And here are the numbers 9. One difference is that it is better to make the number in the most stable way at the top, which you want to put it. That is, at the nine, the lower turn must be strengthened, and at the six, the circle.


You can make a similar volumetric figure with your own hands if you watch the video.
Number 7
One of the simplest numbers in its execution. But there is one difficulty here - it is not so easy to put such a figure vertically, you will have to strengthen the base, or make a flat version that will be attached to a wall, door or something like that.
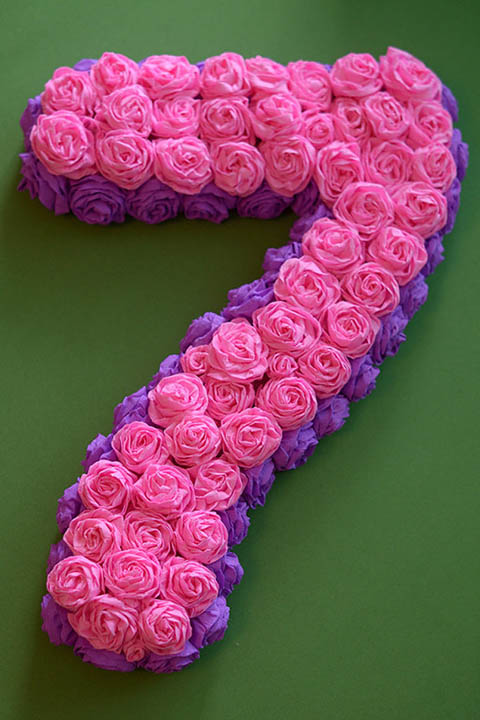
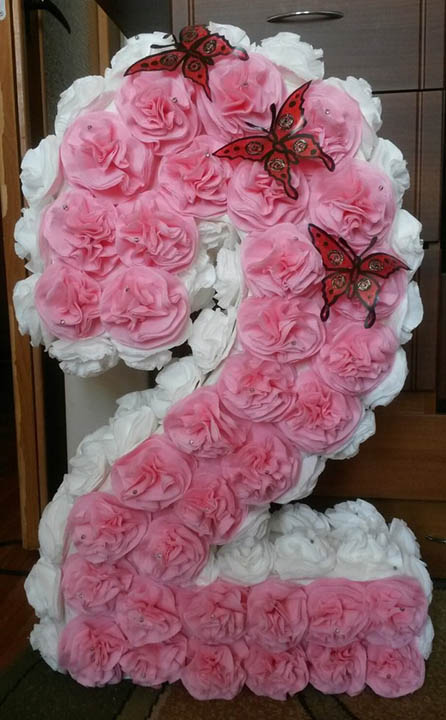
Volumetric number 7 from napkins.

And here is the master class in video format.
Number 8
This figure is made not only for birthdays, but also used to decorate the premises for March 8. So, having done this, you will kill two birds with one stone.

The video, once again proving that even children can cope with such a task - after all, everything is quite simple.
But what about 0?
For any celebration intended to celebrate round anniversaries, you will need a napkin number such as 0. Here again, the foam base will help you out, the rest is the same as for other numbers. Now anniversaries of 10, 50 and even 60 years are no longer a problem.

What size to make?
Agree, small numbers are more suitable for decorating a table or a decorative slide of gifts than for a photo shoot. For the latter, it is better to give preference to the large version with a height of about 70-80 cm.
In any case, focus on the growth of a child or an adult. For a child, it is desirable to create a figure with a height from him, but for an adult this is no longer relevant.
How much does the finished figure cost?
The final cost depends on the amount of labor expended by the master, the materials used to create the masterpiece and the size of the product. But basically you can find prices ranging from 1,000 to 3,000 rubles.
This is how you can make any holiday simply unforgettable. Napkin numbers are a really budget and cool way to feel like a creator and at the same time decorate any room with style and speed.
Share your impressions in the comments, tell your friends and family about the article on social networks - let them also learn to create wonderful dates themselves. See you later!
Best regards, Anastasia Skoreeva
Do you want to make a pleasant surprise for your child or even together with him? A birthday number made with your own hands will be an excellent decoration for the holiday. You can do it in different ways. Joint creativity will be a great way to have fun and exciting time with your baby.
Flat design
A DIY birthday number can be made of paper or cardboard. These materials are best suited as a base for decoration. If you do not need a bulky product, use the simplest manufacturing method. To do this, it is enough to draw the outline of the image on the sheet and cut it out with a knife or scissors.
So that the number can be placed vertically, find a support for the structure or make a "leg" of cardboard on the back side. In addition, such a decoration is easy to hang by making one or more holes in the workpiece through which a string, ribbon or ribbon will be passed.
Bulky product
In order not to think later how to strengthen the decoration on a horizontal plane, a birthday figure with your own hands can be made immediately with a side plane, on which it will be placed. To put on the table or on the floor products that have a rounded bottom (3, 5, 6, etc.), it is recommended to provide a horizontal platform. In addition to the functional purpose, the side plane also has decorative properties. Such a voluminous design will always look more effective, even more modestly decorated than a flat one.

Plus, it's easy to add backlighting here. This basis is done as follows:
- Draw two blanks of the selected number on cardboard or thick paper.
- Prepare a strip that is wide to match the thickness of the number.
- Glue the side part with tape to the base (two blank numbers). If there is no scotch tape at hand, you can provide allowances on the paper strip and use PVA.
Whatever number you need, choose any method of creating a structure. You can decorate both flat and voluminous products in different ways. It is the decor that creates the beauty and impression of the made decoration.
What size to make a figure
The choice of the size of your decor will depend either on what the object is intended for, or on the amount of material available or the time to work. Large decorations are popular for creating a festive atmosphere in the interior. They are made both 50 cm high and meter high. Such a structure can be placed on the floor, on the back of a sofa, or hung in the space of a room. If you want to put the decor on a festive table, you should make a smaller figure. Not a bad idea - a garland of numbers or a postcard of this shape. If you have the time and desire to create, try different options in several dimensional gradations.
Design ideas
The easiest way is to use the most affordable and easy-to-process material - paper, plain or corrugated. The combination of different color shades and material processing methods, even from a simple sheet for an office printer, allows you to make excellent decor. So, the ways to decorate the base can be as follows:
- Quilling decor.
- Supplementing the volumetric shape with interior lighting.
- Gluing squares or rectangles from corrugation cut into strips.
- The use of roses twisted from spirals or strips.
- Making flowers from corrugated paper.
The choice of method depends on the amount of time and paper available. Spectacular works are obtained using corrugated multi-colored paper, as well as metallized, mother-of-pearl, embossed.
Often they use fabric, buttons, beads, sequins, beads, colored cones glued to the base. Openwork transparent airy options from threads with a frame look spectacular. Take ready-made ideas, add your own options, create a spectacular decor for the holiday!
Options for toddler
The number "2" for a birthday with your own hands can be made of ribbons, paper, even dough or in the form of a candle. For the smallest, it is better not to use small parts that the baby can tear off or gnaw off.
It is good to use corrugated paper. From it it is easy to cut many rectangles with cuts in the form of grass and glue them in layers to the base. An idea in the form of rainbow colors or a solid color option will do.
Gift for little
If you create a figure for a birthday with your own hands from paper for a girl, any ideas with frills, flowers of pink shades will do. If you have plain colored paper, glue the base with roses from it.

To make such simple and beautiful elements, it is enough to do the following:
- Cut the circle in a spiral from the edges to the center.
- Twist the resulting workpiece tightly.
- Fasten with glue.
- Glue the blank with the made flowers.
If you initially take circles of different diameters and also change the width of the spiral, you can get a variety of decor on the contrast of sizes. The centers of the roses are decorated with beads or pins are inserted. They attach roses to the base, and the heads perform a decorative role. Such flowers are also made from strips of corrugated paper. It also turns out beautifully.

Another effective and quick-to-manufacture option for a girl is to glue many layers of horizontal strips of corrugated paper. This will create the effect of frills or ruffles on a skirt or dress. If you use a gradation of color shades from light pink to red or lilac, you get a very beautiful decoration.
DIY birthday number for a boy
For little gentlemen, of course, you should not use flowers and frills, so choose methods that allow you to get a beautiful, but austere decor. Apply the appropriate color scheme (definitely not pink). You can decorate the base with many corrugated squares (this does not take much time). The second option is to make. For this, it is enough to connect several sheets in layers, fold them all together with an accordion, tie in the middle and unfold the layers. These flowers are similar to carnations.

Glued to the base in large quantities, they will create the effect of a terry surface. From blue or green paper, it is quite a suitable option for a boy. From above, you can decorate with images of cars, then the decoration will definitely not look girlish.
What to do for older children
Children, starting from the age of three, can already be involved in the manufacture of festive decor from paper themselves. For example, the number "3" for a birthday with his own hands can be made in The simplest elements, the child can twist on his own. If it turns out to be difficult, make them yourself, and let the little helper just glue the finished parts to the base.

In this way, both decorations of an opaque paper base (flat or volumetric) and openwork figures are made, the design of which is completely assembled from twisted rings, leaves, petals and flowers.

If you apply your imagination, it will not be difficult to make stories for boys using this method, for example, write in a number a typewriter, motorcycle, boat or any other attribute of boyish life.
The number "4" with your own hands for your birthday can be made together using an even more complex technology. Glue the frame for the volumetric part from cardboard or thick paper. Leave the slots in the front side, and mount light bulbs or a regular Christmas tree garland inside. So, you will make a backlit volumetric figure.
So, a figure for a birthday with your own hands can be made in different ways. For every holiday, you can easily make a new piece of jewelry.
We also recommend
 Happy birthday pictures for women
 Happy birthday daughter pictures - congratulations Download a beautiful card happy birthday daughter
 Happy birthday to the fisherman Happy birthday to the fisherman
 Beautiful animated cards Happy Birthday (GIF)
 Good morning - funny pictures download
 How to decorate a New Year's table Decorate a table for the New Year