What to weave from large beads. Best Bead Crafts for Beginners
Weaving from beads is a meditative hobby that allows you not only to disconnect from problems and focus on beauty, but also to create delightful jewelry, paintings or toys. Mastering this art is not as difficult as it seems at first glance. But beginners in beading often have questions:
In contact with
- Where to begin?
- How to read and understand bead weaving patterns for beginners?
- How to choose materials?
- Why can't you make the same neat decorations as in the photo on the Internet?
These are not all the questions that arise in a person who has decided to master the art of beading. This article will try to answer them.
Preparing to work with beads
On the Internet you can find many bead crafts with detailed diagrams and step-by-step tutorials. But the first step for beginners should be the arrangement of the workplace, the choice of materials and tools for work.
Workplace
Working with beads is a painstaking business, so the workplace should be as comfortable as possible. There should be no foreign objects that can interfere with a novice master. The workplace should be well lit and equipped with containers for storing beads. Getting started, it is important to make sure that there are no pets or small children nearby to swallow the beads.
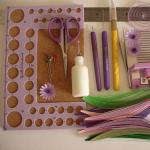
Instruments
To work with beads, the master will need the following tools:

These are the basic tools that a novice master may need. Of course, over time, its own set of tools will be formed: something will be excluded, something will be added depending on the material with which you are accustomed to work.
Materials (edit)
The quality of the finished product depends on the choice of materials. By materials is meant what will be created from. Namely, the base material and the beads themselves... The base material can be used:

The main task before starting work- this is the choice of beads. And in order to make this choice, one must take into account all the criteria by which one can classify beads. Bead selection criteria:

The first thing you should pay attention to when choosing beads by color is transparency. Beads can be opaque - mainly used for toys - or transparent (it gives the products some airiness and ephemerality). Opaque beads can be matte or glossy. Matte beads are always monochromatic and evenly colored, glossy beads can be either monochromatic or chameleons - that is, they shimmer in different colors depending on the lighting. Get started with beads it is recommended with opaque beads.
Transparent beads are somewhat more capricious to use. When working with transparent beads, it is very important to choose the base material to match, since the finished product is translucent and the base will be visible. Transparent beads are mostly glossy. He might be:
- Solid and evenly colored,
- Shimmering in several colors,
- Transparent and colored only in the center (this option looks great in jewelry and creates the illusion of volume).
When choosing beads, special care should be taken with iridescent beads or chameleons. If there are not enough beads for a product and you have to buy it, it is very important that not only the main color matches, but also all the shades with which it shimmers. Otherwise, it will be noticeable that part of the product is made of other beads.
Working with beads: weaving patterns
By organizing the workplace, you can start to master the techniques of beading. Bead craft schemes are listed from flat to volumetric and from simple to complex.
Weaving with a cross
 The easiest technique to perform- weaving with a cross. Suitable for making bracelets and necklaces. Four beads are strung on the thread and shifted to the center of the thread. The right end of the thread is passed through the leftmost bead from left to right and tightened. Thus, the first cross is obtained. Next, you need to string two beads on the left end of the thread, and one on the right, and again thread the right end of the thread through the last bead on the left. It turned out the second cross, then the crosses are woven one after the other over the entire length of the product.
To make the product wider, you need to weave another row of crosses. For this, the last cross in the first row, it is woven as follows: three beads are collected on the left end of the thread and the right end of the thread is again threaded into the last bead. After that, three beads are again typed on the left end and the right end is again threaded into the last bead on the left. The result is the first cross of such a row. Further, two beads are strung on the left end of the thread, and the right end is threaded into the nearest left bead of the first row and into the last bead from the thread set on the left end of the thread. All the crosses of the second row are woven in a similar way. Then you can dial the third row in the same way.
There is a rather nifty modification such weaving. Contrast beads of different sizes will be used here. Large beads are strung in the middle of the fishing line, two small beads are drawn to the left and right of it. Then another large bead is taken and both ends of the thread are threaded into it from different sides. Further, two small beads are again recruited at each end of the fishing line and the ends are threaded into a large bead from different sides. From one row of such weaving, a pretty bracelet is obtained or.
Mosaic
Mosaic weaving is a bit like cross-stitching, only it is done with one end of the thread. An even number of beads is strung on the thread in accordance with the length of the product. Next, the first bead of the second row is strung, after which the end of the thread is inserted from the side of the last bead into the penultimate one. Then the second bead is put on the second row and the thread is threaded into the fourth bead from the end of the first row. Thus, the entire second row is woven. When the second row is completely dialed, the first bead of the third row is strung onto the thread and the thread is threaded into the last bead of the second row. And in this way the entire third row is woven. The fourth and subsequent rows are woven in the same way.
Canvas
 This technique is a little more complicated than the previous ones, but if you master it, you can create pictures from beads. Here, only a thread can be the basis, since even on a very thin fishing line, the finished product will roll up. It is very important to use only calibrated beads, since any defects in the beads will be immediately visible in the finished product. It is also necessary to choose beads with large holes, as the thread will be threaded into the bead three times.
How to make a beaded canvas? The first step is to type beads on a thread along the width of the product. This will be the first row. After that, you need to string the first bead of the second row and thread the thread into the last bead of the first row from the side of the penultimate one, after which you need to thread the thread again into the first bead of the second row in the direction of weaving. After that, the second bead of the second row is strung on the thread and the thread is inserted into the penultimate bead of the first row, after which it is threaded again into the second bead. Thus, the entire second row is typed. The third and subsequent rows are created in the same way.
Since with such weaving Since the beads of each next row are exactly above the previous ones, you can use cross-stitch patterns to create pictures from beads.
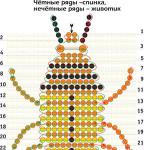
Parallel technique
This technique is used to create three-dimensional animal figures. Wire is used as a base. Weaving always starts from the nose: the first bead is placed in the middle of the base. After that, a second row of beads (two or three pieces) is assembled into it, both ends of the wire are threaded towards each other. Following is typed in exactly the same third row. In the fourth row, you can add one or two more beads. The fifth row will be equal to the fourth... After some time, it will be found that the wire bends and the even rows "hide" behind the odd ones. This is how it should be, due to this, the volume of the product is achieved. The finished craft can then be squeezed a little from the sides if it seems too flat.
To make the animal paws it is necessary to collect beads on one of the ends of the wire in accordance with the length of the paw. After that, you need to slightly move the last bead and thread the wire into this dialed row in the opposite direction, starting with the penultimate bead. The paw is made on the other side in the same way. Then continue to weave the body of the toy. To finish weaving, you need to re-thread the wire into the penultimate and last row of beads.
Crafts from beads for beginners
Here are the simplest lessons beadwork for the very beginners. Following these lessons will make it easy to make a cute craft, even for the one who holds the beads in his hands for the first time.
Openwork bracelet
 For this decoration you will need an elastic thread as a base and medium-sized beads. This bracelet looks especially impressive when it is made of transparent, uniformly colored mother-of-pearl beads.
The bracelet is woven with a cross in six rows v. The length of the bracelet should be slightly wider than the girth of the wrist. When the main fabric is woven, you need to put the bracelet on the table first next to you. Then another bead is put on the far end of the thread and the thread is threaded into the first bead of the last row. Then another bead is put on, into which both ends of the thread are threaded towards each other. It turned out a cross connecting the ends of the bracelet.
Next, you need to thread the ends of the thread into the first and last beads of the penultimate row and add another bead into which the ends of the thread are threaded towards each other. Thus, you need to connect the entire bracelet. Then you need to re-thread the ends of the thread, and the last cross and tie the thread with a knot on the inside of the bracelet. Cut off excess.
Flower bracelet
This bracelet will require a thread, or a thin line as a base, medium or large opaque beads in two contrasting colors. Weaving is performed using the "mosaic" technique... The first tedious thing to do is to consolidate the foundation. To do this, a bead is strung on the base, around which a knot is tied.
Now you can start to weave. The first row is made of beads of the same color - these are petals. The number of beads must be even, but not a multiple of four. In the second row, the first bead will be the same color as in the first row, the second bead in a contrasting color (this is the core of the flower). Alternating beads, weave the second row. The third row is woven from beads of the same color as the first. At the end of the third row, add fastening bead. The clasps can now be attached to the bracelet.
Bracelet with inscription
 This product requires a nylon or silk thread as a base, small or medium beads of two colors and the same size. Before you start weaving, you need to make a diagram of the desired inscription on a piece of paper in a box. The shaded cells are contrasting beads.
To start, you need to fix the line and dial the first row. After that, weave as many rows as necessary for the indentation. Where the letters begin, you just need to change the color of the beads. When the bracelet is completely woven, you need to re-fasten the thread with a bead and attach the clasp.
Beaded spruce
For this cute souvenir, you will need a thin wire as a base and a thicker wire to create a tree trunk, medium-sized green beads, you can add bugles of the same color. You will also need green tape and plaster of paris or to make a pot. Making a tree from beads painstaking occupation, but not technically difficult.
Thin wire must be cut into pieces of 20-25 cm. These will be branches. Each branch is woven according to the following pattern:
- There is a bead in the middle of the wire.
- The ends of the wire are connected and six more beads are put on them.
- Five beads are put on each end of the wire.
- The last bead is shifted and the wire is threaded again into the selected beads, starting from the penultimate one.
- The ends of the wire are again connected and 5 - 8 beads are strung on them (there should be fewer beads on the upper branches than on the lower ones).
Thus, it is necessary to weave about twenty branches. The more there are, the more luxuriant the spruce will turn out. Option for the lazy: where both ends of the wire are threaded together into beads, instead of beads, you can use bugles from the calculation, one tube replaces three beads.
When the vertices are woven, it is necessary to fix them on the trunk, twisting the trunk with the free ends of the wire, from the top to the root ... To not see the connections, you need to wrap the barrel with tape. To make the tree stable, it must be planted in plaster or clay.
Weaving from beads for beginners


The creations of the beadworkers are a whole art, and some of the works are rightfully called masterpieces. Learning to create beautiful little things from beads is not so difficult as they think, the main thing is to learn the necessary techniques. Bead weaving lessons for beginners it is easy to master, but you need to have such qualities as perseverance, patience and a great desire to create beauty. If you decide to try beading, you will never be disappointed with the result.
Basic bead weaving techniques for beginners with patterns
If you decide to create a beautiful thing from beads, but still do not know how to do it, then first choose a convenient weaving pattern for yourself. But most importantly, you need to find large beads that are more suitable for the base of beading by beginner needlewomen. Do not take too bulky products to work for the first time - they require skill and time-consuming. To a large extent, the type of finished work will depend on the quality of the selected material. Therefore, if you notice irregularities on the wire or foreign inclusions on the beads, then discard such material.
To choose the right material, follow a few tips:
- Choose beads according to the shape and color indicated in the diagram.
- When buying, inspect the bag or jar to make sure there are no defective beads.
- The size of the beads is determined by the number. The smaller the number on the package, the larger the beads.
- For beginners, it is recommended to choose a wire that simulates the outlines of the finished elements. The fishing line is different in thickness and color, and also involves the purchase of a needle for work.
Mosaic weaving for beginners
For most needlewomen, the mosaic weaving technique is banal and simple. But even experienced craftswomen make mistakes, so it is important for beginners not to miss all the details of the scheme. In mosaic weaving, the beads are staggered, forming a dense fabric.
Its main principles:
- work is done on one thread;
- the number of beads must be a multiple of 2;
- in order to weave a canvas for an uncountable number of beads, additional passes of the thread are needed through the extreme beads.
Weaving of an even mosaic fabric begins with a set of an even number of beads that make up the first row. For the second row, cast one bead, and pass the needle through the second bead from the end of the row. Then cast on the bead, stitching through the fourth from the end of the row, and so on. To complete the row, pass the needle through the first stringed bead. In order to dial the third and all subsequent rows, sew a new bead through the last bead strung in the previous row. Pass the zigzag needle through the entire weave before breaking the thread.
Brick weaving
Although brick weaving is a bit like mosaic, it differs greatly in its execution technique: it weaves in a different direction and takes more time. Brick and mosaic weaving are similar, so they are often used in one product, and the connections look completely invisible.
The principle and order of brick weaving:
- The first row consists of 5 beads. First, two pieces are put on the needle, and then the third, after which the needle is threaded through the second towards the weaving, and through the third in the direction of weaving. Then a fourth bead is put on the needle, and the needle is guided through the third in the opposite direction to weaving. The same is repeated with the fifth bead, after which it is necessary to return to the beginning, passing each bead in turn in reverse counting.
- The second level of brick weaving can be expanded. To do this, you need to string two beads on a needle, make a stitch, clinging to the thread connecting two beads of the first level, and bring it out through the second beads of the second row. Then the third bead is put on, and the stitch is made between the second and third beads of the first row. You do the same with the quadruple and fifth beads, and when the sixth is typed, the needle is inserted from top to bottom through the fifth bead, and is output through the fourth beads of the first and second rows.
- At the third and second levels, the canvas expands in the same way, and starting from the fifth row, it should already be narrowed. To do this, the first two beads are strung, and the stitch is made under the thread that connects beads six and seven in the fourth row, and returns through the beads two of the fifth row. Next, the needle is guided in the direction of weaving on the fifth row through the first bead, and then through the second. At the fifth level, they stop at seven beads and so on.

Circular (French) technique for beginners
French weaving is very common among needlewomen. And this is understandable, because all the animals, flowers and other decorations come out airy and delicate. In circular (French) weaving, at the base of any leaf or petal there is a thick central wire rod, on the base of which several beads are strung, and a thinner wire with beads is attached below. Two wires are placed in parallel, held together by one curl. This is one half of the arc.
On the other side of the rod, another wire with beads is attached, fixing to the main rod from below. If we weave a couple more of these arcs, alternating between the fastening of the wire, then from below, then from above, then you will get a full-fledged leaf. The wire of the last row is already fastened with two turns, and its tip is cut off. One side of the axial rod is cut so that a small wire end of about 0.5 cm remains. Then it should be bent towards the inside of the decoration.

Parallel weaving technique for beginners
Many needlewomen begin their path in beading by mastering the technique of parallel weaving. This is the easiest way to learn how to weave animal figurines, flowers and other interesting products. The essence of parallel weaving is that the beads of the first and second rows are strung on one end of the wire, and its other end is threaded towards the first level through the beads of the second.
The two rows are drawn tightly to the middle of the wire or line, and pulled tight. After that, both ends of the wire come out from opposite sides of the decoration, and the rows are parallel to each other. This lowering easily creates not only flat products, but also volumetric ones. Only when weaving volumetric figures, the rows are stacked one below the other, and when creating flat ones, they are stacked in one plane.

Bead weaving workshops for beginners with a photo
Beading jewelry is very fashionable. Today, many Fashion Houses in their numerous models decorate bracelets, bags, rings, items of clothing with beaded weaving. Therefore, modern women are fond of beading, because every thing, created with their own hands, takes a worthy place in the wardrobe, and becomes a subject of personal pride.
To work, you will need the following materials and tools:
- beads, stones;
- clasps for weaving necklaces, bracelets, necklaces;
- needles of different sizes for large and small beads;
- nylon threads, fishing line or wire for the base of the product;
- pencil, notebook sheet in a box for sketching diagrams;
- scissors.
Before embarking on practice, a beginner should arrange the workplace in such a way as to enjoy the process, and not suffer from inconvenience or lack of lighting. You need to work at a table on which all the necessary tools and material are prepared. And so that the eyes do not get tired, the light should not be too bright, but not too dim. It is better to start weaving with beads with some simple figures or bracelets, and complex jewelry should be left for later, when some experience has already been gained.
Beaded bracelet for beginners
Simple bundles and bracelets made of beads look very beautiful if weaved them in monastic weaving. Any beginner will overcome this cross stitch weaving, and he will be satisfied with his work.
So, the master class step by step:
- String 4 beads into the center of the line.
- Pass one end of the fishing line from either side of the last beads in the opposite direction so that a cross comes out.

- Put one bead on the right end, and two on the left. Pass the right end of the line through the last beads to form a second cross.
- Weave like this to the end of the row, and when you need to go to the next one, put three beads on the right end of the fishing line and weave them according to the pattern so that the top bead of the first row forms the base of the second level.

- String two more beads on the right end, and you will get two more crosses in the second row.
- Continue weaving to the number of rows you need.

Learning to weave trees
Weaving wood is not as difficult as it might seem to a beginner at first glance.
The main thing is to know the step-by-step procedure:
- To weave the leaves, cut the wire into equal pieces of 80 cm.On one of them, take 7 centimeters of green beads, and then, stepping back from the edge 20 cm, make twists of 3 beads, and then twist the wire in a zigzag pattern.
- Make 7 identical branches, and then combine the composition. To do this, twist two branches, and after 3 mm add another one. Gradually twisting the finished twigs, a beautiful, branched tree is created.

- So that the trunk does not look too thin, it is better to refine it. For this, a floristic tape is suitable, which should be wrapped around the trunk, gradually attaching new branches to the base.
- At the end of the work, all that remains is to plant the tree on gypsum in a pot, and to make it look like a birch, draw brown stripes with a marker that will imitate birch bark.

Easy weaving roses for beginners
A beginner can also weave the simplest rose or violet from beads, the main thing is to clearly follow the instructions.
Master class step by step:
- Cut one piece of wire 10cm for the base of the flower and another 50cm for the base of the flower.
- String 5 beads on the base, and then wind it to the bottom.
- Cast on 2/3 of the wire beads, form an arc, covering the low axis sequentially.

- Make 5 arcs on each side - this will be a rosebud.
- According to this principle, make another 5 (or more) petals, and in order for them to be sharp, they should be wound to the axis at an angle of 45 degrees.

- Let's start collecting roses. Bend the 3 petals in half horizontally, arching slightly outward.
- To avoid spilling the middle, the wire should be squeezed tightly.
- Take a thick wire, insert it between the petals to make the stem stronger. Then, with floss threads, very tightly tie all the petals in order to the stem.

How to weave a bauble
If you want to present a fashionable and original gift, then the most suitable option is a bauble. This jewelry is now popular not only among young people - many respectable people wear a variety of openwork bracelets.
We offer a master class on weaving beaded baubles with flowers:

- Attach one piece of the bracelet lock to a thin line, as shown in the photo.
- String small beads onto 2 pieces of fishing line so that each is 3 cm long.
- Pass a transparent bead through both lines (blue in the picture).
- Again string the beads on each separately piece of fishing line, and then thread both through the white bead - it will become the core of the flower. Unroll the lines and thread each line through 2 blue beads again.
- Follow this principle to make all the remaining links so that the end and the beginning of the bracelet are the same.
Crocodile Beading for Beginners
Connect your imagination and create fun bead crafts.
We offer a master class for beginners on making a simple crocodile, on the basis of which you can make earrings, a key chain or a pendant on a bracelet:
- String one dark-colored bead on the wire - this is the nose of our crocodile. Secure it with parallel weaving in the middle of the section.
- With one end of the wire, grab two green beads, pulling them close to the nose, and then insert the second piece of wire into them. After securing it, you will have a second row.

- The third row is three green beads, the fourth is four, and in the fifth row green beads should be alternated with beads of a different color - these will be the eyes of a crocodile. Starting from the sixth row, the head tapers.
- Once you have narrowed the head down to three beads, by adding two eyelets, make paws on the sides.

- The belly of the crocodile should be larger than the head, so add more beads. Then the abdomen also goes to the narrowing, and at the end the hind limbs of the animal are woven.
- The crocodile's tail consists of one row of beads, two beads each, and at the end of it - one.

If something doesn't work out the first time, don't be upset, because "the first pancake is always lumpy." If you persist, your beadwork will come out better and better over time. You will master beading not only simple bracelets or flowers, but you will soon give your relatives beautiful phone cases, animal figurines and souvenirs, which cost a lot of money in specialized stores. We bring to your attention video tutorials for beginners on weaving beads. We offer you another type of creativity - weaving macrame. After watching the step-by-step video tutorials, you will quickly learn this technique.
All video lessons can be found in our social groups. networks
If you are looking for video lessons of weaving beads for beginners, then here you can watch online. You will find many YouTube videos about beading. Many people like this hobby because you can calm your nerves, as well as get good results. You can consider it a rest. You can find master classes on beading for beginners here and watch for free. With the help of the information provided, you can easily learn anywhere, wherever you are. Interesting patterns, secrets, tips and much more will come in handy for everyone, from beginners to professional bead weavers. Here is everything you want to know about beading. Many people will like this type of needlework. You need a lot of desire and a little patience, and in return you will receive a beautiful item or accessory.
You can find lessons of embroidery with beads of various crafts here. The most convenient way to get training is through video. You will learn how to weave with beads for beginners in the most accessible way. We have prepared a large collection of video tutorials on weaving with beads at home for free for you. It will be useful for both children and adults to learn this craft. Treat this business as a hobby. In a short time, you can turn from a beginner into a professional. The best specialists in their master classes will tell you how to weave something beautiful and light from beads. And it doesn't matter if you are outdoors or at home, the main thing in any business is that there is a desire.
If you are looking for a beautiful and easy weaving with beads, then you can watch online video tutorials. Here we have collected all the best. A large selection of videos from YouTube will tell you all the secrets, techniques and types of weaving with beads for beginners. We have carefully collected a collection of lessons on this topic. Here you will learn how to weave beautiful jewelry, objects, flowers and much more from beads. In fact, everything is very simple. You should listen to the experts, they will tell you everything a beginner needs to know.
Here you can learn and watch step by step weaving from beads for beginners with the help of free video tutorials. Each description will help you learn how to weave beautiful objects while sitting at home on your own. You can use them both for yourself and for a gift to your loved ones.
Methods, techniques, types, secrets of craftsmanship and much more - everything is in one place. If you watch video lessons online with us, you will learn about the simplest weaving with beads for beginners. It will be very exciting for you with us. We collected this section for a reason. You will have a simple decoration in a short time. And it all depends on your choice. It can be voluminous flowers, and beautiful and juicy earrings. Or you need to make a name, or maybe you just need to spend time in peace. In any case, visit our website. We are glad to every guest.
Flowers in flowerpots look very beautiful on the windows, various delightful trinkets adorn shelves, cabinets, wall niches. Without decorative elements, the house seems empty and uninhabited. These can be framed photographs, collections of toys, flowers in vases, figurines and an endless list of possible items. It all depends on the tastes and hobbies of the owners.
Lilac tree
Next time try to make a sprig of lilacs with your own hands, and perhaps a small tree that will remind you of the approach of spring.

You will need a lot of lilac and green beads. For a small tree, you need to prepare 7-15 lilac branches and three times as many leaves. The principle of operation is approximately the same as with chamomiles, only instead of flowers there are small inflorescences.

Wire segments should be 40 cm each. Beads need to be collected 8 pieces, passed through the first three and tighten. Put 7 beads on the ends again and pass through the first, tighten.

Thus, we work through the entire inflorescence (the photo will help to understand what and how to do), gradually increasing the number of beads to the base, so that the tops of the flowers turn out to be triangular. By the way, you can use several shades of color to make the lilac more picturesque.
There are three leaves for decorating inflorescences each, you have to work hard, this is not a matter of one evening or day. A lot of greenery looks much better, so if you can weave more, then they definitely will not be superfluous.

On 25 cm of wire, put on rows of beads in the following order. Start with the middle row, for this, dial 5-7 beads, come back through one, put on 2 more pieces on the free ends. Secure at the end and continue until the leaf comes out like in the photo. By the way, they can be made in different sizes, because in nature not all leaves on trees are the same.

Crown formation
It remains to connect all the elements, as described earlier. For each inflorescence, screw three leaves and form 7-15 branches. Wrap each stalk with green thread or floral tape.

The finishing stage is to connect all the branches. Take one brush for the middle, it will be the highest point in the tree. On the sides, just below you need to place four branches, attach the rest even lower, it all depends on the number of details, splendor, then decide at your discretion.

Spread out all the leaves, the wire is very elastic and the branches can be positioned believably. Pick up a flowerpot and fill your new tree with plaster for stability.
Beading is a fun activity that allows you to create unique jewelry, accessories and decor items. Flowers are especially beautiful and bright from bugles - violets, hyacinths, gladioli and, of course, roses.
In this article, we will present a simple and detailed beading workshop. At first glance, it may seem to you that it is very difficult to create a rose from beads. However, if you carefully read the description of the work and learn how to weave individual petals and leaves according to the pattern, then you will understand that even a beginner can make this delightful flower.
Rose making master class with diagrams
To complete this magnificent craft, you will first need to purchase the necessary tools and materials, as well as prepare the workplace. So, you will need:
- beads (preferably faceted cut) in two shades - pink (150 g) and lilac (30 g) for flowers;
- green beads - for petals (100 g);
- wire of different thicknesses - thin (0.5 mm, 1.5 mm) and thick;
- pliers;
- scissors;
- floristic tape;
- vase or stand.

We advise you to buy a high-quality one for work. It costs a little cheaper than Japanese and completely eliminates color loss. In addition, it is of excellent quality and guarantees a long product life. To make a rose, we advise you to buy exactly cylindrical beads - a faceted cut. It has a special sparkling shine in natural and artificial light. Flowers made from such beads will look especially luxurious. You can choose any color of the beads, whatever you like. We used pink and lilac bugles. After preparing all the necessary tools and materials, we get to work.
French axial weaving
In order to weave a rose inflorescence, you will first need to master the technology of beading, namely the circular French technique. It is completely uncomplicated, and most importantly, it is perfect for making rounded petals and leaves. The principle of French axial weaving is as follows. First, a large loop is made on the wire, from which two ends of the working wire should go, called "axis" (about 7 cm long) and "low" (70 cm long). A certain amount of beads is strung on both tails, the main and additional ones. For example, per axle - 6 pcs., And on the bottom - 9 pcs. Then the additional wire is twisted around the main one from above so that an angle of 45 ° is obtained between them. It turns out the first arc. Further, a certain number of beads are recruited to the bottom. The end of the working wire braids the axle again, but from below. By analogy, all other arcs are performed, while the number of beads in them gradually increases. Step-by-step beading (French axial) is clearly shown in the following figure.

Getting started creating flower petals
We are starting our master class on beading roses. Based on the theory, we will first start making the petals of the flower. For this we take pink and lilac bugles. Cut off a wire about 70 cm long.Form a small wire knot at one end and twist the wire until we get a piece equal to 2 cm. Remove the unnecessary piece with scissors. We string 10 beads. We fix them by twisting the end of the wire on the other side and forming the bottom loop of the base. Next, we string 13 beads onto the end of the working wire and make the first arc. We perform the second in the same way, typing the same number of beads on it. We continue to make arcs by analogy, gradually adding the amount of glass beads so that it covers the axis. We fix all the arcs by wrapping the wire around the base. As a result, you should have the first petal. It should consist of 12 arcs. Now we take the lilac beads. We cut off the wire and push it into the ear of the base. We collect the required number of beads on two working ends and make the last two arcs. That's all, the petal is done. For one rosebud, you need about 10 of these petals. We hope our beadwork master class does not cause any difficulties for you yet.

We continue to work on creating flower petals
In order for the rose to turn out to be more realistic, it is necessary to weave petals of other sizes. We will need:
- 3 petals, made with a base of 10 beads from 5 arcs;
- 3 petals with a base of 12 beads of 6 arcs;
- 6 petals with a base of 14 beads of 7 arcs.
When all the blanks are ready, we proceed to assembling the bud. We give the petals a natural shape. Next, we twist two small petals and add a third to them. It turns out the core of the flower. Gradually add all the other petals, remembering to twist the ends of the wires well. As a result, you should have a beautiful pink bud. Due to the large amount of glass beads, the product may not keep its shape and disintegrate. Therefore, we advise you to take and glue the petals or sew them together with threads.

How to create rose leaves and sepals using circular weaving technique
After completing the bud, we proceed to making the leaves. Their step-by-step beading is as follows. First, cut off a piece of wire 70 cm long. String some green beads onto it. We count 9 beads and make a loop, securing it with turns of the two ends of the wire together. We get the first tier. Further, by analogy, create five more tiers and get the first leaf. We give it a pointed shape. We cut off the wire, leaving the tips about 5 cm long. To complete one rose, you will need 17 such leaves. We also need 5 sepals. They are made using the French circular weaving technique in the same way as ordinary leaves. In your work, you can be guided by the following diagram.

Weaving the twigs of a flower
After making the leaves, we proceed to the formation of branches. In total, we will have 5 of them - three small, containing three leaves, and two more. The latter will have four leaves. So, to decorate the branches, we take a green floral ribbon. Cut off a piece of wire and attach the first leaf to it. We fix the subsequent details on the stem by analogy. Thus, we create five branches - with three and four leaves. Now we make two large branches - we connect one with three, and the other with four leaves using a floral tape. We repeat the operation. As a result, you should have two large branches and one small one.
Beading: master class. Let's start assembling the product

After all the details of the craft - the bud, sepals and twigs - are ready, you can start assembling the flower. We take a piece of thick wire and attach an inflorescence to it with the help of an inflorescence. Next, attach sepals to the bud. Now we attach the first small twig, consisting of three leaves, to the flower stem. And then, in turn, attach large branches to the flower. We carefully straighten all the details and give them a beautiful shape. That's all, a charming rose is ready! Now it remains to come up with a decent design for her. You can take any small container and decorate it to your liking. For example, paint it with acrylic varnish and decorate it with sparkles. To securely fix the rose in the stand, you can use ordinary alabaster. How to do it? Dilute the plaster of Paris with water and fill the container halfway with it. Place the stem of the flower there. Wait for the alabaster solution to "set". Decorate the plaster after drying. For example, you can paint it with acrylic paint and sprinkle a layer of beads on top of it.
Instead of a conclusion
So, in this article we have presented to your attention a simple and interesting master class on, namely, magnificent. In our work, we used the technique of circular French weaving. We hope that now you know that you can make a unique and very beautiful thing out of beads, an element of decor that can decorate the interior of any home. Good luck and creative achievements!