ECHO: Secrets of the Lost Cavern: Walkthrough. Echoes of the Past: Stone Kingdom Complete Walkthrough Open the locker room door
Interface:
Right mouse button - call inventory.
Esc - exit to the menu.
There are hints in the game - the shell and hand icons periodically light up in the upper right corner of the screen. If you open the inventory, then the sink is an encyclopedia, and the hand is a diary.
In this game you play as a young Cro-Magnon hunter Arok.
1. First cave.
After the introductory cutscene, you will find yourself in a dark cave. Look under your feet and pick up a stick (you need to turn to the entrance) and firewood. Walk forward to the dead fire and pick up dry grass (to the left of the fire) and a piece of bark (you need to turn around from the fire). Put wood, grass and bark into the fire, then use a stick on the fire, and Arok will light the fire.
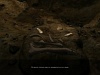
Turn around and look at the wall - there is a drawing on it. Click on the wall, listen to Clem's story, and you will find a painted stone in your inventory. Obviously, you need to repeat the drawing from the stone on the wall.
To do this, you need to find three dyes - red, brown and black. The red dye is to the right of the fire, brown is on the side of the cave opposite from the fire, next to a large stone (there are three small stones on it), black is on the side of the cave opposite from the fire under the picture of a bison and three hunters (next to the branches). Go to the fire and place all the dyes on the flat stone under the pattern on the wall.
Now the paints must be diluted in water. To do this, go to the entrance and break off the icicle (you need to look directly at the lioness). Place it in the sink on the left by the fire, click on the sink and your cursor will turn into a drop. Dilute all the dyes and paint like this:
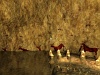
Walk to the opposite side of the cave to the drawing of a bison and three hunters. If you click on any hunter with a dart, and then on a bison, the drawing will come to life. Unfortunately, the bison will knock all the hunters down - you need to find a way to kill the animal. To do this, click on any dart, and then on the hunter, near which there is no dart. Click on the bison and the hunter will kill him.

Arok will get the idea to make a spear thrower out of scrap materials, like the hunter in the picture. This requires the Assegai, which he dropped at the entrance to the cave.
Take the branches (under the bison drawing) and light them on the fire. Go to the entrance and throw the branches at the lioness. Exit the cave and pick up the Assegai. Look under your feet, turn around and pick up the antler.
Return to the cave and go to the center. Look under your feet and find a leather strap.
Take a look at the encyclopedia and remember what a spear thrower looks like (the "Art of the Hunt" tab). You need to give the antler exactly the same shape as in the picture. Place the antler on a large rock with three small stones on it. These are tools - a scraper, flint and awl (from left to right). First, cut off all three branches from the base with a flint, then make two holes on opposite ends of the horn with an awl, and finally press the horn several times with a scraper. It should look like this:
After that, apply the strap to the hole on the right, and the finished spear thrower will automatically be in your inventory.
Light the branches again and throw them at the lioness. Go outside.
After the cutscene, go forward to the second cave.
2. Second cave.
It is dark here, but there is an extinct bonfire at the entrance. You will have to return to the first cave for the branches, set them on fire and bring them to the second cave.
When it lights up, you will see a maze in front of you. A diagram of the maze is depicted on a large flat stone. Click on it and Arok will tell you that it has something to do with the multi-colored Clem stone.
Look at the stone and compare it to the map. On the map, the darker colored squares correspond to the black squares on the stone, the entrance to the maze is marked with a double arrow, and the end of the maze is marked by the sun. Do not forget that you are looking at the map upside down (it is impossible to approach it from the other side), so the correct path would be like this:
brown - black - colorless - brown - black - brown - black - brown - red.

To the left of the map, pick up two torches, near the fire - the third. Light one of the torches (it will burn on the screen on the left) and go into the maze.
The torch burns out after eight steps. Therefore, when you take seven steps, notice the torch on the screen - it is almost burnt out. Open the inventory, select the second torch in it (it will be in the upper left corner of the screen) and click on the already burning torch. Arok will change the torch, and it will be possible to move on. Do the same with the third torch. If you get lost or forgot to light the next torch, you will again find yourself in the second cave, and you will have to go through the maze again.
As a result, you will find yourself in a cave with a drawing of handprints.
It is necessary to build a path upward. Press the switches below and to the right of the drawing to rotate your arms. To start the path, click on the second or third hand from the left in the bottom row - it will light up.
One solution:

Arok will automatically go upstairs.
3. Third cave.
Go forward and try to go down, but the bear will not let you do this. We need to figure out how to get rid of it.
Look at the rock art wall - it shows a bear and a hunter, but one piece is missing. Take turns take two armfuls of hay (near the wall) and throw it down. Take the rope that someone hid under the hay - it will come in handy. Get down - now the hay will drown out the sound of your steps, and the bear will not wake up. Pick up a piece of the wall (to the right of the hay), go upstairs and pin it in place.
Now we need to animate the drawing.
Timed assignment.
Take the stone and give it to the hunter. Aim at the rock above the bear and throw a stone - the bear will turn around. At this time, take another stone and throw it at the same point - the bear must go into the den. Take the third stone and very quickly throw it into the stalactite. When he falls, take the fourth stone and throw it into the pile of stones above the den. Stones will cover the exit from the den.
Climb down, come close to the stones that have filled up the den, and look down. Pick up three stones and a rope.
Climb the cliff, get the stones and aim at the stalactites (the cursor will turn into a sight). Two of them can be knocked down, and the third hangs too high.
Pick up a piece of leather (near a large rock in the center of the cave) and place it on the rock, pass a rope through it. Take a tool (awl) from the stone and pierce the skin twice on the other side (the stone must be used on the opposite edge of the skin). Pass the second rope there, - the sling is ready. Once again go for the stones, and they will automatically be in the sling. Shoot down her stalactite, get down and go along the new path to the center of the lake. When you see the fourth stalactite at the top, shoot it down with a sling.
Walk to the wall and pick up the long branch and the bison horn. Return to the cave and use the horn on the fire to pick up the coals. Go back, and if you have done everything, behind your back one of the stalactites will go under the water - there is no turning back.
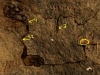
Place the bison horn on the campfire site. The cave will be illuminated by a drawing on the wall, near which there are 14 lamps. You need to light them up.
Take a long branch and light it over the fire. If you click on any lamp, then you will see that adjacent lamps in its row and the lamp opposite in another row will light up with it. If we number the lamps from left to right from 1 to 7, then the solution is:
1 in the near row, 3 in the far row, 5 in the near row, 7 in the far row.

To get to the other side of the cave, you need to animate the drawings on the wall.
Look to the right first. There is an arrow above each drawing - it changes the drawing itself, there is a sun at the top - this is a reset, and there are two arrows to the left - they start frame-by-frame movement.
First, recolor all pictures in one color (in any) by clicking on the picture itself. Next, click on the arrows above each picture and correct it. Check the correctness by pressing the two arrows. Do not forget about the hunter - he must be as close to the deer as possible. If you select the wrong position, playback will stop.
It should look like this:

After that, Arok will move to the other side.
4. Bank of the river.
Arok is hungry - you need to fish and cook dinner. Exit the cave. The next location is very confusing, here is the map.

First, go along the left path (point 1) and take the stone. Go to point 2 and pick the chamomile. Standing still, turn right and step forward once to point 7, take the branches on the right. Step forward along the same path to point 9. Put your head back and look at the symbols on the wall. Pick up the stone and tinder from the ground.
Three paths diverge from point 9, go one step along the right of them and pick up flint (point 6).
From point 6, two paths diverge - the one along which you came, and along the river.
Step along the river once and pick up a rock and a shaft (point 5).
Step along the river once (point 4) and you should see a large rock with a spearhead on it. Look at the river - here you have to fish for salmon. Note the four stones that lie near the large stone. Take the leftmost stone (it is the largest in size) and put it in the river. Next, place the left stone of the two stones on the right, then the remaining stones.
Turn around - there are four paths in front of you, step along the second from the left (point 8). There is a campfire site here. Look under your feet and pick up a belt and another stone. There is a large flat stone near the fire. Place the harpoon tip, shaft and belt on it - the harpoon is ready. Return to the river. Aim the harpoon at the river - the cursor will turn into a sight. Catch the fish and return to the fire.
The roaming carver Toar has appeared here. He will give you pyrite and a wooden vessel for making chamomile tea.
Go to the river and collect water in a vessel. Return to the fire, put tinder, twigs and pyrite into it. Apply flint on pyrite. When the fire breaks out, notice that there are three small flat stones lying around the fire. Put them in the fire and immediately take out with the large stick that lies nearby. Try to take one of the stones - Arok will burn himself, and Toar will give him a wooden spatula. Take a vessel with water from inventory and place it on the ground in front of Toar. Use a spatula to place stones in the vessel and add chamomile.
Now you need to cook the fish. Move the large flat stone next to the fire with the stick into the fire. Immediately remove it from the fire and place the fish on it. Flip the salmon over and give to Toar.
After eating, talk to the carver again. He will ask you to make flint for him.
When Toar places three stones and three tools in front of you (horn hammer, awl, and stone hammer), select the middle stone. Hit it three times with a stone hammer and twice with a horn hammer. Take the flint and give it to Toar. In return, he will give you a knife.
Talk to the carver again about the four stones you found and he will explain that they are musical stones. He will give you a fifth stone and a hammer.
Go to the rock where you saw the drawings (point 9).
Click on the picture and five stones and a hammer will appear in the lower right corner of the screen. This lithophone is a musical instrument. Take a hammer and tap each stone four times. Write down on which stone each of the four icons of the picture turns red - this is the desired sequence.
Solution:
1st stone - black, black, black, red
2nd stone - black, red, black, black, black
3rd stone - all black
4th stone - red, black, black, black
5th stone - black, black, red, black.
So, you need to press like this: 4th stone, 2nd stone, 5th stone, 1st stone.

After that, the drawing will come to life.
Go along the cliff to the left - a passage has opened here.
Railway station
- Take part of the ticket (1/5) (A)
- We look at the graph and remember the time 10:35 (B)
- Examine the bench and collect the listed items (C).
- We get the hands of the clock
- Click on the composter, but it is missing parts (D)
- Set the clock hands to the clock and set the time to 10:35 (E)
- We go through the gate to the main square (F)
- Click on the chained statue (G).
- Walk to the house to the left of the statue (H).
Porch of a house
- Take the wheel (I)
- Click on the ghost swing (J).
- Look in the mailbox and take the pencil (K).
- Remember the numbers on the envelope - 5937 (L)
- Click on the window to the basement (M).
- We pass through the front door of the house (N)
House corridor
- Take 3 paintings (1/6), (2/6) and (3/6) (O)
- Take the drawing (P).
- Click on the height gauge and use the pencil on "60" (Q)
- Take the brick (R).
- Take a part of the photo of twins (1/6) (S).
- Move the chest of drawers (T).
- Go up the stairs to the nursery (U)
Children
- Click on the bed (V).
- Collecting items on the list
- We get the ballerina
- Open the chest and take the RAG (W).
- Apply the sketch to the album on the floor (X)
- Take objects from the bottom and right edges of the drawings and drag them onto the drawn dolls (Y)
- The red thing on the left edge is the dog's collar
- Click on the frame on the dresser (A).
- Take part of the twins photo (2/6) (B)
- Select the window seat (bed) and pick up the listed items (C)
- Let's go down
- We go right into the living room
Living room
- Take 3 paintings (4/6), (5/6) and (6/6) (D)
- Apply these 6 paintings on the wall (E)
- Click to place each painting
- Look in the box and take these 4 gears (F).
- Take part of the twins photo (3/6) (G).
- Place the gears on the music box (H).
- Solve the puzzle (see screenshot) (I)
- We return to the porch for the cutter
Cutter
- Look at the basement window (J).
- Use the RAG to clean the window (K).
- Move our mouse over the area until the window is clear
- Use a brick to break the glass (L).
- Take the cutter (stationery knife) (M).
- It will come in handy to cut the wallpaper
Cut wallpaper
- Apply the cutter (clerical knife) on the wallpaper (N)
- Remember the number on the envelope in the mailbox (O)
- Examine the lock and enter the code 5-9-3-7 (P)
- We pass into the basement
Basement
- Use the utility knife on the rope spool to get the rope (Q)
- Click on the canister near the motorcycle (R).
- Examine the toolbox and pick up the listed items (S).
- We get the lever
- Now the swing can be repaired
Fix the swing
- We go out onto the porch
- Apply a rope (T) and a wheel (U) to the swing.
- Take a part of the photo of twins (4/6) (V)
- We go into the house, then we go to the living room to fix the music box
Fix the music box
- Click on the ominous shadow in the mirror (A)
- Click on the fireplace (B)
- Before that, we have already inserted the gears into the box.
- Examine the music box and insert the lever into the hole (C).
- Place the ballerina on the music box (D)
- Take part of the photo of twins (5/6) (E)
- Now we go to the nursery for a pink dress
College
Dressing room
- Examine the cabinet and take the hammer (A).
- Examine the fire alarm and use the hammer 5 times to break the glass (B).
- Pull the lever (C)
- Click on the floor tiles and take the IGNITION KEY (D).
- Go up the stairs to the classroom (E)
Cool room
- Take the ROSE (F).
- Examine the table and pick up the listed items (G).
- We get a hacksaw
- We go downstairs to open the door to the porch
Open the door to the dressing room
- Use the hacksaw to click on the lock on the door (H).
- Pay attention to the locked locker (I).
- We leave on the porch (J)
Porch
- Apply the ignition key to the trunk of the car (K)
- Take the jack (L)
- Apply the jack on the car (M)
- Take the string (1/4) (N)
- Examine the pedestal and take the string (2/4) (O).
- Pay attention to the shadow on the balcony (P)
- We pass into the corridor (Q).
Corridor
- Examine the board on the wall and remember the location of the switches (R)
- Examine the electrical panel (S).
- Solving the puzzle (see screenshot)
- Move the levers to match the drawing on the board
- First, set all the levers down
- Set yellow, blue, red and adjust the rest a little.
- Examine the box; take the SCREWDRIVER (T).
- Examine the ventilation and use the screwdriver on two screws (U)
- Examine the ventilation and take the CHALK AND STRING (3/4) (V).
- Examine the door mat and place the rose on it (W).
- Take the slide (X)
- Enter the room (Y)
Room
- Examine the trash can and take the LEVER (A).
- Examine the pillow on the sofa and take the string (4/4) (B).
- Examine the balcony and collect the listed items (C).
- We get the key
- It can be used to open the locker in the dressing room.
Open the locker in the dressing room
- Use the KEY on the locker (D).
- Examining the locker
- Pay attention to the candle (E)
- Take another slide (F).
- We go up the stairs to the classroom for the keyboard
Keyboard
- Apply chalk on the board (G)
- Take the slide (H).
- Examine the curtain lifting mechanism and use the lever (I).
- Examine the table and pick up the listed items (J).
- We get the keyboard
- Now we go into the room to connect the keyboard
Connect keyboard
- We return to the room
- Examining the balcony and collecting items according to the list
- We get the knife
- Place the keyboard on the table (K)
- Take the slide (L).
- Pay attention to the painting on the wall (M).
- We go out onto the porch for the last slide
Last slide
- We go out onto the porch
- Examine the guitar and apply 4 strings (1, 2, 3, 4) (N)
- Examine the carved heart on the tree and use the knife 4 times on it (O).
- Take the last slide (P).
- We go to the classroom
- Place 5 slides (1, 2, 3, 4) into the projector (Q)
- We get the soul of passion
- We get to the main square
- Apply the soul of passion to the pink flame (R)
- We pass to the prison (S)
Prison
Courtyard
- Examine the toolbox and take the NIPPERS (A).
- Examine the broken lamp and take the wire (B).
- Use the NIPPERS to make a hole in the fence (C)
- We pass to the observation tower
Observation tower
- Examine the spotlight and use the wire in the diagram (D)
- Pay attention to the tethered shotgun (E)
- Examine the frame with the newspaper and pay attention to the date 1962 (F)
- Click on the front door and pick up the listed items (G).
- We get the nail pull
- We go downstairs for the scissors
Scissors
- We return to the prison yard
- Examining the benches and collecting items according to the list
- We get scissors
- We go into the building (on the left)
Security
- Use the NAIL PULLER on the planks on the door (H).
- Examine the keypad and enter the code 1962 (I)
- We pass into the office of the policeman
Police office
- Apply the scissors on the curtains (J)
- We get a rag
- Take the BULB (K) and insert it into the lamp (L).
- Take the Cigarette Case Key on the Lampshade (M).
- Click on the pillow on the chair and take the SHOTGUN AMMO (N).
- Use the key on the cigarette case on the table (O).
- Take the CABINET KEY (P).
- Examine the painting and use the scissors (Q).
- Take the access card (R).
- Use the key on the cabinet on the left and take the personal file page (1/7) (S)
- Now let's go for the shotgun
Shotgun
- We rise to the tower
- Use the scissors on the shotgun and take it (T).
- Examine the front door again and pick up the listed items (U).
- We get the basketball
- Now we go for the second page of the personal file
The second page of the personal file
- We go down to the prison yard
- We throw the basketball on the basketball hoop (V)
- Take the Personal File Page (2/7) (W)
- Examine the benches and collect the items on the list (X)
- We get the switch
- We go for the third page of the personal file
Third page of personal file
- We go into the building
- Shotgun (1, 2) into glass
- Applying a rag to the glass
- Take the IRON BALL and use it on the chain (C).
- Take the personal file page (3/7) (D)
- Pay attention to the door with a grate (E).
- Click on the control panel (F).
- Solving the puzzle (see screenshot)
- Click 4-3, 8-3-1, and 4-5-7 to solve it.
- We pass into the dining room
Canteen
- Examine the menu (G).
- Take the empty pitcher (H).
- Take the MOP (I).
- Take the bread knife and use it on the bread to get a piece of bread (J).
- Take the FUNNEL (K).
- We pass into the room of death (L).
Death room
- Apply the mop on the tracks (M).
- Take the personal file page (4/7) (N)
- Click on the closed door (O).
- Examine the gate control panel and use the access card (P).
- Pay attention to the back door (Q)
- Examining the tracking system (R)
- Solving the puzzle (see screenshot)
- Pull the right lever, and then the central one (1-2)
- Examine camera 10 and collect items on the list
- We get the valve
- We pass into the torture chamber
Church
Church
- Take the DEMON STATUE (A).
- Take the broom (B).
- Examine the statue and take the key (C).
- Go forward through the double doors to the graveyard (D).
Cemetery
- Take the first wing (1/2) (E).
- Take the HOSE (F).
- Examine the corner and take the SHOVEL (G).
- Examine the barn and pick up the listed items (H).
- We get the garden shears
- Applying garden shears on wilted flowers (I)
- Use the shovel on the grave (J).
- We go forward to the tower
Tower
- Take the second wing (K).
- Use the KEY to open the door to the altar (L).
- Climb the stairs to the bell tower (M)
Bell tower
- Use the broom to clean the dirty stairs (N).
- Take the ladder (O)
- Take the knife (P).
- Examine the painting and take the part of the photo (Q).
- We go down and go to the altar
Altar
- Take the GOLDEN JUG (R).
- Place part of the photo in the frame (S)
- Take the knife and cut the RAG (T).
- Take the ANGEL STATUETTE (U).
- Take TILE PIECE (1/2) (V).
- Now you need to open the door to the dungeon
Open the door to the dungeon
- We leave the altar
- Use the golden jug on the fountain for water (W).
- Press down twice and return to the church.
- Apply the wings (1, 2) on the statue (X)
- We pass into the dungeon (Y)
Dungeon
- Use the knife on the seed bag to get the seeds (A)
- Examine the skeleton and take the ax (B).
- Place the demon figurine in the right niche (C)
- Place the angel figurine in the left niche (D).
- Use the LIGHTER to light both torches (E).
- Examine the coffin and collect the listed items (F).
- We get the crucifix
- Take Photo (1/6) (G)
- Take the third part of the ticket (3/5) (H)
- Examine the book to see how the angel and demon figurines should be positioned (I)
- Solving the angel and demon figurine puzzle
Puzzle (angel and demon figurine)
- Click on the devil figurine
- Solving the puzzle (see screenshot)
- Click on r1-r3-r1 (top right arrow, bottom right, top right)
- Take a piece of the tile under the demon statue (1/2)
- Click on the angel figurine
- Solving the puzzle (see screenshot)
- Click on l1-l2-r2-l2 (top left arrow, left center, right center, left center)
- Take a piece of the tile under the angel statue (2/2)
- Now we need to get the second photo
Second photo
- Back to church
- Use the ax on the boards on the window (Q)
- Take the second photo (2/6) (R)
- Go to the cemetery for the third photo (S).
Third photo
- We go to the cemetery
- Use the ax on the log and get some firewood (T)
- We plant seeds in the ground (before that we prepared the ground) (U)
- Pour water over them (V)
- Take the third photo (3/6) (W).
- Examine the barn and collect the items on the list (X)
- Getting the Bell Tongue
- We pass into the tower
The rescue
Church (salvation)
- Having placed the soul of truth, we click on the church
- Collecting items on the list
- We get a part of the composter (1/4)
- We pass into the house
Home (salvation)
- We go into the house and go down to the basement
- Use funnel (A) and hose (B)
- We get the canister
- We leave the basement, then we go to the right into the living room
- Put firewood in the fireplace (C)
- Pour the gasoline from the can onto the wood (D).
- Light it up with a lighter (E)
- Take the fourth part of the ticket (4/5) (F)
- And again we click on the house and collect items according to the list
- We get the second part of the composter (2/4)
- Now let's go to college
College (rescue)
- Examine the cabinet and take the candle (G).
- We pass to the porch (H)
- Install the stairs under the balcony (I)
- Place the candle in the lamp (J) and light it with the lighter (K).
- Take the last part of the ticket (5/5) (L)
- Back to the main square
- Click on college again and collect items on the list
- We get the third part of the composter (3/4)
- Click on the prison
Prison (rescue)
- Examining the prison and collecting items on the list
- We get the last part of the composter (4/4)
- We return to the station
Station (rescue)
- Examine the composter (M).
- Apply the composter parts (1, 2, 3, 4) (N)
- Put the ticket (1, 2, 3, 4, 5) in the lion's mouth (O)
- Pull the lever (P)
- We get on the train (Q)
- We find ourselves in the ward
Ward
- Take the empty glass (R).
- Take the coin (1/3) (S).
- Examine the box and take the 2 BATTERIES (T).
- Examine the cabinet and take the MEDICINE (U).
- Take our clothes (V)
- Examine the pillow and collect the listed items (W).
- We get the key to the lock
- Examine the table and place the empty glass on the stand (A).
- Take the pitcher of water and pour it into the glass (B)
- Pour the medicine into a glass
- Click on it (C)
- Examine the electrical panel and pour the water from the jug onto it (D).
- We leave the room through the window
Fountain
- Examine the trash can and take the handcuffs, telephone disks and cassette (E).
- Raise the stick (F)
- Examine the barn door and use the key (G).
- Examine the barn and take the SCOOP (H).
- Examine the vase and use the scoop on the ground (I).
- Take the VALVE (J).
- Examine the fountain and use the VALVE (K).
- Take the SECOND COIN (2/3) and OILDIER (L).
- Examining the telephone booth and applying the oiler with hinges
- We return to the ward
Gas canister
- Examine the cabinet and use the stick to break the glass (M).
- Take the GAS CAN (N).
- Examine the pillows and collect the listed items (O).
- We receive a voice recorder
- Now you can make a phone call
Make a phone call
- We go to the phone booth
- Take the last coin (3/3) (P).
- Place the recorder on the shelf (Q).
- Installing phone disks into the phone (R)
- We throw coins (1, 2) into the hole (S)
- We use a gas canister and a handcuff on the killer
- We go into the phone booth and throw the last coin
- Congratulations! You have completed the game "Echoes of Sorrow"
Look under your feet and grab a bundle of brushwood. Turn towards the exit. An aggressive lioness awaits you outside. Pick up a wooden stick from the ground and tear off a piece of ice from the vault of the cave. Go to the far end of the cave. Look down. Pick up a bunch of dry grass and a softwood log from the ground.
Look at the stones laid out on the ground in a ring shape. Place a bundle of brushwood, a bunch of dry grass, and a softwood log in the center of the ring. Use a wooden stick on a piece of wood to light the fire. Now the cave was light and warm. Look at the rock carvings and a group of colored stones on the wall. Click on any stone to play a cutscene showing a person painting the walls of this cave. At the end of the cutscene, a colored Clem stone will appear in your inventory. Examine it at close range in your inventory.
Look at the ground. Find a pile of red pigment among the scattering of small stones and put it in your pocket. Turn to the fire and go to the other side of the cave. Pick up a pile of brown pigment from the ground. Note the flat boulder with three tools. Turn left and go to the rock art wall. Pick up black pigment from the stones. Turn your face towards the fire and take a step forward. Take the small strap from the ground.
Approach the wall with colored squares. Place the red, brown and black pigments on a flat stone on the floor next to the wall. Face the fire and place a piece of ice in the bowl next to the rocks. After a couple of moments, the ice will turn into water. Use the water in the bowl on all three piles of pigment on the stone. You need to paint over the stones on the wall as they are painted over on Clem's colored stone.
Top row from left to right: black, brown, red
Middle row: black, brown, black
Bottom row: brown, empty square, brown
Watch Clem's instructional video.
Walk up to the giant painting that features three hunters and a bison. Click on the image of the bison to animate it in the picture. Take the spear in the picture and give it to the hunter with the bow. Click on the bison and the hunter will release a spear at the bison.
Pick up the branch from the ground next to the wall where this drawing is drawn. Go to the fire and look at the ceiling. Support the branch over the fire. Approach the exit from the cave and throw the burning branch at the lioness. Remove the boulder from the passage and exit the cave. Pick up the spear and antlers near the cave entrance.
Enter the cave and go to the flat boulder with the tools. There is an awl on the right, sharp flint in the middle and a scraper on the left. Place the antlers on the boulder. Cut off three branches with flint. Then use an awl to make two holes at opposite ends of the antlers. Use a finishing scraper and insert the strap into the hole. You have made a spear thrower.
Take the branch near the bison drawing and hold it over the fire. Go to the exit from the cave and throw the burning branch at the lioness. Exit the cave.
Climb the hillock and enter another cave. In the center of the cave, there are stones on the ground, laid out in the form of a ring. Dry brushwood is laid out inside. You need to make a fire to light up the walls of the cave. Return to the first cave. Take a branch and keep it on fire for a bit. Return to the second cave. Throw a branch enveloped in fire into dry brushwood and it will become light in the cave. Let's explore all the nooks and crannies in this cave.
There are four passages in the back of the cave. They told Clem in his message from the past. Colored squares are drawn on the rock near each passage: black, brown, red and a square outlined with white lines (empty). Collect three torches from the ground: one by the fire and two torches next to the map engraved on the stone slab. Go to the map and take a close look at it. The map is divided into nine squares with arrows. The beginning of the labyrinth is two parallel lines going beyond the outer perimeter of the map. The card looks like a colored ornament on the Clem stone. If we compare the paths on the map with the colored squares on the Clem stone, then the path from the maze will be painted in the following colors: brown - black - square, outlined with white lines - brown - black - brown - black - brown - red.
Pick up a torch and keep it on fire. Remember that the torch burns out completely in eight steps. With the torch lit, enter the cave with a brown square on the left side and a drawing of the sun on the right side. After passing through a dark tunnel, you will enter a cave with many exits. Turn right and enter a cave with a black square at the entrance. From there, go out into a cave with a colorless square at the entrance. In the tunnel, light the second torch from the burning torch in your hand. Exit the tunnel into the next cave. From there go into the cave with a brown square at the entrance and further into the cave with a black square. From it you go into a cave with a brown square at the entrance and further into a cave with a black square. Light the last third torch and enter the cave with a brown square at the entrance. From there, go out into the cave with a red square at the entrance.
After all these wanderings, you should find yourself in a spacious cave, where one wall is completely occupied by square tiles with handprints. Approach the tiles. You must lay a lighted path to the topmost tile. Use the switches on the bottom and right side to shape the track. There are several solutions to this puzzle.
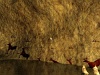
Once the path to the top tile has been laid, you can climb the ledge. Look at the frescoed wall to your left. In the mural, you will see a sleeping bear near its den. One fragment of the fresco is missing. Find and pick up a piece of leather with two holes from the ground. Note the flat stone with the tool.
Walk to the edge of the cliff and look down. To your left below, near its den, a live bear is sleeping. There is a pile of stones right above him at the edge of the cliff. Look up and look at the stalactites under the roof of the cave. If you jump down now, the bear will wake up and attack you. Turn back. Take an armful of dry grass and throw it down. You will need two armfuls of grass for your landing down to be silent for the bear. Take the rope that was under the grass. Jump down and take the mural fragment. Go up. Insert the missing fragment into the fresco.
Mural puzzle
Please note that the mural depicts a real situation with a live bear. As in the fresco, the bear below is asleep under a cliff with a pile of stones on it. Anything you do on the mural will immediately be reflected on the live bear. Take the stone and give it to the hunter standing on the edge of the cliff opposite the den. Throw a stone into the rock just above the den. The bear will wake up and start looking around. Throw another stone into the den. The bear will hide in its den. Now very quickly take a stone and throw it into the stalactite under the vault of the cave. Throw the last stone into the pile of stones at the edge of the cliff. The stones will fall down and block the bear in his den. The same fate befell the living bear below.
Jump down and approach the rubble near the den. Pick up another rope and three stones from the ground. Go upstairs. Approach a flat stone. Place a piece of leather on it. Take the tool. Punch two holes in the leather with it opposite the two existing holes. Use the two ropes on the holes and take the slingshot with three stones from the stone.
Approach the cliff and click on the graphic image of the slingshot into three stalactites hanging under the vault of the cave. Jump down and approach the rubble near the den. Take three more stones. Slingshot the final fourth stalactite. Stalactites, falling into the water, form islands at an equal distance from each other. Cross these islets onto a narrow strip of land dividing the lake in two. Go to the right side of the land, where pick up a bison horn and a long stick from the ground. Note the extinct fire on the opposite side of the land. Return to the shore with the fresco. Use the bison horn on the fire. The horn is now completely filled with embers. Return to the island in the center of the lake. Use the embers horn on an extinct fire. You see a fresco on the cave wall. It depicts deer racing from right to left. There are 14 extinguished lamps in front of you. You must light all the lamps. Take a long stick in your hand and support it in the fire.
Let's count the lamps:
top row from left to right: 1 - 7
bottom row: 8 - 14
Light lamps 14, 5, 10 and 1.
Arok states that the deer could help him get out of the cave. Consider the mural from right to left. It depicts the figures of a deer in different positions. First, he enters the water, then gets out on land in the center of the lake and enters the water again, then to get out on the shore. There is a hunter on an islet in the center of the lake.
1) All deer must be the same color. By clicking on the deer shapes through one, you can change their color: red, yellow and black.
2) An arrow is located above each deer. By clicking on it, you can change the position of the deer. Note that a deer entering the water should have its front hooves submerged in the water, and a deer leaving the water should have its hind hooves in the water.
To change the position of the deer, click on the cross on the right side of the wall.
3) The color of the hunter figure must match the color of the deer. Select the position of the hunter ready to jump on the deer. If you are sure of the correct choice of all positions of the deer in water and land, then click on the double arrow on the right side of the wall and watch an exciting ride.
Now you are standing on the other side of the lake. Exit the cave. There are two paths in the valley in front of you. Step on the left path and follow it to the bank of the turbulent river. Take the processed stone from the hemp. Turn right and follow the path along the river. Pick the chamomile from the left side of the path. At the fork, turn onto the path leading towards the weeping willow. Follow it until you come to the bank of the river. See the salmon swimming in the river. Pick up the spearhead from the ground between the stones. Go to the next location along the path along the river. Look at the ground. Take the treated stone and long stick. Continue along this path and you will reach a cliff with red carvings. Look down. Pick up Treated Stone and Tinder from the ground. Follow this path to the next location. Collect a bunch of branches from the ground. Turn your back on the cliff and follow the path that leads towards the large boulders. Going out into the clearing, look at the extinguished fire. Note the boulder with red patterns. Pick up the Treated Stone and Belt from the ground. Approach a flat stone.
Place a long stick, harpoon point and belt on top of it. Take the harpoon from the stone and go to the river bank.
There is a small gap in the river between the stones, through which salmon swim. Block this gap using the stones lying on the shore. First, throw a large rock into the water to your left. Turn right and throw a stone near your right into the water. Then, throw the remaining stones into the water.
Now watch how the salmon will overcome the artificial barrier. Use the moment when the salmon is in the water next to a stone barrier in order to pierce the fish with a harpoon.
Return to the clearing with an extinct bonfire. Talk to the man sitting on the stone near the extinct fire. Ask him all your questions. You will learn that his name is Toar. He is engaged in the processing of stone and wood. At the end of the conversation, he will give you marcasite and a wooden bowl for making chamomile tea.
Put in the hole where the tinder was used to make a fire, an armful of twigs and marcasite. Use the flint on the marcasite to light the fire.
Take and throw into the fire three small stones lying on the ground near the site of the fire.
Go to the river bank. Fill the wooden container Toar gave you with water. Return to the clearing. Place a wooden container of water on the ground in front of the Toar. Take a wooden stick from the ground and use it to pull all three stones out of the fire. Try to touch the smoking stone. After you scream, Toar will give you a wooden spatula. Use a spatula to transfer hot stones to a wooden container of water. The water in the container should boil. Throw chamomile into boiling water and Toar can sip the aromatic tea.
Use a wooden stick to place a large rock on the fire. Use the same stick to pull it out of the fire. Place the salmon on a hot rock. Use a spatula to turn the salmon over to the other side. Take the fried salmon from the stone and give it to Toar. After the meal, talk to him again. After the conversation, Toar will place a cloth on a flat stone, on which three instruments will lie. Under each tool is a stone on which you can try to use the tool and see what happens.
To your left is a deer antler hammer, in the middle is an awl and to the left is a stone hammer. Take the stone hammer and hit the middle stone with it three times. Now take the antler hammer and hit the middle stone twice with it. Take the flint and give it to Toar. In return, you will receive a knife with a sharp blade from him.
Speak with Toar about the cut stones you have found throughout the valley. You now have four stones in your inventory. After your question, Toar will give you the fifth stone. These are musical stones.
Walk up to the cliff. Right click on the cave painting. In the lower right corner of the monitor, a window will appear with five musical stones, under which lies a small hammer. Take the hammer and hit 4, 2, 5 and 1 stones with it. The count goes from left to right. Turn left and follow the path to another rock art.
Right click on it. You now have access to a passage under the overhanging rock. Follow the path forward and climb the slope to the residential caves at the top of the cliff.
Talk to Tiki, who lives in the first cave at the top of the cliff. After the conversation, leave the cave and go to the cliff. Find a mountain of animal bones. There are deer antlers on the ground next to her, take them. Return to the cave where Tiki lives. Take the fish engraving and the deer engraving from the shelf on the left. Take the stone from the shelf to the left of Tiki. Turn right and grab a statue of a woman, an engraved lion bone, and a vertebra from the shelf.
Exit this cave and enter the next cave along this side. Take the animal fat from the left shelf. Go to the flat rock in the center of the cave. There is a belt and a stick with a hole on the ground next to the stone. Add them to your inventory.
Exit the cave and go to the skins of the animals hanging on the walls. Lift the bubble off the floor and remove the skin from the fence.
Return to Tiki Cave. Go to the left side of the cave. Look at the wall with eleven symbols painted on it. Right-click on any symbol and listen to Arok's short story about his journey into the distant Paleolithic. Place the symbols in the correct sequence for your journey.
After placing the symbols in the correct order, Arok will tell you that it would be a good idea to illustrate each episode of your journey with a corresponding item from your inventory. Place the items from your inventory on the stove in this order (from left to right):
antlers, engraved bone, colored Clem stone, spear thrower, hand stone, stick with a hole, deer engraving, harpoon, fish engraving, knife and woman figurine. Walk up to Tiki and start a conversation with her about the Clem Stone and your artistic ability. She says that it is necessary to restore the fresco located in the farthest cave.
We offer a complete guide to the walkthrough of the game "Echoes of the Past: Royal House of Stone". The passage contains many pictures for each step of the game.
You can also give some general tips: the game starts with 10 tips. For additional clues, you need to find two mirrors in each HOS. Watch out for glittering spots, take a closer look. To return to the previous location, click the down arrow. Otherwise, you need to go through the game, like many other games from the "Hidden Object" series.
We pass directly to the passage. If you still have questions about how to complete the game "Echo of the Past: Stone Kingdom" from Alavar - write on the forum.
Part I
Throne room
After buying a ticket to the museum and entering the Medieval Castle, you will find a book dropped by a woman and the first thing to do for research is to go here.
Follow the clues: on the left side is a sparkling Hidden Object Scene.
Don't forget to collect mirrors everywhere - each mirror will give an additional hint.
To find letter W- turn the pages of the book.
Before leaving the room, a task will appear to find a burning torch.
Take the candle and bring it to the torch.
Your inventory will add burning torch.
* all pictures are enlarged by clicking on them

Return down the arrow to the throne room.
Via burning torch light candles on both sides of the throne.
Click on the left vase to break it.
Pick up from the floor tassel.
Move the doors closer and push out brush key from the keyhole.
Use the key to open the door and go out into the corridor.
Walk forward along the corridor.

Corridor. Stone nanny
Approach the "stone" nanny of the Prince.
Crumpled scraps of a portrait lie at the hem of her dress.
Pick them up and click on the portrait frame on the right.
Collect the picture from the scraps found.
Move 2 times down and then right.

Armory room
Take shield.
Throw off unnecessary weapons from the table, and take the sword for yourself.
Moving away the shield on the wall, you will find the sign "Metal cuts wood".

Go into the room on the left to find the items you need.
To find heart with an arrow- take an arrow on the shelf and insert it into the bow, after which the bow will shoot in the heart.
Upon completion, you will receive pincers.

Exit the Armory and into the hallway.
Two knights are standing below.
Give left found shield and sword.
Take the knight that appears under the shield green scroll.
Go through the opened passage to the left.
Hall of three mysteries
Pick up off the floor diamond key.

Examine the door in front of you.
A puzzle is activated in which you need to correctly collect the royal coat of arms.
The coat of arms was in the picture that you collected near the nanny.
It is also "sketched" in your diary.

Examine the door on the left.
Ticks pull out two nails.

Solve the puzzle.
Use the gears to guide the main unit to the latch.


Go through the opened door on the left.
Princess room
Take in the suitcase under the dressing table a jar of yellow paint.
Complete the Hidden Object Scene.
To find handprint- take your hand near the bag on the right, smudge it in the coal and make an imprint on a clean sheet.
Bring with you before you leave lever arm.


Follow the arrows down to the hall.
Hall of three mysteries
Examine the right door.
Place a jar of yellow paint and solve the puzzle.
Color the picture so that cells of the same color do not touch.

Now all the doors are open, you can continue to explore the rest of the rooms.
Go straight through the door.
Tailor's room
Examine the sparkling area in the opening for a HOS.
Collect all of the items on the list.
To obtain pitcher shadow- take the jug from the shelf between the windows and place it on a tray on the table.
On the way out, grab empty test tube.
Exit the hall and turn through the left door.

Princess room
Open the desk drawer and look at the instructions.
There is a strange unit in the center of the room, insert it into its round recess green scroll.
When the fire comes on, bring the bubbling cauldron closer.
Place on the stand on the right empty test tube.
Collect all green beads in a test tube without touching others.
After completing the mini-game, take the green magic liquid.
Walk down 3 times.


Throne room
Examine the stone prince.
With a diamond key open the lock on the box.
Take away medallion without portrait.

A new Hidden Object Scene has appeared on the right side.
You will be prompted to find all the symbols of the King.
In return, after a simple memory task, you will receive.

Go through the throne room into the corridor.
Turn left into the hall and then step through the right door.
King's room
Put lever arm in place to open the door.
Return bas-relief depicting the king
into the recess under the column.
Take from the opened cache portrait of a prince.
Prince portrait will automatically merge with medallion without a portrait
, get medallion with a portrait.
Walk down and forward 2 times.

Corridor. Stone nanny
Hang on the chain that the nanny holds in her hand medallion with a portrait
.
When the nanny comes to life and disappears, pick up handkerchief.
Move left.

Tower staircase
Double click on the eye-catching brick in the wall.
Take from the cache key.
Go upstairs.

Tower
Take the red from the shelf empty pouch.
Complete the Hidden Object Scene.
To find number 5- brush away the cobweb with a broom.
Upon completion, you will receive gear.
Follow the down arrow 2 times.


Tower staircase
Look into the recess on the wall on the right.
Insert into the mechanism gear.
Place the weights from left to right: 6-2-3.
Move 2 times down and to the right.

Armory room
Key open the chest and take crowbar.
Complete the Hidden Object Scene - collect 15 feathers.
After completing a mini-game in which you need to collect identical feathers in pairs, you will receive feather.


Tower
With the help found in the Armory crowbar open the window and pick up the plank in the floor.
Now you have added knife and ring.
Walk down 3 times, left to the hall and straight through the door.

Tailor's room
In the opening is a sparkling hidden object area.
Find 16 rings.
One of the rings is the "ring of the tree". Take a saw and cut a branch to get it.

Play a mini-game collecting identical items in pairs.
Upon completion, you will receive lion head.
Return to the room.
Examine the dry bush that is in the vase on the table under the windows.
Click on it to crumble the seeds, and then collect them in empty pouch.
Pick up seed bag.

Go 2 times down and forward - in corridor where the petrified nanny stood.
Examine the doors in front of you.
Return the handle to the right door in the form lion head.
Insert into the mouth of the left lion ring.
Press down on both handles to lower them in rings down.
The doors will open - go through them.
Chapter 1. Arrival
After waking up, when control passes to you, leave the room and follow any route following the running triangle. So you get to the next door, behind which there will be a long corridor. Go to its end and interact with the red cube on the bed by pressing the E key.
The Surface
Watch the cut-scene, after which you will find yourself on an unknown planet. When the ship departs, then take a look around. Find small circles under your feet closer to the edges (do not confuse with large ones) - you can interact with them. There are circles on each side - use them, after which a descent will appear. After the next words of your assistant London, jump down by pressing the "Space". The corresponding prompt should appear on the screen.
The suit softens the blow, but it costs energy. Let's deal with this. Suit energy is indicated by triangles - a white, filled triangle indicates a full energy cell, while a white empty one indicates an empty one. The game automatically reloads the suit, but from the very beginning you will have access to only one cell.
If you are going to perform some action that consumes energy, then the number of cells that must be expended will be highlighted in yellow. If at least one of the cells highlighted in yellow is empty, then the action cannot be performed.
Wait for the character on the elevator to go downstairs.
When the elevator stops, exit through the opening on the side. Here you have a very long route down, but the task is simplified by the fact that in fact there is only one way. Go down the various slopes and steps, jump off where the opportunity arises. Hold CTRL to duck. Eventually, you will reach a huge round door.
Try to lower the lever, but nothing will work. Draw your weapon by holding down the RMB and shoot the lever on the LMB to break the ice holding it back. Pull the lever and walk forward through the next door.
Chapter 2. Discovery
ATTENTION! On each sublevel of the chapter there is a certain number of voices, a little later - energy cells and spheres. We will not describe all of them, but we will point out the voices that were found.
Move along symmetrical corridors, but you will soon realize that everywhere there is a passage further. Go down the stairs below and below, and then you will need to jump over the railing several times. When you jump over and, passing along the corridor, see the device, then interact with it.
When the time comes, then jump below and you will see a massive door with some kind of mechanism, which lacks a key (lever). We need to find him. Move deeper into the location, jump over the next railing and climb the steps to find the key. Next, you need to climb higher and walk along the walls in order to jump over the railing to where you came from. Go back and insert the mechanism into the desired hole.
Infinity
Go forward, go down below and find yourself in a huge corridor where you can go both to the left and to the right. The corridor is endless, so you need to jump down in the first span if you don't want to waste time. But as soon as you do this, then find the first voice on the side of the wall.
Continue along the only path, go down the long twisted staircase (there are two of them and it doesn't matter which one to follow), and then go to the next place where you need to jump over the railing below. There are many different objects here, but along the far wall in one of the alcoves with a table there is a second voice.
After jumping down over the obstacle, contrary to the marker, go in the opposite direction to find the third voice. After that, get to the next door, sit on the throne opposite it, and it will open. In the center of the large hall is what you are looking for - just get close and watch the cut-scene.
Evolution
Get out and follow the marker. Doors that can be opened are now indicated with white lines. Just interact with them. Follow on until the marker refreshes and the target is 190 meters away. Follow the nearest door, go downstairs, but do not rush to go right. Follow to the opposite end of the corridor and open the door here - there will be the first voice in the small room.
Now go along the marker, in front of the railing you will see a rotating object - such objects will give a charge to your suit.
Just come close to it, everything else will happen automatically. Then jump down and run to the end of the corridor to the glowing door. Get to the next voice, the second in a row, but here again, do not rush. Go to the right and somewhere behind the next door, on the opposite side of the marker, find the third voice.
Compilation
Then follow the marker. The light will be switched off periodically and the palace will gradually begin to come to life. Over time, some incomprehensible entities will appear, which will soon turn into the main character. First, go around them, then in the corridor, where there will be 3-4 opponents, go around, pushing with your foot - the F key. Jump down, there will be several devices for charging the suit. Therefore, use RMB and LMB to shoot all enemies.
Always use both charges, and then run up to one of the sources. Do not go to the second one, as the suit regenerates the first cell automatically. After that, go to the far end and pull out the key, like last time. Kill opponents again using the charge sources, go back and activate the pedestal. Go further, but do not rush to go down the stairs, and open the door on the right - there is a fourth voice.
Go downstairs, there will be long corridors. By the way, now you can kill opponents from behind. Hold CTRL, sneak up to the enemy and hold the F key. Just hold it, because pressing you will only push the enemy away with your foot.
In the long, tangled corridors, walk along the right side until the lights go out. Activate the scanner for the first time - press the Q key. It consumes one energy cell, but you can see opponents behind the walls. You can also lure enemies with your voice by pressing the R key.
Momentum
Weapon
Go down below and learn about non-lethal weapons. If you aim and click on the mouse wheel, then the main character will shoot from an energy weapon. It launches a wave that repels nearby enemies. It operates within a radius of four meters, and the wave travels 180 degrees - that is, on everyone you see in front of you. Consumes one energy cell. Unfortunately, you do not kill, but temporarily knock opponents down.
As for a regular pistol (RMB + LMB), it kills with one shot ANY enemy regardless of the distance (50 meters - I don't think you will shoot from an even greater distance) and what part of the body you hit. That is, it is NOT NECESSARY to shoot in the head! Also, if two opponents are located close to each other, then there is a chance to kill them with one shot.
After killing enemies or bypassing them, follow to the left to find another voice around the corner. Move further by jumping down over the railing. The next time you can take different roads, take the right route to find the last voice.
Once at the throne, sit on it and try to go through the opened door. Nothing will come of it. Learn about acceleration here. Sit down on the throne again, then go down and accelerate, holding down the "Space" key. Having managed to run through the door, you will find yourself in the next room.
Access (Entrance)
In this place, you will need to collect blue spheres until the yellow circle on the cube behind N's back is completely filled. Note that there are more spheres in the location than needed. You can simply run away from enemies by collecting orbs. The level will periodically reload. This means that all killed enemies will be alive again, but at the same time they will lose you (you will become invisible again).
After collecting all the spheres, jump into the opened elevator and activate it by interacting with the central panel.
We also recommend
 Why doesn't the husband want a second child?
 Long bob with bangs on fine hair
 Features of the design of thematic corners in the younger group
 Selection of makeup for your type of appearance How to choose your makeup
 Dyufaston or Utrozhestan - which is better?
 Face contouring (cheekbones): How to make cheekbones with makeup How to highlight cheekbones in makeup