Pencil skirt with drapery pattern. Modeling a skirt with cascading drapery
We will need to shoot three sizes first:
- waist circumference (OT) - we measure at the narrowest place, tightly wrapping the tape around the waist;
- the volume of the hips (OB) - measured at the most convex places of the buttocks; for ladies with the breeches effect, we measure this volume, to build a pattern we use a larger number;
- the height of the hips (WB) - we measure it on the side from the waist line to the hip line, having previously tied a thin tape along them for ease of measurement;
- product length (CI) - measured from the waist to the planned length.
Measurement locations - see the figure below.
For object drawing of a pencil skirt pattern, let's say that these measurements are:
- FROM = 70 cm;
- OB = 98 cm;
- CI = 74 cm;
- WB = 20-22cm (this is an average measurement, it is usually used to build the main pattern; if your parameters are very different from it, use your numbers).
We will prepare paper for building the base pattern (preferably millimeter paper, it is more convenient to put dimensions on it), a template, a ruler and pencils.
We start from the top left point, and from it we will move down and to the right.
Having retreated 5 cm from the top and the left edge of the paper, put a point (∙) A. Along the vertical downward, set the length of the product - AD. On the right side, we set aside half the volume of the hips plus 1 cm for free fitting = 98/2 + 1 cm = 50 cm - (∙) V. Draw lines DC and BC.
Side line of the skirt
Divide the drawn rectangle in half, drawing a perpendicular line to the segments DC and AB.
Thigh line
From (∙) A put down 20-22 cm - AL (= hip height). Draw a horizontal line from (∙) L, getting (∙) L1 and (∙) L2.
Calculating the size of the darts
Calculation formula (OB - OT): 2 = (98 - 70): 2 = 14 cm.Of these we will remove 1⁄2 in the side darts (14: 2): 2 = 3.5 cm each. We put aside 3.5 cm from the side line and connect these (∙) with (∙) L2.
Extend the lines of the darts 1 cm up.
If the difference between OB and OT is more than 14 cm, two darts are made behind. The first one is 5-7 cm from the middle of the back, its depth is 3-4 cm, length is 13-15 cm.The rest of the segment is divided in half, the depth of the second dart is 2-3 cm, length is 12-13 cm.
We connect the curved curve (∙) 1 and (∙) A, (∙) 1 and (∙) B. We divide the segment Л Л2 equally and draw a perpendicular to the segment AB. From (∙) В1 we measure to the right along the red curved line 5-6 cm (the same parameter for all sizes), draw a perpendicular to the line of the hips.
The remaining excess in volume at the waist - 7 cm - is distributed over the darts of the back and front parts of the skirt. Most - 4 cm - will go to the back, the smaller - 3 cm - to the front. The length of the dart on the back part is 12-13 cm, for the front part - 9-10 cm (the same number for all sizes).
Move the dart to the left by 5 mm for beauty.
Note that the deeper the dart is required, the longer it should be.
Divide the side lines from the waist to the hips in half and set aside 5 mm from these (∙).
Using a piece or by hand, draw a side line.
We transfer the sketched patterns onto tracing paper or other paper. We designate the direction of the lobe thread.
Basic cut assumes seamless front skirt. The back detail is cut with a seam into which a zipper is inserted. A belt is sewn at the waistline.
We build a pattern of a pencil skirt: video master class
Designing various models of a skirt based on a basic pattern
Tapered skirt with two flounces
For such a model, you first need to complete the basic pattern of a pencil skirt with your own hands or download it on the Internet for your size. For example, on the site of Anastasia Korfiati, you can download a skirt pattern for free.
On the constructed skirt pattern, we perform modeling, as in the figure below. We narrow both the front and the back down by one and a half cm. We begin the narrowing, stepping back 10 cm from the line of the hips.
The estimated length of the skirt from the waistline is 70 cm.
We draw a shuttlecock on the front part. Then we reshoot it in expanded form separately, correcting the lower edge, smoothing the stepped transitions at the mating points.
Cutting out a pencil skirt with a flounce
Such a model of a pencil skirt will be perfectly sewn from jersey or any dress fabric with additives of elastane.
To complete, you need 1.7 m of fabric with a width of 145 cm. The main cutting details - see below. In addition, we cut out a belt 7 cm wide (finished - 3.5 cm), length - along the length of the waist plus 3 cm of the increase for the fastener. It is better to use a thermal cloth to strengthen the belt.
When laying out on fabric, keep in mind that the seam allowances should be 1.5 cm, and 3 cm along the bottom of the skirt.
Sewing skirts
We cut out all the details. We fold the details of the shuttlecocks in pairs with the front side inward, sew along the rounded edge, turn it out, sweep this edge and iron it.
We bend the shuttlecocks along lines 1 and 2, avoiding asymmetry.
We sweep and cut off the front and rear darts. Ironing. We mark the flounces on the front part of the skirt along the marked places at the waist and sides.
We carry out the side seams, iron the allowances and process the edges. If you use this pattern for sewing a knitted pencil skirt, then it is better to process the edges of the parts with an oblique silk stitching. Sew a hidden zipper into the back seam.
Sew on the belt at the waist.
Tuck the bottom of the skirt up by overstitching it with a double needle. You can do otherwise - go along the edge with an overlock, bend the edge and manually sew it with a blind seam.
Skirt with buttons: MK video
Peplum pencil skirt
This model is suitable for slender girls. For ladies of size 48 and above, it is better to choose skirts without hip-enlarging details.
First you need to build a pattern according to your size (see. step-by-step instruction above) or download it on the website of Anastasia Korfiati.
We decide on the style of the Basque. It can be different - the same length, elongated in the center of the back. Then we build a peplum pattern.
For example, the given finished pattern is drawn for a peplum length of 20 cm without any differences along the profile.
For the calculation, we use the formula: R = OT: 6 - 1 cm. We draw a semicircle, and from it, putting aside 20 cm, we draw a second line.
To lengthen along the back, we increase one side of the pattern to 25-30 cm. Draw a smooth line connecting the lower ones (∙).
Models of straight skirts with various frills look very impressive. You just need to take into account that the blouse in this case should be laconic, without ruffles.
Front slit pencil skirt with vertical flounce
For such a model, you first need to build a basic pattern of a pencil skirt with your own hands or download it on the Internet for your size. For example, on Anastasia Korfiati's website, you can download a skirt pattern for your size.
Copy on tracing paper in front of the skirt in full spread - see drawing.
For a pencil skirt with a slit, draw a vertical line and cut the pattern.
The back part for the skirt of this model does not change, we cut it out of 2 parts according to the basic drawing.
Add a spline allowance to the narrower part of the front. Its width is 8 cm, length is 14 cm.
On the larger part of the front, we draw a shuttlecock.
We reshoot all the elements of the shuttlecock on tracing paper and glue them into a common detail along the long sides.
With a smooth rounding, you need to create a beautiful outer side of the shuttlecock. How to do it correctly is marked in the drawing with a blue line.
- front piece - 1 piece;
- front side piece - 1 pc .;
- back piece - 2 pcs.
Black cotton fabric:
- detail for processing shuttlecock - 1 pc. (in blue in the drawing);
- belt - 1 pc. (length is equal to FROM + 4 cm for the fastener, width - 7 cm).
Do not forget to take into account the allowances for the seams of 1.5 cm, for the hem of the bottom - 4 cm. The belt is strengthened with thermal fabric, cut out without allowances.
How is this model sewn
We fold with the front sides inward a large part of the front and a part of black fabric for processing the shuttlecock.
We sweep their outer edge and the outer edges of the slots. Trimming the details, cutting off the allowances, turning out the shuttlecock. We sweep the shuttlecock along the edge, iron it on.
We process the side of the front part with an overlock, turn the allowance - 4 cm - onto the slot, and sweep it.
We put the central part of the skirt on the side, aligning it along the line and sweeping it.
Adjust along the alignment line to the spline.
Sew a zipper into the back seam. We sweep and sew side seams.
We turn the allowance on the bottom to the wrong side and manually sweep it with a blind seam.
We lay the slot and sweep it with a blind seam.
We sew the lower part of the shuttlecock along the longitudinal side to the skirt with a blind seam.
Sew on the belt, sew on the hook for the fastener.
Split straight skirt
The slotted skirt is modeled on the classic straight model. Interesting details are implemented in it - a yoke with vertical relief seams, a slot along the back seam, fastened with buttons. Under such a skirt, you can easily pick up a light summer blouse in the kit.
We build basic pattern according to its size or we are looking for and download ready-made on the Internet. There are options on A. Karfiati's website different sizes, you can find lessons online for building drawings of skirts.
How to pattern a pencil skirt with a slot
Now let's start modeling. We put 15 cm down from the level of the hips. Draw the level of the yoke and cut it off. From the bottom (∙) darts, we lower the perpendicular (red dotted line in the drawing). Cut the back yoke along the dart lines and the red dotted line. We draw a slot 8 cm wide.
For the front part, repeat the level of the yoke and the perpendicular from the lower (∙) dart.
For the back half, we cut out 2 pieces. every detail.
For the front, we cut out 2 pieces. side parts of the yoke and 1 pc. the rest of the parts with a fold.
In addition, we cut out the belt. Its length is OT + 8 cm for a fastener and a loose fit.
How to sew
We outline the relief seams on both yokes, we stretch them off with an indent of 7 mm. We outline and cut off the seams on the side of the yokes. Sew a hidden zipper into the central seam on the back yoke.
From the right side of the lower panel of the back of the skirt, cut a strip 4 cm long, leaving 4 cm for bending the slots on the right and 8 cm on the left. We strengthen the allowance for the slot on both parts with thermal fabric. We turn the right allowance 4 cm wide and press it on. We sweep along the loop markings.
Tuck the left allowance by 4 cm and press it on.
We put the right side on the left, sweep away at the top.
We sweep the lower panels of the skirt on the sides, sew.
We sweep the yoke with the bottom detail. We sew, stepping back 7 mm from the edge. Sew on the belt.
Wrap skirt: video master class
Draped skirt
The draped element on the sides and the buckle on the stitched belt add special originality to this model. You can sew such a skirt using materials of different composition and color. The main thing is that they are soft, draped beautifully and keep their shape.
We start by building a basic model according to our p-frames or find ready-made pattern, for example, on the site of A. Korfiati.
Next, let's look at the modeling process step by step. We put 3 cm down from the waistline on the front part and draw a set-in belt 7 cm wide ( blue color on the pattern). The belt lines should be smooth. A belt is sewn between (∙) a-a. Let's reshoot the belt as a separate element.
We cut the front into two vertical parts along the auxiliary line (red). Cut the left side horizontally along the blue lines and move the drapery between (∙) bb, adding from 10 to 15 cm for folds.
The back of the skirt is modeled in the same way, but without the yoke.
The drawing below shows the modeling of the front part and the middle part with the front yoke.
To process the upper cut, we reshoot and draw the piping on the front and rear panels of the skirt 4 cm wide.
Details for the pattern, their quantity - see below. Do not forget about 1.5 cm for the side allowances and 4 cm for the bottom allowance. Details highlighted dark color, are cut out, in addition to the main fabric, from the gasket.
Description of sewing a model of a skirt with drapery
We sew the side parts with auxiliary stitches with a long stitch (4 mm) on plots bb... Gather them up to the desired size, distributing them evenly.
Sew on parts of the front yokes. We sew the allowances with one joint seam and iron them onto the yokes.
We grind the stitched belt along the upper and lower long sides, turn it out, sweep it out. We put on the buckle. We put the belt between (∙) a-a on the central part of the front and sweep it. Sew the draped details to the central details of the front and rear of the skirt.
We sweep and cut off the side seams. We sweep the allowances, iron them out. We sew a zipper into the central seam of the back part.
We strengthen the facing of the front and rear parts with thermal fabric, overcast them along the bottom, grind them on the sides. We put the piping on the skirt, combining along the upper cuts, we grind it along the waist.
We bend the facing up, iron it, stretch along the seam, stitching allowances to the facing.
After that, fold it back onto the skirt and stitch it along the short sides to the back halves along the zipper tape. Bend the piping to the wrong side, sweep it out and iron it.
We bend the bottom seam allowance and sew it with a blind seam.
Pencil skirt with decorative zippers: MK video
Lace pencil skirt
This striking openwork skirt is tapered at the bottom and has a slit in the back. The upper transparent skirt is made of black lace, the lining is made of light fabric (satin or any mixed).
The average length of the skirt below the knees is 66 cm, but you can sew such a translucent skirt even longer, proportionally increasing the length of the back slit.
We build the basic pattern of a skirt or use a ready-made one, printed from A. Korfiati's website.
We narrow the front and back halves by 1.5 cm. Draw new lines of the side seams, stepping back 10 cm from the hip line. We outline the length of the cut for 1/3 of the length of the skirt.
For this model, we need:
- lace 1.2 m wide - about 0.8 m;
- fabric for lining with a width of 145 cm - 0.7 m;
- zipper 20 cm long;
- threads.
The sheer lace skirt is cut from:
- rear panel - 2 children;
The petticoat is cut out from:
- front panel - 1 child. with a fold;
- rear panel - 2 children;
- belt - children. And 8 cm wide, FROM + 4 cm long at the start of the fastener.
We lay out the lace details on the front side of the petticoat details, sweep them in pairs along the perimeter. Further, the transparent skirt is sewn as a single layer.
On both halves we sweep and grind the darts. We sew in a zipper. We outline and grind the seams on the sides. We process the allowances with an oblique inlay.
We strengthen the belt with thermal fabric cut without seam allowances. Sew in a belt at the waist.
The black lace pencil skirt is ready!
Leather pencil skirt
A leatherette or leather skirt looks great on any type of figure. The main thing is to decide what style and length of a pencil skirt made of leather suits you. Large size 56 or 58 women should not be sewn short skirt... A long pencil skirt with a slit is better for them.
It should be noted that this type of material is well suited for a business style. A jacket or jacket matched in style will accentuate your look. Long skirt from eco-leather it will be interesting to look with a fur sleeveless jacket and leather boots.
Consider step by step how sewing is performed leather skirt on an elastic band.
Keep in mind that not every sewing machine can work with skin. If you have a thin skirt made of eco-leather or leatherette, the sewing process will be simplified. But, if the main material is thick leather, then you will need to sew some seams with an awl.
Measurements, according to which the pattern was built: CI = 45 cm, FROM = 67 cm;
- leather (eco-leather) - 0.5 m;
- lining fabric - 0.5 m;
- wide elastic band (4 cm) for the belt - 0.7 m;
- hidden zipper;
- sewing machine, scissors, leather needles, crayon.
We build a pattern for a straight skirt.
We mark all the elements on the main material and on the lining. Cut out, leaving allowances of 1.0 - 1.5 cm.
We sweep the details of the skirt and lining (separately), leaving the seam on the back unstitched.
We sew all the seams, except for the middle one on the back.
Iron the allowances at the seams in different directions through the cotton fabric or (for rough skin) tap with a hammer.
Sweep and then sew the leather and lining down the bottom of the skirt.
Sew a zipper into the central seam on the back. We carry out the center seam of the back.

Skirt pattern with wrap and draped waist
A skirt of a straight silhouette, on the right panel of which there is an assembly along the waist line, the bottom line is rounded. With this model it is convenient to correct the change in the size of the waist circumference by simply sewing a button or a hook.
The skirt is good at everyday wear for any typical figure, except for figures with a protruding belly, since the assembly will increase it even more.
Wrap skirt can be made from any fabric of the dress group, excluding transparent chiffon-type fabrics.
To construct a pattern for a skirt with a wrap and drapery, use the pattern of the base of a straight skirt.
Construction of a skirt pattern with a wrap and drapery
1. Draw the entire front panel of the straight skirt.
2. In the upper part of the skirt, the edges of the wrap-around parts should be located in the immediate vicinity of the ends of the darts.
Draw the outer edges of the scent on the left and right sides of the front as shown in Figure 1. The edges of the scent intersect at the center line of the front panel about 10 cm above the bottom line.
3. To simulate the drapery (folds) from the dart on the left side of the front panel of the skirt, set aside half of the mortar of this dart (1 cm) towards the middle of the part and from this point draw the first cut line to the point of intersection of odors.
4. Transfer the dart to the cutting line.
5. Draw the second and third cut lines as shown in Figure 1.
Note. The number and depth of folds depends on the selected model.
6. Transfer the resulting two parts of the front panel with smells to tracing paper.
7. Cut a dart on the right part of the front panel and make cuts along the three cutting lines without cutting the part at the bottom.
8. Move the obtained parts of the wrap skirt part apart by values approximately equal to 4-5 cm. The depth of the folds is determined by the model (Fig. 3).
9. Align the cuts of the skirt on the resulting pattern.
10. Fold in the pleats in the direction indicated by the model of the skirt and adjust the waist line.
11. Move the dart on the left front part towards the middle, as shown in Figure 4.
12. The pattern of the rear panel of the wrap skirt remains unchanged (fig. 2).
The sequence of sewing a skirt with a wrap and drapery
1. Sweep and grind darts on the front and back panels of the skirt, press them towards the center.
2. Assemble the assembly on two machine lines or lay folds on the right part of the front skirt.
3. To process the edges of the sides of the front panel with stitched beads. To do this, glue the non-woven adhesive with an iron on the wrong side of the collar. The width of the trim can be 3-7 cm. Fold the edge of the bead face to face, overstitch with a seam 0.5 cm from the edge.
4. Press the seam towards the hem.
5. Sweep and grind side seams. Neaten the sections, press them towards the rear panel.
6. Unscrew the hem on the wrong side of the garment and sweep the piping from the side by 0.1-0.2 cm and process the bottom of the skirt along its rear half.

Skirt. Drawing skirts
Draped skirts
The designs of draped skirts are built on the drawing of the base of a straight skirt. In this case, the darts turn into drapery. The type of drapery depends on the structure of the fabric. So, silk and wool give a voluminous soft drapery, knitwear - flexible, plastic. The drapery from these fabrics is easy to fit along the oblique and transverse threads. Hard light fabrics are draped only along the oblique thread, forming clear ray-like folds.
Model 1 (fig. 1)
The skirt is draped along the line of the darts.
Rice. 1 skirt with draped darts
Rice. 2. Drawing a line of direction of folds-draperies
Fig. 3. Divorce along embossed lines
Three small, non-ironed pleats emerging from the slanted, slightly curved dart create a draped effect.
On the pattern of the front panel of the skirt, the lines of the direction of the folds-draperies are applied (Fig. 2). Along the outlined lines, the pattern is cut and diluted to the desired size. The distance between the folds should not be the same: between the first and the second it is about 3.5-4 cm, and with each subsequent fold it decreases by 0.5 cm compared to the previous one (Fig. 3).
Model 2 (fig. 4)
Skirt with asymmetrical drapery along the front panel.
Fig. 1 Skirt with asymmetrical drapery along the front panel
Fig. 2. Drawing undercut lines
Rice. 3. Spreading the pattern along the undercut lines
With asymmetric drapery, the pattern of the front panel of the skirt is built in full size... The scraper can be positioned from the line of the waist to the line of the hips and below. If it runs below the hip line, then for greater elegance, the skirt is narrowed at the bottom along the side seams by 2-3 cm on each side. The cut line is marked on the pattern, along which the folds of the doping will be located (Fig. 2). It is undesirable to place them at the extreme points of the lodrez line; it is necessary to retreat by 2-Z cm. Libya is drawn from the undercut line to the side seam, determining the direction of the folds.
First, cut the pattern of the front panel of the skirt along the undercut line (Fig. 3) and close the dart on its left side, and then along the marked lines of the draperies. The width of the folds ranges from 3.5 to 4.5 cm.
The back panel of the skirt is left unchanged.
Model З (fig. 4)
Softly draped wrap skirt front cloth
Fig. 1 Skirt with a softly draped wrap along the front panel
Fig. 2 Undercut lines
Fig. 3. Divorce along the undercut lines
The pattern of the front right panel of the skirt is built in full size. Outline the lines of undercuts (Fig. 2), along which the folds of the drapery will pass. These lines run from the side seam to the bottom of the skirt to the dart at the waist at a distance of 5-6 cm from each other. A rounded bottom line is outlined according to the style.
Along the outlined lines, the pattern of the right front panel is cut and diluted to the accepted value (Fig. 3) - from 10 to 15 cm.
The left front panel of the skirt is left unchanged, that is, with darts at the waist. The back panel is also left unchanged.
The material is based on the book by T.N. Ekshurskaya. " Fashion dress... Construction "
The eyelet looks like a spiral with additional chiffon wedges.
I looked at another monitor.It seems to me that the yoke is cut out at the corners of a square (more precisely, not a yoke, but the top of an ordinary straight skirt - the darts are simply not visible), and the sun is sewn to this case, so the corners hang down so down. There is still a lining, and it ends somewhere below the knee
Participant
From: Vilnius
Said thanks: 487 times
Participant
From: Moscow
Said thanks: 27 times
But I don’t remember where I got it from - from some catalog. I lost all links after reinstalling the system. I've already broken my whole head - I can't remember! From the same place and these models:
Maybe this will help someone to identify the "hand of the master"!
Can't this skirt be with the same cut as this dress, only barrels with corners?
Participant
Thank you said: 0 time (s)
Hello! I'm new. And I really need your help. I liked this skirt, but I don’t know how to cut it. with the top, everything is clear, but the bottom. The wedges are somehow incomprehensible. Maybe someone knows how this is done?
I do not know the name of the fabric, it is very similar to velor. Soft.
At the expense of the folds. It seems to me there are intricate reliefs and they turn into SUCH tails.
I don’t know how to build a pattern.
It seems to me there are not wedges, but folds, not fully stitched to the end of the skirt and stitched with a double line.
Somehow everything is deliberately "shikos nakos" in front of her
What fabric do you want to sew?
M. b. similar "wedges" may come in handy below (modeling):
Spiral skirt bottom decoration (Merylin)
Participant
Thank you said: 0 time (s)
Men's rocker jacket (leather jacket), help me find a pattern or tell me how to build it.
Thank you for responding!
that's just the point that is not clear. To hold it in my hands. Some wedge-shaped pieces.
The fabric is dense, but soft, not “dry” like velor.
Participant
From: Togliatti
Thank you said: 15 times
Participant
From: SPb
Said thanks: 6 times
In my opinion, the shape of the skirt was achieved by making a "double sun" moget on a regular "sun" skirt, there are probably all sorts of tricky lines, because constructive lines are not clearly visible on the rirunka. IMHO
What follows from this? Need to sew!
From: Tallinn + Fuengirola
Said thanks: 24074 time (s)
Open albums
Judging by the technical drawing, the base is either straight, free, with an elastic band on top, or a half-sun. A straight line is more likely. At the back, at the level of the ends of the darts, the bottom of the skirt is sewn to this structure, which is sewn from two half-suns. They are sewn to each other mirroredly. Again, judging by the drawing, the lower panel is sewn (in the sense of the seam of the yoke, or in the undercut, maybe) only in the center of the back. Further, it is somehow attached periodically so that it does not fall, and in front, the free lower ends of this structure are attached under the "apron". Here. I can't make it clearer yet, I'm sorry.
It is easier to order this pattern than to try to recreate it from a modest technical drawing.

Sun skirt with drapery. We build an asymmetric pattern
Drapery skirt. We build an asymmetric pattern
"Data-medium-file =" https://kroycad.ru/wp-content/uploads/YUbka-s-drapirovkoy.-Stroim-asimmetrichnuyu-vyikroyku1.gif "data-large-file =" https: // kroycad. ru / wp-content / uploads / YUbka-s-drapirovkoy.-Stroim-asimmetrichnuyu-vyikroyku1.gif "/> The sunny skirt with draperies that I offer you today is very feminine and interesting. It will suit slender graceful girls without a prominent tummy.
Such a skirt with asymmetrical drapery extending from the center of the front can be made of wrinkle-free fabric, moderately soft and dense. These can be suit fabrics, woolen and half-woolen fabrics, as well as other materials suitable for these characteristics.
Let's take a look at this model.
Drapery skirt. Design
- in silhouette - this is a pencil skirt, built on a regular basis;
- the direction of the drapery lines is symmetrical, but their combination (docking) is asymmetric;
- drapery lines diverge from the center, reminding everyone of the familiar herringbone parquet;
- the back is without features, in the central seam there is a zipper and a slot, which can be either open (slit) or closed (overlap).
- The front panel should be made on one layer of fabric, and for the back panel, the fabric should be folded, as usual, in half.
- When laying on the wrong side of the fabric, be sure to turn the pattern of the front panel face down.
- This pattern must necessarily have control points for correct assembly drapery.
- To check the sewing accuracy, fold the front piece along the center line. If you did everything exactly, then the bottom lines, side cuts and waist (almost all) of the right and left parts should coincide.
Drapery skirt. Sewing procedure
We collect the drapery in a certain order, indicated by the numbers 1 - 4:
- First, lay the lower right (pictured) fold (1). We fix it with pins.
- Place the bottom left fold (2). The blue (in the photo) parts of the fold lines 2 must match. Sew the blue areas.
- Place the upper right fold (3). We fix it with pins. The green areas of fold 3 must match. Sewing green areas.
- Place the upper left fold (4). We fix it with pins. The red areas of fold 4 must match. Sew the red areas.
- Depths of the laid stock must be embedded in the seams of the connection.
Despite the fact that the contour of the pattern of the front panel has internal corners, the technology and assemblies make it possible to do without cutting them. Therefore, you do not need to cut the corners to the top.
It seems to be not difficult, but so that the skirt does not turn out to be skewed, greater assembly accuracy is required.
It is necessary to iron the front fabric of this model very carefully: when ironing the connecting seams, you should not touch the folded folds with the iron. It will be quite difficult to iron them later.
And now I invite you to watch the album and video on modeling this skirt and get to work.
If this article turned out to be useful or interesting to you, I will be very grateful if you share it with your friends by clicking on the social media buttons.
Perhaps it will be interesting to you too.
I invite you to cooperation!
Red dress "must have" - we sew and we have no doubts.
Prom dress with lace decor - we sew quickly and easily!
Pencil skirt pattern with decorative zippers
6 Comments
thanks for your nice answer .i do not read russian so can i find an English or Frensh translation /
Welcome to my blog, sara. You can use google translator (for example).
re: Solar skirt with drapery
I hope you will understand english, but first I love your blog, I learned much of this, now I have a question about the Solar skirt with drapery, on the end how to cut by the folds. Thanks in anticipation
Astrid
Astrid, thank you for my blog appreciation. To my regret, my English is worse than my cutting and sewing. If I didn’t understand, you can draw your question and send it by e-mail [email protected] But as I understand your question, you don’t need to cut folds. They folds (lay down) and must be ironed slightly in the direction as shown at the picture. Good luck!

Skirt patterns allow using one pattern to sew several completely different skirts... If you love to dance, then the patterns of gypsy and Spanish skirts will allow you to sew an outfit for performances yourself. And if you just follow the fashion, or prefer your own, purely individual style, then this section will help you always look fashionable and stylish. Moreover, using this skill, you can sew an exclusive dress. There are many styles of skirts: year, flared, sun, pleated, pleated, Scottish, spiral, mini, midi, maxi, and patterns of skirts will allow you to fulfill any design fantasies. Below are very interesting and practical different options for skirts patterns: patterns for straight skirts, patterns for "Gode" skirts, patterns for "Sun" skirts, patterns for straight skirts with a detachable cape, patterns for wrap-around skirts, patterns for skirts with a chilli frill, patterns for undercut skirts and drapery, etc. which are easy to sew and pleasant to wear.
You may also be interested in
Question... Hello! On the eve of the New Year, I want to sew such a skirt. Tell me how to model it?
Answer... To model this model, you need templates for the details of the front and back parts of a straight classic skirt. In this case, there is a cascading drapery.
Stage 1. On the front and back of the classic skirt, mark the yoke line. We close the darts and transfer their solutions to the line for attaching the yoke. We cut off the coquette.

Stage 2. We outline the lines of the drapery. According to the model, the drapery is "soft", so it is better to design the lines curved.

Stage 3. We cut the parts along the outlined lines.
Stage 4. To form cascading draperies, it is necessary to use parallel dilution of the resulting parts. The amount of dilution depends on the desired depth of the fold along the seam of attaching the details of the skirt to the yoke.
Various options are possible here. You can make all the folds of equal depth, or vice versa, different, for example, from deeper to the center to less deep to side cut.
In the diagram, the blue dotted line shows the side cut. You can design a skirt without a side seam, although the consumption of fabric will be higher.

Stage 5. We design a chill mold. One-fourth of the circle can be drawn. Also possible different variants and by the amount of dilution and by the lengths of the segments.
The construction of a strict straight type skirt is based on straight lines. The elementary cut of the product allows you to model it by modifying the fragments of the finished pattern.
Technically and artistically, the base model is transformed into a number of other types of skirts.
blogspot.com
Modeling features
The correct fit of the base skirt becomes the main criterion for the possibility of its further modeling. The cut-base can be disassembled along any lines. In the drawing, it is important to keep the width of the waist area and the length of the product.
Basic methods of constructive modeling
- Transfer of darts.
- Changing the location of construction lines.
- Partial expansion of the product.
- Creation of a fundamentally new configuration.
Before modeling a drawing of a skirt on the basis of a straight line, it is necessary to separate the front and rear panels from each other. Work on them is carried out one by one. The main methods for modifying a straight cut (narrowing, varying the level of length) are applied to specific types of skirts.
The simplest of the methods for modifying the pattern is the formation of folds. They are created either on one of the panels, or around the entire perimeter of the thing.
A single fold on the product is made as a counter. It starts in the center of the front panel, consists of two folds, which have one side and are turned towards each other.

yoox.com
Building a pattern
- From the center of the drawing at waist level, set aside 0.5 cm to the left.
- Reduce the solution of the tuck located in the immediate vicinity of the new point by the same amount (0.5 cm). This will keep the width of the product unchanged at the waist.
- Combine the resulting measurement with the lower straight line reaching the bottom. This line will outline the fold of one of the folds. It is necessary to start the fold at the waist in order for it to fit sufficiently to the base.
- Along the line from which the tuck is coming, to the right, draw a segment equal to half of the allowance required to form the fold.
The folds on this model go from the center of the skirt and capture both panels. These elements are aligned with the darts at the top of the product.

domremonta52.ru
Building a pattern
- Draw a vertical through the center of the dart in the drawing, dividing the structure in two.
- Transfer the fragments of the pattern to a clean sheet of paper.
- Dissolve parts of the cut along the cut, forming an allowance for the future fold. If the folds have one side, the allowance width should be up to 10 cm. The opposite fold needs a larger allowance width.
- Outline the details according to the new contours.
- Make a folded fold. Connect the points on the waist line with the center marks of the product using segments ending at the bottom edge.
- Create a center fold.
- The allowance for it in a long product should be larger.
Skirt with one counter and two one-sided pleats
- Determine the location of the front fold, outlined parallel to the middle of the front of the model at a distance of 12 cm from the center.
- Move the dart at the waist to the area of the fold. To the right and left side at waist level, set aside half the value of the tuck mortar. Mark the length of the dart.
- Cut the front part of the cut according to the marks made. At the top, cut the pattern on both sides of the future dart.
- Directly on the fabric, take the middle of the construction 12 cm from the cut formed by the fabric, folded in half, in the direction of the shared thread. This is necessary to create the opposite fold.
- Spread apart the front of the garment to create a one-sided pleat.
- Decrease the depth of the fold at the bottom by 1.5 cm.
Landing on a yoke
Straight models of skirts are complemented by cut-off yoke belts of various configurations and sizes. Such belts can be overstated or underestimated. With a strong understatement of the yoke, an undercut is formed - an element that structurally and decoratively changes the product.
Building a pattern
- The dart passing through the lower edge of the yoke is closed and secured with a pin until the end of processing.
- The detail of the coquette is first outlined. It may differ depending on the selected model. After it is cut off according to the marks.
- If the yoke does not reach the end of the dart or is under it, the dart should either be extended or made shorter.
- In this case, the formation of folds is also performed on the lower part. The pattern is cut along the fold marks and pushed apart according to the intended allowances.
- The bottom of the model is expanded by cutting and expanding based on the style. Decorative flounces can replace folds.
Relief
The product can be laid out on elements, which are sometimes complemented by flounces. Such elements create a relief on the surface of the model, constructively complicating and decorating it.

pinterest.ru
Building a pattern
- Draw relief lines. The axial boring is carried out vertically downward.
- Divide the base vertically, forming the required amount of relief of a certain width.
- Connect the resulting marks with the solution of the existing darts.
- Extend the canvas along the bottom. To do this, set aside about 3 cm on both sides.
- Combine the resulting marks with the edge of the dart. You will get two skirt details - side and front.
- Provide the side part with pocket elements and shorten at the bottom.
- Draw vertical lines on the cut fragment, expand them to create a decorative assembly.
Straight cut and pleats
Model with an undercut, the top of which runs parallel to the waistline and is straight and complemented by one-sided pleats. The folded fragment comes out directly from under the scoring structure.

In the course of cutting, the folded area is made in the form of a single piece or made up of two parts. In both cases, the folds follow the inner folds.
Wedges of the "semi-sun" type and rectangular undercuts
The style refers to the model of the "godet" type (with a sharp flare at the bottom). In the hem of the product, 4 undercuts are made in the form of narrow rectangles. Wedge-shaped fragments, the configuration of which is called "semi-sun", are sewn into undercut parts.
Figured assemblies
The silhouette of the product expands downward.

storesnew.ru
Building a pattern
- Provide the front panel of the drawing with the bottom lines of the curly-type yoke.
- Apply similar contours to the back part, aligning the side construction marks of both parts of the cut.
- Cut the frills in a straight line. The width of the parts should exceed the lower cut-off part by 3 cm.
- The frills are cut at a 45-degree angle to the warp. The width of the elements is 3 cm larger than the cut-off parts of the bottom of the model.
In the course of modeling, the product of a straight cut is complemented by draperies on the sides, acquiring a more solemn look.

revolveassets.com
Building a pattern
- From the upper edge of the drawing along the waist line, lay down a segment equal to the measurement of the width of the belt.
- Draw a straight line from the top of the dart down to where the drapery will begin.
- From the obtained point in the direction of the thigh, draw a line marking the future undercut.
- Mark the location of the drapery cut.
- Make similar changes to the cut of the back panel, observing the alignment of the side points.
- The seam in the thigh area on the drapery is not performed, as the details will be one-piece. The presence of a seam on the side is possible in this case only if there is an inflated belt.
- Lay the folds of the drapery with the folds up.
- Sew the bottom of the drapery into the undercut area.
Smell, undercut and skirt drape
A straight silhouette item can be equipped with a front zip and a three-button fastener. In the area of the fastener, an asymmetrical undercut and drapery placed under it are performed. The back of the pattern remains unchanged. The front panel is made up of two halves - a larger base and a smaller odor.

aws-service.ru
Building a pattern
- From the upper edge of the dart of the smaller half of the front, lower the perpendicular to the intersection with the lower line.
- Round off both front panels at the bottom.
- Draw an undercut for the future yoke. Close the dart on the yoke details.
- Mark the outlines for extending the bottom. They will run parallel to the middle of the front. Cut the pattern from top to bottom, pushing it apart to the required width. You will get an assembly for the part of the yoke belt.
- In the drawing of the smaller front fragment, at the level of the darts, draw a straight line along which the right side of the product will be superimposed - that is, the smell. Align the new contour with the board.
- Smoothly finish the bead detail at the bottom.
- Carry out a trim-type trim with a width of about 7 cm. Their shape corresponds to the configuration of the sides of both front panels of the pattern.
- Cut out a part of the belt up to 10 cm wide. The length of the belt is equal to the waist circumference with the addition of a few centimeters. The cut is made perpendicular to the main thread.
Smell and waist gather
The product turns out to be asymmetric in the area of the fastener. The smell is located in the front. The assembly from the waist line is performed on a smaller piece of cloth. The bottom of the scent is formed by a smooth line. The back in this case remains unchanged.

burdastyle.ru
Building a pattern
- Measure the odor value from the center mark on the front to the right. It is recommended to use the future element to overlap the dart of the larger part.
- Draw a perpendicular from it in the direction of the bottom. The bottom of the smaller panel is rounded.
- Spread the cut using parallel straight lines that should pass relative to the center mark.
- Cut the pattern from the top.
- Extend the waist area as needed. This parameter depends on the density of the assembly, which the product style suggests. The dart automatically becomes part of the assembly.
- In the area of the tuck of the odor detail, draw a straight line, which will outline the location of the starboard side. He will have to close the dart. The bottom of the larger piece will remain straight.
- Carry out a pick-up, the shape of which corresponds to the configuration of the smaller part of the model. The width of the part is about 7 cm. The edge of the second panel is made similar in width, stitched, equal in shape to the edges of the bead.
- The product is supplemented with a belt 10 cm wide. Its size must exceed the size of the waist.
Triangular yoke and counter-pleat
- Mark on the drawing the location and size of the darts, leaving them unformed.
- Define yoke labels.
- From the extreme marks, lay down segments with a length of 30 cm. Connect the new points with the upper extreme marks of construction.
- Move the edges of the darts to the yoke line. Draw a smooth outline on the other side of the darts.
- From extreme marks to the left and right side set aside 10 cm. You will get the bottom of future folds.
- Make the upper cuts in such a way that during processing they are inside the seam of the yoke attaching.
- Form a soft folded row in the area of the cut-off belt. Extend the cut according to each of the marks by 4 cm.
Additional modeling options
The undercut can be used twice as a modeling element. Symmetrical undercut pieces in the center of the product are supported by a piece of opposite folds.

season.ru
- Symmetrical undercuts located at the bottom of the model can be extended by using the back of the garment.
- With the help of undercuts, product pockets are formed. The waist area is supplied with a soft folded row.
- Asymmetrical drapery slightly off-center of the model is pulled together with a wide ribbon or decorative buckle.
Draped skirts
The designs of draped skirts are built on the drawing of the base of a straight skirt. In this case, the darts turn into drapery. The type of drapery depends on the structure of the fabric. So, silk and wool give a voluminous soft drapery, knitwear - flexible, plastic. The drapery from these fabrics is easy to fit along the oblique and transverse threads. Hard light fabrics are draped only along the oblique thread, forming clear ray-like folds.
Model 1 (fig. 1)
The skirt is draped along the line of the darts.
Three small, non-ironed pleats emerging from the slanted, slightly curved dart create a draped effect.
On the pattern of the front panel of the skirt, the lines of the direction of the folds-draperies are applied (Fig. 2). Along the outlined lines, the pattern is cut and diluted to the desired size. The distance between the folds should not be the same: between the first and the second it is about 3.5-4 cm, and with each subsequent fold it decreases by 0.5 cm compared to the previous one (Fig. 3).
Model 2 (fig. 4)
Skirt with asymmetrical drapery along the front panel.
With asymmetric drapery, the pattern of the front panel of the skirt is built in full size. The scraper can be positioned from the line of the waist to the line of the hips and below. If it runs below the hip line, then for greater elegance, the skirt is narrowed at the bottom along the side seams by 2-3 cm on each side. The cut line is marked on the pattern, along which the folds of the doping will be located (Fig. 2). It is undesirable to place them at the extreme points of the lodrez line; it is necessary to retreat by 2-Z cm. Libya is drawn from the undercut line to the side seam, determining the direction of the folds.
First, cut the pattern of the front panel of the skirt along the undercut line (Fig. 3) and close the dart on its left side, and then along the marked lines of the draperies. The width of the folds ranges from 3.5 to 4.5 cm.
The back panel of the skirt is left unchanged.
Model З (fig. 4)
Softly draped wrap skirt front cloth
|
Fig. 1 Skirt with a softly draped wrap along the front panel |
Fig. 2 Undercut lines |
|


Difficulty level: easy
Technical drawing of the model:
Appearance Description:
Women's casual skirt, knee-length. The front of the skirt has an asymmetrical drapery in the right side seam. The back of the skirt has two darts. In the left side seam- zipper closure. The upper section of the skirt is finished with a stitched belt fastened with a loop and a button. The product assumes the presence of a lining.
Main material- suit woolen, half-woolen, silk or blended fabric, plain or with a "strip" pattern, which will emphasize the design concept of asymmetric drapery.
Attention! To ensure and maintain the drapery, the material must be "dry", not in the sense of the antonym to the definition of "wet", but in the sense of "sufficiently rigid, capable of holding the drapery without sagging."
Lining material- any lining material in color combination with the main one. However, I would recommend focusing on the material containing viscose fibers and threads, because it is less electrified (sticks).
When ordering a pattern, you will receive 3 pdf files:
- A file with instructions for printing a pattern, containing a control square and measurements, according to which the pattern was built;
- File with a pattern in A4 format, for printing on a regular printer
- File with a pattern on one large sheet - for printing on a plotter
Sample pattern:

* PRINT ON A4 FORMAT PRINTER:
When printing a pattern in A4 format, open Adobe Reader and check the " Real size"(or uncheck" Fit to page ") in the print settings.
Notice the test square (or grid) on the pattern sheet. Its size is exactly 10 by 10 cm. It is needed in order to understand whether the scale is set correctly on your printer when printing. Before printing the entire pattern, print out the sheet with the red square and measure it. 10 cm sides? this means that you can print the rest of the pattern sheets. If the sides are more or less than 10 cm, you need to adjust the print scale for your printer. Otherwise, the pattern is not printed correctly.
After printing all the pages of the pattern, glue them in the order shown: the letters (A / B / C +) represent the column and the numbers (01/02/03 +) represent the row. The first (top left) sheet of the pattern will have the number A01.
* PRINT ON PLOTTER:
When printing a pattern on a plotter, open the pattern file in Adobe Reader (or Foxit Reader). Click on the "File" menu item, then select "Print". Select the "Poster" print mode in the "Adjusting page size and handling" section. Make sure the Segment Scale field is set to 100%. Check the boxes for Clipping Marks, Labels, and Split Large Pages Only.
The following designations are adopted on the pattern:
.png)
Parts list
MAIN MATERIAL
Back part - 1 piece (folded)
Front part - 1 piece
Belt - 1 piece (with a fold)
LINING MATERIAL
Back of the lining - 1 piece (folded)
Front part of lining - 1 piece (folded)

Attention! The seam allowances on the front of the skirt are shown in the illustration.
When cutting the rest of the parts add seam allowances for all main connecting cuts - 1 cm; along the bottom edge of the back of the skirt - 4 cm for the main material and 3 cm for the lining.
.png)
Attention! For more precise definition the length of the belt (parts without seam allowances), it is necessary to measure the waist circumference, add 1 cm (for the use of material and constructive increase), as well as 4 cm for the processing of the fastener.
Attention! Before cutting the lining material, it must be pre-cut, i.e. provide forced shrinkage (soak in warm water for 15-20 minutes, allow time to dry and iron).
Consumption of the main material for the specified model can be determined as follows: the length of the finished product plus 30-40 cm, with a material width of at least 140 cm for small sizes and at least 160 cm for large sizes!
Average material consumption for a skirt is 1 m with a material width of at least 140 cm.
.png)
In addition to the main material for making a skirt, you will need:
- about 10 cm of adhesive cushioning material for duplicating the belt (with a width of 90 cm);
- glue edge (woven or non-woven) 0.8 cm wide - 30 cm;
- zipper - 18-20 cm;
- button.
Technological sequence of processing a skirt
Processing the front of the skirt
1. Apply on the front side hand stitches material is the main lines of the drapery.
2. Glue the hem along the top edge of the front of the skirt.
Now the fun part !!!
3. Pin, and then sweep along the right side cut of the folds that form a drapery (the upper fold looks with the fold up, and the lower fold - with the fold down) Fig.1.

Note! The horizontal line between the numbers 1 and 1 * will sag between the layers. This is fine! In the process of sealing the folds, it is advisable to combine the cuts so that the right side cut of the skirt is completely aligned. Formed slice DOES NOT repeat the side cut of the back of the skirt ... It is this design solution that allows you to get the excess volume of the material of the front part back.
Attention! At this stage, it is necessary to sweep the back to the front of the skirt along the side cuts and see the "pattern" of the resulting drapery. The constructive solution of the part allows you to play with the volume of the formed folds and their direction. Materials of different properties will fit into the drapery in different ways !!! This can be used to create an AUTHOR'S version. AFTER making your final decision, trim off the excess material along the right side cut, maintaining a 1 cm seam allowance.
4. Sew along the right side hem, securing the folds.
5. Iron the masonry lightly at an area 4-5 cm from the cut.
6. Overcast the left side cut of the front of the skirt.
Processing the back of the trousers
- Sweep and grind darts. Press the darts towards the middle.
Belt blank
- Duplicate the belt (glue the adhesive cushioning to the wrong side of the belt).
- Press the belt in half.
10. Overcast one longitudinal edge of the waistband. (If you take a belt, ironed in half and the curly cut is in your left hand, then you need to sweep the lower cut of the part of the belt that looks at you ). Rice. 2. Option 1.
- Grind the curly end of the belt (cross-over). Turn out the corner, iron it.
Lining blank
- Sew the pleats along the top edge of the front of the lining.
- Sew darts at the back of the lining. Press towards the side cuts (!).
- Overcast the sides of the lining.
- Stitch the front and back of the lining along the side cuts.
Attention! Sew the left seam from the zipper end to the bottom.
- Iron the side seam allowances.
Mounting
- Baste and then stitch the front and back of the skirt along the right side cut.
18. Neaten the seam allowances and press them on the FRONT of the skirt (!). It is this "trick" of incorrect ironing of the seam allowances that makes it possible to obtain the required shape.
Stitch the front and back of the skirt along the left side cut (from the end of the zipper to the bottom.
(line 3 Fig. 2. Option 2).

28. Overcast a buttonhole and sew a button at the waist.
29. Seam the hem of the skirt with a closed hem or open hem seam.
30. Try on the product. Determine the length of the lining. If necessary, trim it along the bottom cut.
31. Sew a sewing allowance for the hem of the skirt lining.
32. Overcast a buttonhole and sew a button at the waist.
33. Iron the skirt when finished.
We also recommend
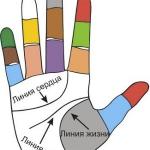
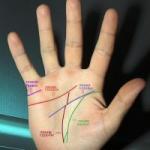 Palmistry - determine the line of marriage and children on the hand
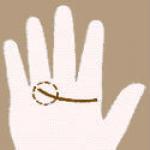 Palmistry of the marriage line on the hand
 How to find out by hand how many marriages will be and whether they will be happy?
 Skyrim: how to get rid of vampirism?
 The Mystery of the Silent Twins: The Life Story of the Mysterious Gibbons Sisters How She Died
 Hematite is a stone of blood, its healing and magical properties