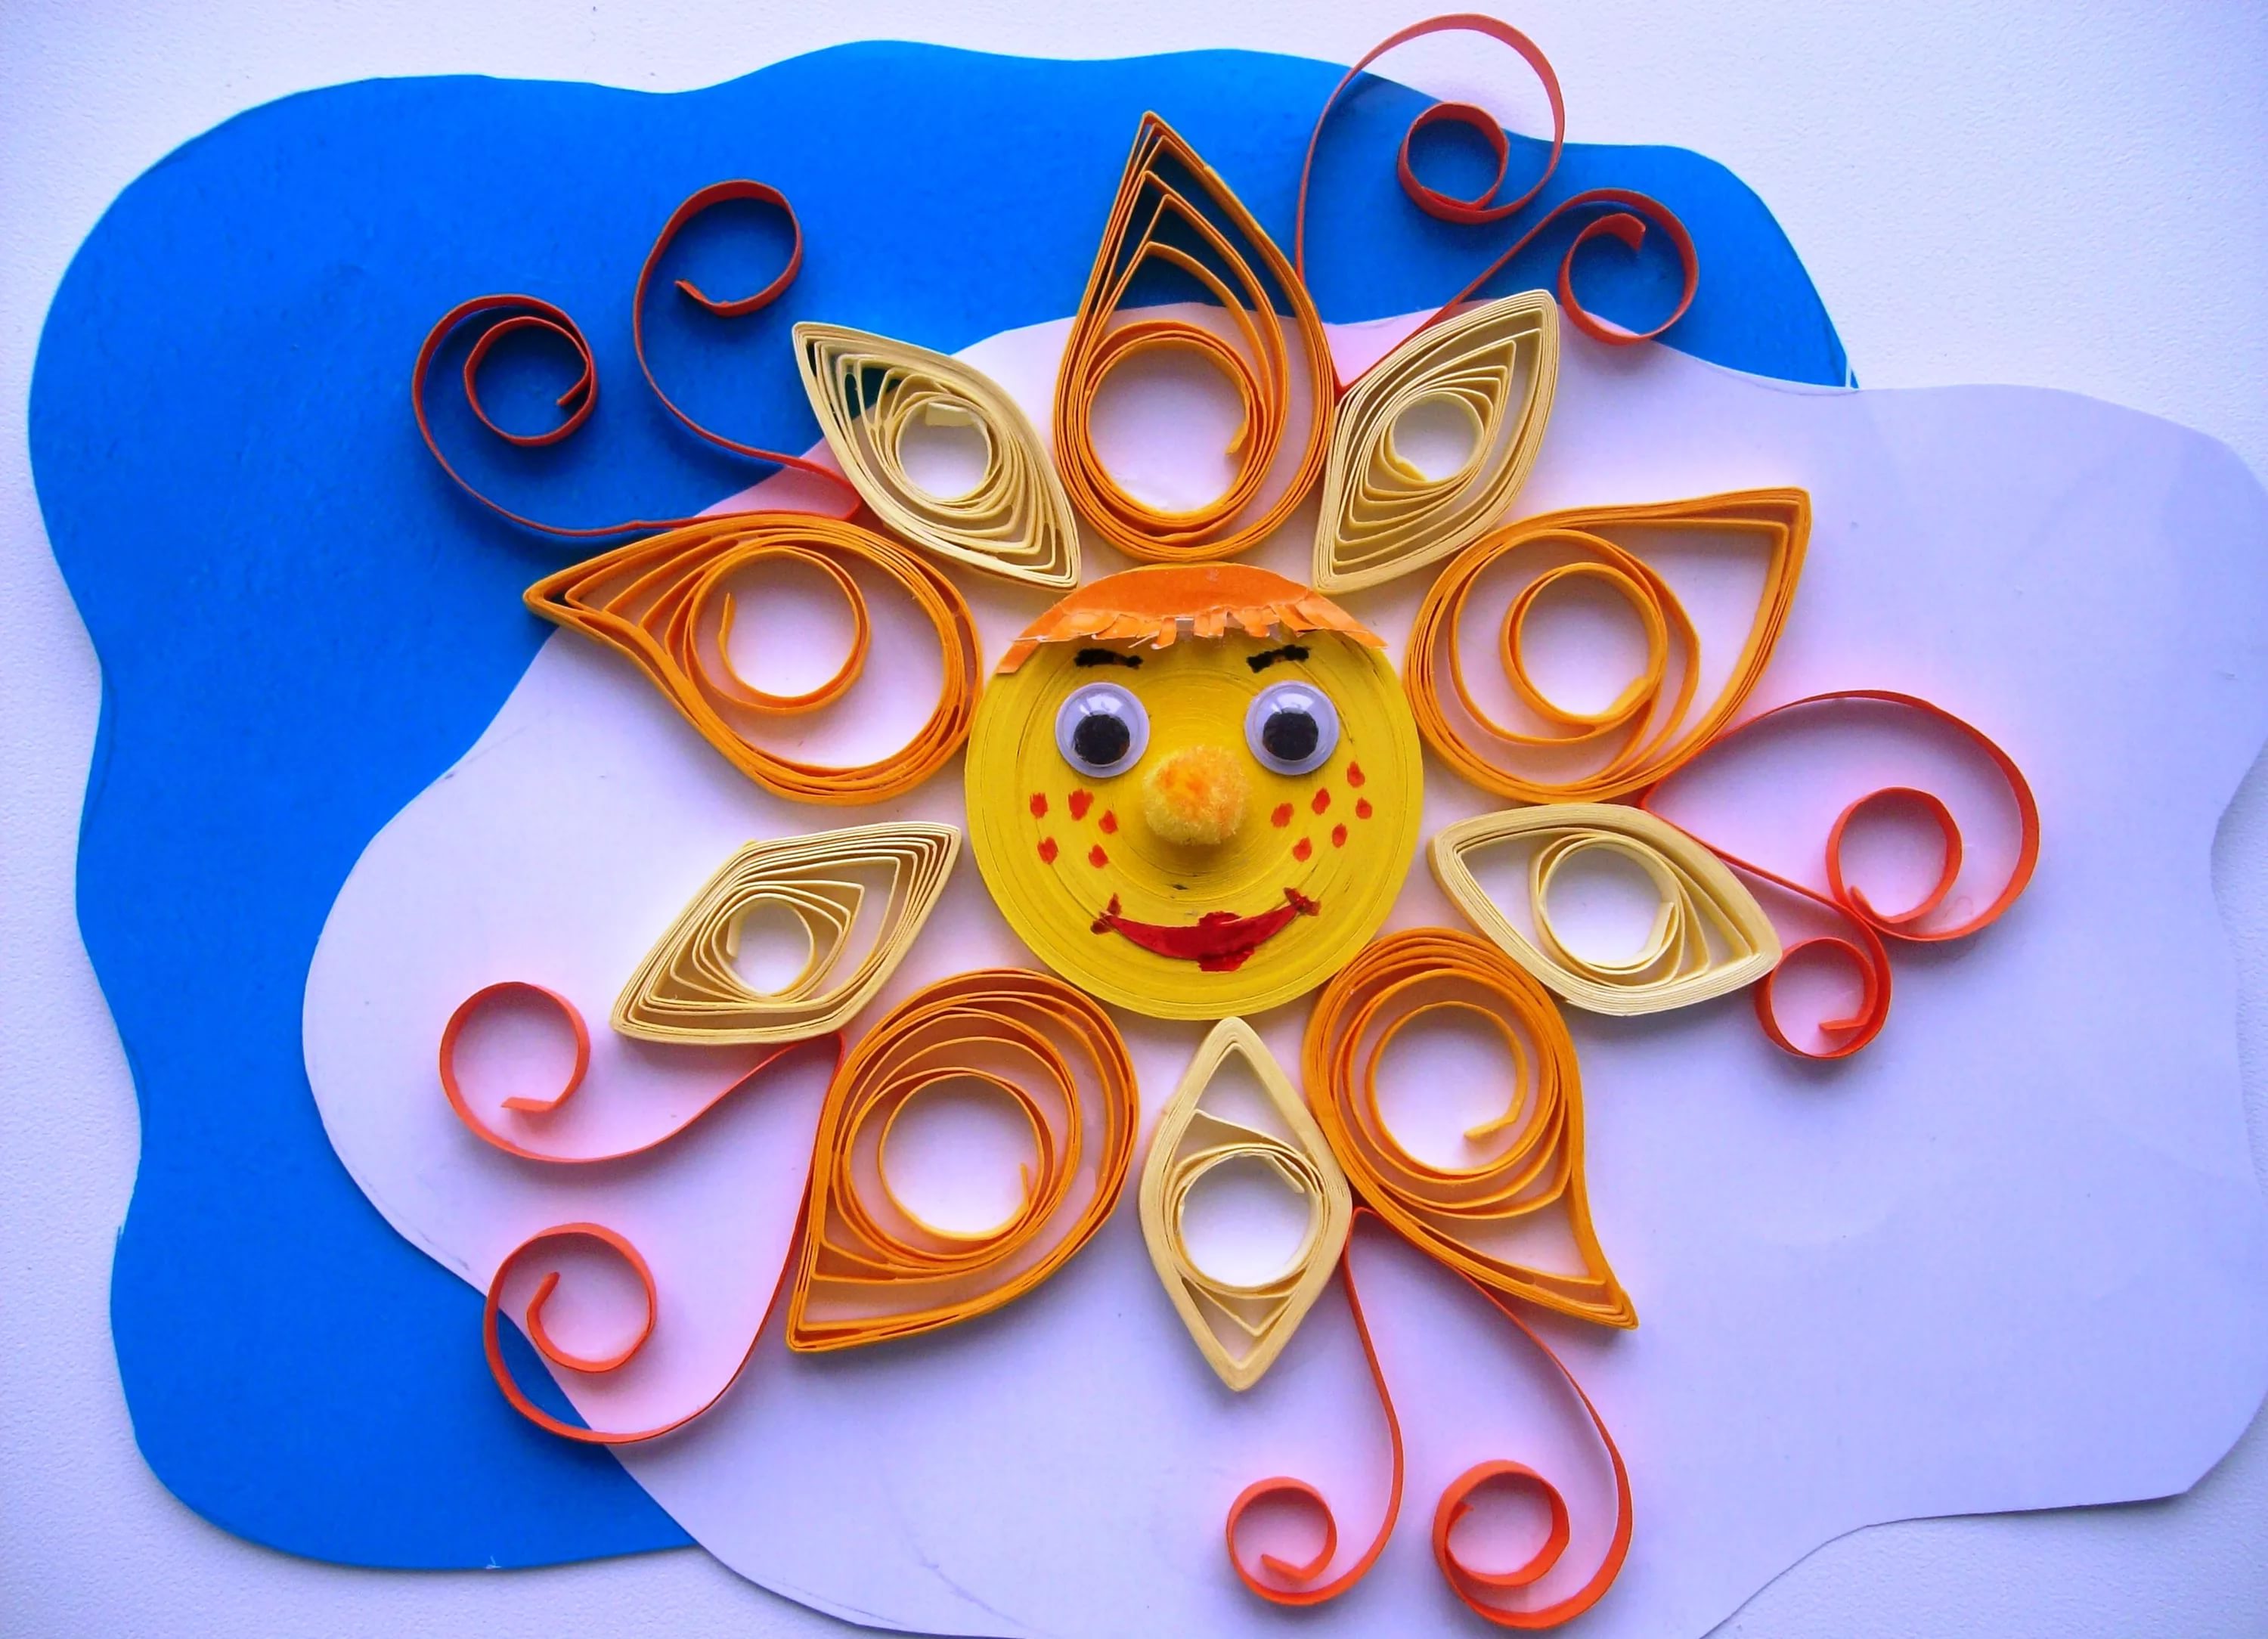
Patterns of paintings for quilling. Quilling: learning to create real masterpieces using the paper-rolling technique
Fishnet quilling crafts will decorate any window sill, wall, desk or crib. Sophisticated postcards, panels or small quilling souvenirs will surely appeal to young connoisseurs of beauty and those whose hearts always yearn for a fairy tale.
Monks of medieval Europe are considered the creators of the first quilling crafts. By trimming the gilded edges of religious books and rolling paper strips at the tip of a pen, they made medallions that simulated gold miniatures. No wonder from in English the word "quill" is translated as "bird feather".
Quilling is a unique technique that will help you convey the airiness and lightness of lace patterns.
To create crafts from quilling, you will need the following tools: awl, tweezers, scissors, glue, as well as a pencil, compasses, ruler template.

Before starting work, familiarize yourself with the basic elements of quilling, the so-called modules. Exactly different shapes spiral paper strips will allow you to achieve the desired pattern.

Quilling angel
A stylish pendant or a tiny souvenir for a friend - an angel using the quilling technique will move anyone. In my opinion, a great gift if you are going to visit.
All parts of the craft, except for the head, consist of “free spiral” modules.
1. First make an angel sleeves: take four strips of blue color 21 cm long, glue together. With the help of an awl, twist it into a tight spiral, and then dissolve it a little - to a diameter of 20 mm.
You can use special quilling paper, or cut the colored double-sided paper yourself, as I did.


2. For dresses angel you will need:
- three "free spiral" modules, consisting of eight glued blue strips, each 21 cm long. The diameter of the spiral on the ruler must be 32 mm;
- two modules "free spiral", consisting of two glued blue strips, 21 cm long. The diameter of the finished spiral should be 10 mm.
3. Pens- these are 2 loose spirals of 2 glued light pink strips 21 cm long each. The spiral diameter is 10 mm.
4. To create wings toys, make 2 free spiral modules consisting of 4 glued strips white, each 21 cm long. The diameter of the spirals for the wings is 26 mm.

5. For making heads make a tight spiral of 10 light pink stripes length 21 cm.
Important! Remove each spiral from the template ruler with tweezers. Carefully grease the edge with glue so that the module does not unwind.


6. For all spirals, except for those 10 mm each, give the shape of a droplet.

7. Tiny spirals for the dress will remain unchanged. And pink - for pens - you need to give the appearance of curved droplets.

8. Assemble the angel: glue all the parts with PVA glue, as shown in the photo. Styrofoam is ideal as a stand - it is easy to stick pins into it.

9. Insert a loop between the head and wings. The angel is ready!

And here are a few more quilling angels - for everyone who knows the technique thoroughly.


Quilling snowdrops. Beautiful spring card
To make a flower card with snowdrops, you will need: colored cardboard, an openwork napkin, PVA glue, a long toothpick, white and green quilling paper.

1. On a toothpick, twist three modules under the name "free spiral". These are snowdrop petals.

Form three of them basic elements"Eye" by clicking on a spiral from two opposite sides.

2. Take a green strip of paper and form a tight spiral out of it. Using the blunt end of the skewer, squeeze out the middle of the spiral, thus forming the "cone" element.


3. Collect the snowdrop flower: glue the petals and place them in the middle of the cone. If you want to make an unblown bud, place only one petal in the cone.
4. Cut thin stems 8-9 cm long from green paper.

5. Cut off ¼ openwork napkin, remove the sharp corner and make a basket blank, bending the edges in the middle.

6. There is very little left - to stick all the details of the bouquet on a cardboard blank and sign the postcard. I am sure that the hero of the occasion will be very happy with such a touching gift: beautiful flowers in the quilling style.

Miniature flower in a pot using quilling technique
This tiny flowerpot from the "mi-mi-mi" area will surely delight girls. So why not do a pleasant surprise to your beloved friend or deskmate?
In addition to pink, green, white and orange paper for quilling, you will need: a wine stopper, a toothpick, PVA and scissors.
1. From a cork and a toothpick, make such a tool for winding paper.

2. Cut six strips orange and twist them into spirals, dissolve a little.

3. Press the spirals from one side, giving them the shape of droplets.

4. Glue three white stripes 7 mm wide and make a fringe. This is the core of the flower.
5. Make a spiral of two green strips, dissolve and squeeze from both sides. Thus, make 2 sheets.
6. From a strip of green color 6 mm wide, make a tight cone-stem.

7. Make a flower pot from three glued pink strips 1.5 cm wide. Roll a tight roll, squeeze the middle down. Pour PVA glue to the bottom, glue a circle of paper.
8. Make the herb in the same way as you made the core of the flower. Strip width 10 mm.

9. And now the best part - assembling the flower.

Here it is - a decorative quilling flowerpot and a new gift for a friend.
What else can be done from quilling
Quilling is always bewitchingly beautiful and very pleasant. Any quilling craft gives a feeling of sophistication, airiness of the depicted object or drawing. See what unusual products can be done using the paper-rolling technique.
Animals, birds and insects. There are many photos with quilling products that even a beginner can handle:

Quilling classes have become popular due to the fact that the English princess Elizabeth at one time began to get involved in this art. This handicraft is a fun experience. It consists in curling long strips of paper into spirals. You can decorate jewelry, postcards, frames with such crafts. The technology is not very complicated, but for beginners who want to make beautiful products, you need to have enough patience.
Any base can be used for quilling. The work can be done on plastic, paper or fabric. At the first stage of the work, the most difficult part of the formation is the placement of forms within the drawing and along its contours.
Simple schemes are distinguished by their detail: in addition to the general drawing, the placement of the main forms of the composition is marked in detail on them.
Before starting work, you need to learn more about quilling, this will help the instructions. You should also find out what are basic forms quilling.

Quilling forms are grouped into 2 main groups:
- Tight rolls are made by very tightly wrapping paper tape on the tool and fixing the shape with glue.
- Free rolls - initially twisted with a special tool, with a release of the strip tension at the end of the twist.
Usually, in the quilling technique, tight rolls are placed in the center. They are the basis of the entire composition. Sometimes, to highlight individual areas, you can use tight rolls, which, due to tightly wound stripes, have a more contrasting color.
Universal quilling for beginners: diagrams describing the implementation
The most beautiful tree with flowers can be obtained from corrugated cardboard do it yourself, napkins or plain paper. This craft is easy to do with a description, and has a very beautiful view.
To make a tree you need to take:
- Gypsum;
- Any object that has a round shape;
- Trunk for a tree;
- Pot;
- The knitting needle on which the roses will be wound;
- Super glue;
- PVA glue;
- Corrugated paper (tissue paper or napkins).

Prepare strips of corrugated paper with a width depending on the size of the flowers. Cut green strips and squares for leaves from colored paper. The strips can be 1-2 cm wide, squares with a side of 4 cm. Proceed with the roses. Apply glue after each break in the paper. The strip is folded 90ᵒ. You can try to do it in different ways, the shape of the rose will depend on it. There are a lot of such flowers to be made.
Next, make the base of the tree. To make it, you need to take an ordinary stick and any round-shaped object (it can be a small ball woven from threads). The ball is fixed on a stick. All the flowers are glued to it with superglue. After that, they take green squares and, using the "facing" technique, add leaves between the flowers in random order.
Now you need to plant a tree in a small pot. Pour gypsum into it and dilute with water.
It is necessary to obtain a mixture of thick consistency.
We make quilling for beginners step by step: an autumn tree from napkins
Using this type of needlework, you can make almost real trees. One of these crafts is autumn tree from napkins.
For such a composition you will need:
- Toothpicks;
- Glue;
- Plain plain and multi-colored three-layer napkins;
- Miscellaneous colored paper;
- Scissors.
First you need to make the base for the composition. To do this, take a green and blue sheet, cut it in half with a wave, and glue 2 halves to the base (it can be cardboard) different colors.

Separate the 2 lower layers from the multi-colored napkin. Cut 4 cm strips and fold 2 times lengthwise. Using a toothpick or other device, twist the strips into a loose spiral (twist and release on the table so that it unwinds a little). After that, glue the end, and squeeze the product into the desired shape.
On such a tree, you can learn the quilling technique. It's pretty simple and pretty.
Further branches and stripes are made, which will represent the trunk. Need to take a napkin Brown, cut off the strip, and fold it in half. Expand and fold at the top and bottom (lengthwise) to the marked line. Folded in half, glue the inside with glue. Gently glue the branches to the base of the composition. Blanks for the crown shape are also glued. Next, twist a napkin roll, and fold a voluminous bush from several pieces. The final stage is to attach fallen and falling leaves to the base.
Interesting quilling: flowers for beginners chamomile
Chamomile flowers are one of the easiest compositions in quilling. Beginners learn how to correctly step by step work on this flower.
To make chamomile you need:
- PVA glue or any other;
- Corrugated paper and wire;
- Pencil, scissors, a tool for twisting paper;
- Leaflet template;
- Green paper;
- For a flower - a white stripe (35 mm), for a core - a yellow stripe (15 mm), for a sepal - 3 green stripes (3 mm).

To make chamomile, you need to cut a strip of white and yellow flowers fringed. Roll the yellow fringe into a tight spiral. Grease the yellow strip with glue, and wrap it around the yellow center. Then turn the flower over, straightening the petals and center.
If necessary, you can twist the petals with scissors. This will make the chamomile look more natural.
Start decorating the stem by wrapping the wire using corrugated paper pre-greased with glue. Twist a tight spiral of 3 green stripes (3 mm). Make the finished spiral convex so that it resembles a cone, and grease it from the inside with glue. Attach the green cup to the stem with glue.
Place the chamomile in a green cup, greased with glue, gently pressing the middle into it. Cut out the leaves (2 pcs) using a template and use tweezers to make creases on them. After that, attach the leaves to the stem. The chamomile is ready. The flower can be placed in a vase, or a whole bouquet can be made.
So that the composition has more interesting view, you should learn to combine full, compact and empty rolls. An interesting solution would be a combination of several colors at once. This can be done in stages, twisting 2 stripes of different colors, and superimposing them on top of each other, you get a striped roll.
You can make a two-color roll with a sharp color transition - glue the ends of 2 strips of different colors, and so twist everything.
Such color transitions are suitable for composing images of flowers in a quilling composition.

For quilling, you will need special tools:
- Safety pins;
- Curly scissors;
- The rug on which the strips will be cut;
- Dummy knife;
- Sets of special or homemade paper for quilling;
- Thick paper for the base, which will serve as the background of the entire composition;
- PVA glue;
- Special template for quilling (can be replaced with a ruler with shapes);
- Tweezers;
- Scissors;
- Spoke.
Also, in some works, a toothed comb is used. It is used by weaving strips in a specific order between the teeth of the comb.
Marine quilling for beginners: fish schemes
Another light scheme quilling work - fish scheme. This master class is very easy and quite interesting.
For composition you need:
- Simple pencil:
- Double-sided tape, PVA glue;
- A piece of dark blue paper;
- Thick cardboard - 1 piece;
- Scissors;
- Wooden skewer;
- Various colors of paper strips (5 mm wide).

In order to make the basis, you need to take thick cardboard, and cut off a rectangle (15x18 cm). Then attach the base to the dark blue paper, and wrap the opposite edges in pairs, fixing it with double-sided tape. This will be the background of the composition.
The next step is to form the blanks (free spiral). You need to make figures: 6 pieces yellow, 17 dark orange, 18 light orange and 24 green. Dark and light orange blanks should resemble the eye. To do this, simultaneously squeeze a round spiral with both hands from opposite sides. From blanks of yellow and green colors, make elements that are called "crescent" and "wave". They are made in the same way as the "eye". Only the first one needs to be squeezed and bent in the middle, and the second one must be folded in half.
For the fish, you need to prepare a few more elements: two V-shaped blanks of light and dark colors for the tail, 3 blanks in black are made with a tight spiral.
When all the main elements are ready, you can start collecting them. To begin with, you can draw the details of the picture with a pencil. Make algae from green blanks, spread glue on the base, and glue the elements. The fish is ready.
Simple quilling master class for beginners
No less popular composition in the quilling technique is weaving from newspaper tubes... This does not require a lot of materials.
For the basket you need:
- Glue;
- Scissors;
- Old newspapers.
First you need to prepare the vine. To do this, cut the newspapers into long strips. Then take a knitting needle, wind a paper strip - you need to start from the corner, and twist it obliquely, winding tightly until the tape ends. Fasten with glue and pull out the knitting needle.

Weaving should start with a simple mesh. When the mesh is ready (5x5), start the circular weave. If the tube is over, insert it into it and glue a new one. Next, you need to choose the size of the basket, taking a flower pot or something similar as a sample. The woven bottom should be the same as the bottom of the specimen.
To make the basket look more beautiful, you can paint it. This is best done with a stain, paint or stain.
Quilling for beginners (video tutorials)
Quilling lessons are quite painstaking work that requires perseverance, diligence, accuracy and patience. For a beginner, learning can seem overwhelming. To master the technique better, you should start with the lighter compositions. To do this, you can download a video tutorial in Russian. The main thing is to fill your hand in this matter, and then even the most complex crafts can be done very quickly and effortlessly.
Today, everything is original in fashion. In addition, it is assumed that there are handmade parts not only in the wardrobe, but also in the interior. There are many ways to quickly and tastefully decorate the most ordinary objects. The quilling technique comes to the aid of creative individuals, and just those who like to create beauty on their own. Quilling is a paper craft, it consists in creating an interesting drawing, or figures from paper strips that curl to form a picture.
Interesting fact: It turns out that even in the Middle Ages, needlewomen in Europe used this technique, however, it was not available, since high quality paper was required to complete the paintings.
What is quilling?
Quilling is becoming widespread today. And no wonder, because everyone has access quilling materials:
- Colored paper, but not heavy, or you can purchase special quilling paper;
- Ruler;
- Stationery knife;
- A rod, an awl, a thick needle, a toothpick - in a word, something that you can wind the paper on;
- Stencil with round holes;
- Tweezers;
- Nail scissors;
- Fast drying glue;
- Compass;
- Pencil.
Interestingly, modern stores are ready to offer a variety of sets, which contain everything you need for a quality hobby.
The advantages of the quilling technique
By far the main advantage of quilling crafts is their availability... In addition, with the help of work performed in this technique, you can:
- Decorate the house;
- Make an unusual gift;
- Relax with benefit;
- Get rid of stress.
However, such a hobby is a match for a neat and diligent person, therefore, do not despair if the first pancake comes out lumpy. You can always develop these qualities in yourself by methodically following the instructions for creating paintings and images from paper using the quilling technique.
Remember that even the first craft will not be as bad as you might think. Be sure to save it!
Quilling for beginners schemes with a description
Where to begin? As in any business, you need to start small... Let the first crafts be simple installations, for example:
- Flower;
- Snowflake;
- Duck;
- Butterfly.
Having studied the basic drawings that can be created from strips of paper, in the future you can make interesting compositions.
Scheme number 1 - Flower
 To complete this lesson you will need: colored paper, glue, cardboard (or any other surface on which the flower will be transferred), toothpicks, scissors, and a pencil.
First of all, it is worth preparing the base - cut the paper into strips of half a centimeter and no more than 20 centimeters long.
We start with a spiral, the main pattern using the quilling technique. You need to take a ready-made strip and wind it around a toothpick. Fan the paper tightly to prevent it from falling apart. Glue the tip of the paper strip to create an even circle.
Now we have a spiral, by the way, if you play a little with this shape, you can get pictures like:
- Droplet - you need to gently squeeze the circle on one side;
- Boat - you need to gently squeeze the circle on both sides;
- Heart - you need to hold the spiral on one side, and on the other - bend inward.
So, we have the core of the flower - round spiral... But different shapes can serve as petals for it. It remains only to decide on the number of petals and start making droplets, boats and even hearts. When you collect a sufficient number of parts, for example, eight, they need to be coated with glue from one edge and glued to a cardboard box, or to any other surface.
The craft is almost finished. However, the flower does not yet have a stem and leaves. The stem can be made from a strip half a centimeter wide and 10 centimeters long and glued sideways to the canvas. The leaves are best done in the form of drops and attached to the stem.
That's all. The first craft is ready! Congratulations!
Lifehack 1: It is more convenient to wind the paper not on a toothpick, but on a skewer, because it is longer.
Lifehack 2: So that you do not have to constantly control the position of the paper on the skewer, you can fasten one end of the paper strip. Make an incision and insert the tip into it.
Scheme No. 2 - Snowflake
 It is worth starting to perform it, as in the previous paragraph, with the preparation of strips. Recall that the width of each is 0.5 centimeters, and the length no more than 25 centimeters... In the case of a snowflake, the color of the paper can be white, but in order to make it easier for yourself and not to draw the paper from scratch, you can take already lined sheets.
There is no trick on how to make a snowflake. In fact, a snowflake will be any competent reduction of quilling forms: "drop", "boat" and "spiral". In addition to the shape that can be given to the paper, it is important to pay attention to its size. In the photo on the left, the game with the size of the details is visible very well:
Creating snowflakes is a laborious process and may take more than one hour... Therefore, on the eve of new year holidays to create home decorations, you can involve the whole family in making crafts. Call everyone. Fun will be guaranteed!
Scheme number 3 - Duck
Making a paper duck is pretty simple. It is enough to have only 6 paper blanks and 2-3 colors in the arsenal. So, the duck will consist of a head, body, tail and wing.
The head is mostly round, so we use a spiral shape for it. By winding paper on a skewer, or a rod special for quilling, you need to form a tight circle. Better to make the head big, so from standard size paper strips you can step back and make it about 50 centimeters long.
The torso is performed in the same way. However, in order to successfully fit the head, it can be made in the shape of a "heart" by pressing one of the ends of the spiral inward. In addition, you can add originality to the picture if you do not curl tightly, but loosely, for this, glue the tip of the paper strip a little later to let it unwind. Then the body of the duck will consist of pretty curls.
The tail consists of drop-shaped parts. It is enough to prepare three small droplets, the length of the strips can be reduced to 7-8 centimeters, and then glue the pieces of the tail.
It is also better to make a wing for a duck in the form of a drop, but choose a larger size. The drop itself can be slightly bent to give some grace to the wing.
The final stage - gluing all parts together... It will be more convenient to start transferring details to the canvas from the body, then the head, tail and wing.
An additional detail to the duck can be a beak, which can be easily made from a strip 2 centimeters long, bent in half, and glue it to the head of the product in the middle of the fold.
Scheme No. 4 - Butterfly
 The main element of the butterfly is its wings. You can color them using multi-colored strips of paper 5 millimeters wide, the length of these strips is arbitrary. It all depends on the desired size of the butterfly. Try to harmoniously choose colors for your future craft.
You need to prepare stripes(12 pieces), glue 3 pieces into one to get 4 potential wings, with two of these blanks being shorter than the other two. Each workpiece is twisted on a toothpick or needle into a free spiral, which must be shaped like a drop. This makes 4 wings for a butterfly.
Next step - make a butterfly body... It will consist of two parts, each of which is a cone. In order to make such a cone, you need to take paper strip the desired color, start winding it tightly so that each next curl drops a millimeter lower than the previous one and continue doing this until the strip ends, then fix the edge of the strip with glue. Now all that remains is to connect the bases and 4 wings. The butterfly craft is ready! In addition to the butterfly, you can provide antennae, and surround it with flowers made using the quilling technique.
Crafts using the quilling technique for beginners


Quilling is a word very few people are familiar with. And it means making figures from strips of paper twisted into spirals. Is it really that simple and easy to do? The variety of options will surprise you.
Next, I will tell you how to create from plain paper beautiful things. This type of activity will help you brighten up long winter evenings or make a beautiful thing. with my own hands and give it to your beloved. Or maybe after my lessons, it will become a hobby for you and even bring a small income.
But in order to understand what it is, to find out who invented it, let's plunge into the history of quilling.
A bit of history
This art form was invented by monks in Europe during the Middle Ages. When they cut the edges of the books with gilding and twisted them around the ends of the feathers of the birds. Thus, it turned out something like a golden miniature.
This is where the name quilling comes from. From the English word "quill", which translates as "bird feather". At the very beginning, this was done in poor churches, especially in the 19th century, quilling was a favorite pastime of noble ladies.
It was forgotten in the twentieth century. And at the end of the last century, quilling began to return to people's homes as a hobby.
As a result of his walking around the world, schools began to form in each country. And each nation brought something to its own in this kind of art. For example, oriental schools differ from European ones in the complexity of patterns, which allows oriental people to create masterpieces of art.
And the Korean school differs from the European one in that a rod is not used when winding the paper, and everything is done by hand. The work of the Korean school is very complex. In our country, this art became popular at the end of the twentieth century.
Therefore, few of us know this art form thoroughly. I will introduce you to the basics of this art form, give advice, give examples and try to give you all my knowledge. Let's start with a base of basics.
But before you start to engage in this type of creativity, you need to prepare. That is, to acquire necessary tools for work.
List of required tools
Below I have given a list of essential tools if we want to create all kinds of beauty out of paper.
You can not spend on the purchase of quilling kits. And make the right tools from home appliances.
To do this, use ordinary female nail scissors with straight ends, an awl or a toothpick. Between the two ends of the scissors, you need to put a long strip of paper, squeeze gently so as not to cut and wind. With an awl and a toothpick, they act a little differently: at the end of the awl, lay the edge of the paper and hold it with your finger, and the rest of the strip is screwed onto it with the other hand.
Now, knowing and keeping the tools that we need next to us, we can proceed to learning the basics of quilling.
Quilling basics for beginners
The production of paper products begins with a drawing. In this form of art, a drawing is a scheme according to which it will be made in the future. unusual craft, which can bring a touch of brightness and unforgettableness to your interior. First, let's look at how they draw simple schemes and which of them are magic crafts using the example of making a snowflake.
We will need:
- Pencil.
- Colored paper.
- Scissors.
Now we take A4 paper and fold the sheet so that we get a right-angled triangle. Cut off the unnecessary excess part and fold it three times. Then we draw patterns on it and cut out along them.
When you have mastered the initial and simple technique making crafts, which we discussed above, move on to more complex ones. Let's learn how to make rolls. It is the main element in the quilling technique.
We will need:
- Colored paper.
- Pencil.
- PVA glue.
- Scissors.
Rod for making rolls
At the very beginning, you need to outline with a pencil the future composition on the workpiece for greeting card or where this product will be located when finished. The next thing we need to do is roll. To do this, we need to take a thin and long strip of paper and wind it onto a specially prepared rod.
After what has been done, we must let the roll unfold. The end of the roll must be carefully glued to the spiral that has turned out. Now you can give the roll any look, be it a drop, a heart or a month.
Advice
In order not to get smeared with glue, it is necessary to apply it to the details of the product quite a bit. This can be done with a toothpick.
Special paper for quilling is on sale. It is better to use it.
And now we got to the main elements of quilling.
Essential elements
Now let's take a look at what parts the creations in quilling consist of. Any work starts with tight spiral. This is the first element in quilling when preparing a product.
Above, when we made a roll, in fact, we used this element. But then we did not know its true name yet. We now know this.
Let's repeat the process of creating a tight spiral again. A rod is taken, a strip of narrow paper is wound around it. And the tip of the latter is neatly glued to the spiral.
For information
- If you are right-handed, hold the strip with your left hand and the rod with your right.
- If the strip is double-sided, then the back of it should look towards the rod.
- The rod must be rotated clockwise.
The next element is the "free spiral". It is made in the same way as a "tight spiral". But after we have finished winding it, we need to remove the spiral from the rod and let it unwind a little.
Now we have learned how to create various kinds of spirals. The same technology is used to create a "curl" figure. But at the end of the work, the end of the paper tape does not stick and hangs freely in the air.
In order to make a drop, you need to squeeze one part of the "free spiral" shape with your fingers and hold it for a few seconds. This is done so that the shape takes on the shape of a drop. It is also possible to bend the tip at the “drop” shape to obtain a slightly different “curved drop” element.
Advice
If you are just starting to learn quilling - never rush!
Well, we have considered simple forms quilling. Now it's time to move on to the more complex ones. Such forms are obtained from two or more folded together.
Complex shapes in quilling
The complex element "horns" is created from two "free spirals" twisted in different directions.
For him, take a long strip of paper and break it in half. The right side is screwed in one direction, the left in the opposite direction. This element can be attached to a fun greeting card.
Underwater theme - decorate a house near the sea
The next shape will be the "heart".
It is done in the same way as the horns. Only the directions in which the spirals are wound change. And the junction is clamped with your fingers. This type of product is ideal for decorating a gift for your girlfriend or spouse.
The next most difficult will be the "crescent".
It is made from a simple "eye" shape, only the opposite corners are bent upwards. It turns out something like the letter "C". For the form, which in psychology denotes a leader, namely for a triangle, a "free spiral" is taken. Then it is compressed in three parts with your fingers and held for a while.
The next element is obtained from the shape of a triangle.
To do this, you need to bend two opposite sides to the center. And we will get "paws". To make a square shape, I use a free spiral. Then I squeeze it in four parts so that I get a square.
So we got acquainted with the basic forms of products in quilling. And also now we know what tools we need for this type of creativity. And we have some base that will allow us to move on to creating more complex products.
Quilling flowers
Such flowers will serve as a novice quilling master as a kind of transition from simple to complex. In fact, this is not yet the most complex product, but it contains many simple elements that complicate the manufacture of the product. Thus, the novice creator receives invaluable experience and beauty in his home, made with his own hands.
To create these colors, you need to make a "drop" from the "free spiral". And in order for the flower petals to have a different color, you will need colored paper.
As you can see, the heart of the flower is created from a "free spiral". Next, the core of the flower is first glued to the postcard or the surface that you intend to decorate. Around this figure, I glue the "drops" that I have already made in advance.
At the very beginning, you need to draw a template according to which they will be made. It is necessary to divide the strips of paper in half. There should be three of them. Then I turn the first spiral. Then I insert it into the hole of the stencil. It is necessary to make the rest of the spirals the same size. Therefore, I find out that the hole is one centimeter, which means that the other four spirals will be the same size.
In order not to damage the workpiece, I pull it out carefully and with a toothpick, and then let it unwind a little. And only after that I glue the tip to the spiral. Then I place these blanks in the center of the layout drawn in advance.
For beginners, it is advisable to use pins to attach the spirals to the breadboard. And then they can be glued together.
Now we have learned how to make complex snowflakes. The next step will be making decorative jewelry in the form of lovely ladies' earrings. They are perfect for a birthday present for your girlfriend.
Making women's earrings
To create such jewelry, very beloved by our women, we need:
- Colored paper. I will have blue and white colors.
- Scissors.
- Quilling rod.
- Quilling board.
- PVA glue.
- Pencil.
At the very beginning, in order for such jewelry to be symmetrical, I will have to imagine how the earrings will look and draw a diagram on paper. This diagram will serve as a template for gluing the various pieces together.
Step-by-step instruction
- I cut six strips of blue paper, one centimeter wide, and glue them together.
- Made of white paper, three strips and glue to the end of the resulting tape of blue stripes. And I supplement it with three more glued strips of blue paper. I do this twice to get two long ribbons.
- Then, with the help of a rod, I turn them into a "tight spiral" shape. We discussed the creation of this form at the very beginning.
- I do the same tapes again, only I cut the strips in two. That is, instead of six strips, I cut out four from blue paper, I also leave three from white paper and glue it together, adding two strips and blue paper at the end.
- With the help of the rod, I also turn this tape into a "tight spiral". Only now it turned out to be smaller than the first one. And I create another one of the same spiral.
Take your time, this technique doesn't like being in a hurry.
Step-by-step instruction
- And the third time I do the same with the paper as the first two times, only I reduce the number of strips of the first blue ribbons to two.
- Again I turn the created ribbon into a "tight spiral". As well as the first time, I will need two such spirals. You have probably already guessed why I needed paired forms of quilling. Of course, there should be two ladies' earrings! Now I lay out the prepared forms on the already created template and glue them.
- Finally, I cut out a few more strips of blue paper, glue them and twist them with a rod. But now I turn the shape not into a "tight spiral", but into a "free spiral" and pinch it along the edges with my fingers and stretch it slightly to get the shape of "eyes".
- I make four such types of figures. Two for each earring and stick it according to the template.
- The final step is to thread the clasp ring through the eye-shaped holes. The picture below shows what an excellent beauty I have turned out.
So we have learned how to create complex and beautiful ladies' jewelry. Let's now try to make an unusual quilling flower.
Making an unusual flower
Now we come to more serious things. I will tell you and show you how to make volumetric quilling flower. To do this, you need to purchase or get the tools already prepared in advance, namely:
Step-by-step instruction
- I take a sheet of white paper and divide it into strips three centimeters wide. Then I cut them and glue the strips one by one along the length. The result is one long tape.
- Now we need to paint it. Apply paint to the sponge with a pipette. Apply yellow ink on one half of the sponge, red paint on the other half.
- Then, using a sponge, we paint our prepared long tape made of white paper. And after the paint dries on a paper tape, cut out the pattern using curly scissors. What should turn out can be seen in the picture.
- Now let's move on to creating the petals for our flower. They must be cut so that both the petals and the corners sticking out between them. In this case, you need to leave four millimeters at the edge unfinished so that the tape does not break. As shown in the picture below.
- Then I make a core for the flower. To do this, I twist a strip of quilling paper into a tight spiral. The diameter of the roll should match the diameter of the pencil.
If the diameter is smaller, then you can safely add another tape.
Apply glue only to the uncut edge!
Step-by-step instruction
- The next step in creating a flower will be to smear the dyed tape with glue from the side of the paint application.
- Then I glue the petals of the flower with the core, as shown in the picture.
- After the flower is twisted, it is necessary to glue its bottom with PVA glue to be sure that it will not come apart in the future.
- Now I remove the flower from the rod and straighten its edges with my fingers. As a result, such a miracle turned out.
- Of course, at your discretion - you can straighten the edges, or you may not. I straightened them in order to insert a "pistil" there, and thereby make the flower more like a real flower.
- I cut off part of the sharpened pencil, grease the cut off part with glue and stick it in the center of the flower. Here's what we get!
Any of these products can decorate postcards on the first school day of the year, please the child with its beauty and uniqueness.
Before that, we looked at the quilling technique for adults. But you can also involve children in this handicraft. Thus, they will develop the breadth and originality of thinking.
Quilling for children
According to psychologists and pediatricians, modern children now have poorly developed hand and finger motor skills. It is difficult for them to correctly and firmly hold a pen or pencil in their hand.
Therefore, it is difficult for them in life to learn standard skills and simple self-service. Quilling for children promotes the development of this type of motor skills. At the same time, he raises the level of logical thinking.
The development of fine motor skills helps to increase the child's attention and memory. All this will be extremely necessary for him in his future life and the quilling technique can help a lot in this.
It also helps to educate the child in perseverance, accuracy, aesthetics of taste. Of course, you need to start with simple things.
Master class for children - ladybug
For creating ladybug we need the following materials:
- A sheet of cardboard.
- Colored paper.
- Screw rod.
- PVA glue.
- Scissors.
Step-by-step instruction
- At the very beginning, I cut out the body of a ladybug from cardboard - a semicircular oval. Then from a sheet of red colored paper I make an oval in the shape of the body and cut the lower part as shown in the figure.
- Now I prepare the lower part from a light yellow sheet and glue to cardboard. Then I take and cut a long black strip and glue down the center of the cardboard.
- When the oval of the body for the "ladybug" is ready, you can start "paper rolling". Black dots on the body of the ladybug will consist of "free spirals". Then I glue these created forms to the cardboard.


Quilling - master class for beginners
Quilling, a fashionable hobby, as a result of which you can make a variety of paper miniatures... Most often, crafts are made from colored paper, but it is quite possible to make miniatures from white paper.
In order to master the art of quilling, it is enough just to master the manufacture of individual elements of miniatures, and then to cook from them different crafts, postcards, pictures ...
You can buy special quilling paper at craft stores or make your own blanks. The most important thing is the weight of the paper. It should be at least 60 grams per square meter (usually this information is indicated on the packages), otherwise it will not curl neatly and keep its shape.
Now comes the fun part. How do you get such wonderful work. It turns out everything is quite simple. The principle of creating masterpieces from paper: you need to wind a strip of paper on the awl rod (you can use a simple toothpick), fix the end of the strip with glue, and then create the shape of a petal, a drop, or some other. There are quilling schemes by which you can create one or another pattern of stripes.
Quilling technique
 |
Take a strip of paper with two fingers. |
 |
Pull back the end of the strip with two fingers of your other hand, running your fingernail over it so that the end bends slightly. |
 |
The curved tip is easier to wrap around the awl. Twist a few turns tightly; the curled tip wraps around the awl more easily. Wind a few turns tightly. |
 |
When the diameter of the roller becomes 3-4 mm, it can already be removed from the awl and further twisted by hand |
 |
Twist the tight disk with both hands, intercepting it with your fingers all the time so that the paper tape does not unravel. |
 |
The whole strip is collapsed |
 |
Now relax your fingers slightly, allowing the paper spiral to unfold slightly. |
 |
Glue the end of the strip with PVA glue |
 |
Now squeeze the workpiece with two fingers. The result is a "drop" blank. |
 |
Blanks can be shaped into a wide variety of shapes by performing compressions and dents. |
 |
These are “drop” and “petal” blanks. |
In addition to these two figures, there are also a number of basic forms of twisting. paper tapes:
 |
Tight spiral. Twist the tape and glue the tip without removing the spiral from the needle so that the tape does not unwind. |  |
Free spiral. Twist the tape, remove the spiral from the needle and let it unwind before gluing the end. |
 |
Curved drop... Make a drop and fold a corner of it. |  |
Eye. Make a loose spiral and squeeze opposite sides to shape |
 |
Semicircle. Make a free spiral, squeeze the two corners so that one side of the workpiece is flat and the other is rounded. |  |
Bird's foot. Make a free spiral, squeeze the triangle, bend two corners in the direction of the third and press firmly. |
 |
Sheet... Make a loose spiral, squeeze it to form an eye and bend the corners. |  |
Triangle. Make a loose spiral and squeeze it in three places. |
 |
Arrow. Make a free spiral, squeeze it so that a triangle forms, and press its two corners together. |  |
Cone. Twist a tight spiral in the form of a cone, glue the end of the tape, dry the workpiece and only then remove it from the needle. |
 |
Crescent... Make a loose spiral, squeeze the corners and bend the part. |  |
Rhombus... Make an eye and squeeze the corners to make a diamond. |

Master class 1. Quilling flower.
For work, you will need double-sided colored paper, PVA glue, cardboard as a background for creating a postcard and a couple of toothpicks.
The simplest quilling element is a spiral, to make it, you need to wind a strip of colored paper about 5-0.7 cm wide and up to 25 cm long, then remove it from a toothpick, dissolve a little and glue the edge of the paper with glue. The spiral is ready, it is the basis for the manufacture of other elements.
Spiral with a clip made from an ordinary spiral by squeezing it with your fingers on one side. A spiral with a clip can be used as a petal or leaf for a future flower.
If you squeeze the spiral from both sides, you get a boat, which can also be used as a leaflet. And if you squeeze the spiral on one side, and bend inward on the other, you get heart.
When all the elements are ready, it is necessary to form a pre-planned composition from them and glue them with PVA glue to the cardboard base, you can also use velvet paper as a base, such a craft looks more spectacular.
Here is such a simple quilling master class, I hope it will help you master the basics of quilling.
Quilling beauty:


We also recommend
 Openwork bell (hook): diagram, photo, description
 Closed women's club This club is for those women who
 A girl wants to be 14 years old
 Crochet top with a round tight yoke Openwork white crochet top on a round yoke
 Nautical kits for boys, crocheted - Crochet
 Sleeveless jacket for a boy: the choice of model and method of knitting Crochet vests for a boy of 6 months