Crochet cape with hand slots. Crochet capes with patterns: how to knit a female cape on the shoulders according to the patterns on the example of some models, knitting a shawl, poncho, stole
The generalized term "cape" can be called a type of clothing that does not have sleeves and has a characteristic free cut. Capes are ponchos, capes and their varieties.
Types of capes
A crocheted cape can be dense and warm, or vice versa, openwork and decorative. The beauty of this type of clothing is that almost any woman can find a suitable model for herself.
Capes are popular because they hide unwanted silhouette details. For instance, long model, reaching to the waist, reliably masks the tummy and sides. At the same time, delicate elegant capes, crocheted, decorate evening dresses and help cover open shoulders or neckline.
So, based on the knitting methods and appearance, capes can be:
- Tied with a solid canvas.
- Composed of separately linked pieces.
- Round.
- Semicircular.
- Rectangular.
- Bell-shaped.
Round capes
Such products look very interesting. In addition, they are extremely interesting to knit. The photo shows an example of a round cape.
Most likely, a napkin or tablecloth served as the basis for her scheme. As a rule, such products have the main decorative element in the center, which is located on the back. At a certain stage, you should take care of the armholes. To do this, you need to measure the width of the back and check with the knitted fabric. When the circle is equal to the width of the back, along the edges of the canvas using chains air loops(VP) form holes.
In finished form, such a crocheted cape looks like a jacket or a cardigan with a collar. It can be used as a shawl if necessary.
Semicircle capes
This type of knitted capes is one of the most popular. They can also be based on napkin patterns or just large openwork fragments. The example below shows a cape tied in an Obviously rectangular piece.

It can still be classified as semicircular, since the principle of expanding the circular canvas is preserved. A feature of this product is the use of thick thread in combination with openwork pattern... The knitting texture is very clearly visible and all the elements look attractive.
Such crocheting of a cape implies the presence of a center near the neck and a gradual expansion of the fabric. Semicircular capes can be made of two parts (as in the photo) or one circular blade, the first row of which is the neck.
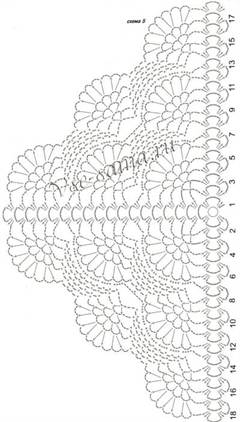
Openwork cape with pineapple pattern
A kind of semicircular is the following crochet cape (the diagrams are shown in the photo). This wonderful model very successfully combines the classic “pineapples” with openwork “fans”. After examining the images, it becomes clear that the development of the cape model was based on a round napkin pattern.

Modification of some elements and proportions, as well as a shift in emphasis on "fans" allows the cape to be airy and very crocheted of the cape (the schemes are given both before and after the improvement), according to the scheme below.

There are few rows in the pattern, so the yarn was chosen quite dense.
Rectangular capes
As the name suggests, this crochet cape is in the shape of a rectangle or square. It is knitted in the form of a straight strip with holes for the hands. Sometimes it looks like two sewn rectangles.
You can use almost any pattern for knitting such capes. It can be both simple even patterns and intricate multi-row ornaments. The photo below shows a rectangular cape, for which three equal squares were tied. The armholes are formed by unsewn sections in the seams between the squares.
Bell-shaped drapes
The specific shape of this type of capes allows you to throw them over your shoulders and not worry about them opening, slipping or being blown away by the wind. Bell caps have no fasteners or sleeves. True, if such a cape is crocheted long (up to the waist and longer), then you have to supply it with vertical slots for the arms.
From the photographs you can see that the capes-bells are knitted in circular rows. Depending on the purpose of the cape, it can be knitted with a solid dense pattern, equipped with a warm collar or be light and delicate.

This one is suggested in the photo) expands according to the principle of a sun skirt. It is very spacious and designed for comfort.
The next cape has a more decorative purpose.

It expands quite a bit and looks more like a flat pipe-canvas. This cape is perfect for ceremonial gatherings. However, if knitted from light cotton, it will become an indispensable addition to summer sundresses helping to keep warm on cool evenings.
Such capes, knitted from angora (rabbit down) or from mohair ( soft wool goats and sheep with long hair). They can be knitted with either a dense or an openwork pattern, they will be equally warm.
Which pattern to choose
When deciding which scheme to use for making a cape, it is worth thinking about the future product and calculating your capabilities. Knitting a flat fabric is much easier than circular expansion or creating a product from fragments. Of course, there are limitations regarding the choice of ornament variations and the model of capes. But, at the same time, a simple pattern will allow you to avoid difficulties and quickly finish crocheting the cape. The patterns of modern solid patterns are very varied and interesting.
On the other hand, lace and intricate ornaments are always popular, and a new challenging task is a challenge for a gambling knitter.
Knitting of items of clothing implies, first of all, insulation, although in the world of all kinds of yarn and newfangled patterns, very stylish solutions continue to appear in the images of modern women of fashion. Shawls, boleros and lace scarves, ponchos adorn the outfits of many girls both in everyday life and on special occasions. Crochet capes, with patterns you can see in our material, complement evening and festive dresses with delicate chic, hide your shoulders from the scorching sun and warm you on summer and winter evenings.

We offer some options for crochet capes with patterns. Some types of capes, like ponchos and shawls, are easy to knit. You just need to choose the pattern by which you will knit, the shapes are very simple. But for a bolero, you first need to draw a pattern on paper and, starting from it, tie the details together. It will take a little sewing skills. Boleros are decorated with functional and decorative materials, such as buttons, brooches, beads, ribbons in the form of strings.


Knitted shawl
Sometimes, stylish things are easier to create than finding the right one in the store. Choose the desired color and pattern, knit a triangle with an openwork pattern, and an elegant knitted cape on the shoulders will not only warm, but also express your style.
You will need yarn for such things from 300 g, up to the waist and below about 600 g, the crochet hook is taken twice as thick as the volume of the thread.


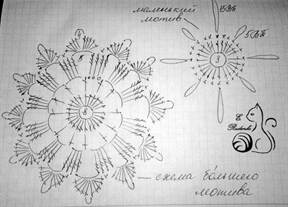
Outfit of motives
Openwork women's scarves are easy to crochet with motives. The knitting principle is pretty simple. Knit motifs of different sizes and assemble them like a puzzle in the desired shape. The photo below is an example of a motif poncho.
Threads used - Maxi viscose Madame Tricote (72% cotton, 28% viscose), 50 g - 207 m, hook number 1.3, yarn consumption per product - 300 g.


Shawl for a cool evening knitted from threads of Angora yarn (40% mohair, 60% acrylic, 500 m / 100 g + methanite) - 150 g, crocheted number 2. Knit 36 motifs according to pattern 1, 9 squares according to pattern 2. It is connected with each other and tied from above with single crochets. Thread brushes add a complete look.


An openwork shawl with a large pattern is suitable for warm and not windy weather in autumn; the hook for such products is taken twice as much as the thread volume.
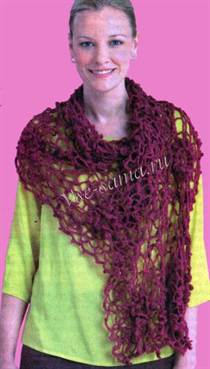

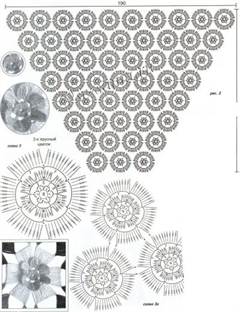
Diagram and description of an amazing shawl made of flowers.


Take 300 g of yarn (10% wool, 10% mohair, 80% acrylic, 550 m * 100 g), the color is best with section dyeing, hook 3.5. So, first we knit 3 tiers of the flower and connect them together, then we fasten the second and first tiers.
Party scarves
Dresses with thin straps will be decorated with crocheted boleros. You can create chic beautiful things yourself for any special occasion, proving once again that knitted things are not only things for insulation, but also for an exquisite addition to an outfit.
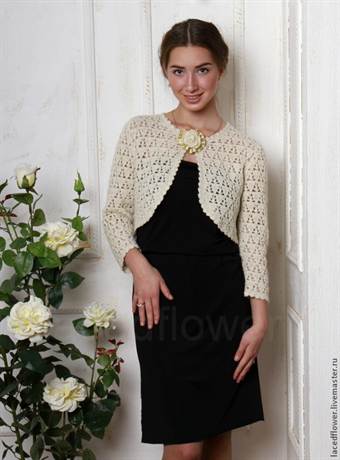


Bolero with long sleeves crochet in addition to simple dress thin dress on a date to a restaurant or a festive buffet table. Take a Bright type yarn for the product (80% polyamide, 20% metallic, 340 m / 90g) - 400 g, hook number 2.


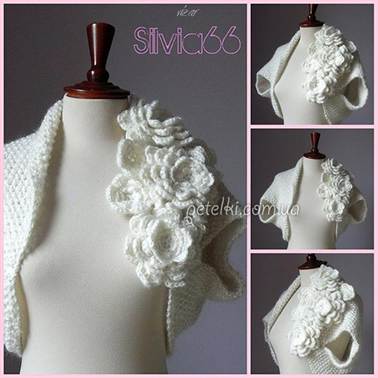
The most simple scheme knitting can be complemented with knitted flowers or leaves, adding romance and splendor to the image. Tie a rectangle with a dense cloth and fasten the side corners together for a few centimeters, as shown in the photo below.


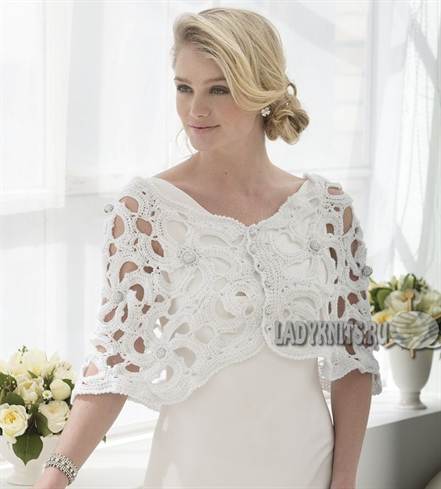
If you are a skilled craftswoman, we suggest knitting an openwork designer bolero from various knitted elements, with additional bead decorations. Such an openwork will look stylish made with cotton threads. For this example, size 48 required 230 g. White cotton yarn 360 m / 50 g, Hook 0.75 mm for the mesh, 0.9 mm for the elements. Beads 8,6,4 mm, seed beads, 4 viscose decorative tassels, a pin for a brooch.


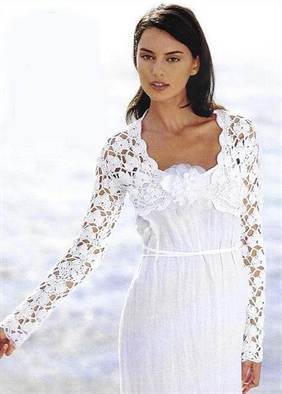
Tie a bolero with white threads on your wedding dress with bare shoulders. Complement pearl beads or an elegant flower brooch.
If earlier the cape on the shoulders was mainly a detail of evening dresses, today this accessory is increasingly being used in everyday life. Moreover, there are many options for capes - from naughty beach capes to glamorous and luxurious evening capes. The topic of this article is - fishnet capes... Most suitable for summer, they will protect your shoulders from the scorching sun, add a zest to your look. Tied cape crochet looks very feminine, it can be combined with different details of clothing.
Crochet openwork cape on the shoulders
Size: 52/54.
We will need:
- yarn, 100% cotton, 50g by 175m, black - 400g;
- yarn, silver lurex - 25g;
- hook number 1.75.
Description
We crochet the cape, guided by the diagrams. We start with scheme number 2. We knit a long, with a margin, chain of air loops. On it, you need to knit 15 or 16 (at your choice) pattern repeat pattern No. 1. Then we make a fitting, after which we cut off the extra VPs of the original chain.
We tie the lower edge of the product with silver yarn along the pattern. When tying in the area between the fans, we perform two spirals: in each loop there is a chain of air. n. knit 3-5 columns with 1 crochet.
On the upper edge of the cape, we crochet along the cx. # 2.
Openwork cape of large motifs
Sizes: 38-42.
We will need:
- yarn containing 40% wool, 20% mohair, the rest is synthetics, 25g per 137m - 125g;
- hook number 5.
Pattern:
- square openwork motif: tie a chain of 8 air. etc. and connect it into a ring with one connecting stb.
Next, crochet in a circular pattern. Every cr. we start the row with the given number of VPs instead of the first p. and finish with 1 SS or 1 stlb with a crochet in the upper VP of the replacement or in the top of the stlb with a crochet knitted together. Go to the next. cr. in a row we carry out the connection. column.
First, you need to link to 1p once. for 10 rubles. All trace. we make square motifs crochet according to the drawing of the same scheme, but in the 10th p. we attach it to already connected squares... To do this, replace the middle VP of the arch from the VP with one single crochet around the counter arch of the square to be attached.
The diagram shows two square motifs with connection points. To connect the corners of the squares, we knit extra. connecting loops in the first conn. P.
Density: 1 square motif is equal to 27cm by 27cm.
Description
Knit 12 motifs = 6 pieces for the front + 6 pieces for the back. Connect them together according to the pattern. Along the top edge we leave a gap of 22cm for the neckline. We tie the entire product around the edges with a crustacean step, performing a single crochet stb from left to right.
Crochet bolero: video MK
Elegant openwork cape
Dimensions: 35.5cm by 105cm.
We will need:
- yarn containing 96% acrylic, 4% polyester, 50g for 185m - 150g;
- hook number 4;
- beads with rhinestones Ø13mm - 6 pieces;
- beads with rhinestones Ø19mm - 17 pieces.
Pattern:
- the motive is performed according to the scheme. In total, 12 whole fragments are needed.
We collect 8 VP and close them in a ring. Then we work according to the description and scheme:
1r. (front side): 12 air. n., 1 pillar. b / n in the 2nd p. from the hook, 2 sc in the next. 9p., 1 sc in the last. p., SS in the next. column of the ring, turn;
2p .: 1 VP, 1 SBN behind the back wall in each stlb, turn;
3p .: 1 VP, 1 stlb without n. behind the back wall in the first 4 stlb, * 3 VP, 1 sc for the back. the wall in the next. 4 stlb * - from * to * four times, CC in the next. column of the ring.
Second curl
1r. (obverse. Art.): 11 VP, SS in the 2nd arch from the ring before. coil, 1 post. without crochet in the 1st p., 2 stlb without n. in the next. 9p., 1 sc in the next. p., 1 sc in the next. column of the ring, turn;
3p: 1 air. n., 1 pillar. without n. behind the back wall in the first 4 stlb, * 3 VP, 1 sc for the back. the wall in the next. 4 stlb * - from * to * four times, CC in the next. column of the ring.
Knitting third, fourth and fifth crochet the curl according to the algorithm of the second curl.
Sixth curl
1r. (obverse. Art.): 11 VP, SS in the 2nd arch from the ring before. coil, 1 post. without crochet in the 1st p., 2 stlb without n. in the next. 9p., 1 sc in the next. p., 1 column b / n in the next. p., 1 sc in the next. column of the ring, turn;
2p.: 1 VP, 1 PRS for the back. wall in each column, turn;
3p: 1 air. n., 1 pillar. without n. behind the back wall in the first 4 stlb, * 3 VP, 1 sc for the back. the wall in the next. 4 stlb * - from * to * twice, 1 VP, SS to the extreme point of the 1st curl, 1 VP, 1 RLS behind the back. wall to the next. 4 columns, 3 VP, 1 sc for the back wall in the last four stb, SS in the first column of the ring.
Finish knitting.
Half motive
These need to be connected 5 pieces.
Perform knitting of 4 curls, after the fourth we knit a SS in each loop along to the first curl.
Assembly
We lay out all the elements (12 full and 5 half) on a horizontal surface according to the pattern and connect with each other with a needle or crochet.
Strapping
Knitting is done in circular rows.
1cr. R. (obverse. st.): we connect the yarn conn. stlb to any curl. We knit: [* 1СБН in each stlb and 2 СБН in each arch from the VP * - from * to * we repeat until the beginning of the next. curl, 4 VP, 1 stb without n. to the beginning of the next curl] - between the brackets we repeat for the whole river, we connect at the end a row of SS;
2p .: 1 VP, 1 RLS in each stlb, 5 RLS in each arch, SS;
from 3p. 5p.: 1 VP, 1 RLS in each stl;
6p .: 1 VP, strapping with a crustacean step, SS.
We finish knitting, carefully tuck the tails of the thread.
Sew on one large bead in the middle of the motifs, and six small beads on the edge of the right shelf, instead of buttons - see pattern. The holes between the loops will be used as buttonholes.
Crochet lilac acrylic yarn cape: video master class
Fishnet Shoulder Cape for Beach
The openwork cape is made in one size.
We will need:
- sectional yarn, 100% cotton, 50g by 180m - 350g;
- hook number 2.5 and number 3.
Patterns:
- main pattern: the original number of stitches must be a multiple of 16 plus 3p. We knit according to the images of the scheme.
We knit the beginning of each row according to the scheme, with 3 VP lifting instead of 1 CCH and with a loop in front of the rapport, which we repeat for the entire row. We finish with loops after the rapport. From 1p. for 9 rubles. we perform once, then repeat with 2p. for 9 rubles.
Density: 20.5p. 8.5 rows equal 10cm by 10cm.
Description
The openwork cape on the shoulders is knitted with a single piece of fabric. The direction of knitting is indicated by an arrow on the pattern.
We start crocheting number 3. We make the initial chain from 115 VP plus 3 VP lifting. Next, we knit the main pattern. After 77r (this is about 90cm) from the initial row, we will get 1⁄2 of the product, that is, we have tied it to an imaginary shoulder seam.
We knit the first 30p. for one shoulder, we leave the central 55 loops untied, to connect the two sides we make a chain of 55 VP, in the end we knit 30p. for the second shoulder.
Having knitted a total of 153r. (this is about 180cm), we finish the work.
Strapping
We tie the product along the contour with a crochet hook No. 2.5, performing 1 cr. R. columns b / n. We carry out the neck strapping in the same way.
Kimono cape with a simple pattern: MK video
Delicate cape on the shoulders
We will need:
- yarn containing 60% cotton, 40% acrylic - 200g;
- hook number 3;
- beads for brooches;
- clasp for brooches.
Description

Doing the promise made, and tell how I knitted a flower to an AMAZING BEAUTY SCARF.
Everyone who looked at it liked the scarf. But many - including myself - had some technological misunderstandings.
During a trial knitting, nuances appeared that required attention.
In the process of solving them, a harmonious sequence was built, with all the amendments to the original, invented by me for creative convenience, and technological incidents.
KAZUS FIRST: the thread, laid for the bundle of the petal, all the time strove to fall down.
In the original, the craftswoman holds this thread with her finger.
It was extremely uncomfortable for me, and I decided to make slits on the sides of the cardboard to secure the connecting thread, and at the bottom - for the main thread.

This gave the desired result: the threads were firmly anchored and stopped moving.

Having fixed the tip of the main thread in the lower slot, I made 40 turns around the cardboard.
There were no problems, I even enjoyed laying even rows.

KAZUS SECOND: after removing the winding, I started the strapping, as suggested in the original,
where the craftswoman ties the loops of the petal, removing them from the cardboard.

But it was not there. The threads immediately got tangled, the loops became uneven,
and the result is such a fluffy "lumpy pancake."

Then I decided to tie the set right on the cardboard. Immediately, the matter went without a hitch.

Here you can see each thread, which easily connects to the next thread with a single crochet.

After finishing the strapping, I cut the thread longer. We will sew petals with it.

Now we shift our threads to the center and tie them at the bottom with that thread,
which was waiting for this moment in the side slots.
Hidden here CASUS THIRD.
If you simply tie the threads, without hesitation, you will get exactly that pompom,
which several people have written about. After repeated attempts, it became clear
that, having made the first knot, and without tightening it to the end, you need to remove the element from the cardboard.
We hold one end of the knotted thread - the left - firmly, and the second tip - the right - so to the right and pull. The threads are evenly gathered in a row and the pompom disappears.

On a narrow - 2.5 cm - cardboard box, I made the first petal. She rolled a bud-middle out of it.

On a cardboard that is twice as wide as the first - 5 cm - I made the main petals.

So I'm spreading the flower.
We also recommend
 Physical Activity and Health Presentation
 How can you clean your iron at home from scale and carbon deposits
 Project on the topic: "Birthday of the Earth" project (senior, preparatory group) on the topic Material and equipment
 How to clean the iron from burn-on on the sole, scale inside
 If the father does not pay child support: what to do?
 Why do men lie to women?