Drying autumn leaves for applications and preparing for work
Collect and dry beautiful plants and enjoy creative work with children, develop imagination, accuracy and a sense of beauty.
Collect leaves, flowers and herbs for future paintings is possible from spring to autumn.
Dry they are better in old heavy reference books or magazines. Thick stems of plants do not dry well, so it is recommended to cut them in half lengthwise. Leave the plant in the book for 10-14 days.
Glue take it thick enough so that no drops form.
 If according to your plan colored but transparent petals
must be superimposed on a dark background and at the same time retain their original color, then first you need stick them on thin white paper
, cut along the path, and then include in the composition.
If according to your plan colored but transparent petals
must be superimposed on a dark background and at the same time retain their original color, then first you need stick them on thin white paper
, cut along the path, and then include in the composition.
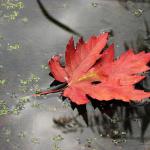
So, on a fine autumn day, you got out into the park or into the forest and collected a large collection of beautiful bright leaves and plants.
Applications can be done as from freshly picked leaves and dried... If you want to preserve the leaves, there are two drying methods we recommend.
The first, well-known, way - nesting leaves between the pages of an old unnecessary book. It is better to lay each leaf on both sides with a paper napkin.
The second method is express drying of the leaves using an iron. Just remember that the leaves are not sterile, so it is better to iron them on a surface that you do not mind throwing out later, for example, on large sheets of paper. On top of the sheet before ironing, you also need to put a sheet of newsprint or paper napkin. And now for more details.
 Powder drying
This method of drying flowers and leaves is not quick and easy. It will require free-flowing substances with hygroscopic properties: sifted river sand, semolina or corn grits, salt or crushed chalk.
Powder drying has its own advantage: it completely retains the shape and vibrant color of plants or inflorescences.
Heat the sand in a frying pan so that no moisture remains, and let it cool. Place 2 cm of sand in a cardboard box and place the flowers on top of it.
Gently sprinkle the top with sand until you completely cover the plants.
After two to three weeks, holes need to be made in the bottom of the box so that the sand spills out.
Shake the dried flowers lightly to remove any remaining sand.
Such flowers can be used for volumetric paintings or drawing up floristic compositions.
Drying fast-growing plants
There are also plants that wither faster than they have time to dry up (hydrangea, bulbous, heather, chicory). They need to air-dry the stems by immersing them in water.
Cut the lower part of the stem at an angle of 45 degrees and place it in a vessel with water to a height of 7.5 cm.

Hot Drying of Plants (Express Drying)
Hot drying, that is, drying with an iron is ideal when you need to dry the leaves for the herbarium for tomorrow. Also, baking can preserve the original color of cornflowers.
Wipe the leaves with a damp cloth or cotton pad to remove dirt and dust. Too much wetting and rubbing is not necessary, so as not to damage the fragile surface.
Line your ironing board with clean paper and spread the leaves on top of it.
If you use newspapers, be careful, as ink can be printed both on the leaves and on the surface of the ironing board.
Cover the top with another sheet of paper.
Set the iron to the lowest temperature and check that there is no water in it. If your iron is not too high power, then you can set the temperature closer to medium, but not maximum, because too hot an iron will ruin the leaves.
Iron the leaves several times, then remove the paper and turn them over to the other side. Cover with paper again and iron.
Repeat the procedure until the leaves are completely dry.
Drying plants for garlands and crafts
Leaves and flowers that you want to use not for herbarium and paintings, but for creating garlands or other crafts, must be dried without a press.
To dry the plant, lay it out on paper and spread it gently.
Tie the flowers in bunches and hang them with inflorescences down. The room should have good air circulation and relative dryness.
 Drying of plants and leaves under the press
Drying the leaves under the press is the most famous and simplest way.
Leaves and flowers are simply shifted with sheets of paper or paper towels on both sides and placed under a press, or in books and magazines.
The paper needs to be changed every day to remove any moisture that has been absorbed.
Flowers and leaves will be ready to use after a week.
If the workpieces become too fragile, immerse them in a solution of water and PVA glue (for 4 parts of water, 1 part of glue), and then dry.
Leaves dried and processed in this way are ideal exhibits for herbarium.
Drying plants on a wire rack
Some plants can be dried horizontally on a wire rack (eg ivy). Some are better not to be turned upside down (physalis).

Drying flowers in the oven
Single large flowers, whose petals are rich in liquid, such as roses or tulips, can be dried in the oven at a low temperature.
Watch the process carefully: the flowers should not turn brown.
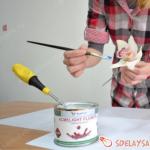
Before starting work, cover the table with oilcloth so as not to stain it with glue. Prepare the base - a sheet of cardboard, collected or dried leaves, scissors, glue (preferably PVA), tweezers.
First you need come up with a future picture ... Then arrange it on a separate sheet. And only then begin to glue the individual leaf parts to the base. It is best to apply the glue in droplets around the edges. If you apply the glue to the entire surface of the sheet, it may warp when the applique dries.
You need a finished picture put under the press for one or two days. Don't forget to do for her frame!
Types of applications
Overhead applique.
Try to get started by coming up with pictures that do not require cutting out any details from the leaves, but rather created by overlaying the leaves. You can think of a lot of such pictures: butterflies, mushrooms, chickens and other birds ... The missing elements can be drawn with a felt-tip pen or made from other natural materials.
Once they get caught up in simple pictures, kids can start to come up with multi-tiered images. In this technique, the leaves are glued on top of each other in layers. The application will turn out to be bright and cheerful if the leaves differ in color.

Silhouette applique.
In this type of applique, the extra parts of the leaf are cut off to get exactly what the little artist intended.

Modular application (mosaic).
Using this technique, a picture is created by gluing many leaves of the same or similar shape and size (or, for example, maple seeds). So you can make the scales of a fish, a cock's tail or a firebird.

Symmetrical appliqué.
It is used to create separate images or whole pictures with a symmetrical structure, as well as to obtain two completely identical images (for example, reflection in water). To do this, you need to select similar leaves to get an image with its "reflection" or symmetrical in itself ("Butterfly", "Dragonfly", "Landscape with a lake", "Boat on the river").

Ribbon applique.
A kind of symmetrical appliqué. Its difference is that it allows you to get not one or two, but many identical images - ornaments. It turns out whole "round dances" of trees, flowers, mushrooms, butterflies, etc.
We also recommend
 What soil to choose for the aquarium - sand, gravel, pebbles, nutritious for plants or black with prices
 When can you transplant flowers
 Unusual flower glowing in the dark
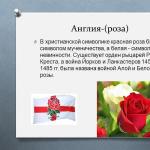 Flowers and plants as symbols of the countries of the world O The presentation was prepared by Victoria Aldokimova Teacher Kostrikova I
 And also several other ways
 Plants symbols of countries