Small handbag for your phone with your own hands. How to sew an original phone case
A universal choice of gift ideas for any occasion and occasion. Surprise your friends and loved ones! ;)
Greetings to everyone gathered now on the blog! Today I will tell you about how to decorate your life and the lives of others with the help of such a simple object as a bag with your own hands.
Many shops sell bags, handbags, clutches, etc., etc. But it's so great to do something like that yourself, to feel the process of creating a product, isn't it? Many will agree with me, I think. Therefore, today we will make a bunch of handbags with you, cute and funny)
How to sew a bag with your own hands
First of all, I suggest you sew a cute fluffy handbag that you can give a little girl or girl.
List of materials:
- artificial fur (for the outer part of the bag);
- fleece (for lining and for covering buttons);
- threads in the color of the fabric;
- two round buttons;
- two small white rhinestones or half beads;
- synthetic winterizer;
- paper for patterns;
- needle;
- second glue;
- pencil;
- pins (for pinning patterns);
- scissors.
You can download the patterns of the future bag here: eyelet and the foundation... Let's deal with them.
What kind of patterns are there:
- the pattern of the bag is one-piece (lid + back) - the entire area of the pattern;
- the front of the bag - everything below the side panel;
- width of the side insert - we will sew the side part into the bag, this is its width. The length is the length of the contour of the front (excluding the straight top).
As for the side insert: it should consist of two equal parts, the direction of the pile of which will be directed against each other. But this is only for fur! From fleece, just cut one strip of the required width, you can ignore the direction of the pile.
How to sew a bag: a detailed master class
First of all, we will work with the side of our product.
Take two fur side pieces and sew them along the edge. Sew them so that the pile of the pieces is directed towards each other.
Why do I suggest doing this? The answer is: the fur has a long pile, which should go in one direction. And this can be achieved just by stitching two pieces
Cut off any unnecessary items. And sew the side to the front of our future bag.

Now we sew on the back of the bag! The cover is already planned

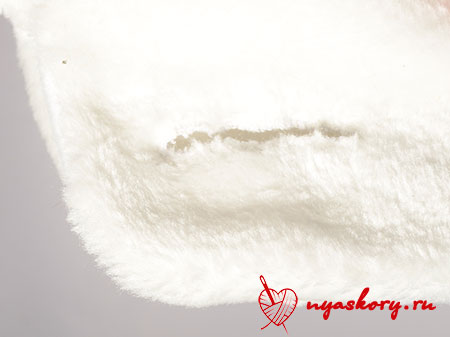
Trim the edges of the seam allowances. See why:
By the way, here is the back view of the handbag:
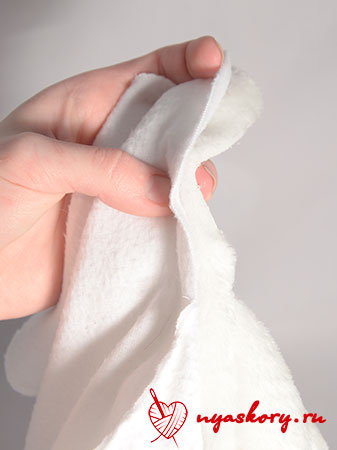
Sew the fleece "purse" in the same way. This will be the lining - the inside of the bag.

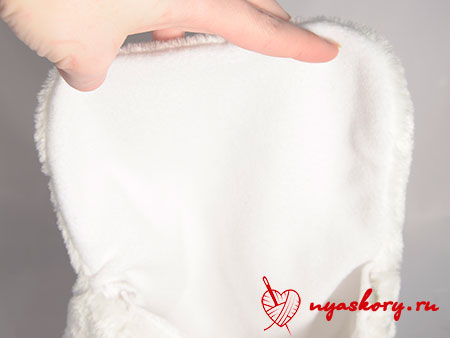
How to sew a lining to a bag? First, place the fleece and fur pieces right side inward.

This photo seems to be clearer.
And just sew the covers of both parts.

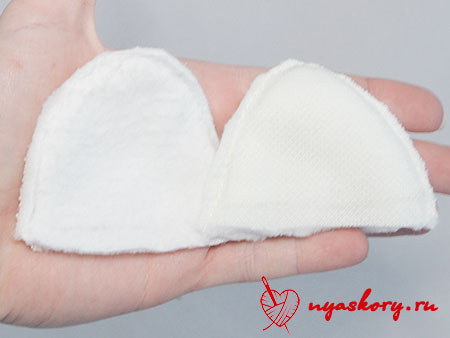
Screw the inside into the bag.

Sew the remaining edges with a blind stitch.

To decorate our bag, I suggest you cut out these ears:
This is how you should get them:

Now let's make a strap for the bag. To do this, cut three strips of fur of such length that it would be convenient for you to later put on a strap of them on your shoulder. Weave a pigtail out of them (fasten at the end and at the beginning so that it does not come apart).

Remember we left holes for the mountings? Now you need to insert into them and carefully sew up the resulting pigtail with a secret seam.


But our bag has no fasteners yet! There are several options: you can sew in a zipper (which is better to do earlier), you can use Velcro and buttons.
I decided to stick with the last option.
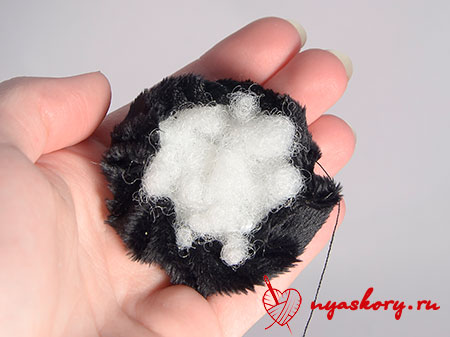
Cut two black circles out of the black fleece that are larger than the button and take the button.
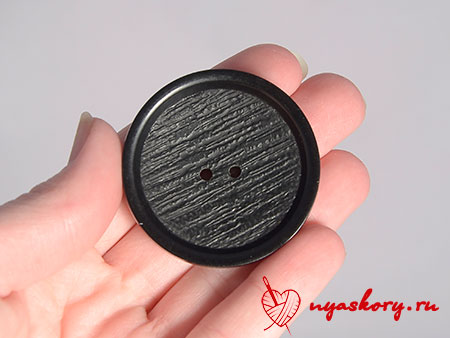
Put a little padding polyester on the button.

And in a fleece circle, along the edge of which, walk with a basting stitch without securing:
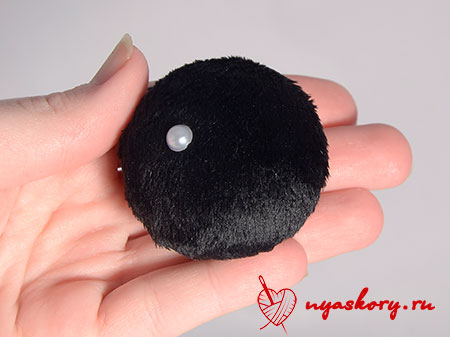
Put them together.

And pull off the thread.

The button for attaching the bag to the back should look something like this:

Glue a small rhinestone-flare in front.
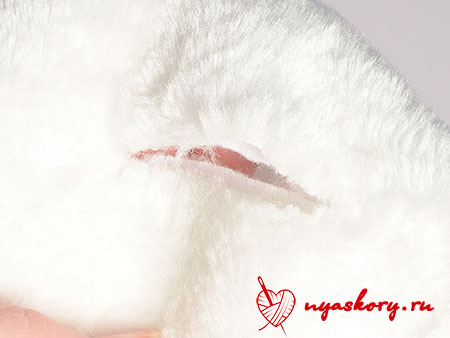
Now attach the clasp to the lid of the bag to see where you will need to cut for the tab.

Draw a line down the center of where you want the button to be. Make a cut along the line you have drawn.
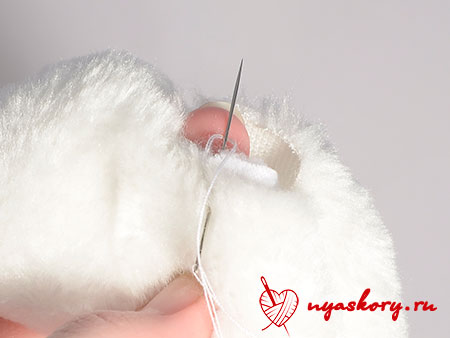
To keep the cut nice and neat, sew a buttonhole over it so that each stitch is as close as possible to the previous one.
This is what the bag will look like after trimming:
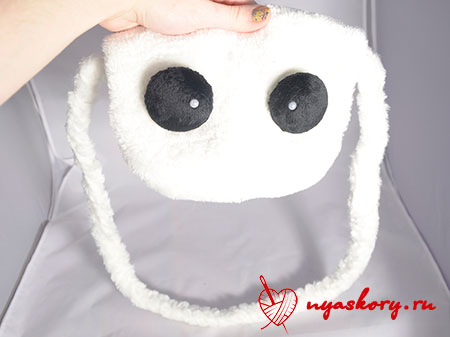
Sew the button eyes to the bag:
Well, now back to the ears! Fold and hem the edges.

And sew them where you would like to see them.

Ta-dam! The bag is ready It turned out to be a cute kitty)

DIY leather bags
Leather is one of the most interesting and durable materials for sewing bags. Therefore, I present to your attention several master classes from this particular material.
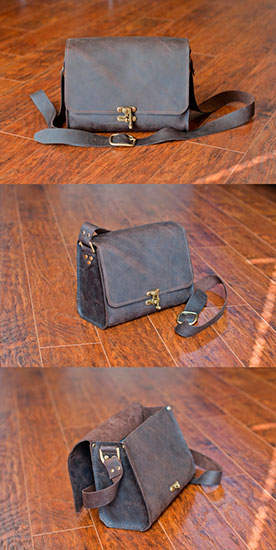
Bag - cat
For this simple but very cute model (somewhat reminiscent of the previous one), you will need leatherette, scissors, an awl, thread and a thick needle.
This can be worn by both a young girl and a small child.

The simplest leather bag
No, you definitely need to get one. You will need leather, scissors, a strap, tape, a marker and (optionally) a special tool for cutting several holes in a row (you can do without an awl). Essentially all you have to do is cut out a circle, punch holes, pull tape through them, and attach a strap. Everything)

The envelope
Reminiscent of the way of processing a cat bag.

Chanterelle
Adorable model)) Prepare for her leather or dense leatherette, braid and rivets. You don't have to sew the chanterelle, just glue it around the edges and hide these places under the braid.

Diy jeans bags
However, the following models can be made from both jeans and old jeans.
Network
For her, cut the jeans into strips and weave the canvas, as in the photo. Sew it with a bag (by folding a piece of canvas in half) and sew on the handles.

Simple denim bag
There is a denim leg - let's go to the production of a bag! You will also need a buckle, a leather strap, scissors and thread with a needle.

A graceful bag made of jeans
Here you will need two trousers, scissors, thread with a needle and a zipper.

DIY fabric bags
Rectangular
For her, take a few pieces of cotton fabric, a zipper and accessories.

Clutch
An interesting idea is to use dense pieces of processed cardboard for the backing. I would recommend taking plastic boards from Fix Price or juice packaging as a dense base.
Bring such a handbag to your mom - she will definitely be delighted))

Semicircle clutch
Cut out two round pieces of cotton fabric and a circle of padding polyester from the fabric. Fold them in a sandwich and sew several times at right angles. Stitch around the edge with bias tape. Fold the blank in half and sew a zipper into your purse. Decorate.

Handbag
This is where the cotton fabric, lining, clasps and floral decorations come in handy. A young lady, say, about 17 years old, will definitely appreciate such a gift.

Sports bag
For her, prepare thick fabric, braid, scissors, pins, fasteners, zippers and threads. In addition to sports uniforms, you can also put your hiking items into this bag.

Mini handbag
According to the scheme described below, you can make both a very miniature accessory and a larger object.

Alteration of old things
For the first of the two photo workshops, you will need a long soft cloth bag, and for the second, you will need an old T-shirt.


Photo of handmade bags
I want to show you how you can get many bright and unusual products using the same patterns.
Sandwich bag
Nice purse made of fleece. It's quite simple! And this design is quite possible to implement in a cat bag.

Panda bag
Cute panda design

Simple and elegant bag
The handbag is quite simple and made according to patterns similar to the very first ones.

Knitted bag
Although this bag is knitted, its design can be implemented and sewn from fabric.

Leather bag
Octopus bag
The bag, again, is knitted. But it is very similar to the first one (at the beginning of the article). Only to it you need to add tentacles and remove the ears.

By the way, I bought fleece for the eyes of the "kitty" bag here... In the store, you can hardly find such
This concludes the article. I hope you were happy to look at all the handbags and took note of something interesting for yourself. See you soon!
P.S. Subscribe to updates!
Best regards, Anastasia Skoreeva
Mobile phone bags. I would like your mobile phone to look different, but there is no way to change it every day. You can purchase several replacement panels and “dress” your phone according to your mood. Or you can use our tips to make unusual handbags for your phone, so that every day they create a wonderful mood for you. Try it, it's stylish! 
A mobile phone case is best done if you have an old, worn out and unnecessary one, that is, after the model of an old case from your mobile phone, because the tubes are different, and accordingly there are a great variety of covers.
For any cover you need:
- main material,
- plastic,
- wide elastic band or snake (Velcro)
- and, depending on where you have it, a clothespin or "rope around your neck."
A clothespin can be removed from an old case, a piece of plastic - from a plastic cosmetic bag L'Ogeal, Nivea, Lumeme, Garnier, etc. (you know such gift sets), there are no problems with snakes nowadays, and even more so with the main material. Since the "front" of the cover is made of plastic, and the main material comes only from the sides, it makes sense to choose something brighter or decorate thicker.
Remember that the cover is often in the hands, and frequent touches will make the suede shine, the rhinestones can come off, and the blue denim will have to be washed often. As you can imagine, the covers can also be supplied with "pendants" and caps, buttons and rivets.
Handbag-case for a mobile phone "Chess"
You will need:
- Scissors.
- Round punch.
- Tweezers.
- Leather in two colors (black and light brown).
- Moment glue.
- Candle.
What do we do:
- Make stencils out of cardboard.
- Cut and straighten the strips for the braiding and the handle of the bag in black leather, for braiding the sidewall in brown leather. The width of the strips is 3-3.5 mm (for plain weaving - 5-6 mm, the length is equal to the width of the end piece of the bag).
- Gently process the strips with a candle flame.
- Mark the two parts of the end sides of the bag. Make identical parallel cuts with a knife at a distance of 5-6 mm from each other
- Braid wide black strips, securing their ends with glue from the inside of the base.
- Glue braided parts with the same but smooth ones.
- Mark the edges of rectangular pieces and process them with a round punch (diameter 4-5 mm).
Making a handbag-case for the Shakhmatnaya mobile phone:
- a) - twisted edging;
- b) - connection of parts;
- c) - weaving the strap
Make a twisted piping on the end pieces of your black leather purse by passing a long strip through the holes as shown.
Connect the end sides of the bag and the side with a light brown braid. Decorate the top edge of the bag in the same way.
Weave a plait strap out of black leather strips. Strap length - head circumference + 5-15 cm. Temporarily fasten the ends of the strap with fishing line so that it does not come loose. Thread the strap strips into the holes in the side part of the bag and glue them from the inside. Take off the unnecessary fishing line.
Bag-case for a mobile phone "Evening"
You will need:
- Scissors.
- Tweezers.
- Fine needle.
- The skin is black.
- Moment glue.
- Nylon line 0.15 mm.
- Candle.
- Black and silver beads.
- Round small silver and smoky purple cat-eye beads.
- Black metal button clasp.
What do we do:
- Make stencils out of cardboard.
- Using stencils, cut out blanks from leather.
- Glue the leather pattern details to the front and back of your purse.
- Note: the pattern should be bakhtarma down, the base - bakhtarma up.
Pattern of a handbag for a mobile phone "Evening"
Expand the front and back details of your purse along the contour of the applique with silver beads. Sew on the beads and halves of the button closure as shown. Collect the details by embroidering their connection first with silver, and then, in between the stitches, with black beads.
Work the leather circles on the candle and glue one of them over the place where the fastener is attached to the flap of the bag, hiding the stitches of fastening the button-fastener under it. Weave a braid strap from two black strips of leather and a long strand of black beads. Strap length - head circumference + 5-15 cm.
Secure the ends of the strap with string to keep it from ripping. Sew the ends of the strap to the side of the bag. Hide the attachment points of the strap under the glued convex circles.
Handbag-case for mobile phone "Grapevine"
You will need:
- Tools: scissors, knife, round punch, tweezers, fine needle.
- Materials: leather of two colors (black and brown), glue "Moment", nylon line 0.15 mm, candle.
What do we do:
Make stencils out of cardboard. Using stencils, cut out blanks from leather. Rectangular parts of a handbag, a leaf and curls are cut from brown leather, grapes - from black. Tuck and neatly hem the edges of the parts of the bag. Measure the edges of the rectangular parts and process them with a round punch (diameter - 4-5 mm).
Cut and straighten the strips for the braiding and the handle of the bag in black leather, for finishing the sidewall in brown leather. The width of the strips is 3-3.5 mm.
Make veins on the leaf. Gently process the edges of the grapes and leaves with a candle flame. Measure the front side of the bag.
Attention: the front and back parts should be on top with the seamy side of the leather - fringe, the side part - face up.
Glue the grape details to the front of your purse. With neat small stitches, grab the grapes along the edge with a thin fishing line in several places - the decoration of the purse will last longer.
Sew a leaf and its petiole to the front of the bag, as shown in the figure. Hide the ends of the leaf petioles and bunches under the leaf itself. Sew on the leaf with small, even stitches along the veins - so that the seam is invisible.
Secure the curls with a fishing line. It is not yet necessary to completely sew them on - this is done only after attaching the side part of the bag.
Decorate the side stripe detail by pulling a strip of brown leather diagonally upside down as shown. Secure the ends of the decorative strip by gluing them from the inside of the sidewall.
Connect the front of the bag and the side with black braid, leaving the long loose ends of the strips for weaving the handle. Then, taking another strip of black leather, braid the same edge in the other direction, as shown in the figure, again leaving the long free ends of the strips for weaving the handle.
Fasten the curls of the vine in several places along their entire length with a fishing line.
Connect the black braid between the back of the bag and the side, leaving the long loose ends of the strips for weaving the handle. Then, taking another strip of black leather, braid the same edge in the other direction, as shown in the figure, again leaving the long free ends of the strips to weave the handle.
Weave the strap-handle of the bag using the weaving shown in the figure. Fix both free ends of the strap with a fishing line at the same distance from the bag. Your head should pass freely through the ring they form.
Overlap the free ends of the bag strap by 2-3 cm and tie them tightly with fishing line.
A special case will help to extend the service life of the phone, which prevents cracks and micro damage. Today the stores offer a large selection of different models.
Most of us love unusual things that help us stand out from the crowd.

A large number of interchangeable covers and panels helps to diversify the design of a mobile phone.

It is quite easy to buy the necessary accessory. Another thing to do it yourself from a variety of materials at hand.

Here you can emphasize your individuality and exquisite taste. Our material presents several ways to create a cover with your own hands.
Materials for creating a protective cover
How to make a case with your own hands? Everything is simple enough. The main requirement of the whole process is free time and good imagination.

Various materials can be used to make an accessory:
- felt;
- jeans;
- silicone film;
- wide elastic band;

The soft base of the materials protects the mobile phone from daily trials. No scratches or cracks remain on the glass surface.

Tools for making a mobile accessory
These include:
- sharp scissors;
- ruler;
- button;
- glue;
- ribbon or lace is long;
- sticky base.

When working with each material, it is necessary to take into account its properties. For example, felt does not crumble at the edges when cutting parts, while denim needs additional border decoration.

The silicone film does not like the frequent impact of a sharp needle. To do this, you need to use glue that dries after a few seconds.
The process of creating a phone case
The initial stage in the creation of the cover is the preliminary creation of the design of the future accessory. To do this, you can draw a sketch of the product on paper. It's important to consider the size of your phone, as well as the location of your camera and microphone.

The finished case should be slightly larger than the size of a mobile phone. This will allow you to easily pull it out whenever you need it. Fabric accessories do not require specific sewing skills. Here you need to carefully sew two parts together.

The process of creating a cover is divided into several stages:
- Cut out paper patterns.
- Transfer them to the material from which the cover will be made.
- Carefully cut out each piece, leaving 1 cm for the seams. This technique allows you to sew the correct product, taking into account the parameters of a particular model.
- To join felt and denim, you need a sharp needle and strong thread.
- To make a silicone phone case, specialized glue will help.
- When all the parts are connected to each other, you can fix the safety button, which will prevent the cover from constantly unbuttoning.
For people leading an active lifestyle, you will need a sports phone case. Thanks to the dense elastic band on the forearm, it is well fixed on the human body.

For this, a small piece of dense elastic is sewn to the finished protective product. In the process of movement, she will tightly press the mobile body to her hand.

Note!

The design of the phone case is a cover. In one side, the mobile phone case is fixed, and the other part serves as a protective panel. A snug fit of the top of the cover will provide small magnets that are fixed in the upper corners of the cover.

Additional sections for storing plastic cards can be made using a multi-layer fabric structure.
To do this, you need three fabric bases, which differ in size.

The first part of the pocket is sewn to the base of the cover. All other elements are sewn together and fixed to the previous parts of the cover.

Decorative elements will help you create an exclusive design for your phone accessory. Fabric appliques add zest to your product. Do not use multi-colored details to decorate the case.

Note!


DIY phone case photo


Note!


Today it is difficult to imagine life without a mobile phone, we take it with us almost everywhere, we actively use it day after day. In order not to damage the device so necessary for a person, a cover is used to protect it. Naturally, covers can be bought in a store, but it is expensive and this item will not always be exclusive. Incredibly beautiful cases can be sewn by yourself. There are a huge number of patterns for sewing cases, they are sewn from felt, leather, fabric, from any materials, the choice of which depends on imagination. Let's try to sew a phone case with our own hands. It's not difficult at all!
How to sew a phone case with your own hands
First of all, you need to choose the material from which you can create a pencil case for your phone with your own hands, for example, felt, jeans, wood. You also need to choose the style of the future cover: with a strap, with a Velcro fastener, a zipper.
The main stages of the cover sewing process:
1.Pattern
2. Cutting
3. Sewing
Let's take a closer look at the algorithm step by step.
Pattern
The first stage is making a pattern for a phone case. The process is responsible. The mobile device is placed on a sheet of thick cardboard and outlined with a pencil. Based on the thickness of the phone, seam allowances are made. Cut out a pattern. You can quickly learn how to sew yourself, then, if you wish, you can do non-standard and individual things with your own hands.
Cutting and sewing
The second stage is cutting and sewing a phone case. The pattern is applied to the selected material, parts of the future case are outlined and cut out.
The easiest way is to connect the parts of the cover with a stitch seam on a sewing machine with strong threads. It is very popular to sew a phone case from old things, for example, they use jeans, sweaters and even socks.
Assembly
The third stage is the assembly of the product. If the parts of the cover are connected on a sewing machine, then the contour of the seam is drawn with a pencil along the front of the part. The details of the case are left with large allowances. Fold both parts of the phone case together and sew. After that, the allowances are cut, leaving about 0.3 cm to the seam.
Master classes on the topic
We present to your attention a few simple master classes on sewing covers and stands for your phone with your own hands.
Denim DIY phone case
What is useful to us:
- denim;
- golden threads;
- decorative tape;
- sewing machine;
- scissors;
- ruler.
We cut out two parts, a long and a short one. 
A long piece on one edge should taper - this will be the smell of the cover covering the opening. We measure our mobile device, and taking into account the seam allowance, we make a pattern.
We process the top of the short part with an overlock seam. We place the decorative tape. 
We put two pieces together and sew them together. 
Phone stand
With your own hands, you can make a lot of phone stands from scrap materials, for example, paper, cardboard, plastic cards, parts from a designer, stationery clips.
Let's dwell on the option of a cardboard stand.
What is useful to us:
- sheet of cardboard.
Cut out a 10 x 20 cm strip from a cardboard sheet.Fold it in half along short cuts. Draw a shape. 
The fold line remains intact. The bottom line is a comfortable and stable phone stand.
Phone charging case
 In order for the charger for the mobile phone not to get confused, not to be injured, you can sew a cover for it with your own hands.
What is useful to us:
- Main fabric (two pieces 27x15 cm)
- Pocket fabric (two trapezoidal pieces, 18 cm and 15 cm at the bases, 13 cm high)
- Non-woven fabric (two parts, 27 x 15 cm and 18 x 13 cm)
- Ribbon 25 cm
- Fringe with pom poms 76 cm
- Plastic eyelet for curtains
We glue non-woven parts: main, pocket detail. 
Sew together the parts. Fold inside out and iron.

Sew on: ribbon, bow.  Place the pocket on top of the main piece, glued with non-woven fabric. Stitch around the edges.
  The pom-poms are directed towards the center, the ends of the fringe overlap. Sew around the perimeter.
  Fold, sew parts, leaving a hole for turning out. Unscrew, iron and then sew the hole by hand.
  Install the grommet.
Leather Case
 The leather case is practical, it is durable and does not rub. Leather is expensive, so you can use old leather items such as a bag, which will significantly reduce costs.
What is useful to us:

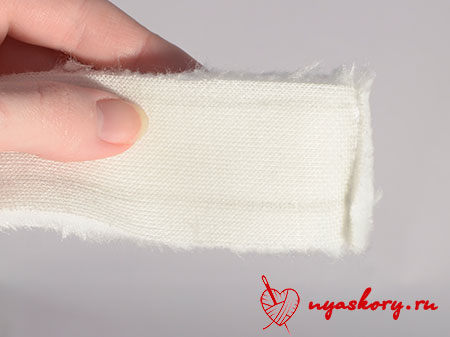
We measure the dimensions of the phone and, according to the pattern, cut out 4 patterns from rectangular leather
and one strip. Cut the velcro in the shape of a square or rectangle. 
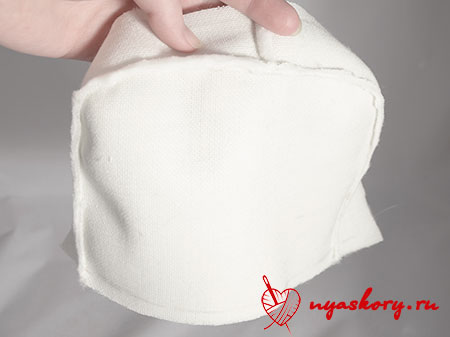
Sew rectangles from the seamy side.  We turn the product onto the front side, insert a smaller bag inside.
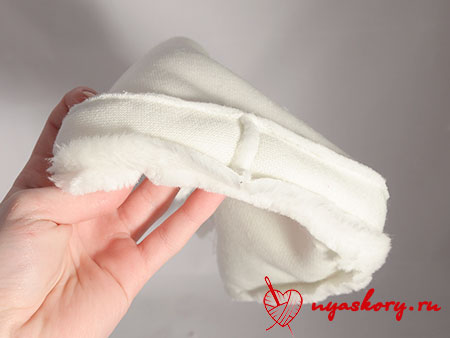
We bend the strip, connect it. Sew one side of the Velcro to the edge of the front side of the cover, and the other to the fastener. 
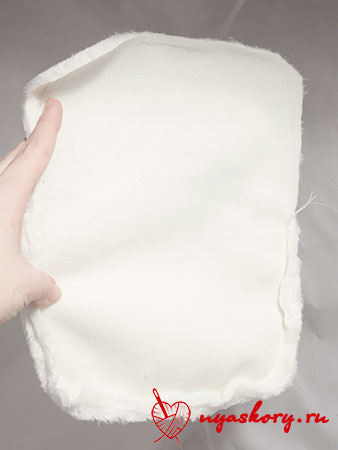
Sew the fastener to the cover in the center of the reverse side, bending the edges inward.
Leather sewing master class
Felt cover
 Felt is a popular material for making covers.
What is useful to us:
- felt;
- floss threads;
- beads;
- satin ribbon;
- scissors;
- glue "Moment";
- sewing needle.
 To make a pattern, we transfer the contour of the phone to paper. Add seam allowances.
  Place the finished piece on the felt.
  Cut out two identical parts along the contour.
  Making decorations. We glue the finished application on one of the parts of the pencil case.

After that, we fold both parts, sew. 
 The presented master classes are popular and simple, create and the finished product will delight.
Video mk sewing from felt
The easiest phone case

The easiest way to make a phone case is with a tie.
What is useful to us:
- tie;
- pins;
- threads;
- needle;
- Velcro;
- sewing machine.
Cut off a wide piece from the tie. We calculate the length of the phone bag.  The tie, we steam it, then we sew it so that it is the same size along its entire length.
  Tuck the edges of the tie and sew. Do not throw away the excess part of the tie.
We lift the left edge of the tie up, stitch along the edges, not forgetting to sew in the handle. We sew the case. 


Felt phone case pattern
Felt is a useful material for creativity. Dense, it does not crumble during work, a variety of products are sewn and glued from it. Huge material color palette. Only felt is not inferior in properties to felt. It is prized for its durability, and this property is important when using phone cases.
Felt phone case pattern 
Fabric cover
 What is useful to us:
- sock;
- sewing needle;
- threads;
- felt;
- scissors.
We draw a pattern based on the size of the phone. Cut off the elastic of the sock, cut off the excess according to the pattern. Next, cut the sock vertically.  We fold the two halves into triangles where the cuts are. Sew on these "ears", the lining can be made from felt.
Phone case with pull-out tape
 What is useful to us:
- detail from the main fabric 10 x 30 cm;
- detail from inner fabric 10 x 30 cm;
- tape 22cm long;
- metal semi-ring;
- metal decoration;
- scissors;
- threads;
- pins.
Stepping back 8 cm from the upper edge of the inner part, make a loop in the center with a width slightly larger than the width of the tape. You can use a special stitch and foot in your machine, or sew a buttonhole by hand. 
Insert the tape with one end into the resulting loop 1.5 cm up, to the short edge of the part. Sew around the outside edges of the buttonhole. 
Fold the inside and outside of the phone case so that the right sides are inward, keeping the tape between them. Stitch off 0.5cm from the edges, leaving an open seam area of about 5cm. Cut the seam allowances at the corners obliquely. 
Turn out, iron and sew the open area. 
Topstitch the short sides to the hem, or double decorative stitching on each side. At a distance of 1.5 cm from the edge, make a second loop of the same width as the first. The second loop is located closer to the opposite edge of the cover. Pin the fabric around the buttonhole. 
Sew on the decorative element. 
Fold the piece in half, right side out, and sew along the sides 0.5 cm from the edge, starting at 0.5-0.7 cm from the top edge. 
Pull the tape into the top loop, insert a half ring, fold 1 cm of tape and pin with a pin. Sew.
The pencil case is ready. You can add a magnet to the strap of your phone pouch. 
Even if you are a beginner in sewing business: create, dare, do not be afraid to create beauty around you.
Video master class of sewing a cover from foarmiran
Photos of covers for inspiration


We also recommend
 Pregnancy and Funeral: Dispelling Myths Is It Possible for Pregnant Women to Funeral
 Can pregnant women go to funerals and what should they be afraid of?
 How much can pregnant women lift in the early stages
 Dress up games for girls with super heroes
 Prayer conspiracies from adenoids
 How to sew a dress and cape of Elsa from a cold heart with your own hands