Extended hair hairstyles for every day. Hairstyles with extended hair (41 photos) - the nuances of haircuts and styling
Olya Likhacheva
Beauty is like a precious stone: the simpler it is, the more precious :)
Content
According to reviews, hair extensions have pluses and minuses, various consequences. Girls and women resort to building up when their own hair is not satisfied with the length, volume or quality. The procedure requires careful execution, the qualifications of the master and cannot be carried out independently. Check out the stages of extension, hair care.
What is hair extensions
Extension is a cosmetic procedure that helps to increase hair volume or length. It consists in attaching strands (artificial or natural) to your own. The length of the hair extensions depends only on the wishes of the client. The purpose of the procedure is called aesthetic considerations. It has disadvantages, advantages, consequences and features of its conduct.

Types of hair extensions
In cosmetology, there are only three types of extensions. Among them there is a division into building methods:
- Cold building - fixing strands with glue or beads, without thermal effects. It is divided into tape (tape is glued to the roots), Spanish extensions (light fasteners for fixing), using metal beads (fasten their strands with extensions), Brazilian (wrap in pigtails).
- Hot build-up - the strands are attached with a special resin that heats up for stickiness. It is subdivided into Italian building technology (fixing with a heated resin), English technology (using a glue gun).
- Ultrasonic - the glue is heated not with high temperature, but with ultrasound, this refers to hardware procedures.
Advantages and disadvantages
When carrying out the procedure, it is worth considering the pros and cons of hair extensions that accompany it:
- Advantages: giving a spectacular volume, length up to 70 cm, a quick, inexpensive process, the possibility of a radical change of hairstyle.
- Disadvantages: the enlarged areas are visible, special careful care and periodic correction are required, the strands get tangled, their strands experience additional stress, fall out.
Effects
The consequences of hair extension depend on the professionalism of the master and the materials used. Their negative side lies in the following factors:
- burns, irritation of the scalp;
- feeling of heaviness, headaches;
- loss of extended strands along with their own;
- follicle injury;
- hair becomes thin, weak, brittle, thin, splits.
Hair Extensions Price
It is possible to build up strands only from masters who have confirmed their qualifications. There are approximate prices in beauty salons in Moscow and St. Petersburg:
|
Mounting method |
Price, rubles |
|
|
Hot capsule build-up |
200 strands of 40 cm |
|
|
Correction of extended curls |
150 strands |
|
|
From 180 strands |
||
|
Cold tape |
80 ribbons 40 cm each |
|
|
Correction as you grow |
||

Hair Extensions Care
For girls who have undergone the extension procedure, it is useful to know how to care for hair extensions:
- comb with a brush three times a day;
- purchase professional care products;
- wash your hair in the shower, dry gently, naturally, but not with a hot hairdryer;
- wear a cap when swimming in the pool;
- do not visit the solarium, baths, saunas;
- you can use irons and curling irons for styling the extended strands, but at a safe distance from the capsules;
- perm is prohibited;
- do not walk in direct sunlight without a hat.
How to wash
Choose a pH-neutral shampoo for daily shampooing. Use shampoo diluted with water to help distribute the product better and evenly. When washing, do not rub, do not twist the strands, do not make sudden movements with your hands. Do not wash your hair by throwing it back down, under a tap or in a basin. The water should drain from top to bottom, so only use a shower.
When applying the balm, only touch the middle and ends, not the roots. Avoid sprays and conditioners from the attachment points. Do not take a bath with long hair loose; rather, braid it. Do not wrap your head in a towel immediately after washing - blot the length and let it dry naturally. Do not go to bed with wet strands loose.
How to comb
Before washing, the extended strands must be prepared. Comb them with a natural, sparse-toothed massage comb. This will help avoid static electricity and entanglement. After washing, lightly dry the length and comb, holding at the roots to avoid high pressure in the places where the tapes or capsules are attached. It is allowed to lightly dry the length with warm air of a hair dryer and comb gently. Combing wet hair is undesirable, even with a special comb.

How to dry
If you wash your hair at night, then in no case go to bed with wet or damp strands. They get tangled, form tangles that cannot be combed. After washing, gently blot the extended strands with a dry towel, without wrapping it over your head. If possible, dry your hair naturally, without a hairdryer. In practice, this rarely happens, so you can use a hairdryer in the cold air supply mode. Do not direct streams to the capsules, start drying from the tips, gradually working upward. After drying, check with your hands for any nodules.
Hair extension dyeing
It is advisable to think about dyeing the extended strands before building, so there is less hassle. In this case, the master separately dyes the client's hair in the desired shade and separately overhead. If the girl wants to change color after the procedure, contact a specialist. Self-staining can give unpredictable results. The extended strands are colored faster than natural curls, a weak solution is used for them, and the paint is not applied to the capsules.
Hair Extensions Care
After the extension, the girls will have to change their cosmetics and choose the means of care for the extended hair. You will need a special neutral shampoo, a smoothing and nourishing balm, a leave-in spray for length (helps to avoid tangling), oil for the ends and masks to strengthen and nourish the roots (prevent hair from falling out).
Shampoo
To rinse your hair well, you will need to buy a mild shampoo for hair extensions. It should be neutral, contain gentle soapy bases, without aggressive components and silicones. Popular brands:
- Keune Design - suitable for colored strands, removes impurities, saturates with vitamins and minerals, protects against heat, gives silkiness, elasticity;
- Constant Delight - gives shine and elasticity, delicately cleanses due to its natural composition;
- Barex - a special shampoo for tape build-up, eliminates tangles, gives a natural shine, eliminates excess oiliness;
- Yves Rosher - the detergent strengthens the roots, prevents the formation of split ends, is not capable of damaging the capsules;
- Estel - gently cleanses the skin, contains natural protein, Chinese camellia extract and fruit acids, protects against the effects of solar radiation.

Masks for hair extensions at home
In hair care, it is good to use folk masks made by yourself at home:
- Mix together five tablespoons of natural yogurt, an egg, a teaspoon of flaxseed oil, and a couple of tablespoons of cocoa powder (not necessary if you are blonde). Apply the mask to the length of dry hair, avoiding the roots, leave for half an hour, rinse with shampoo.
- Add a couple of tablespoons of honey, olive oil to the egg yolk, beat. Distribute along the length, leave for half an hour.
- Heat a glass of kefir in a water bath to a comfortable temperature, moisten the strands, wash after half an hour.
In the loose form, hair extensions are practically do not differ from their own... The connection points are not visible regardless of the technology used.
However, the truth can come out with the construction of high hairstyles. Such styling looks flawless with hot extensions, when donor ones are securely attached to real keratin capsules.
Fixed on ribbons or hairpins, it is better to dissolve, curl, collect in low bunches or braids. A high tail on the top of the head cannot be made, the attachment points will be noticeable.
When creating hairstyles or cutting hair extensions, they must not be pulled, tugged or combed. It is important not to allow tangling in the root zone when styling hairstyles for extended hair, because it is there that donor strands are attached to their own.
Desirable do not use styling products containing alcohol or oils may weaken the fastening. This is especially true for tape buildup.
Weaving "Waterfall"
 The stylish hairstyle of hair extensions combines the beauty of loose curls with an elegant braid. Suitable for hair of any texture and length.
The curls are carefully combed. A narrow strand is separated near the left ear, divided into 3 parts and woven into a braid. After 3 crossings, the central strand is released, instead of it, a little hair is taken from the bottom, from the bulk.
Weaving continues in a circle, every 3 crossings a new strand is woven into the hairstyle. Released hair creates waterfall jets effect.
Weaving is carried out smoothly and accurately. At the right ear, it ends, the pigtail is tucked inward and imperceptibly pinned up. Hair extension hairstyle can be decorated with small flowers, live or artificial.
Side spikelet
An elegant braid based on a regular French braid. Its zest is in the side location, which gives the styling informality and charm. Hair is carefully combed, wavy strands can be smoothed out with an iron.
On the left, a narrow strand is separated and woven into loose braid... After each crossing, small portions of hair from the bulk are added to the strands.
The braiding should not be too tight, the hair does not move towards the center of the head. It is important that the spikelet is on the side.
Having brought the braiding to the back of the head, the hair can be tucked in and pinned up with hairpins. Another option is to braid the braid by tying the end with an elastic band or ribbon.
Ponytail
 Hot hair extensions can be used to make a spectacular ponytail... Before laying, it is better to straighten the strands with an iron, having previously sprayed with a spray that removes excess static electricity. The hair will be perfectly smooth and shiny, which will add beauty to the hairstyle.
The strands are combed up and fixed with a narrow elastic band in the color of the hair. One thin strand is detached. Then it wraps around the base of the tail, masking the elastic. The tip is tucked inward and pinned up with a hairpin.
From hair extended on ribbons or hairpins, you can make an equally beautiful low ponytail. A narrow strand is separated from the mass of hair, braided into a pigtail, the tip is fastened with an elastic band.
The remaining curls are collected in low tail on the back of the head and smoothed with a brush. The pigtail is twisted around the base of the tail and fixed with a hairpin. Such a tail can be tied in the center of the head or shifted to one side.
French fold
 The elegant styling, sometimes called French sausage, is indispensable in the office, at a business lunch or other social event.
It is in perfect harmony with an office suit or formal evening dress, it can be created from hair of any length. The thicker and longer the strands, the more voluminous the styling will be.
The hair is divided into a side parting, and then combed to one side and fastened with hairpins in the center, from the crown to the back of the head.
The strands are collected with one hand, twisted into loose harness, which fits in the center of the head, from bottom to top. With your free hand, the tourniquet is twisted so that a dense and even fold-fold forms in the center.
It should be uniform, without dips or bumps. The hairstyle is stitched with hairpins, you need to stick them from top to bottom and slightly obliquely.
The installation is fixed with a lacquer with a slight sheen. If desired, thin strands can be released at the temples and easily curled with tongs.
Lush bun
 Elegant hairstyle which is especially beautiful with an open evening dress. A wide strand will get off above the forehead, carefully combed with a brush.
The hair rises in the form of a small coc and is slightly shifted forward, after which it is fixed with a flat thin hair clip. The strands on the back of the head are combed, lifted and fixed in the tail.
The hair is then twisted into a very loose braid and laid in wide rings along the central part of the head. The hairstyle should be voluminous, fluffy and slightly sloppy. For greater reliability, it is fixed with a varnish with a gloss effect.
Retro hairstyle with curls
For the evening, you can make a romantic high styling in the style of the 60s... Medium length hair is suitable for her.
The strands are combed up without parting and fixed in a tail at the crown. The hair on the back of the head should lie smoothly and not stick out.
The free ends are treated with a fixing spray and curled with hot tongs. Curls should be large, hair curled in different directions.
The curls are pinned with hairpins so that the base of the tail is completely hidden. The finishing touch is a moderate hold varnish.
Cascade of curls
 The hairstyle is perfect for wavy or curly hair. The front of the curls is detached, rolled up and secured with a clip. The remaining strands are divided into 3 equal parts, each tied in a ponytail.
Two tails are located on the sides, the middle one is in the center of the back of the head. The side ponytails are rolled up clockwise into tight bundles, which are stacked in rings and fixed with hairpins.
The ends remain free and curled with tongs into small curls. The strands from the central tail are twisted in the same way. Hair is fixed with varnish.
The central part of the strands is split off and twisted with tongs. Then the curls are thrown back and stabbed with hairpins so that volume is created at the crown. A couple of playful curls can be released over the forehead and temples.
A bundle of braids
Very simple and spectacular hairstyle, suitable for both very young and older girls. The hair is carefully combed, pulled back and divided into 3 parts.
Each is woven into a simple, not too tight braid, the ends are fixed with thin elastic bands.
The resulting braids are folded into bunches or intertwined in the form of plaits at the back of the head. The lower the bunches are, the more beautiful the hairstyle.
It is secured with simple or decorative pins. Braids can be braided with thin silk ribbons in contrasting colors. The hairstyle will look more informal and perfect for a summer vacation.
Laying with harnesses
 Extremely simple styling that looks effective and stylish... It does not require a lot of hairpins, properly styled hair keeps on its own.
First, a wide triangular strand on the forehead is separated from the total mass. It is twisted clockwise from the left side and is translated to the right during the twisting process. On the right temple, a thin strand is separated, joins the tourniquet.
Twisting continues, while the tourniquet is again led to the left. A strand is again attached to the left temple, the tourniquet is twisted and led to the right. Thus, dense, neat bundles that do not require pinning with pins are laid on the back of the head by themselves.
When the tourniquet reaches the back of the head, it is tucked inward and fixed with an invisibility. The hairstyle can be sprinkled with varnish or gloss in a spray and decorate with decorative hairpins.
Low shell
An elegant shell knot is appropriate in the evening and during the day, it can be decorated with fancy hairpins or flowers. The hair is pulled out with an iron, carefully brushed and tied in a low ponytail.
Then it rolls up into a ring around the finger, the ends of the hair are secured from above with a flat clip, and from below they are fixed with invisible ones. The end of the tail is split off and wrapped around the base so that it resembles a wide ribbon. The hairstyle is fixed with varnish.
Hair extensions require careful care and careful handling, only then they will look perfect.
Take a close look at post-extension hair care and try different hairstyles to find the one that matches the new length of your strands and perfectly enhances their beauty.


When we see celebrity hairstyles on the red carpet, we wonder why they all have such thick, voluminous curls?Or how does their bob cut turn into long wavy hair in a week? Just like most things in Hollywood are fake, hairstyles are no exception. Hair extensions are the secret weapon of celebrity hairdressers. While some are made of real hair and others are synthetic, they all do wonders by changing your hairstyle in no time.
Overhead hair clipscan give you thicker and longer hair in seconds. The main thing is to wear them as natural andyou just need to know how to do it. We will tell you about 10 beautiful hairstyles with hair extensions.
First hairstyle for hair extensions: headband with oblique plus bangs

How to do: To create this look, wash your hair, blow-dry your hair as usual, and iron your bangs. Then, attach the overhead strands.from ear to ear and comb your hair gently to blend the natural curls with the fake ones. Wear a braided headband like this one.
 Decorate your hair with a beautiful accessory above the ear. This is the image of a coquette.
Second hairstyle for hair extensions: long and straight

How to do: Lay your bangs on your side and spray with hairspray. Now, attach straight, long strands on hairpins on the back of your head, comb carefully. To add style to your hairstyle, braid a French braid on the opposite side from the bangs, like a headband, with the end at the ear.
Third hairstyle for hair extensions: ponytail on the side
 How to do:
This is the easiest look ... Run your bangs on their side with some nail polish. Attach long, straight strands at the back of your head and tie a ponytail at the side. Simply and easily…
How to do:
This is the easiest look ... Run your bangs on their side with some nail polish. Attach long, straight strands at the back of your head and tie a ponytail at the side. Simply and easily…
The fourth hairstyle for hair extensions: bun on the side

How she did it: If you know how to create a regular side bun, great. All you need to do is make a ponytail on the side. Then, twist it into a bun and fix it with invisible pins or hairpins. Finally, attach an artificial bun of hair with a clip to the bun, like this one:

Fifth hairstyle for hair extensions: voluminous ponytail
 How to do:
Extend the bangs and separate them in two, parting in the middle. Spray strong hold varnish on it. The next step is to create volume at the crown. Create it with a bouffant comb. Tie your hair into a ponytail, and make a bun out of the ponytail. Release a few thin strands on the sides of your face and curl them with a curling iron. Finally, attach to the bunartificial tail. The model used a tail like this (in a different color):
How to do:
Extend the bangs and separate them in two, parting in the middle. Spray strong hold varnish on it. The next step is to create volume at the crown. Create it with a bouffant comb. Tie your hair into a ponytail, and make a bun out of the ponytail. Release a few thin strands on the sides of your face and curl them with a curling iron. Finally, attach to the bunartificial tail. The model used a tail like this (in a different color): 
Sixth hairstyle for hair extensions: high tail

How to make: Spray the top of the head with water and apply some gel to the hair. Tie a high ponytail. Attach to your own tail - an invoice. Here's one, for example (it comes with a strand already separated for wrapping around the tail):
This is the easiest way to make a beautiful ponytail, even if it's time to wash your hair.
Seventh hairstyle for hair extensions: long and wavy

How to make: First, roll your own hair with small diameter tongs. Create waves and spray them with hairspray. Then attach the wavy strands from ear to ear for extension with bobby pins. These are, for example:

In this case, the model used 5 synthetic strands. Then, use your fingers to blend the original hair with the false hair.
Eighth hairstyle for hair extensions: curly bun

How to make: Easily. From the previous hairstyle, make a tousled ponytail on the side, tie with an elastic band, and wrap its end under the bottom and hide. Decorate this romantic hairstyle with a flower.
The ninth hairstyle for hair extensions: braided headband

How to make: Do hairstyle # 7. Pull your hair up, pinning it in with a crab barrette and leaving the ends tousled. Then, just put on the headband with the faux braid as in the first lesson. Pull thin strands out of the hair on the sides of the face. That's all!
Tenth hairstyle for hair extensions: long braid on the side

How to make: Put on hair extensions and comb to blend the fake section with the original curls.

Braid a side braid and wear a hoop to remove bangs from your face. Ready!
With modern technology, extended hair has become very popular among today's fashionistas. Thanks to them, girls do not have to waste many years growing strands. Using extensions, you can get a beautiful, thick head of hair in just a few hours. But the owners of new luxurious strands face a reasonable question: "How can you style them so that no one around you could guess about the presence of hair extensions?" We offer you hairstyles for all occasions with detailed instructions and photos.
QUICK ARTICLE NAVIGATION
The most comfortable and fastest hairstyle that has gained immense popularity. It would seem that there is nothing easier than collecting your hair and tying it with an elastic band.
But in the case of extended strands, you will have to make a little more effort in order to hide the bases of the attachment of the capsules.
You will need: 2 elastic bands, several invisible ones (depending on the density).
- We comb the hair and collect the tail on the crown, leaving the bottom layer of hair loose (as in the malvinka). We fix it with an elastic band.
- We select the remaining strands, carefully covering all visible capsules with them. And at the same time we smooth out the hair with a comb, so that unnecessary waves do not form.
- We attach the neatly assembled layer to the first tail using an elastic band.
- We select a small strand from the tail, sprinkle with varnish and lay around the elastic in such a way as to completely hide it under the strand. We fix the lock with invisible ones.
The tail can be split in two and twisted each in a harness... Then we twist two bundles together and fix the end with a small elastic band. In the photo you can see how it looks in the final result.

The French braid looks the most beautiful on thick curls... And thanks to the straight weaving, it is possible to control the overlap of the capsules by the hair.
You will need: an elastic band or a hair clip.
Separate the upper part of the hair from ear to ear and divide it into three strands, as shown in the photo.

We lay the left strand from the bottom between the middle and right strands.

After that, we also lay the right strand under the bottom, between the left and middle.


We repeat the steps, alternately adding loose hair to the main strands. The principle of weaving is similar to a spikelet, but weaving the strands not on top, but underneath.

When all the hair is collected, loosen the strands folded into braids a little to add volume to the hairstyle.

We fix the end of the braid with an elastic band or hair clip.

Using a curling iron
Curls are both the basis for creating a hairstyle, and an independent styling option. Therefore, it is important to learn how to wind the strands correctly and beautifully.
Creation of natural curls
You will need: curling iron, crab, hairbrush, varnish.
We turn on the curling iron and, while it heats up, we collect our natural strands on hairpins with a crab, leaving only the bottom layer on the back of the head. We choose a small strand and wind it on a curling iron. The contact between the curling iron and the hair should last about 5-8 seconds.
Do not bring the curling iron close to the capsules, as this can lead to their destruction. Therefore, it is necessary to wind the extended strands at a distance of 6-8 centimeters from the root.
After dissolve the strand and spikul straighten it... This is necessary so that the curl does not look "doll-like", but looks natural and beautiful.

We wind all the lower hairs in the same way. Then we release the next layer and again wind the strands one by one. So we wind up all the curls step by step to the crown.

Before curling the hair at the crown combing a little spikul - to add extra volume. Then we dissolve the strands and straighten them with our fingers.

We form a parting and lay the twisted strands on both sides of it.

Sweep your fingers from the bottom several times - from the back of the head to the ends of the hair. This will loosen the strands a little more. After that, they will look prettier. Fix the result with varnish.

You will need: a curling iron, a crab, an elastic band, hairpins, invisible hairpins, a hairbrush, varnish.
- Make a ponytail at the bottom of the head. Collect the top strands with a crab.
- Comb the ponytail vigorously and form a bun out of it, securing the hair around the elastic with invisibility. We wind the remaining hair according to the previous method (Section " Creation of natural curls ").
- We begin to lay the curls from the back of the head. We lay each strand on top of the bundle in such a way as to overlap it. We fix it with hairpins, connecting them with invisible ones located around the beam.
- We fix the front curls over the occipital, finally overlapping the bundle and invisibility that remained visible.
- Fix the result with varnish. There are many variations, an elegant exit option, you can see in the photo.

Styling for the most daring
You will need: a small corrugated curling iron, a curling iron, a crab, a hairbrush, hairspray.
- We collect the upper part of the hair from ear to ear with a crab, and level the lower part with a curling iron, without getting close to the capsules.
- We release the bottom layer on the back of the head from the crab so that the extended strands do not fall into it. At the root, we use a corrugated curling iron, the strand below is leveled with an iron.
- With a spikul, we comb the entire layer from root to tips. After that, the roots should rise up, creating volume. If the volume is insufficient, comb the roots with a comb. We fix the bases with varnish.
- Gradually separating the layers and winding them on the corrugation, we approach the front strands. We do not wind the last two layers, but only align and lay them back, smoothing to the previous layers so as to overlap them. We fix the hair with varnish. The result, as in the photo, is guaranteed.

You will need: a small corrugated curling iron, a hairbrush, invisible hairpins, hairpins, varnish.
- Comb the hair at the crown and gather it into a snail, leaving the top layer of hair intact, fasten it with invisible hairpins. You should have a tourniquet at the back of your head and volume at the top of your head.
- We make a parting and lay the front strands on both sides so as to overlap the fleece and create a beautiful wave in the ears.
- We fix the result. Several images can be seen in the photo.

Hairstyles on hair extensions: photo examples


The procedure for extending curls itself is simple, but artificial hair does not have the ability to recover on its own due to the lack of a root through which nutrients can be obtained.
How to properly wash and dry
After building up, the head is washed for the first time in 2-3 days. This will help prevent the capsules from coming off. During this time, it is worth purchasing special pH neutral shampoos that will not contain conditioners and various additives. It is also required to avoid shampoos intended for dry hair, which will not only spoil the appearance of the hair extensions, but also contribute to their tangling. Some manufacturers produce whole series of hair extensions care products.  But choosing the right remedy is only the first step in caring for curls at home, you should also follow the following rules:
- so that the hair is less tangled during the washing process - each strand is pre-combed;
- during the procedure itself, it is not advisable to roll the hair forward (it is better to use a shower);
- if the balms or shampoos are too thick, you can correct the situation by diluting them with warm water;
- the detergent is applied to the hair along the entire length, without rubbing or fluffing.
For more information on how to properly wash hair extensions, see the video example.
An equally important point is the correct drying of the strands.
- for the safety of the capsules, the strands are not rubbed or wrapped in a towel;
- combing wet or damp hair is excluded;
- curls dry naturally without using a hair dryer;
- before going to bed, curls can be braided into a light braid or use a special mesh, but only after they are completely dry.
After studying the reviews of girls who have practiced strand extension, you can avoid other mistakes. For example, it was noticed that capsules break down faster at high temperatures, which means that going to the bathhouse or sauna is not recommended. Chlorinated water, which is present in swimming pools, is also destructive. If, nevertheless, a trip to these places cannot be avoided, it is better to use a special rubber or plastic cap.
Brushing rules
In order for the combing procedure to take place with less hair loss, you will need to purchase a special comb. The main rules when choosing are its softness and wide teeth. It is also impossible that there are balls-tips on the teeth, which can damage the capsules that were used for building.
The extended hair is combed at least three times a day, in 3 stages. The procedure begins from the ends themselves, gradually moves to the middle of the hair, and only then, a gentle combing of the root part of the head occurs. Coarse flecks, as well as tight and dense hairstyles, mousses and foams are completely excluded. How to comb hair extensions correctly can be viewed in the video review.
Additional procedures for hair extensions in the form of coloring and masks
 Capsule extension of curls does not prohibit hair coloring, but there is one condition - during the procedure, it is impossible for the coloring composition to come into contact with the fasteners. Only a specialist can cope with such a task, but if you still want to try to do the procedure yourself, you should watch the video instruction and take into account some points:
- the coloring composition is selected with a minimum ammonia rate;
- the extended strands after frequent staining become naughty and tough;
It is better to entrust the staining procedure to the master who was engaged in building. Only he will know all the features of the procedure and will be able to stain with minimal negative impact.
Looking through reviews on the care of extended curls, you can find many interesting recipes for making homemade masks.
Having decided to use them, you should understand that their use will not help restore a healthy look to artificial curls, due to the lack of roots. But this does not mean that the native hair should remain unsupported. Professional tips for using masks:
- masks are applied only to the root of the head, avoiding attachment points;
- the mask recipe should not contain aggressive ingredients: alcohol tinctures, spices (these include cinnamon and mustard), citrus products;
You can put your hair in order using ready-made masks designed specifically for hair extensions and sold in specialized stores.
Detailed instructions on the proper care of curls at home can also be obtained from a specialist. Only he knows what technology was used to build up, and each of them has its own subtleties and secrets.
We also recommend
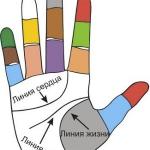
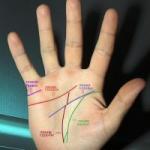 Palmistry - determine the line of marriage and children on the hand
 Palmistry of the marriage line on the hand
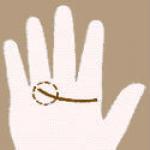
 How to find out by hand how many marriages will be and whether they will be happy?
 Skyrim: how to get rid of vampirism?
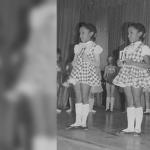 The Mystery of the Silent Twins: The Life Story of the Mysterious Gibbons Sisters How She Died
 Hematite is a stone of blood, its healing and magical properties