How to make a balloon with your own hands, basket. How to make a paper balloon How to make a balloon yourself
Below is a description of a balloon that you can make with your own hands. And now I want to talk with you not about those balloons that children need to launch, but about those real balloons that can be flown.
Previously, such flights were unrealistic, we could only dream of this. It's great that now you can make this fantasy come true and take an unforgettable romantic flight! Such flights are very original and safe, and most importantly, they can be performed all year round, both in winter and in summer. If you are organizing your own event, then such an event will bring a lot of pleasure to your guests. Such a holiday will be remembered for a lifetime. If you are interested in such an idea, you can contact the Aeronaut ballooning club, which offers. The pilots of the club have won the main competitions in Russia more than once, and this club is considered the best and most professional.
In addition to romantic rises in the air, if you love and appreciate extreme sports, the club has a special tempting offer for you - a balloon flight in the only basket with a transparent bottom in Russia. And one more news from the company, now everyone can take a hot air balloon flight under the new MONO program. Flights under the MONO program are carried out in the Dmitrov air zone, on weekends. The flight duration is from 40 to 60 minutes. The balloon basket can hold up to 8 people! You have a great opportunity to spend a whole hour in the air with your family and friends.
And one more thing that interested me. Here is a unique gift idea for any occasion, this is an acquisition. The gift will be the most original and unusual, the certificate can be made in the form of a balloon with the inscription "Happy Birthday". For flights, there is a large selection for your imagination. You can choose the flight "Picnic", "Draw" and others. Or you can choose (this is for young romantics) the "Proposal of a hand" flight. A very romantic way to make a loved one a marriage proposal. Eh!
And now, after you fly, I propose to hand over the balloon with your own hands.
Buy 24 sheets of silk paper from a stationery store. For each slice of the balloon, you need a 210 cm long paper sheet. Therefore, to get this length, you will have to glue several sheets of paper into one.
Make a pattern from newsprint (also glued) and cut out the segments of the balloon along it. A pattern with dimensions is shown in the figure (Fig. A). Dimensions are in millimeters. After cutting out all the slices (there will be eight of them!), Glue them together, and you get a ball (Fig. B). In the process of gluing the segments of the cylinder, a paper ball forms on its top. He will get in your way. Therefore, carefully cut it off, but so that a circle about 10 cm in diameter forms on the top of the ball. Cover its surface with a strip of paper (Fig. C).
At the bottom, the ball goes into a cylinder, to which a rocker for a cup with cotton wool is attached. The cylinder must be firm. To do this, take several sheets of old drawing paper, which is glued together in several sheets in its entire length, equal to about 140 cm.The diameter of the cylinder should be 47 cm. burnt paper (fig. e). Then make a circle out of a wire about 1 mm thick. Attach a piece of wire to it on both sides. This will be the axis. Insert the circle into a paper cylinder, but first attach one more, second axis perpendicular to the axis, onto which put on the lid from the boot cream jar. Punch holes in the lid with an awl, and as high as possible, that is, at its very edge, so that its center of gravity is as low as possible under the suspension (Fig. D). Thus, you get a Cardan suspension, the essence of which is that when the ball is tilted under the influence of the wind, the cup will always remain in a horizontal position. It is very important to make sure that both in the paper cylinder and in the lid of the boot wax box, the wire rotates completely freely.
To avoid fire, the balloon should be launched outdoors. Put a cotton swab soaked in alcohol on the lid and set it on fire. Warm air will fill the balloon, stretch the paper, and slowly lift it up. If the segments of the balloon are poorly glued, warm air will escape from it, the balloon will not rise. Therefore, you need to carefully check whether its slices are well glued together.
I will tell you how I made a balloon decoration out of a simple balloon, a basket-box and threads. Suitable for a wedding with an appropriate theme, travel theme, like ours, as well as for any other, with a non-contradictory concept.
A perfect pretty picture looks like this:
Let's try to recreate something similar, but with our own hands.
I originally planned to put the resulting balloons on the table, and this is due to some of the design elements. It is also good to hang these balloons, as in the photo above.
So, in the general case, we need
Balloon (preferably plain, classic or fashionable now round);
- a stick-holder for a balloon (sold in stores for the holidays, as well as in toy stores, in the same place as the balloons themselves);
- tip for the ball holder (you need two of them, on both ends of the stick);
- a basket suitable in size and shape (if there is a wicker basket - great, I didn't find it, and I'll tell you how it was twisted);
- jute, linen or cotton twine (for tying a basket);
- smooth, but not too thin threads for weaving a mesh on a ball (I took cotton threads for knitting);
- a small ring for the base of the mesh (optional, it's just more convenient with it);
- glue;
and, if the resulting composition will be used together with floristry, like mine, you will also need:
- a glass that fits tightly into the main basket (if the basket is made of a water-permeable material, like mine, if the basket is plastic, an additional glass is not needed);
- floristic sponge (in a glass);
- the flowers themselves.
Get down to business!
The first thing I did was to find the right baskets. Ideally, these should have been wicker baskets, but very miniature, and without a hint of a handle. I found only peat pots. They look like this:
Cut the pot a little on top if it is too big. Then we coat it with glue (not entirely, but only at the very bottom and at the end at the top). We wrap the pot tightly from top to bottom with twine.
Then we put a jar of a suitable size inside (in my case, this is a jar of yogurt), and a balloon holder with tips at both ends. If you use a floral sponge, the bottom tip may not come in handy because the holder will simply stick into the sponge, and thus will be securely fastened. To be sure, you can hold everything together with glue.
We inflate the balloon and fix it on the upper tip. It turned out the following:
In general, it already looks like. It was the turn of the most important thing - the threads connecting the ball itself and the basket. You can use satin ribbons like here:
You can use thick threads arranged in the same pattern (I tried with the same twine, I will show this option as well). However, the net looks best, as in a real balloon. A simple net weaving scheme for a balloon is shown in the picture:
I used 8 strands and a fairly large cell size. As it turned out, it is better to take 16 (or even 32) threads, and make the cell size a little smaller. I'll show you what happened so far. A little later I plan to edit the MK when an improved version appears.
We unwind the threads, 4 segments (or better, I repeat, 8 segments) of the same length, a little more than a couple of meters. We take a small ring for jewelry, and we tie all the threads on it exactly in the center:
For the same cell size, we use a piece of cardboard, which we tie, taking out later (this idea was spied on on the fishing forum). It's good if you initially start weaving on the ball itself, so that someone holds the ring in the center. It is quite inconvenient to weave such a mesh on your knee on your own:
After the second row, I moved the grid onto the ball, and continued, increasing the cell size, already without any additional. devices.
As you can see from the photographs, the ball expands rather quickly, and you need to significantly increase the size of the grid cells, otherwise they will be irregular in shape, too wide. Increasing the number of threads will just solve this problem. In general, when the net already lies on the ball to be tied, its shape is generated by itself.
We continue weaving, soon reaching the widest point of the ball or just going behind it a little. From this moment we release the threads down freely, to the basket itself.
Cut the threads to the required length and secure them at the edges of the basket inside (I have not done this yet). You can use glue, hooks, holes in the basket - whatever is more convenient.
You can leave the balloons as they are. In this case, you need to be especially careful with the upper edges of the basket (in this case, the finished wicker will be very useful), with its inner part, as well as with the places where the threads are attached. Since all this will be in plain sight. I propose to put flowers in the basket, thus we will solve a number of problems:
- the whole composition looks more elegant;
- in one bottle we have both thematic and floristic design, without overloading the space;
- the edges and the inner part can be arbitrarily curved 😀, since all these flaws will not be visible under the head of flowers.
Actually, we stick suitable flowers and greens into the floristic sponge, forming a composition. For training, I used the flowers that grew under the window (just twigs of blooming cherry and some unknown flowers growing on the flowerbed).
I show two options, described with a net, as well as with a coarse twine.
Celestial, Chinese lanterns (hum loy or hum fei) are very popular in Asian countries. There they are launched during the holidays. For example, in Thailand, there is a festival of lights, which is accompanied by a massive launch of sky lanterns. Recently, such balls began to gain more and more popularity with us. Let's try to flash a sky lantern with our own hands.
After a lot of experimentation, I finally found the simplest and fastest circuit to make.
To make a homemade sky lantern, we need:
1. Garbage bags 30L. (it is better not to take any more because polyethylene is thicker and heavier in them) After many experiments, I finally found the simplest and fastest circuit to manufacture. To make a homemade sky lantern, we need:
2. Stationery tape
3. Aluminum wire 0.5mm
4. Candle "pill" (only a can is needed from it)
5. Dry fuel tablet
The ball itself is glued together from several packages. Two to three. it all depends on the air temperature. In winter, even one will fly into the cold. In the summer, in the evening - at least two. To connect two packages, one must be cut along the seam line and inserted into one another. Then glue the seam with tape.
The holder for the torch is made of aluminum wire. To do this, take two pieces of 40 centimeters each and twist them around the candle.
At the ends of the wire we make clips for the bag.
We divide the package into four corners and screw each corner onto clamps. Everything. Our homemade sky lantern is ready.
We use dry fuel as fuel. Break the dry fuel tablet into four parts. It may happen that the balloon does not take off immediately, due to the fact that the dry fuel is quite heavy. We'll have to wait until it burns out a bit. To launch, we straighten the ball and hang it up. We set fire to the fuel and put it in a jar.
It is worth mentioning security measures. This thing is pretty flammable. Therefore, launches should be carried out away from trees and buildings. Mandatory in calm weather. By the way, the slightest breath of breeze and the bag will immediately melt or burn out.
The process of building and launching on video:
(Visited 1 606 times, 1 visits today)
Marina Hoda
Picked up the idea of the script graduation party... For 27 years of work as a music director, there were different things. I really wanted to find something interesting and original. On the Internet, I drew attention to high school graduation"Travel to hot-air balloon» ... I liked this idea very much. But how to build this Balloon, based on our capabilities (in our village they do not fill balloons with helium? Thoughts were different. I connected my parents to the search and delivery of such balloons. They brought them from a neighboring village by train. And then again, how to make the balloons stay at a certain height, etc. .d.
Here's what I came up with, take a look. Maybe someone will find my idea useful.
Material:
Large cardboard;
Air balloons on colorful ribbons filled with helium;
Multi-colored bags for decoration;
Bag of cargo (a rock)
So from a large sheet of cardboard(from the box from under the refrigerator)made a basket: cut to size (so that all the children fit, tried it on so that it stood firmly on the floor, and painted it with gouache.

On the upper edge of the basket I attached multi-colored bags (I accidentally caught my eye from the didactic game, but it turned out spectacularly.

Tried on air balloons: gathered in one bundle, tied in a knot and tied ballast (put a stone in the bag).

But I didn't like this idea very much. Children will go into the hall and immediately see this « Balloon» - not interested! And then I had a thought: what if you collect the ball right on holiday? I tied colored ribbons to the balls, hung them from the ceiling. Nice, festively, and most importantly, not a single hint of « Balloon» .

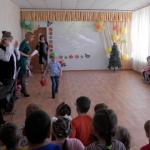
On the holiday I had to go in search of Dyudyuki (the evil heroine who stole all the letters of the alphabet)... But on what? The kids had tons of ideas: on the bus, and on the train, and on an all-terrain vehicle (also a familiar form of transport for our area, and on a motorboat, and on an airplane, and even on a rocket. But not a single child suggested my option. And when I offered the children fly on hot-air balloon,was a huge surprise: how, where to get it? And then to the song "On the big balloon» I began to collect balls, tied ballast - there was no limit to the surprise of the children,

and when I got it out "Bushes" cart….

In general, we flew on hot air balloon during the whole holiday... This design is removed easily (all the children helped in turn)... Arrived in a clearing - removed, it was necessary to fly - set.

And at the end holiday, untied these balls and launched into the sky, making a cherished wish.

For large In cities, the launch of balloons is a common occurrence, and this was the first time in our country, it was spectacular and very interesting for both children and parents.

How to make a balloon with your own hands?
Hot air ballooning is an exciting activity to spice up your weekend or holiday. There are companies that provide balloons for rent, so it is best to use their services. If you are interested in the process of making a balloon in theory, or if you want to make a miniature balloon, then our article will reveal to you all the subtleties of this process.
Consider the process of making each element of the balloon separately.
How to make a balloon dome with your own hands
The balloon dome is best made from durable nylon materials (polyester or polyamide). So that the fabric does not allow air to pass through, from the outside of it  need to be coated with polyurethane or silicone. The dome is sewn from segments, the number and size of which depend on the size of the balloon. In this table on the site sdelai-sam.pp.ua you can find segment sizes for diameters from 1 to 3 meters. To make a ball with a larger diameter, calculate proportionally the size and number of the corresponding segment.
The base of the dome - the inflating hole - must be protected with a heat-resistant fabric tape. At the top of the canopy, it is necessary to provide a parachute valve through which heated air will be released to lower the balloon. For greater strength of the dome, you can sew on ribbons vertically and horizontally. At the top, the straps are attached to the parachute valve ring, and at the bottom to the suspension ropes.
Balloon basket
The basket is made from wooden vines, and its bottom is best made from sea  plywood that tolerates moisture well. The frame for the basket can be stainless steel cables that attach the basket to the dome. These cables are best wrapped in leather covers to protect them from damage.
Hot air balloon burner
This is the most important part of the balloon and must be chosen with care. These burners use liquid propane as fuel. They are made of stainless steel with special protective covers.
Balloon assembly
The most difficult thing is to make a mechanism for opening a parachute valve, however, in specialized sports clubs, for example, aeronavt.1gb.ru, you can find recommendations on how to design this mechanism. The assembly sequence is as follows:
- We fasten the steel cables to the lower rim of the dome and the basket with bolts.
- The burner is mounted on a rigid frame above the basket.
- The parachute valve control cords are attached to the cables.
- Inside the basket, containers are arranged for storing cards, a fire extinguisher and provisions.
We also recommend
 Physical Activity and Health Presentation
 How can you clean your iron at home from scale and carbon deposits
 Project on the topic: "Birthday of the Earth" project (senior, preparatory group) on the topic Material and equipment
 How to clean the iron from burn-on on the sole, scale inside
 If the father does not pay child support: what to do?
 Why do men lie to women?